Grand-Moments: Planner-Devotional-Journal Grandmother Gift

Featured

Becoming a grandma (“Nanny!”) changed the way I look at time. I don’t just want to remember the sweet moments with my grandsons, I want to CREATE them. I want to be present, intentional and part of the childhood memories they carry forward. I want to impact their lives in a positive way.

Grand-Moments grandmother planner devotional journal - Christian planner to help grandmothers create meaningful moments with grandchildren.

That’s exactly why I created Grand-Moments, a planner, mini-devotional, journal (and so much more) designed to help make room for connection in the middle of real life! If you’re a grandmother, you get it. Grandchildren are the BEST.thing.ever and we want to encourage them in the best possible ways.

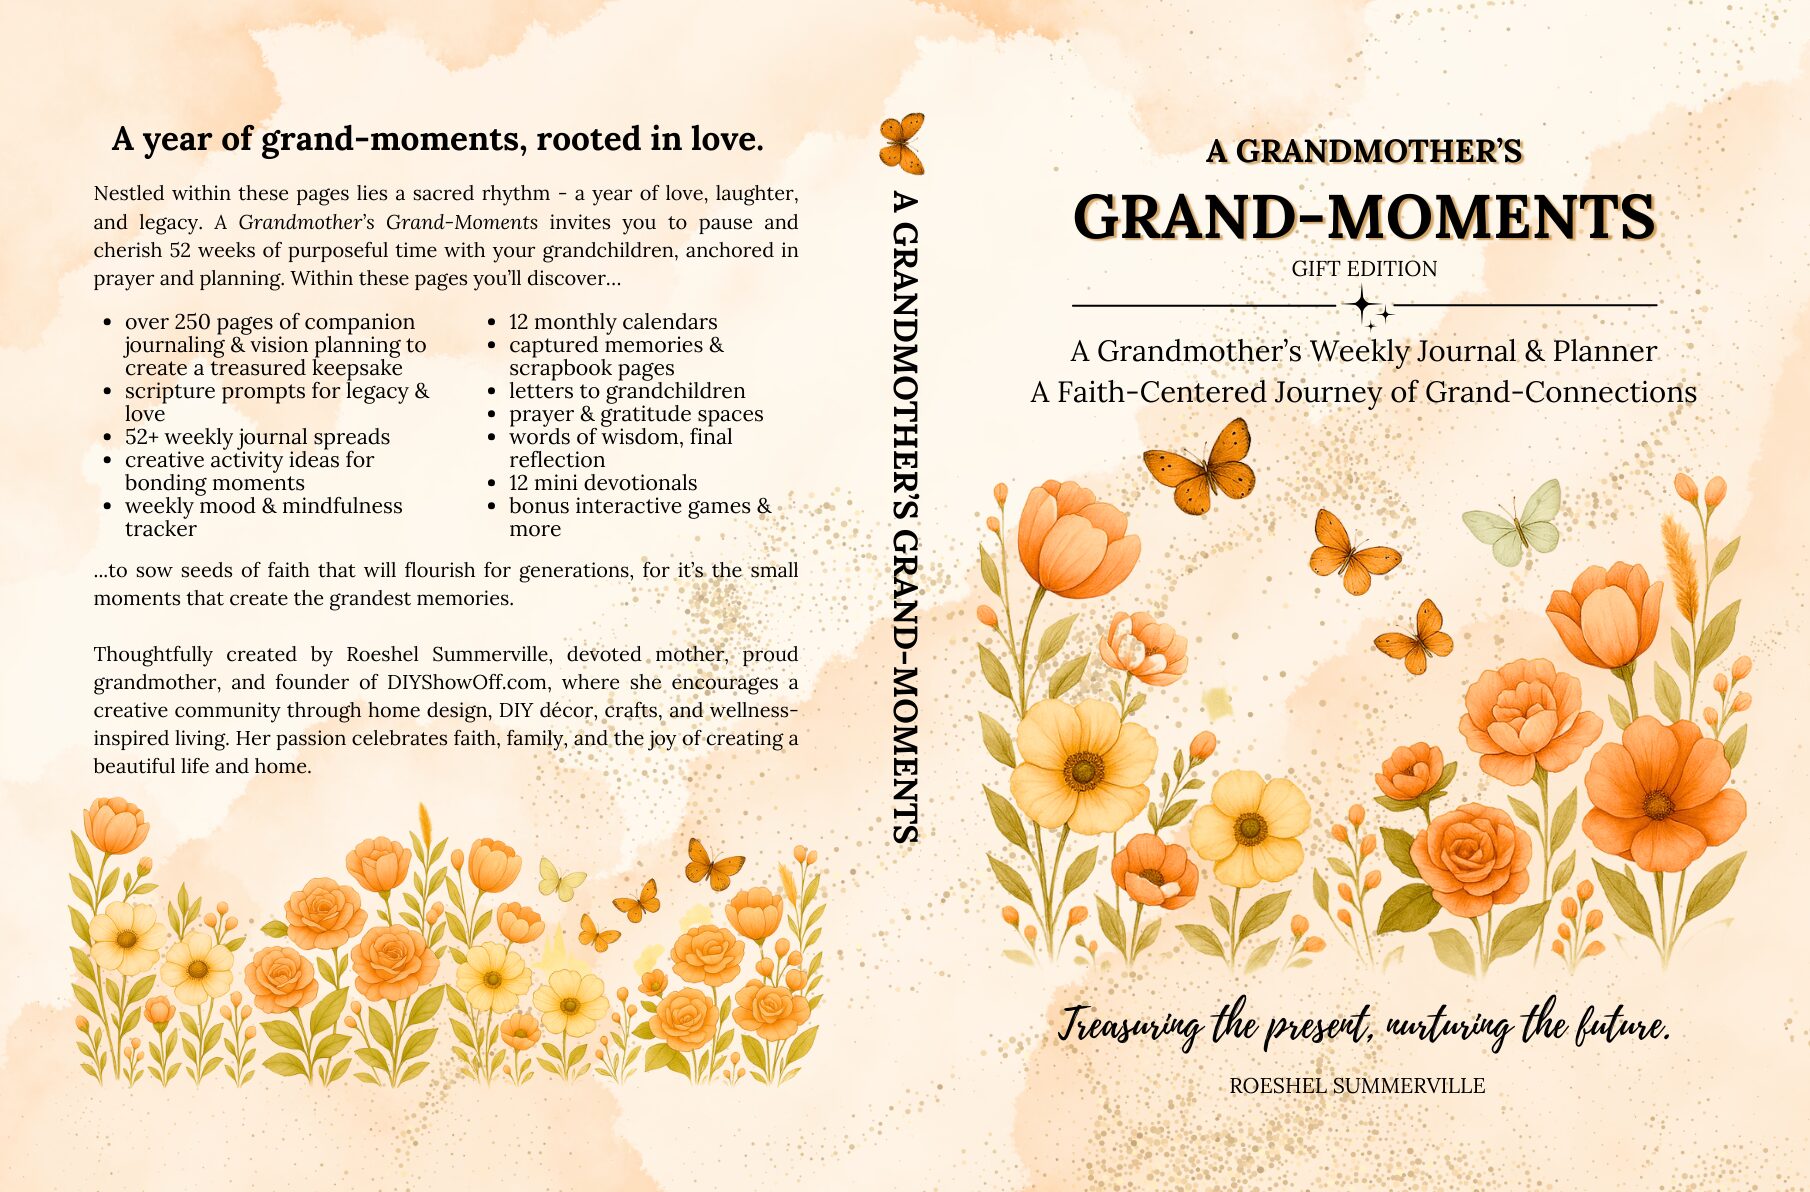
Why I Created Grand-Moments

This is so different than the usual grandmother story book. Most grandmother memory books focus on past stories, memories from our childhood and lifetime, advice, family history. Those are beautiful too but focused on the past and stories to pass down. I felt like something was missing. I wanted something for “right now”. Something that helped me:

  • Plan small but meaningful moments with my grandsons
  • Stay intentional throughout the week
  • Encourage their little hearts and to build their confidence
  • Keep my own faith grounded as I show up in their lives
  • Capture the memories we make as we go
  • An interactive mood tracker
  • With a quiet moment of reflection and intention setting for quality time

Grand-Moments became that tool. And I think you (or the grandmother figure in your/your child’s life will enjoy the results of setting intention too.

What’s Inside the Planner (and Why It Works)

Weekly Planning Pages: These are simple, doable prompts that keep connection front and center (even in busy seasons). 12 Months broken down into weekly planning pages with beautiful graphics and sweet prompts. I use these pages to jot down:

  • A moment of connection I want to create
  • Seasonal plans or events happening
  • A small activity or outing (nothing elaborate – sometimes it’s bubbles or a walk)
  • A reminder of who I want to be in their lives this week

Mini-Devotionals + Prayers: Each week includes a gentle devotional, a bible verse, prayer space. These help reset my heart and perspective so I’m showing up with patience, presence and purpose.

Journaling Space: This is where I reflect on the little things: a phrase they said, a funny moment, a moment of growth, or a small answered prayer. These are the memories we forget unless we write them down.

Simple Activity Ideas: Quick ideas you can do at home or on the go, perfect for days when your mind feels full and creativity feels far away. Broken down into seasonal inspiration with a focus on presence! Even if the ideas of activity elicits a groan, these moments can be silly and memorable in the long term, especially when it become part of a routine.

Heart Moments: Little snippets of works of encouragement to foster confidence. These are gold!

Letters: Space for writing letters to yourself, your family, any advice or stories you do want to pass down. Maybe just a recipe, maybe a heartfelt letter, or maybe just a “dear diary”. You decide.

Scrapbook Pages: For documenting times to remember. Create an album in your phone, place an order from Free Prints monthly and tape them the old fashioned way to the scrapbook pages. Keepsake!

Record: Pages for remembering birthdays and milestones. Tracking special moments.

And so much more! It’s truly a treasure for grandmas, if I do say so myself. lol Time with grandchildren is the legacy. It’s what shapes them and future generations. Leave a lasting imprint. Make a difference.

Grand-Moments grandmother planner devotional journal - Christian planner designed to help grandmothers create meaningful moments with grandchildren

How I Use Grand-Moments with My Grandsons

Every week looks a little different, but the intention stays the say. Sometimes I write before they arrive, sometimes I jot notes after they leave. I just set aside 5-30 minutes once a week week (morning tea, Grand-Moments and a favorite pen). A few examples:

  • Planning a simple treat and easy seasonal craft time
  • Talking a walk and collection leaves for “nature art”
  • Writing down something they’re curious to talk about later or something they shared that was important to them
  • A written prayer over a challenge they’re facing or a handwritten blessing or gratitude thought
  • Recording a moment that made us all laugh or cry (in the best way)
  • A note of ideas for gifts as they’re favorite things are shared…activities, interests
Roeshel and her grandsons, her grand-moments

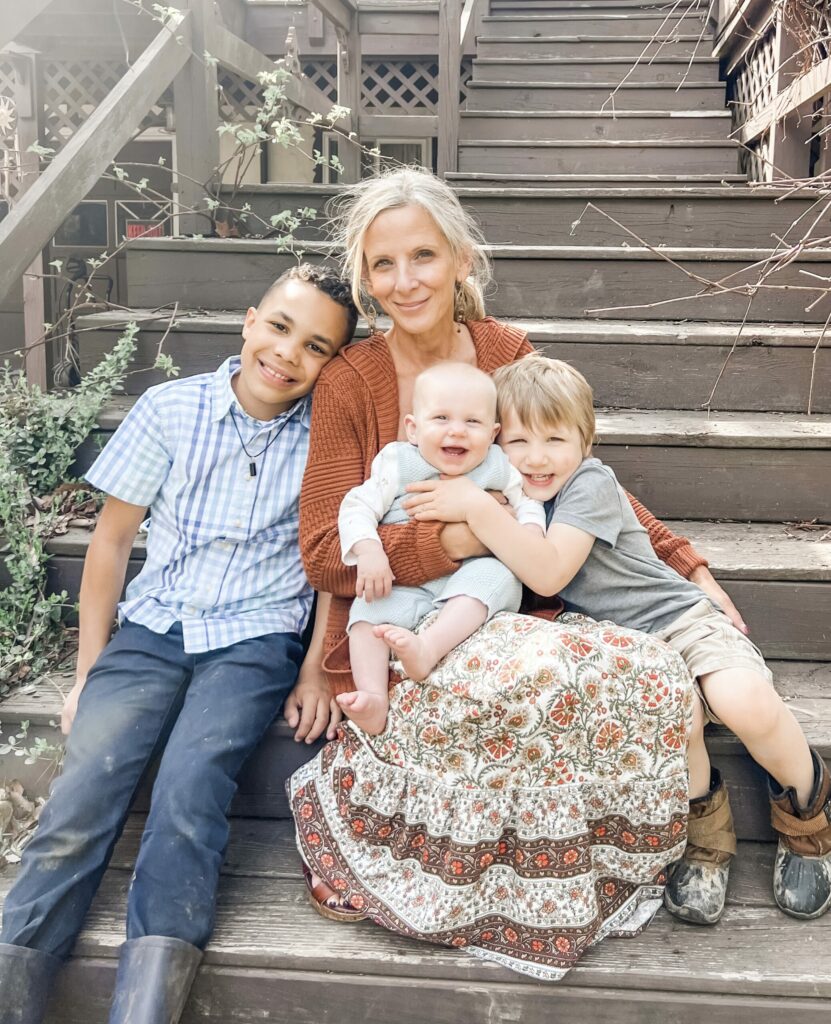
Nanny and her love bugs…

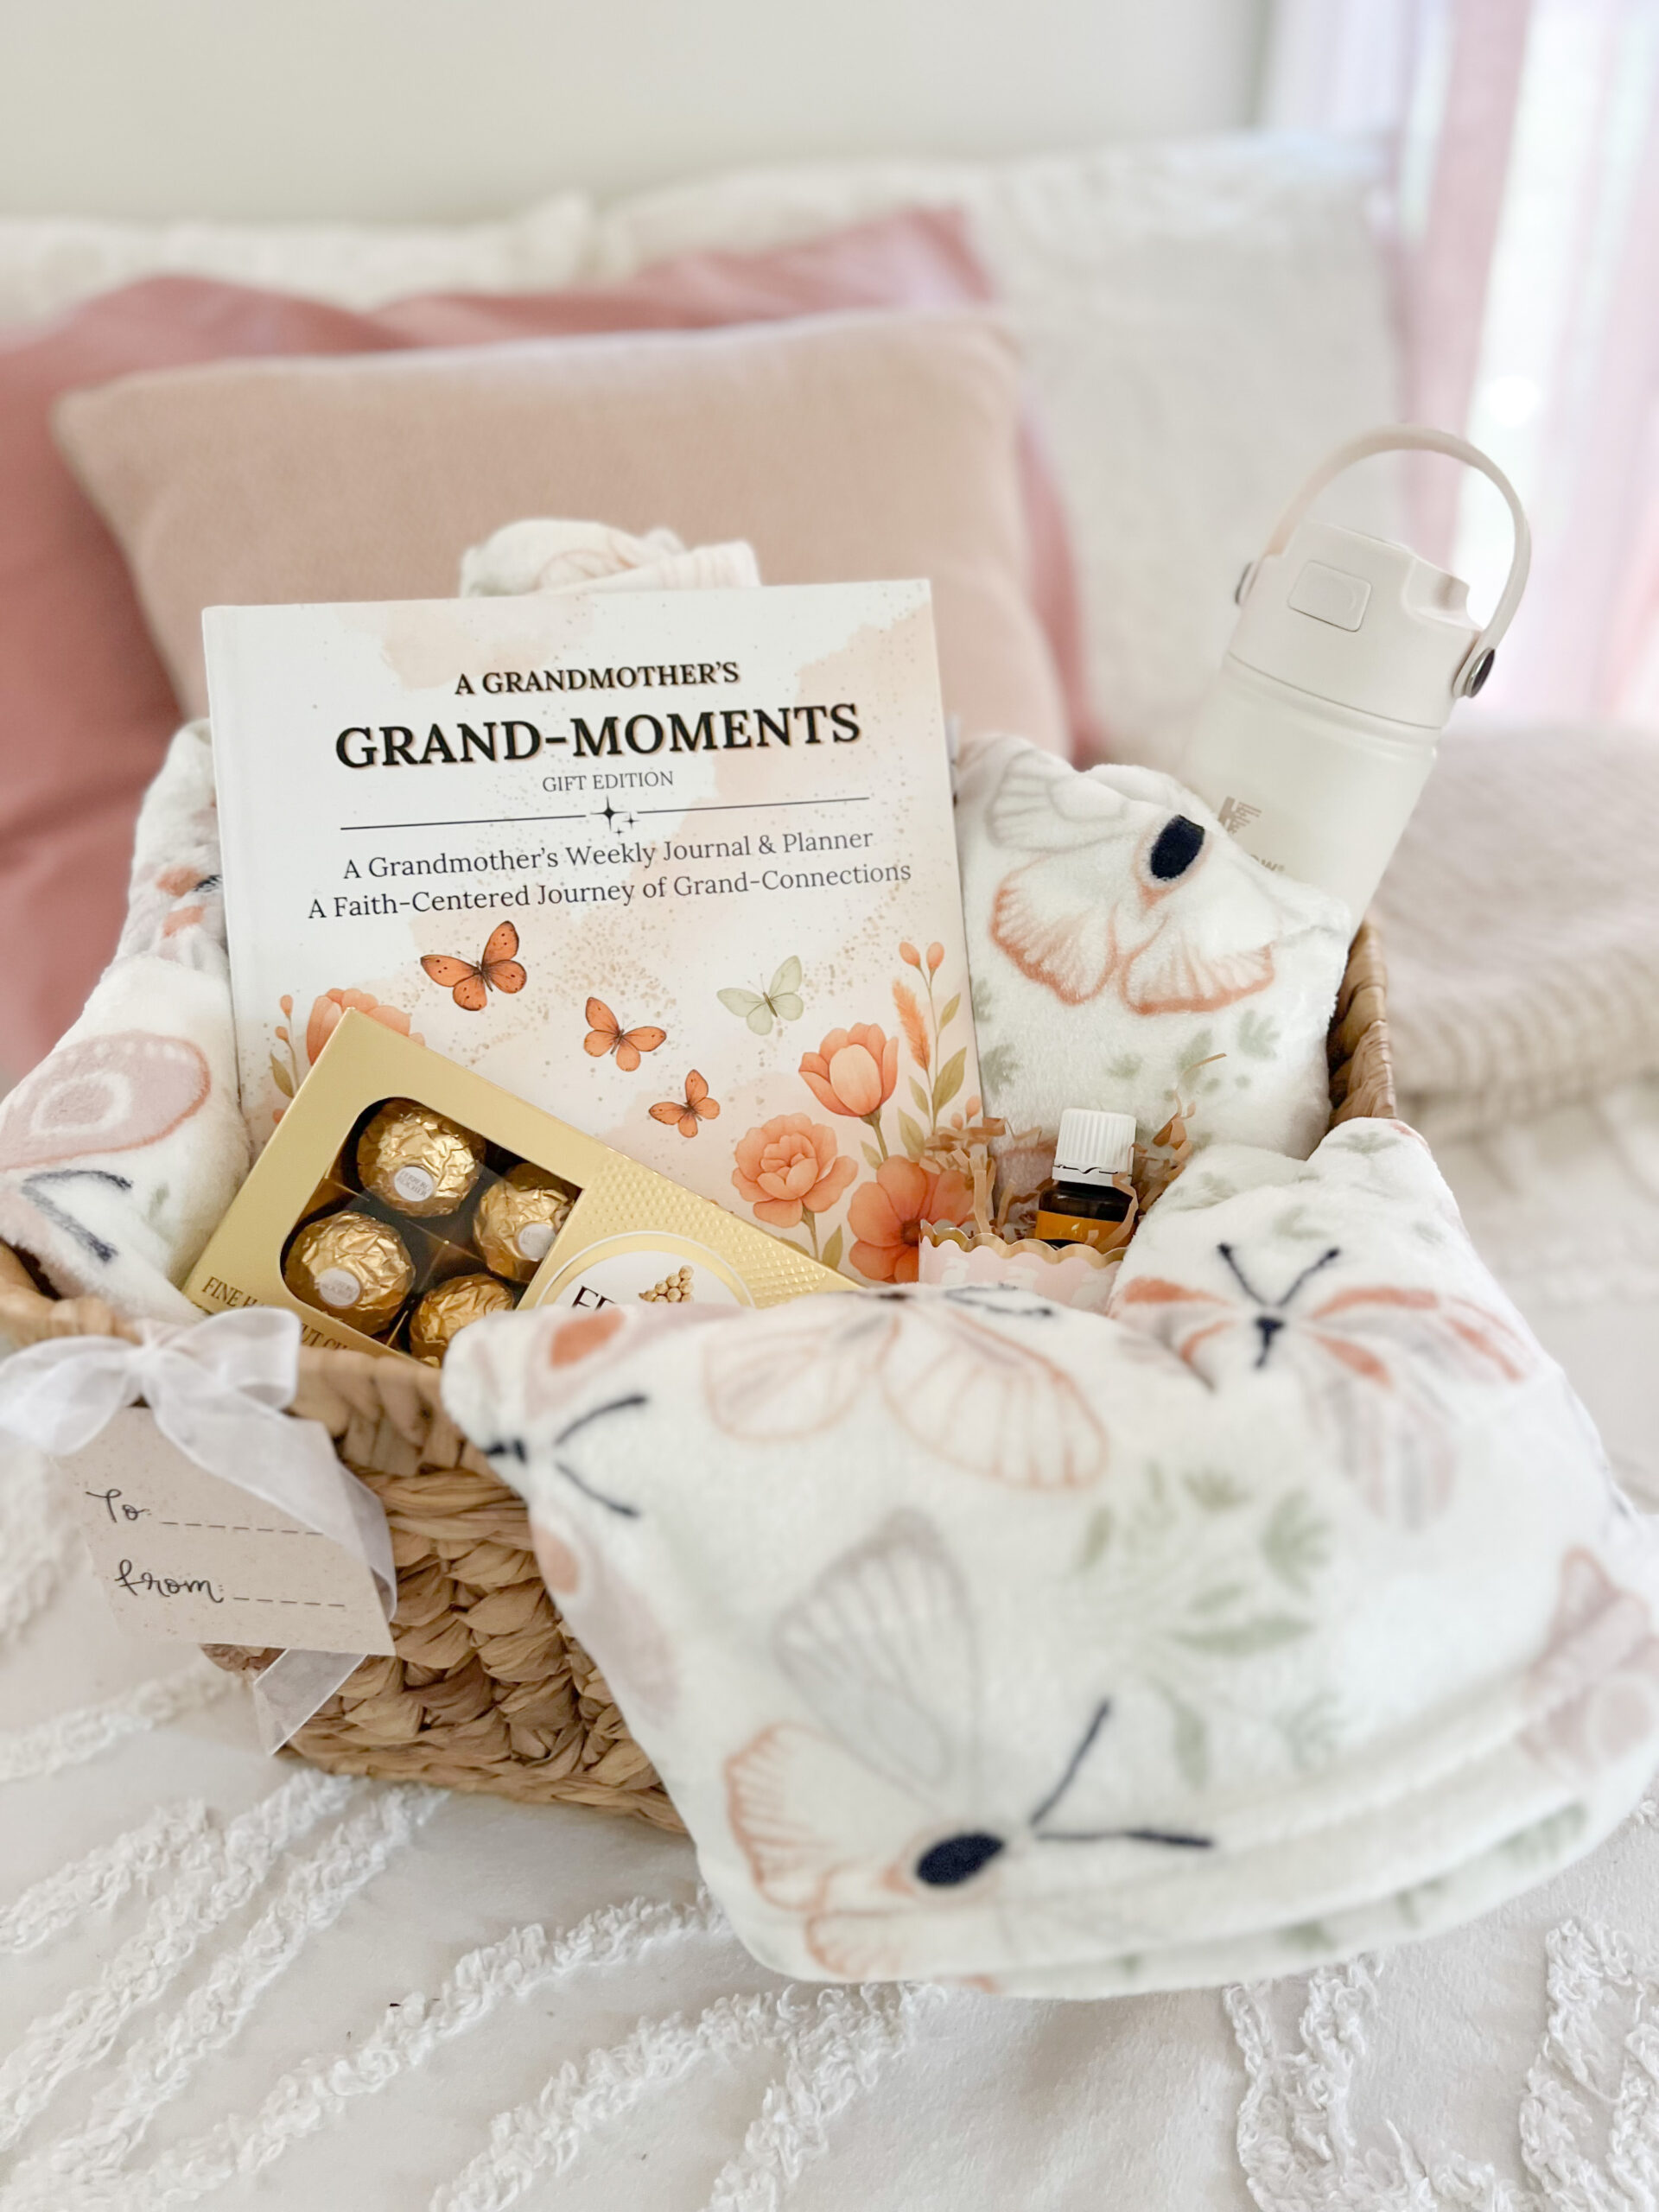
A Thoughtful Gift for Any Grammy!

Whether you’re a brand-new grandma or you’ve been in this season for years, whether you’re local with a physical presence or virtual over distance – this planner is a gentle companion. It also makes a meaningful gift for:

  • Mother’s Day
  • Baby announcement to grandma
  • Grandma-to-be baby shower gift
  • Christmas
  • Birthdays
  • A grandmother who wants a special way to connect
Grand-Moments journal, planner, devotional and so much more is perfect grandmother gift idea!

Where to Get Grand-Moments

Grand-Moments is a keepsake devotional planner journal for the present not past for grandmothers

You can now find it on Amazon on these formats:

Classic black/white paperback

Deluxe color paperback

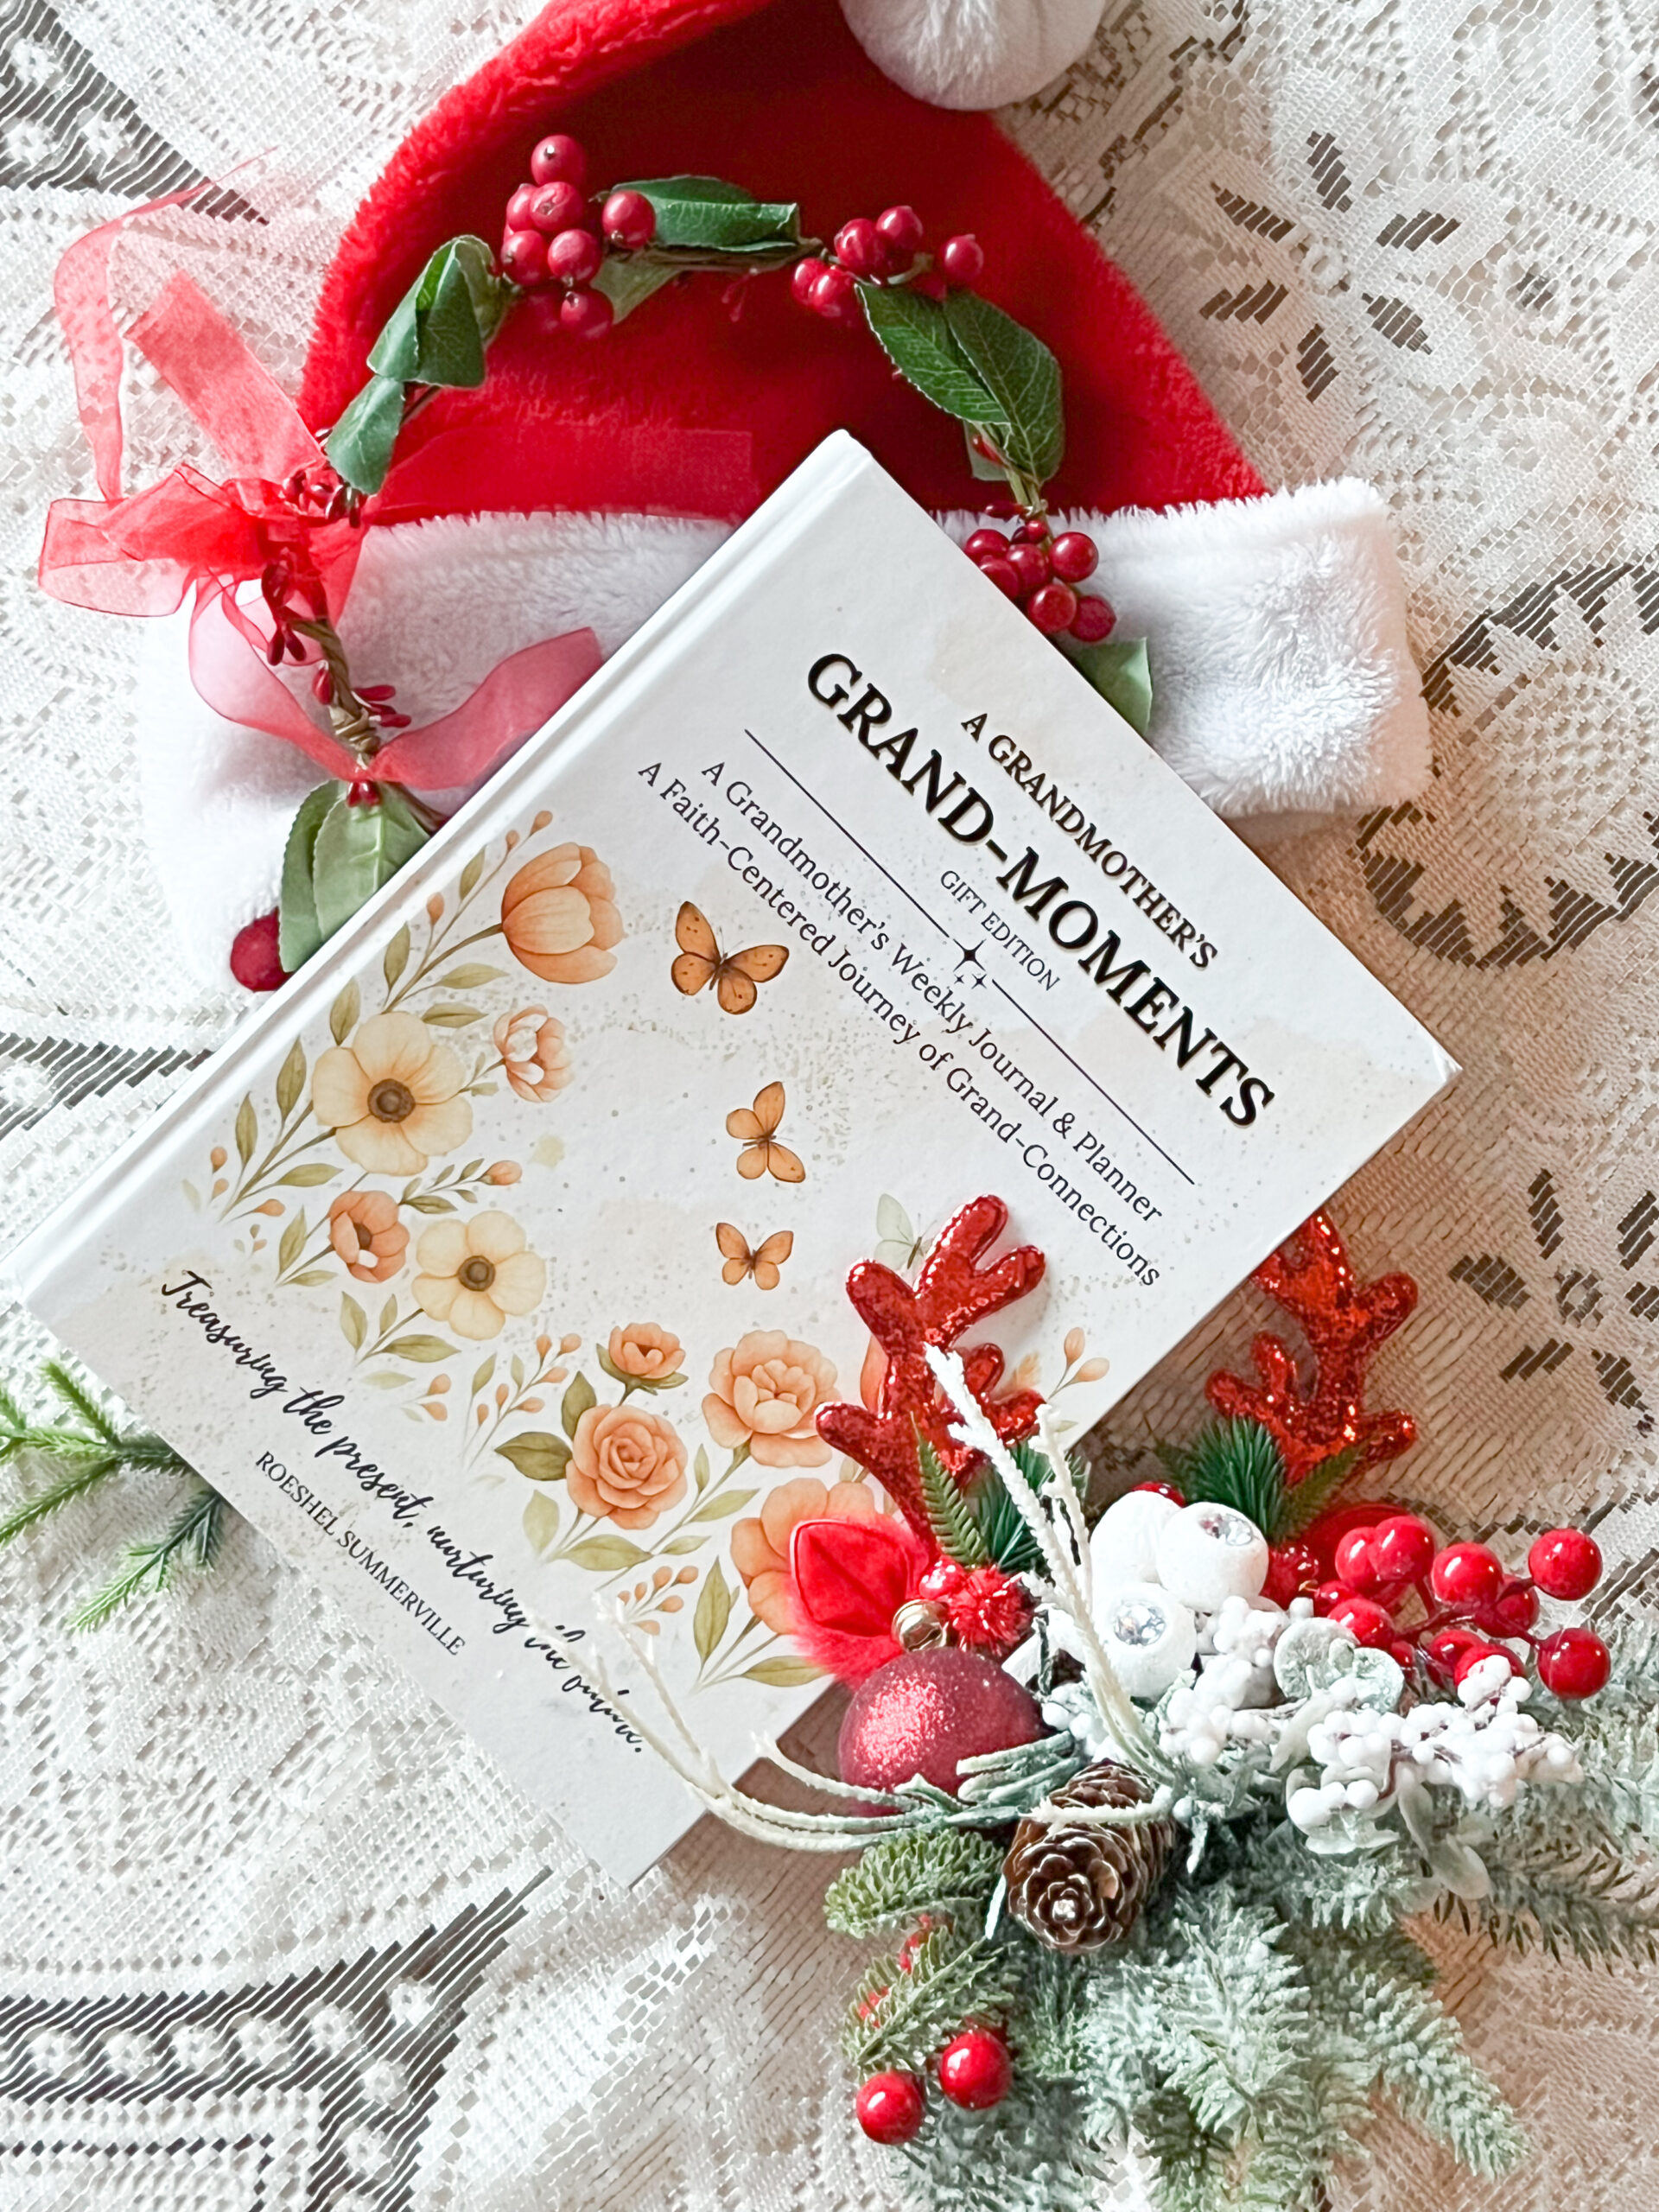
Gift Edition – full color hardback

*Affiliate links. Thank you for your support!

Why Intention Matters More than Perfection

Grandmotherhood isn’t about doing things perfectly. It’s about showing up with love, presence, and a willingness to grow alongside them. It’s hugs, direct eye contact, it’s making them feel seen and heard. It’s encouragement and laughs, forehead kisses and silly dances. Games and stories. It’s being present. This planner helps me do that and if it helps even one other grandma feel more grounded and connected, more grandchildren feel prioritized and loved, then the work behind this project was worth it. Acknowlegement that grandmothers have the ability to leave a lasting impact on the children in their lives. Legacy! If you want to be more present, more connected, more intentional with your grandchildren this year, Grand-Moments is a beautiful place to begin!

Build a Beautiful Pallet Flower Planter + Blog Updates

Vertical pallet garden full of colorful flowers.

A Quiet Comeback + A Favorite DIY Revisited

There’s something comforting about returning to familiar places. Especially the creative kind and I’ve missed this space. After a little time away from blogging, I’m finding my rhythm again and thought I’d start by dusting off a simple, cheerful project from the archives: a DIY pallet flower planter. It’s a reminder that sometimes beauty blooms best when we revisit what we’ve already begun.

Materials I Used for a DIY Pallet Flower Planter

  • 1 kiln-dried pallet (in good condition)
  • Scrap wood. Here’s what I grabbed: (1) 1×4 board, (2) 2×4 boards, (1) 4×4 block
  • Exterior nails or wood screws
  • Wood stain (optional, for color and finish)
  • Clear protective topcoat (weather-resistant)
  • Heavy-duty staples or staple gun
  • Fabric weed barrier or landscape fabric
  • Potting soil (suitable for flowers)
  • Seasonal flowers of your choice
flower pallet garden

How to Make a DIY Pallet Flower Planter

Step 1: Choose and Prep Your Pallet
We had plenty of pallets on hand and selected a kiln-dried pallet marked “HT” (heat-treated), which indicates it’s safer for garden use compared to chemically treated wood. We gave it a thorough scrub with bleach and water to clean off any dirt or residue (important if you’re planting anything edible or placing it near your home).

Step 2: Remove Boards to Create Planting Space
Using a pry bar, we carefully removed three of the horizontal boards from one side of the pallet. This helped open up the structure, creating more vertical room for taller flowers to grow freely.

Step 3: Sand and Prep the Wood
Next, we sanded down all rough edges and splinters using medium-grit sandpaper. I also hammered in any protruding nails to ensure the surface was smooth and safe to work with, especially important for a garden piece that’s often handled.

Step 4: Add Stability and Feet
To give the pallet a flat base, we attached scrap 1×4 boards to the bottom edges of each side, creating a shelf-like structure. This gave us a place to attach “feet” made from more scrap wood. We experimented with adding a caster to one side for mobility, but when that didn’t work as well as we hoped, we opted to secure the pallet to the side of our patio swing instead. You could also anchor yours to a deck railing or set it securely into the ground.

pallet garden tutorial

Step 5: Stain and Seal the Wood
I stained the pallet using Rust-Oleum Wood Stain in Kona, applying it with a brush and wiping away the excess. Although the stain dries in about an hour, I let mine cure for a few days before sealing it. Once dry, I gave the entire pallet a quick coat of clear protective spray to help it stand up to the elements.

rust-oleum stain and pallet

Step 6: Cut Fabric for Planting Pockets
To create planting pockets, I used newspaper and junk mail to make a simple pattern. Be sure to account for folding the edges under and covering the sides of each pocket. Once the pattern was dialed in, I used it to cut my fabric weed barrier to size.

weed barrier planter pockets on pallet garden

Step 7: Staple the Fabric Weed Barrier
I folded under the raw fabric edges for a cleaner look and then stapled the fabric in place between the pallet boards, forming deep planting pockets. The corners were a little tricky—I used a trial-and-error folding technique and may have gotten a bit staple-happy. My final setup created 12 planting pockets in total.

Step 8: Set Up Your Planter
Once everything was secure, I moved the pallet into its final position. You can lean it, secure it to a railing, or anchor it in the ground depending on your space and preference.

DIY flower pallet garden tutorial

Step 9: Fill and Plant
Time to get planting! Fill each pocket with quality potting soil and your favorite flowers or herbs. The fabric allows for natural drainage, helping prevent overwatering.

watering flowers in vertical pallet garden

Finished and Flourishing

Ready to bloom! I love how this project gives new life to old materials and brings a pop of color to any outdoor space. If you give it a try, I’d love to see how yours turns out! Tag me on social media @DIYShowOff or leave a comment below!

vertical pallet flower garden

Let’s Show Off Your Creativity!

Have a DIY project you’re proud of? Whether it’s a craft, home improvement idea, seasonal decor, or something uniquely creative, I’d love to feature it here on the blog or on social media! Sharing inspiring ideas is what this space is all about and your creativity could spark someone else’s next project. Fill out the form below to submit your tutorial, photos, or story. Let’s inspire each other!

DIY Essential Oil Perfume

DIY essential oil perfume recipe using Young Living oils – signature scent gift idea

Create your own essential oil perfume using Young Living oils

If you love thoughtful, handmade gifts, this DIY essential oil perfume recipe is a perfect fit!
Bookmark this post and save these natural perfume ideas to create your own signature scent or craft a custom gift for someone special.

How to Make Your Own Essential Oil Perfume

DIY essential oil perfume recipe using Young Living oils – how to create your own perfume

Want to create a scent that’s all your own?
Follow this DIY signature scent recipe using Young Living essential oils to make a custom perfume…naturally.

Steps:

  1. Choose your scent (see ideas below).
  2. Decide on a spray or roll-on bottle.
  3. Follow the recipe.
  4. Let it settle for 24–48 hours.
  5. Shake gently, apply, and enjoy your natural fragrance!

💡 Don’t forget to jot down your blend. When you love it, you’ll want to recreate it!

Supplies:

Referral links included where noted.

DIY essential oil perfume recipe using Young Living oils – DIY perfume supplies

Understanding Scent Notes:

DIY essential oil perfume recipe using Young Living oils – scent note examples

Scent Categories:

  • Fruity
  • Floral
  • Woodsy
  • Herbal
  • Spicy
DIY essential oil perfume recipe using Young Living oils – DIY scent categories

Scent Notes Explained:

The best perfumes balance scent layers:

  • Base notes (20%): woodsy, balsam
  • Middle notes (50%): floral, fruity, green, spicy
  • Top notes (30%): herbal, citrus, aromatic
DIY essential oil perfume recipe using Young Living oils – notes explained

DIY Signature Scent Recipes (Inspired by Classic Perfumes)

Try these Young Living oil blends inspired by timeless fragrances:

  • Aramis Cologne Recipe
  • Giorgio Armani Inspired Blend
  • Chanel No. 5 Inspired Blend
DIY essential oil perfume recipe using Young Living oils – armies cologne
DIY essential oil perfume recipe using Young Living oils – giorgio armani
DIY essential oil perfume recipe using Young Living oils – chancel no. 5.

Ready to Get Started?

Not a Young Living member yet?
We’d love to help you get started! Use our referral link:
👉 Young Living Sign-Up
Our family has used these oils daily for almost 10 years. Have questions? Message me on Facebook or email. I’m happy to help!

DIY essential oil perfume recipe using Young Living oils – get started

Gift-Worthy Perfume Bottle Ideas

(Referral links)

More DIY Perfume Recipes to Try

Comfort & Joy roll on

comfort and joy rollon tutorial

Happy Unicorn Blend

unicorn essential oils make and take DIY roll on blend
magic unicorn essential oil blend roll on DIY recipe

Follow on Facebook and Instagram!

DIYShowOff is back on Facebook! Follow along here:

DIYShowOff Facebook

DIYShowOff Instagram

DIYShowOff Pinterest too!

DIY essential oil perfume recipe using Young Living oils – signature scent gift idea

DIY Halloween Floral Skeleton

DIY Halloween Floral Skeleton tutorial

I am so in love this decadent and decay theme for adding a touch of Halloween class to the front porch! It’s a skeleton with beauty and style and solar fairy lights!

What I gathered:

Supplies:

  • artificial fall florals
  • 36″ skeleton
  • clip on butterflies
  • hot glue
  • solar fairy lights

Tools: hot glue gun, wire cutters

What I did:

Using wire cutters, I separated some of the florals and removed stems if needed. Then simply secured fall floral pieces and arrangements and accents onto my skeleton using hot glue. A flower crown, some florals over the rib cage and a few tucked within, a wrist and ankle corsage. I added a few butterflies too.

Once that was complete and all of my florals were securely in place, I started at the bottom of one leg and worked my way up the skeleton (there is a LOT of wire so be generous with wrapping and even going back over an area) then back down to the other leg with the string of solar fairy lights.

I used a shepherd’s hook to display in a planter where I could also easily tuck in the solar panel.

Decadence and decay!

Do you decorate for Halloween? Spooky? Creepy? Fun and cute?

Source List:

JoAnn Fabrics: florals and skeleton (after the fact, I also saw the same size skeleton at Family Dollar)

Amazon (affiliate links) ~ make your own kit with everything you need:

Easy DIY halloween floral skeleton decor tutorial

DIY Decorative Juju Hat Inspired Wall Decor Tutorial

African/Cameroon Juju hats have been around as home decor for a few years. They’re so beautiful, artisanal/handmade (symbolize prosperity, worn by ceremonial dancers). DIY decorative Juju hat inspired tutorial:

DIYShowOff Juju hat wall decor tutorial

juju hat wall decor diy

When a friend of mine had to part ways with her African Juju hat wall decor (you don’t want to know), she was in the market for a replacement. It’s been a while since I’ve been crafty and what better time than the new year for a fresh start?! Perfect timing. A perfect opportunity to focus on the positive and to send some good juju to a friend. 

What’s your first DIY project of the new year? Looking for and easy, fun and “GOOD” DIY to jumpstart 2022? This is the perfect little project for you to try! I felt empowered and inspired so I opened up my Amazon app and ordered these supplies: 

diy materials for juju hat wall decor

Materials I used (referral links):

cardboard circle (could easily make one from recycled cardboard too, especially if you’ve been procrastinating the holiday clean up!)

• feather trim ( purchased 2 of this feather trim and 1 of this feather fringe trim)

• aluminum pop top (removed from can) to hang (could also use string or hang with push pins)

Tools:

hot glue gun/sticks, scissors

What I did:

I found the center of my cardboard circle. From there, I drew a straight line to the outer edge. 

tape measure

Using scissors, I cut along the line. 

scissors

Next, using hot glue along one side of the cut, I glued the other side slightly on top to create a little bit of a ‘bowl’-shape. It’s very slight…just enough to give it a 3D look.

Gorilla Glue gun cardboard circle

Then, protect your fingers ‘cuz that hot glue is HOT! Be careful! (I used a capped pen to hold down the ribbon as needed.) Determine placement and start attaching the bottom of the feather trip to the cardboard circle. I worked my way around the outer edge. 

hot glue feather trim feather crafts feather circle

Repeat in circles for complete coverage. Based on your supplies, determine how close together to cover the cardboard. I alternated the 2 different feather trims. 

gluing feather trim feather ribbon juju hat craft project making a juju hat decoration gray feathers placing feathers circle of feathers juju hat inspired wall decor circle of gray feather trim cutting feather trim hot gluing feathers diy juju hat wall decor making a juju hat DIY juju hat tutorial easy diy feather project juju hat DIY

For the center, add a coordinating or same color silk flower. Or, like me, take a bit of leftover trim and roll to create a “center” piece. Attach with hot glue. 

glue gun and feather trim feather trim craft flower feather boa craft craft project with feathers

Fill in with individual feathers as needed.

scissors and gray feathers gray feather and glue gun gray feather craft idea

Attach hanging mechanism of choice to the back with hot glue. 

hanging wall decor with a pop top

Easy peasy! Much lighter and not as detailed or heavy as the real thing but beautiful none-the-less and special because you made it yourself!

The result:

diy juju hat wall art diy gray juju hat wall art

Texture! Softness. Beauty!

poofy feather wall art sitting room wall art diy DIYShowOff Juju hat wall decor tutorialgray juju hat wall decor diy gray feather juju hat decor

I’m hooked and plan to create several more! More feather trim as been ordered! I need a fluffier one! A feather boa would work as well (although a little messier)! Maybe some rattan coasters for the center or a coordinating silk peony would be beautiful too. I’ll come back and post more pictures. Interested in adding yours to the feature? Submit your juju hat photo to thediyshowoff at gmail. 

How about you? Ready to get crafty, creative and inspired in 2022?


Fun Halloween DIY projects

Where are my Halloween lovin’ friends? Time for some Halloween fun! 

I’ve rounded up some DIYShowOff Halloween ideas from DIYShowOff past for inspiration for your upcoming weekend Halloween projects. 

Past DIYShowOff Halloween Ideas

Skeleton Fairy Couture – perfect for adding Halloween touches to your decor. Attach to a wreath, pin onto your jacket, position in a plant, unlimited ideas and so much fun – a little reminiscent of playing with paper dolls only more creative and 3D. I’m on the hunt for supplies again this year…with felt accents for skeleton diffusers! CUTE!

DIY Halloween Fairy Fashion Show - Skeleton Couture @diyshowoff


Halloween (witch) dreamcatcher // tea party – this whimsical witch-catcher is just too cute! A great Halloween themed craft idea. Gather some friends and cider! Or make one up and add it to your “BOO” for a friend or neighbor. 

Halloween witch dreamcatcher tea party @diyshowoff #madewithmichaels Halloween witch dreamcatcher tea party @diyshowoff #madewithmichaels Halloween witch dreamcatcher tea party @diyshowoff #madewithmichaels

The Raven inspired Halloween party ideas – throwing a monster bash? A black and white Poe theme is perfectly POEtic! I’m gathering up my props from the past to create a Poe-themed window at my wellness studio. Can’t wait!

The Raven Nevermore Halloween Party Ideas @diyshowoff #MakeItWithMichaels


Halloween {essential oil infused} Marshmallow Treats – easy to make party favors! 

So cute! Halloween (essential oil infused optional) marshmallow treats @diyshowoff #makeitwithmichaels

This witch hat tutorial for a Halloween centerpiece, candy dish, vignette or planter – ‘witch’ purpose works best for you? A construction cone + plant dish = so many options! EASY!

DIY Witch Hat Halloween decor tutorial @diyshwoff


monster repellent Halloween party favor recipe – you just might want to use this all year long! Still holding out on trying essential oils? Learn more at my Wellness Website to get your essential oils and to be a part of our amazing community of friends! 

Halloween essential oils Make & Take ideas, graphics and printables @diyshowoff


Halloween wooden BOO blocks and super easy wall art tutorial – isn’t that laser cut wall art amazing? It’s like the easiest craft project ever and so pretty!  DIY Halloween decor @diyshowoff

DIY chicken wire/cheesecloth spooky skeleton ghost – this guy hangs out in our (storage) barn all year long until it’s time to come out of hiding! A scary sight when you walk in to rummage through the treasures. And a fun addition to the grape arbor/gazebo with the curtains blowing around. Spooky! 

DIY Halloween Ghost


DIY ‘Nevermore’ tree Halloween decor – grab some branches from the yard and ravens from the Dollar Store and your glue gun! Easy fun craft time!

DIY Halloween Nevermore Tree


The Raven inspired Halloween mantel

Nevermore Halloween Mantel


personalized trick or treat tote bags

 DIY trick or treat tote bags

DuckTape trick or treat bucket tutorial

 DuckTape trick or treat bucket tutorial #halloween @diyshowoff #spookduckular

DIY pumpkin/jack-o-lantern diorama


candy skull owl

 DIY Neon Sharpie Candy Skull Owl

wooden candy corn decorations

 DIY Halloween/Fall craft: decorative wooden candy corn pieces

I love this old Halloween display from quite a few years ago…

halloween decorating @diyshowoff