Build a Beautiful Pallet Flower Planter + Blog Updates

Vertical pallet garden full of colorful flowers.

A Quiet Comeback + A Favorite DIY Revisited

There’s something comforting about returning to familiar places. Especially the creative kind and I’ve missed this space. After a little time away from blogging, I’m finding my rhythm again and thought I’d start by dusting off a simple, cheerful project from the archives: a DIY pallet flower planter. It’s a reminder that sometimes beauty blooms best when we revisit what we’ve already begun.

Materials I Used for a DIY Pallet Flower Planter

  • 1 kiln-dried pallet (in good condition)
  • Scrap wood. Here’s what I grabbed: (1) 1×4 board, (2) 2×4 boards, (1) 4×4 block
  • Exterior nails or wood screws
  • Wood stain (optional, for color and finish)
  • Clear protective topcoat (weather-resistant)
  • Heavy-duty staples or staple gun
  • Fabric weed barrier or landscape fabric
  • Potting soil (suitable for flowers)
  • Seasonal flowers of your choice
flower pallet garden

How to Make a DIY Pallet Flower Planter

Step 1: Choose and Prep Your Pallet
We had plenty of pallets on hand and selected a kiln-dried pallet marked “HT” (heat-treated), which indicates it’s safer for garden use compared to chemically treated wood. We gave it a thorough scrub with bleach and water to clean off any dirt or residue (important if you’re planting anything edible or placing it near your home).

Step 2: Remove Boards to Create Planting Space
Using a pry bar, we carefully removed three of the horizontal boards from one side of the pallet. This helped open up the structure, creating more vertical room for taller flowers to grow freely.

Step 3: Sand and Prep the Wood
Next, we sanded down all rough edges and splinters using medium-grit sandpaper. I also hammered in any protruding nails to ensure the surface was smooth and safe to work with, especially important for a garden piece that’s often handled.

Step 4: Add Stability and Feet
To give the pallet a flat base, we attached scrap 1×4 boards to the bottom edges of each side, creating a shelf-like structure. This gave us a place to attach “feet” made from more scrap wood. We experimented with adding a caster to one side for mobility, but when that didn’t work as well as we hoped, we opted to secure the pallet to the side of our patio swing instead. You could also anchor yours to a deck railing or set it securely into the ground.

pallet garden tutorial

Step 5: Stain and Seal the Wood
I stained the pallet using Rust-Oleum Wood Stain in Kona, applying it with a brush and wiping away the excess. Although the stain dries in about an hour, I let mine cure for a few days before sealing it. Once dry, I gave the entire pallet a quick coat of clear protective spray to help it stand up to the elements.

rust-oleum stain and pallet

Step 6: Cut Fabric for Planting Pockets
To create planting pockets, I used newspaper and junk mail to make a simple pattern. Be sure to account for folding the edges under and covering the sides of each pocket. Once the pattern was dialed in, I used it to cut my fabric weed barrier to size.

weed barrier planter pockets on pallet garden

Step 7: Staple the Fabric Weed Barrier
I folded under the raw fabric edges for a cleaner look and then stapled the fabric in place between the pallet boards, forming deep planting pockets. The corners were a little tricky—I used a trial-and-error folding technique and may have gotten a bit staple-happy. My final setup created 12 planting pockets in total.

Step 8: Set Up Your Planter
Once everything was secure, I moved the pallet into its final position. You can lean it, secure it to a railing, or anchor it in the ground depending on your space and preference.

DIY flower pallet garden tutorial

Step 9: Fill and Plant
Time to get planting! Fill each pocket with quality potting soil and your favorite flowers or herbs. The fabric allows for natural drainage, helping prevent overwatering.

watering flowers in vertical pallet garden

Finished and Flourishing

Ready to bloom! I love how this project gives new life to old materials and brings a pop of color to any outdoor space. If you give it a try, I’d love to see how yours turns out! Tag me on social media @DIYShowOff or leave a comment below!

vertical pallet flower garden

Let’s Show Off Your Creativity!

Have a DIY project you’re proud of? Whether it’s a craft, home improvement idea, seasonal decor, or something uniquely creative, I’d love to feature it here on the blog or on social media! Sharing inspiring ideas is what this space is all about and your creativity could spark someone else’s next project. Fill out the form below to submit your tutorial, photos, or story. Let’s inspire each other!

Easter Succulent Garden

Take a moment to gather your thoughts, count your blessings and start the holiday weekend with a grateful heart.
 
But God demonstrates his own love for us in this: While we were still sinners, Christ died for us. ~Romans 5:8
 
Blessings to all this Good Friday.

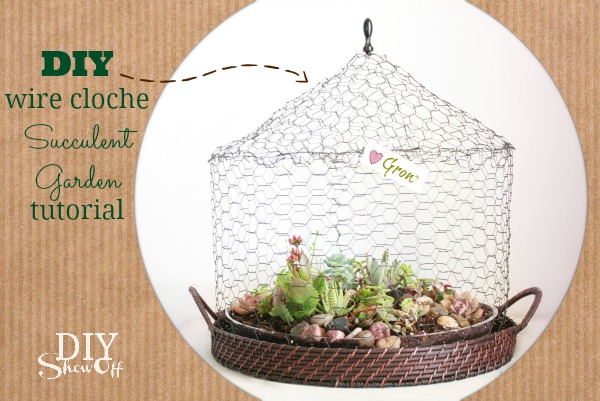
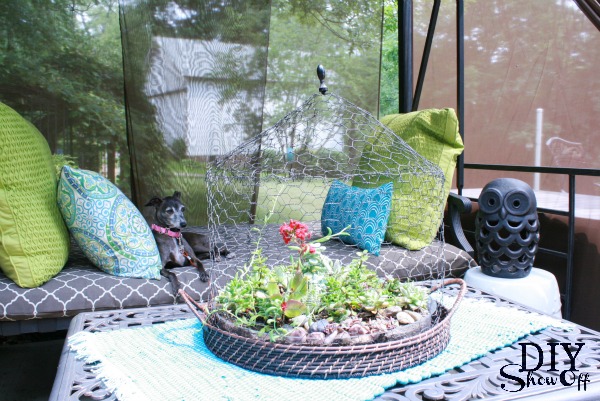
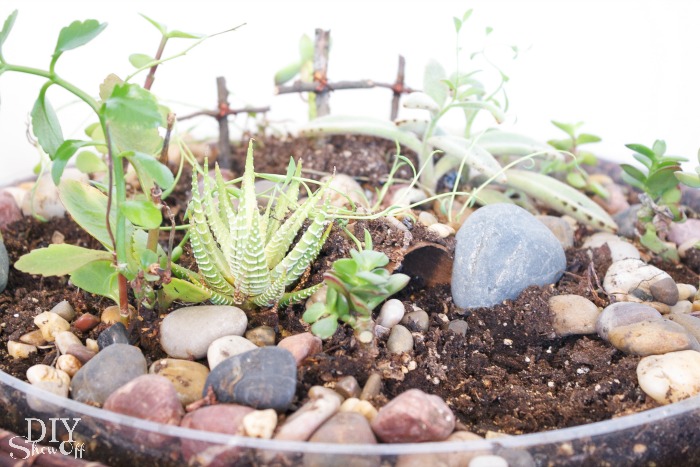
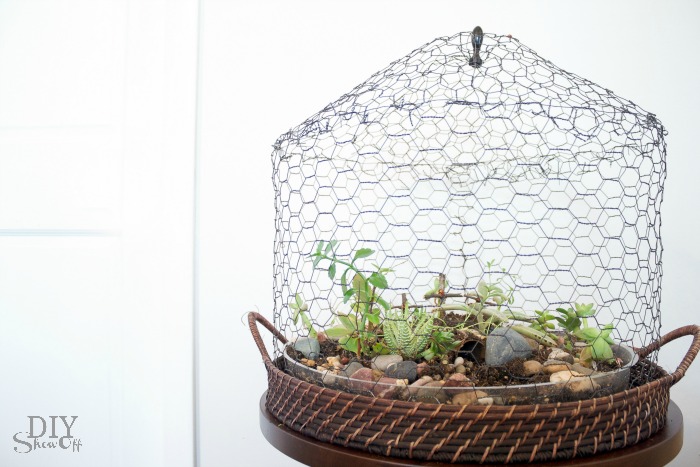
Remember that one time last year when I made a wire cloche for a succulent terrarium/garden? It’s a miracle! I haven’t managed to kill the plants! I love that succulents are so hardy, nearly fool-proof. Well, for Easter, I’ve done a little re-arranging in my little succulent garden. 

DIY wire succulent garden

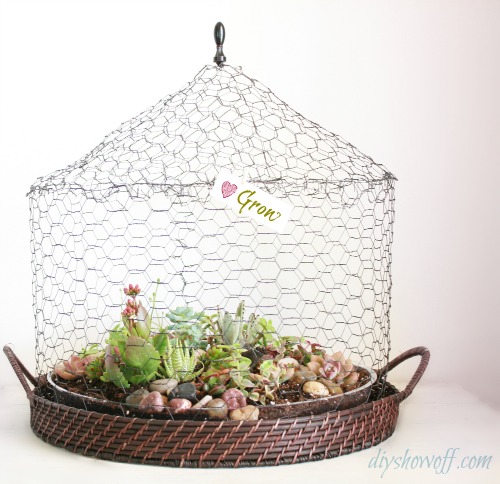
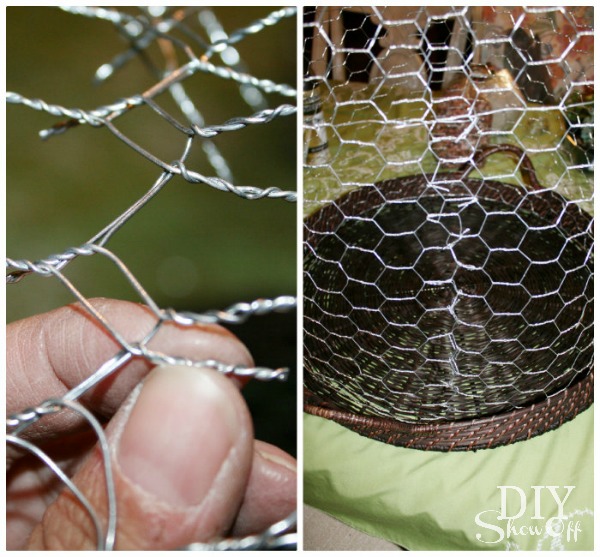
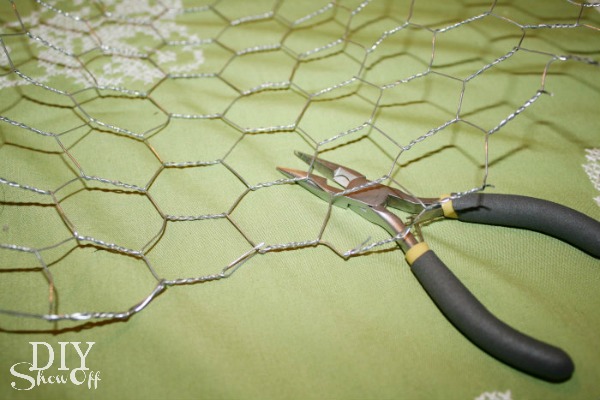
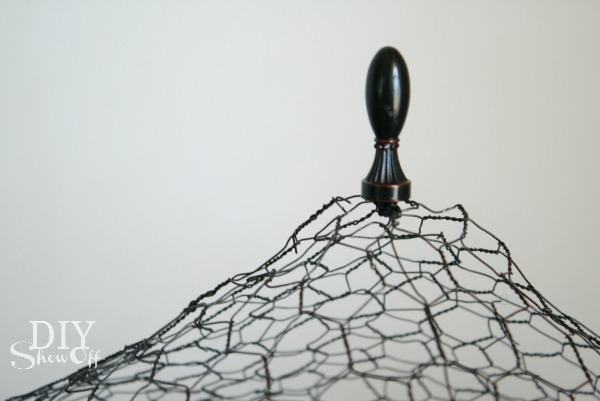
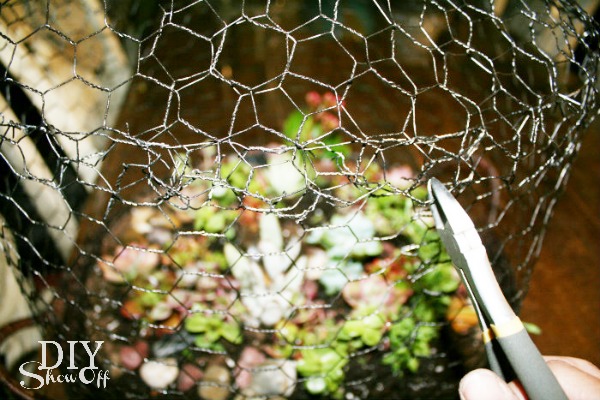
{DIY wire cloche for succulent garden}

It’s still alive and thriving but it was looking a bit neglected and sad (okay, so some of the plants didn’t make it) but I took a few minutes to freshen it up for spring, trying to make up for my non-green thumb. I saw something similar somewhere one time but for the life of me, can’t find it now to properly credit that glimpse of inspiration. Here’s what I did: 

Easter succulent garden at diyshowoff.com

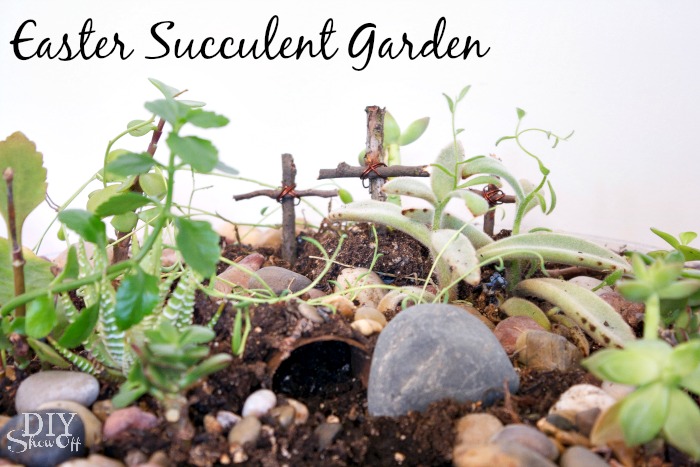
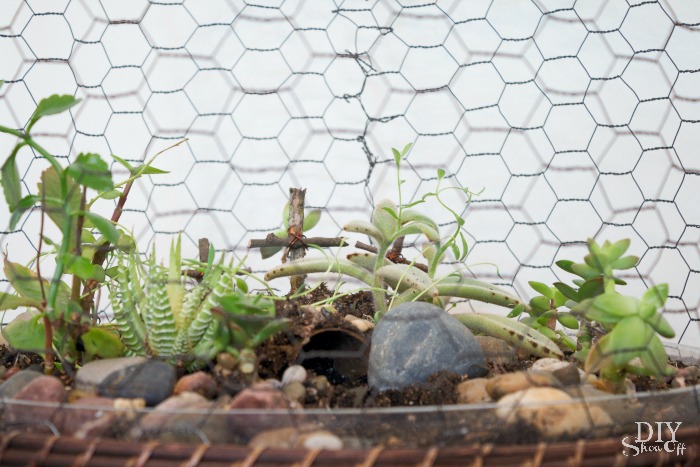
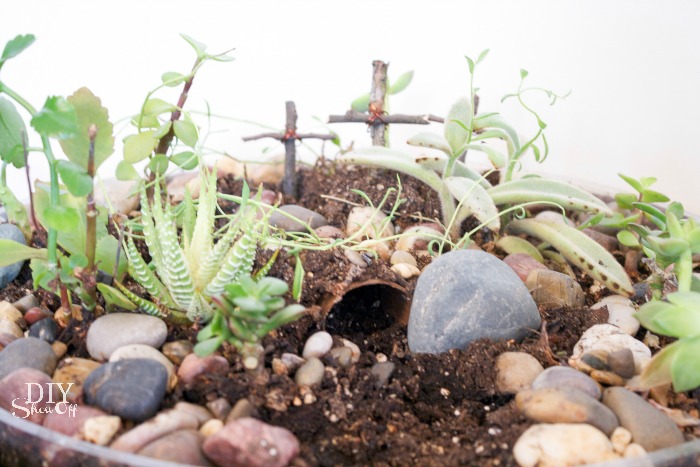
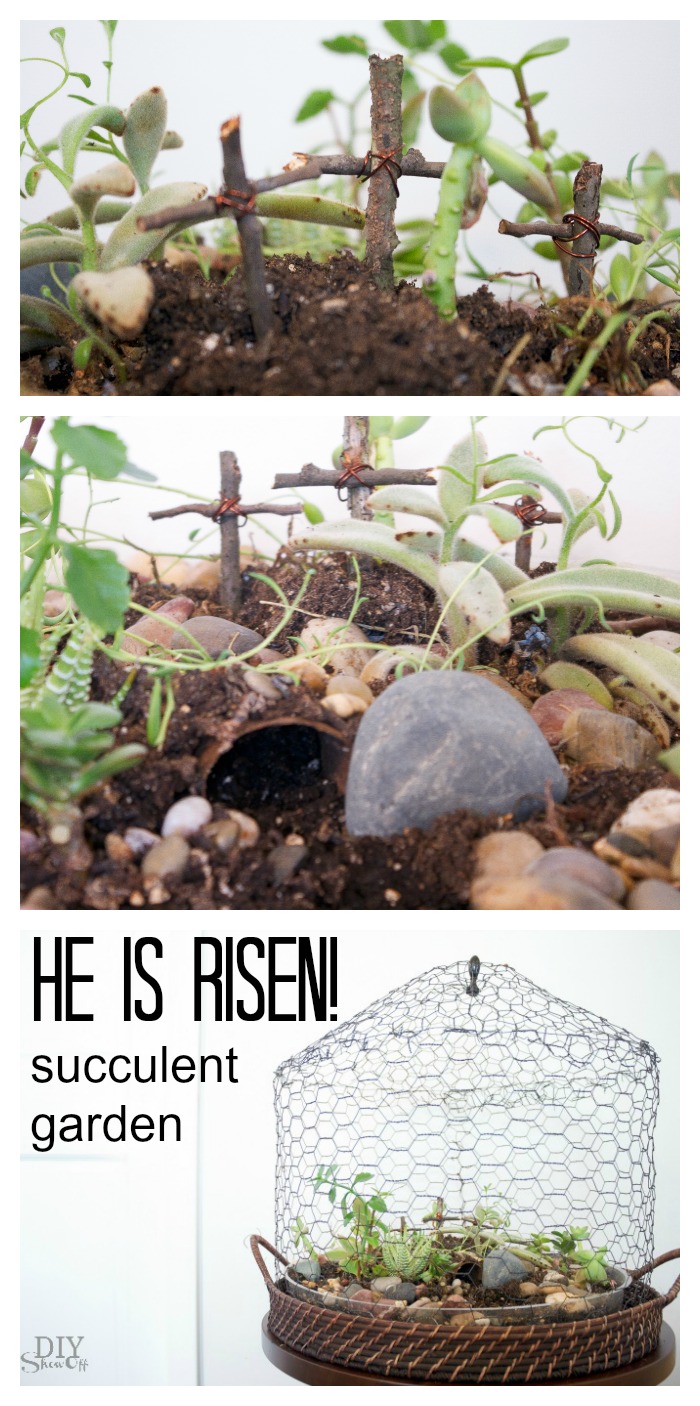
  • I added water so the soil was wet. I broke up the compacted soil with a fork then added half of an empty toilet paper roll. I covered it with soil and pebbles then added a rock to the side…just like Jesus’ tomb. 
  • Using twigs from my yard and scrap floral wire, I created 3 little stick crosses and tucked them near the back. 

succulent garden for Easter at diyshowoff.comEaster succulent terrarium at diyshowoff.comEaster succulent garden - diyshowoff.comHe is Risen succulent garden at diyshowoff.com

When Easter decorating becomes bunnies, eggs, chicks and candy overload (which I do love too, don’t get me wrong!). However, it’s important to have a sweet reminder of the true reason for celebrating Easter. He is risen! 

Jesus' tomb succulent garden at diyshowoff.com

 He is Risen, indeed. xo 

He is Risen! succulent garden at diyshowoff.com

 Update: Here are links to some more (thanks for sharing, Graziela!)

This post is sponsored by my Young Living business! Check out my essential oils page for more information on how you can get these amazing oils in your hands too along with helpful freebies, a gift from me, and tons of support:

April 2019:

Hello April DIYShowOff welcome bundle 2019

DIY Wire Cloche SucculentTerrarium

Succulents make for a great indoor/outdoor centerpiece. I’ve been using this wire cloche succulent garden as a centerpiece on our patio coffee table all summer. I love that it requires little maintenance. 

DIY wire succulent garden tutorial

DIY wire cloche succulent terrarium tutorial:

diy wire cloche succulent garden

Materials I used:

  1. Miracle Gro Cactus & Citrus Potting Soil
  2. Rustoleum Oil Rubbed Bronze Spray Paint
  3. Chicken Wire 
  4. Allen & Roth Round Serving Tray
  5. Pebbles
  6. Sand
  7. Finial
  8. Tools: Needle Nose Pliers & Wire Cutters
  9. Assorted Succulents
  10. Plastic Planter Liner
  11. Decorative Rocks & Accessories (not shown)

What I did:

In the plastic planter liner, I layered pebbles, sand and topped with the potting soil. Then planted the succulents and added decorative rocks. And placed the plastic planter liner into the round serving tray.

DIY succulent garden

I measured the diameter of the plastic planter liner and decided on the height of my wire cloche and using wire cutters, cut out my shape to create a cylinder to go around the terrarium.

DIY wire succulent garden tutorial

I cut the wire so that I’d have little wire “tabs” to secure the shape up along the side.

DIY wire succulent garden tutorial

To make the top (roof) of my wire cloche, I used a large round clock as a circle template (the biggest circle size I could cut from my chicken wire width) and cut using wire cutters.

DIY wire succulent garden tutorial

I cut a straight line to the center of the circle and created a ‘cone’ shape top for my terrarium and again used the small cut chicken wire tabs to secure my shape. Then I spray painted my cylinder and top.

DIY wire succulent garden tutorial

Once dry, I used an extra piece of wire (a twist tie will work) to attach a finial to the top. Glue and screws weren’t working so this takes some playing with, but the wire cloche is light so lifting it from the garden will be easy to do, even if it’s simply twisted in the chicken wire. 

DIY wire succulent garden tutorial

And using the same technique with ‘tab’ piece of wire from the cylinder, I attached the “cone” (sort of like a “roof”) to the cylinder.

DIY wire succulent garden tutorial

Then just slip the wire cloche over the terrarium.

DIY wire succulent garden

Here it is on the patio:

succulent patio garden

See more patio and outdoor projects in the DIY Show Off Project Gallery

And more fun DIY ideas at Lowe’s Creative Ideas, follow Lowe’s on InstagramPinterest and sign up for the Creative Ideas magazine and app.

Spring 13 Blogger Badge Subscribe Banner Version

*Disclaimer: As a member of the Lowe’s Creative Ideas Creators and Influencers network, I received a Lowe’s gift card to complete a DIY terrarium project, however the tutorial images, instructions and opinions are my own. 

How to Build a Free-Standing Pallet Herb Garden (Step-by-Step DIY Tutorial)

Our vegetable garden is located a few acres from the house. Wanting to have a small herb garden closer to the patio, grill and kitchen and inspired by so many vertical pallet planters, Mr. DIY and I created a free standing (moveable) vertical pallet herb garden.

free-standing-vertical-pallet-herb-garden

Materials:

(if referring to our tutorial for your own project, completely read through what we did as I recommend some changes to our experience)

  • Kiln-dried pallet in good shape
  • Scrap 1×4 wood
  • Scrap block 4×4 wood
  • Scrap 2×4 wood
  • Nails
  • Wheel and hardware/screws to attach (This is what we used but read below! I do not recommend attaching a wheel but creating 2 bottom supports using 2 4×4 blocks and scrap wood instead).
  • Wood stain
  • Protective clear coat
  • Staples
  • Fabric weed barrier
  • Potting soil
  • Herbs

Here is what we did:

1. We have plenty of pallets stacked around here and chose a kiln-dried one, marked with “HT” (heat-treated and less likely chemically treated) and gave it a good scrubbing with bleach as well.

2. We removed a three of the horizontal boards from one side with a pry bar to create a larger space for working and tall growing herbs.

pallet

3. Then sanded down the splinters, rough edges and hammered down all of the nails.

4. We added a piece of scrap wood to the bottom of one side (1×4) to create a ‘shelf” type surface to attach a caster/wheel. Inserting the 1×4 took some playing around (prying up one of the pallet boards to squeeze it into place.

vertical pallet garden

5. The other side of the bottom got a 4×4 block (double check for leveling with the wheel side) and a miter-cut scrap 2×4 for support. (If I had to do over, I would skip the wheel and use a 4×4 block and mitered 2×4 on both sides since the wheel is convenient but the vertical height makes it unsteady.

vertical pallet garden tutorial

6. One to two people can easily move the herb pallet garden with the supports only and without the wheel. Our original plan was to also attach a handle to the one side (for tipping and wheeling around however kiln dried pallet wood is VERY dense and our screws just kept breaking off…so, no handle for now). I do NOT recommend attaching a wheel. I recommend creating support on both bottom sides. 

7. Next I stained the pallet using Rustoleum’s Wood Stain (Kona), wiping away after applying. I let it dry and cure for a few days (although Rustoleum’s stain dries in about one hour).

staining pallet

8. I moved the pallet outside and gave it a spray of protective clear coat.

vertical pallet

vertical pallet garden tutorial

9. Once that was dry, I used junk mail/newspaper to create a pattern, including room for folding the fabric edge under and the sides of the pocket. Then used my pattern to cut the fabric weed barrier to size. 

10. I folded under the edges and stapled the fabric weed barrier into place between the pallet boards to create a pocket.

vertical pallet garden tutorial

11. Corners were tricky…do what works for you. I can’t explain my complicated folding technique. I think I got a little staple-happy.

12. I just kept cutting and stapling the fabric weed barrier into place. My pallet has 12 planting pockets. All done!

planting pallet garden

I’ve started some herbs from seed, but I purchased these already started herbs from Lowe’s to fill it up. Instant fresh herbs! Hurray! I planted:

DIY herb garden

  • basil
  • parsley
  • rosemary
  • dill
  • oregano
  • thyme
  • peppermint
  • chocolate mint
  • spearmint
  • tarragon
  • lavender
  • another type of spicy globe basil

Next I moved it into place. Unfortunately our patio is getting a little crowded so rather than have it free standing/showing both back and front, up next to the patio swing seemed to be the best location. (Until I rearrange…you know how I love to move things around!)

vertical pallet herb garden

Again, I’d recommend support on both ends instead of the wheel. It’s unsteady with the one wheel/one person. Live and learn and DIY experimenting. It’s easy enough, even planted, for one person to move without the wheel. I think two side supports is a better option. It’s also two sided. It’s perfect for creating a border on a patio. Great for small spaces too!

Doesn’t it look amazing?! I looooove it!

free standing vertical pallet herb garden

We spend most of our time on the patio on pretty days…I love the fresh herbal scents too!

free standing pallet herb garden

And having fresh herbs right off of the kitchen is so convenient.

free-standing-vertical-pallet-herb-garden

Whatcha think?

More outdoor projects:

patio-makeover
outdoor patio swing makeover
chandelier-planter-feature
DIY dog bed
tire flower planter tutorial at DIYShowOff
home tour


This post is sponsored by my Young Living business! Check out my essential oils page for more information on how you can get these amazing oils in your hands too along with helpful freebies, a gift from me, and tons of support:

young living essential oils @diyshowoff


Premium Miracle Gro: The Gro Project

This is a Sponsored post written by me on behalf of Miracle-Gro for SocialSpark. All opinions are 100% mine.


Our family loves outdoor get-togethers when the weather cooperates and it’s the start of BBQ season around here. With the help of Miracle-Gro (a sponsored event), I’m planning a fun family backyard BBQ for Mother’s Day.

I’m using The Gro Project to ensure growing success. Have I mentioned I do NOT have a green thumb? I’ve always heard that gardening can be fun, easy and enjoyable and this is the perfect opportunity to “grow” as a gardener with a gardening expert holding my hand.

They have a few really cute and fun garden projects to inspire some growing-creativity:

the Gro project

  • Toyrarium (this looks like SO much fun…digging in the dirt with little ones!)
  • Ukelele Garden (fun for a luau themed party)
  • Origami Garden (so many custom color options)

Since I’m planning something special for Mother’s Day, I’ve decided on a beautiful creative container garden idea for the females in our family. Our thrift stores/yard sales are filled with cheap brassy chandeliers and we’ve started collecting them.  I’ll share more details and the DIY instructions soon but here’s a peek at our inspiration:

chandelier-planter

{source – etsy}

Thinking I might even add a small matching toyrarium planter for the 2 precious nieces and 1 adorable nephew (all under the age of 5) who will be in attendance as well. Doesn’t a gardening themed BBQ sound like a great time?

We will use Miracle Gro Moisture Control Potting Mix, ideal for container gardens – exclusive formula absorbs 33% more water than ordinary potting soil and protects against over and under watering! Which means…my project has an awesome chance of surviving! (Hellooooo, green thumb!) and the little ones will have a summer opportunity to take care of something they planted. Easy peasy!

Mr. DIY will control the BBQ tasks. Menu includes:

  • BBQ/smoked ribs
  • a vinegar-based coleslaw
  • dill/red potato potato salad
  • fresh brewed iced tea and mojitoes
  • raspberry/lemon trifle

For more gardening tips and information:

Check back to see how our chandelier planters turn out! Can’t wait to show you!

Visit Sponsor's Site

DIY Feature: Vertical-Pallet-Garden

Since finishing our wall mounted pallet project and we use a pallet as shelving in our faux mantel

diyshowoff-pallet-projects

and I have a few more wood pallets for DIY projects, I wanted to share this beautiful vertical pallet garden from Amanda at Mommy is CooCoo.

before:

pallet

vertical pallet garden tutorial here

vertical-pallet-garden-tutorial

after:

vertical-pallet-garden

Awesome, right? A beautiful garden feature! Love it! Now if the weather would cooperate around here, I’d be a copy cat!

Thanks so much for sharing, Amanda!