Premium Miracle Gro: The Gro Project

This is a Sponsored post written by me on behalf of Miracle-Gro for SocialSpark. All opinions are 100% mine.


Our family loves outdoor get-togethers when the weather cooperates and it’s the start of BBQ season around here. With the help of Miracle-Gro (a sponsored event), I’m planning a fun family backyard BBQ for Mother’s Day.

I’m using The Gro Project to ensure growing success. Have I mentioned I do NOT have a green thumb? I’ve always heard that gardening can be fun, easy and enjoyable and this is the perfect opportunity to “grow” as a gardener with a gardening expert holding my hand.

They have a few really cute and fun garden projects to inspire some growing-creativity:

the Gro project

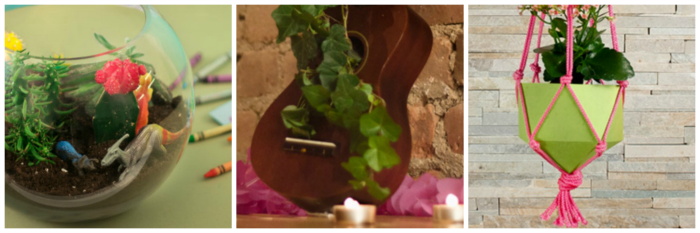
  • Toyrarium (this looks like SO much fun…digging in the dirt with little ones!)
  • Ukelele Garden (fun for a luau themed party)
  • Origami Garden (so many custom color options)

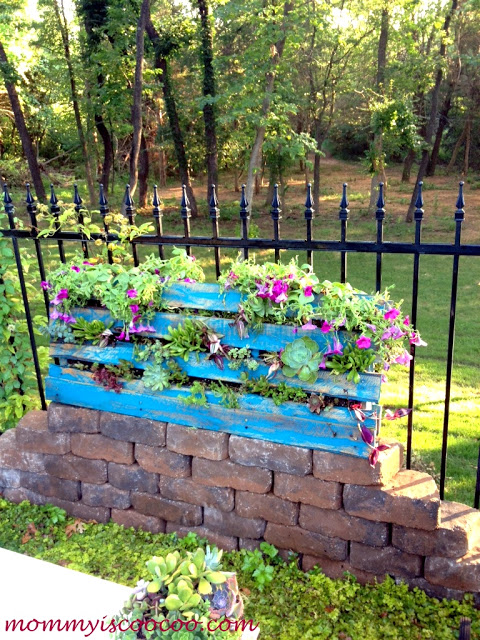
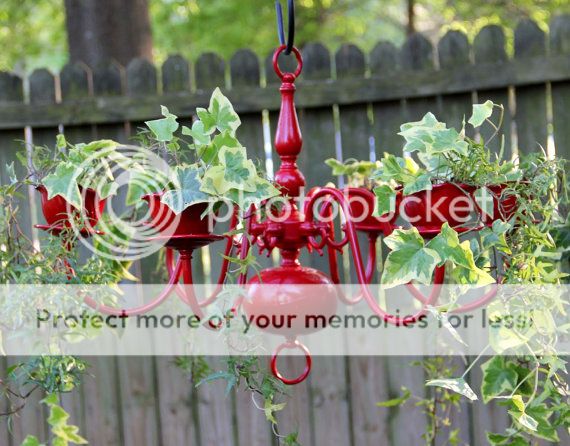
Since I’m planning something special for Mother’s Day, I’ve decided on a beautiful creative container garden idea for the females in our family. Our thrift stores/yard sales are filled with cheap brassy chandeliers and we’ve started collecting them.  I’ll share more details and the DIY instructions soon but here’s a peek at our inspiration:

chandelier-planter

{source – etsy}

Thinking I might even add a small matching toyrarium planter for the 2 precious nieces and 1 adorable nephew (all under the age of 5) who will be in attendance as well. Doesn’t a gardening themed BBQ sound like a great time?

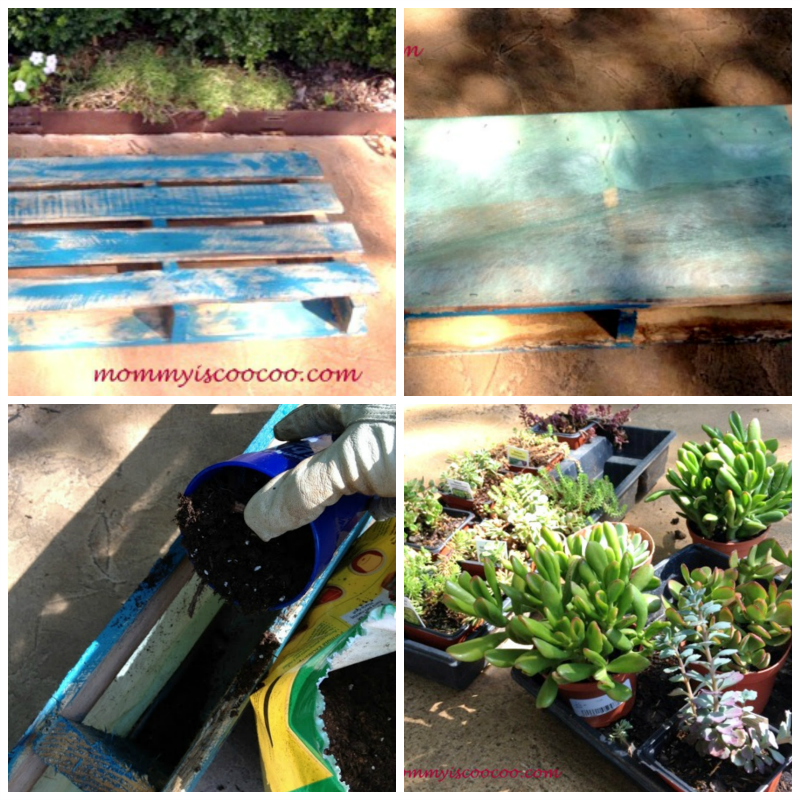
We will use Miracle Gro Moisture Control Potting Mix, ideal for container gardens – exclusive formula absorbs 33% more water than ordinary potting soil and protects against over and under watering! Which means…my project has an awesome chance of surviving! (Hellooooo, green thumb!) and the little ones will have a summer opportunity to take care of something they planted. Easy peasy!

Mr. DIY will control the BBQ tasks. Menu includes:

  • BBQ/smoked ribs
  • a vinegar-based coleslaw
  • dill/red potato potato salad
  • fresh brewed iced tea and mojitoes
  • raspberry/lemon trifle

For more gardening tips and information:

Check back to see how our chandelier planters turn out! Can’t wait to show you!

Visit Sponsor's Site

DIY Feature: Vertical-Pallet-Garden

Since finishing our wall mounted pallet project and we use a pallet as shelving in our faux mantel

diyshowoff-pallet-projects

and I have a few more wood pallets for DIY projects, I wanted to share this beautiful vertical pallet garden from Amanda at Mommy is CooCoo.

before:

pallet

vertical pallet garden tutorial here

vertical-pallet-garden-tutorial

after:

vertical-pallet-garden

Awesome, right? A beautiful garden feature! Love it! Now if the weather would cooperate around here, I’d be a copy cat!

Thanks so much for sharing, Amanda!

How to make a distressed chevron sign

I wanted something bold to add to our summer mantel and decided a large distressed wooden chevron garden sign was the perfect focal point. how to make a chevron sign

Materials:

  • scrap wood planks (I used two 1x4s and two 1x5s)
  • furring strip (cut into 2 pieces a little smaller than the width of my four 1x4s)
  • Gorilla wood glue
  • 3 colors of paint (I used acrylic craft paint in white, green and brown)
  • glaze (or watered down brown paint)
  • Frog Tape Delicate (I used the 1.41 in. wide)
  • vinyl stencil (I created mine using my Silhouette Cameo)
  • (2) saw tooth picture hangers

Tools:

  • Sander (or sanding block)
  • Paint brushes
  • Clamps
  • Saw

Distressed Chevron Sign Tutorial: 1. I cut my scrap wood planks to measure 32 inches each. cutting boards 2. Using Gorilla wood glue, I glued my planks together, clamped and let dry. glue and clamp boards 3. I glued two furring strips to the back for extra protection and added weights while they dried. You could also screw the furring strips into each plank.

4. Once all of the glue was dried, I sanded the edges of my boards. sanding edges of wood plank sign

5. Next I gave my sign a coat of white paint all over using a dry brush technique. dry brush white paint 6. Once the paint was dry, I chose FrogTape Delicate (for freshly painted surfaces) and created a chevron pattern. I used a small piece of the tape to create spaces. chevron Frogtape design FrogTape Delicate - chevron pattern 7. Once my FrogTape design was set, I rubbed down the edges and gave the untaped areas a coat of green paint. painting a chevron pattern 8. Then a coat of glaze, brushed on, wiped off. I love that it gives it a summer grass/garden dirt feel. glazing chevron sign 9. As soon as I finished applying the glaze, I removed my tape and let the sign dry.

10. I love having a Silhouette Cameo (affiliate link below for a great deal) because I can create my own custom vinyl stencils, decals or lettering as needed. I created an cut out a garden quote with my Cameo and using transfer paper, applied the stencil to my sign (I also saved the letters as stickers to make another sign). Silhouette Cameo vinyl stencil 11. Using my brown craft paint, I gave each letter a couple of coats of paint. painting stencil garden sign 12. As soon as I applied the last coat of paint to each letter, I removed my vinyl stencil and let the sign dry. chevron garden plank sign 13. Attach saw tooth picture hangers to the back and it’s all done! I love how it turned out. Just the right amount of bold for my summer mantel! garden chevron sign

{pallet shelving in faux mantel} garden sign A little inspiration for canning tomatoes this weekend… garden mantel Summer is just about over (but you’ll be seeing this sign show up somewhere else very soon) and I’ll be working on putting together my fall mantel. And guess where I’ll be sharing? At the Countdown to Fall party coming up soon! Time to get your autumn projects ready and join in the fun!

Countdown to Fall linky party

The DIY Fall Festival will also be starting soon! Get a head start on inspiration for your fall DIY projects from previous years’ DIY Fall Festival parties. DIY Fall Decorating, Recipes and Crafts

I received vinyl to share this tutorial and will receive a percentage of sales from this SILHOUETTE end of summer PROMOTION: This promotion runs from August 23 through the 31st. Using  the discount code “SHOWOFF” will get you a nearly $75 discount when you visit this affiliate link:http://www.silhouetteamerica.com/blog-vinyl-5.aspx. Plus, all vinyl will be 40% off when you use the “SHOWOFF” promo code.

This is a sponsored post brought to you by FrogTape. The opinions and instructions are completely based on my own experience. 

FrogTape Blog Squad