Project Diary #9: Carpeted Stairs

Featured

The #helloredreno series continues! The stairs at the studio needed some attention. We started with carpeted stairs and I knew that I wanted to go in the same direction. Choosing carpeting for the studio space from the entrance of the commercial area to the residual space upstairs makes a lot of sense.

My choice: Shaw Carpet Final Piece Coatbridge 
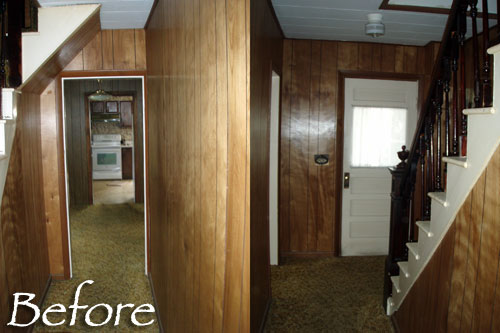
The before: 

A commercial grade glued down blue with no padding.

DIY craft studio // workshop - before room makeover @diyshowoff DIY craft studio // workshop - before room makeover @diyshowoff

At our house, our stairs are noisy and the painted risers show a lot of scuffs so while I don’t anticipate daily use of the stairs at the studio, I wanted to soften the vibe, cut down on the noise, and add warmth to the space. I also wanted something more neutral than the original blue as well as something that contributed to adding a beautiful statement to the area. 

DIY craft studio // workshop - before room makeover @diyshowoff

The landing will be the entrance to the future studio apartment. So I want something warm and inviting.

DIY craft studio // workshop - before room makeover @diyshowoff

My choice: 

As a member of the Shaw Styleboard, I had the opportunity to choose from their carpet collection. I wanted something neutral but with texture, something durable but pretty. Read the description: Warm up rooms and reduce energy bills with the natural insulation and comfort of carpet. With many styles to choose from and the best stain-fighting technology in the industry, Shaw carpet brings color, texture and value to your floors. Create distinctively stylish looks when you play with texture, loop, pattern and twist options.

Final Piece Coatbridge Shaw Carpet

Shaw Carpet Final Piece Coatbridge 

A perfect fit! I chose the color “coatbridge” from the “Final Piece” collection. It feels timeless and classic. I like to switch things up when it comes to design and decor so this option gives me the freedom to go any direction when it comes to decorating. It’s the perfect base palette and texture for any style. 

Installation: 

The same installer, Mike, who did worked with me on the Floorté vinyl floor planks in our home installed the carpeting. We had removed the former blue carpets to prepare for placing the new carpet.

The stairs before:

staircase before carpeting before and after carpeting stairs

The landing at the top of the stairs before:

stairs before

He set to work with the underlayment and prep work. Who knew that carpet padding is just as important as the carpet itself? I kind of assumed it wasn’t something really necessary but luscious, soft carpet padding minimizes noise, maximizes warmth and extends the life of your floor! I had no idea! 

shaw carpet padding

After: 

You guys! IT IS GORGEOUS! I am in love with my choice! The texture and pattern add interest to the space, without an overpowering or super trendy style. It’s the perfect base for whatever I choose to do with wall paint and decorative accessories. It’ll work when I change my mind and swap out decor. It’ll work with seasonal decorating colors. It’s warm and inviting.

The stairs: 

Shaw Carpets Final Piece Coatbridge Shaw Carpets Final Piece Coatbridge stairs

Shaw Final Piece Coatbridge carpet meets SanFrancisco hexagon tile

carpet tile transitionShaw Final Piece Coatbridge carpet San Francisco

The landing at the top of the stairs: 

stair landing Shaw Carpets Final Piece Coatbridge staircasestair landing Shaw Carpets Final Piece Coatbridge

Shaw Final Piece Coatbridge carpet meets Monterrey Grandview rustic wide plank hardwood floors.

Shaw Final Piece Coatbridge carpet Grandview Monterey hardwood


And that padding? Luxurious! Seriously. I don’t think I’d need an air mattress if I decided to camp out in this space! It’s that cushioned! Slumber party, anyone? Oh! And ever accidentally bounce down the stairs on your back side? This makes for a better ride and less painful experience. lol

More decisions: 

I cannot wait to get started with decorating and to call this area complete. I’m still deciding how to finish it. Options:  

  • To make it an entry space for the apartment with a bench, shoe storage, coat hooks, plants and a side table. (The apartment will not have a full time tenant. It’s for overnight/short term guests.)
  • To furnish it with a small writing desk in front of the window, book shelves on either side, plants, a lamp, curtains, a comfy chair, fun wallpaper on the back wall. 
  • To suspend some swinging chairs or a bamboo-type porch swing, fun wallpaper, a coffee table, plants. 
  • A small conversational area with a love seat or two comfy chairs.
  • A window seat and comfy reading nook, plants, diffuser, book cases. 

So many options. I’m all set with a beautiful blank slate, gorgeous cushion-y textured patterned floor that I love! I’m leaning towards the window seat and a hanging chair with a shelf for plants and a small accent table for a cup of tea or a good book…a little escape and restful spot for meditation with the vibe of a private porch area only indoor and then creating a small entry area inside of the apartment right inside the door instead. What do you think? What would feel more welcoming to you as a guest? 

As we keep checking projects off of the ‘to-do’ list, I’m getting so excited for fun parts – decorating and furnishing! I can’t wait!

Next up on the remodel:

Clean up the railing and banister, paint, baseboards, installing doors, light fixtures, fun feature wall, possibly creating a kitchenette then furnishing, decorating and then the reveal! Then moving in! Okay, not that last part but I do plan to extend the invitation and welcome you to visit! 

The building has so much historical charm. It’s about one block from our town’s Main Street. The bus stop is literally steps away. There are breweries, the YMCA, shops, restaurants, salons, florists, candy/coffee shop, holiday parades and festivals within walking distance. So fun! If renovation from blah to ahhhhh is your thing, stay tuned!

So subscribe and be reminded of updates as the renovations progress! I’ll share before and after photos, projects underway and updates, plans and design boards, sources and links as they relate as well as fun events going on in and around the downtown area. I’ll be using a specific hashtag on social media to keep things all neat and tidy and organized.

#helloredreno

I welcome your thoughts and ideas! And as always, thanks for your encouragement and support and for sharing in my joy and vision! Watch for #helloredreno!

DIY Ombre Balusters

Ever think about those boring stair balusters?

Martha Stewart

Meet: Angie from

Angie's Roost

Angie and her husband bought a 100+ year old home in desperate need of some love and blog about the misadventures in DIY home improvement.  Angie’s project was the Pinterest-Martha-Stewart-inspired image above and here is her DIY result:

Gorgeous! When Angie first started this project, she hadn’t intended to use the same blue color scheme as in the Martha Pin-spiration photo but after color searching, a blue palette was the obvious choice for a home filled with many blues and sea foamy colors.

Her pictures are just as inspiring. But Angie does warn: this project is HARD for her 100+ year old, un-square, un-level home.

First step, choosing the colors:

Angie’s tips for choosing colors: So many blues! I’m addicted to the Valspar color options at Lowes, so I started the color selection process by selecting one section of the blues and bringing home ALL the chips in that section. I then chopped them up so I could “play paint chips”. And I played, and I played and I played some more. I originally thought I wanted to choose 16 different colors, one color for each of our balusters. But choosing 16 blues and putting them in ombre order proved way too difficult. Choosing 8 colors was hard enough. In the end, I chose two sets of three chips (you know…the paint chips come with 3 different colors on them with their own little ombre-ness to them). Then I just found two more colors, one really dark one and one really light one, to round out the field of 8.

It doesn’t take much paint. Paint samples (Valspar $2.94/each) are perfect for this project.

Angie didn’t want brush strokes to show up on the finish and used 1″ foam brushes to apply the paint. Three coats each.

So pretty! Next step was installation. The balusters did get a little scuffed up by the table saw and during installation, but it is far easier to touch up a little paint here and there afterwards than to paint them in their entirety after installing.

Before:

Amazing after:

The balusters are a great complement to DIY ski map art and pictures on the entry gallery wall.

Again, before (old homes have so much character but they generally do look like this at one point in their history)…

And the beautiful, fresh and light after…


Want to see more DIY (home + wedding) from Angie? Pop over, introduce yourself and take a look around at Angie’s Roost.
DIY Show Off - FacebookDIY Show Off - TwitterDIY Show Off - PinterestDIY Show Off - Feed


Cottages & Bungalows Magazine Feature!

I was super excited when my stairwell/landing makeover… stairwell makeover

{see the full stairwell/landing transformation here}

won this back in January/February:

DIY Talent Scouting Party

Wahooo! I was so touched when you shared my excitement and excuse my beaming with pride and sharing today. It’s a “my highlight of the year” type of experience and the June issue is out!

I’ve “e-known” Amy from WhisperWood Cottage for several years. She is such a sweet blog friend and super talented (have you seen her beautiful home filled with gorgeous flea market finds and amazing DIY decor?). Once the announcement was made and I stopped screaming, I got to “talk” with Jickie (awesome!) who interviewed me/asked questions about my project and wrote up my article while I submitted my pictures. See my name?!! SO exciting!

DIY Show Off in Cottages & Bungalows Magazine

(Tip: Always, always keep the large original format of your photos and edit/resize a copy for blogging just for this reason. Pictures for print require a larger size. Images on your blog should be resized smaller for speed with loading/storage reasons.)

My stairwell wants to show off…looky!

Cottages & Bungalows Magazine - DIY Show Off

Periodic party themes for upcoming issues of Cottages & Bungalows Magazine will be announced at WhisperWood Cottage. Bloggers (that’s YOU!) can link up projects that relate to that theme during the availability period. After the availability period ends, a list of top contenders for the magazine feature will be announced. From the top contenders, a final project will be selected as the winner of an upcoming feature in Cottages & Bungalows Magazine. You can pop over to WhisperWood Cottage now to see the “All Things Kitchen” contenders. Congratulations to those talented blog friends and their creative projects!

Mark your calender and think ahead! The theme for July will be Halloween/Fall!

Knowing that my blog friends will be featured in Cottages & Bungalows in the future meant I couldn’t subscribe fast enough. Donna from Funky Junk Interiors and Rita from This (sorta) Old Life are next and trust me, you don’t want to wait for it to be on the shelf in stores. It’s hard to find and you’ll have to wait.

DIY Show Off in Cottages & Bungalows Magazine

Thanks to Amy for hosting the fun Talent Scout Party ~ a great source of inspiration too when browsing the party with so many creative real ideas. Thanks to Cottages & Bungalows for the super awesome 2 page feature! And thanks to YOU for sharing the love of DIY, visiting me, letting me share this with you, thanks for encouraging me! I hope to see YOU featured!

DIY Show Off - FacebookDIY Show Off - TwitterDIY Show Off - PinterestDIY Show Off - Feed