Faux Beam: home makeover progress!

It’s been a while since I shared an update of the progress going on at mom’s house. It’s still a work in progress but wait until you see how far along things are coming, especially since their current home sold in less than 24 hours of being on the market. TIME TO HUSTLE! Disclosure: We received product in exchange for this review. Take a look! 

Before: Before and after home improvement project - ceiling with a gorgeous faux beam @diyshowoff Before and after home improvement project - ceiling with a gorgeous faux beam @diyshowoff Before and after home improvement project - ceiling with a gorgeous faux beam @diyshowoff Before and after home improvement project - ceiling with a gorgeous faux beam @diyshowoff Before and after home improvement project - ceiling with a gorgeous faux beam @diyshowoff

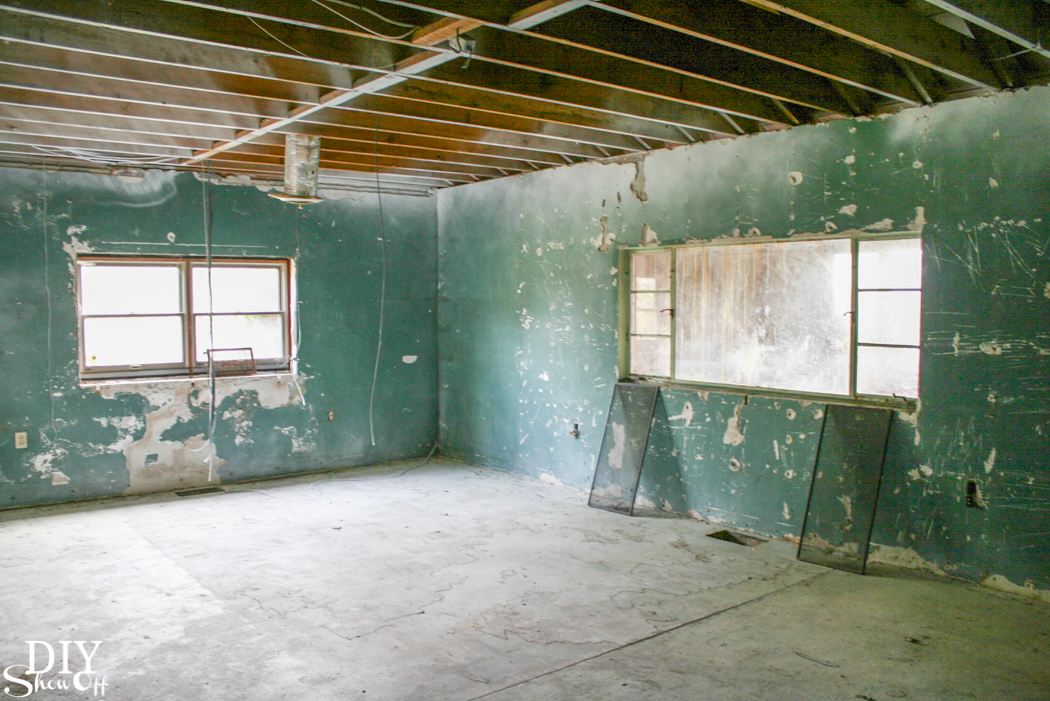
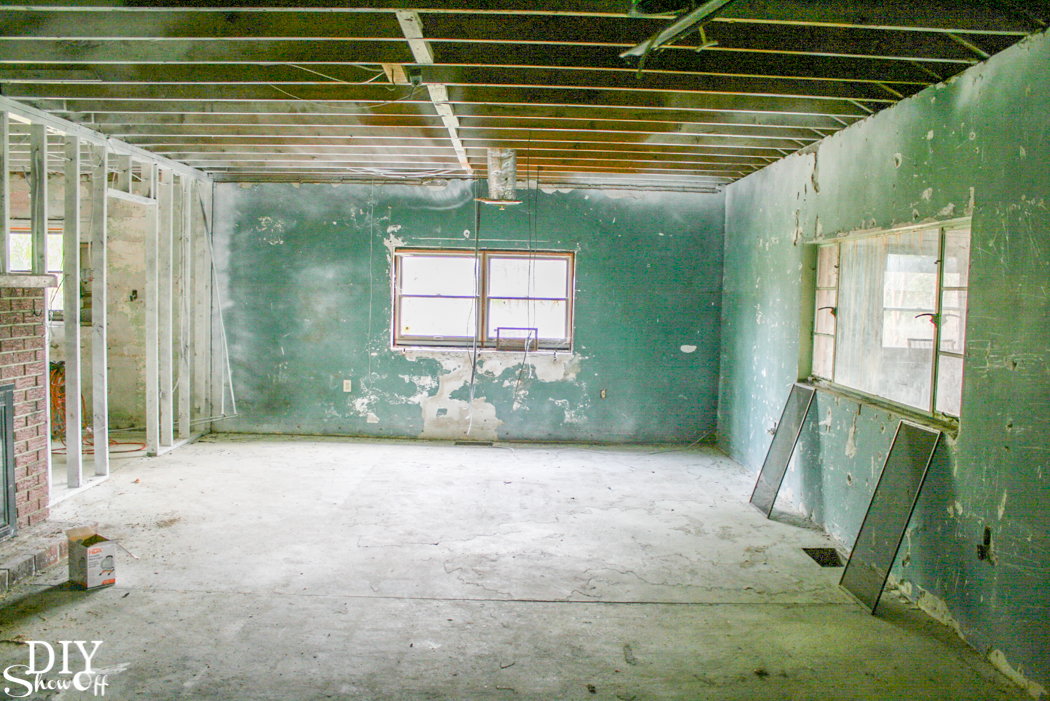
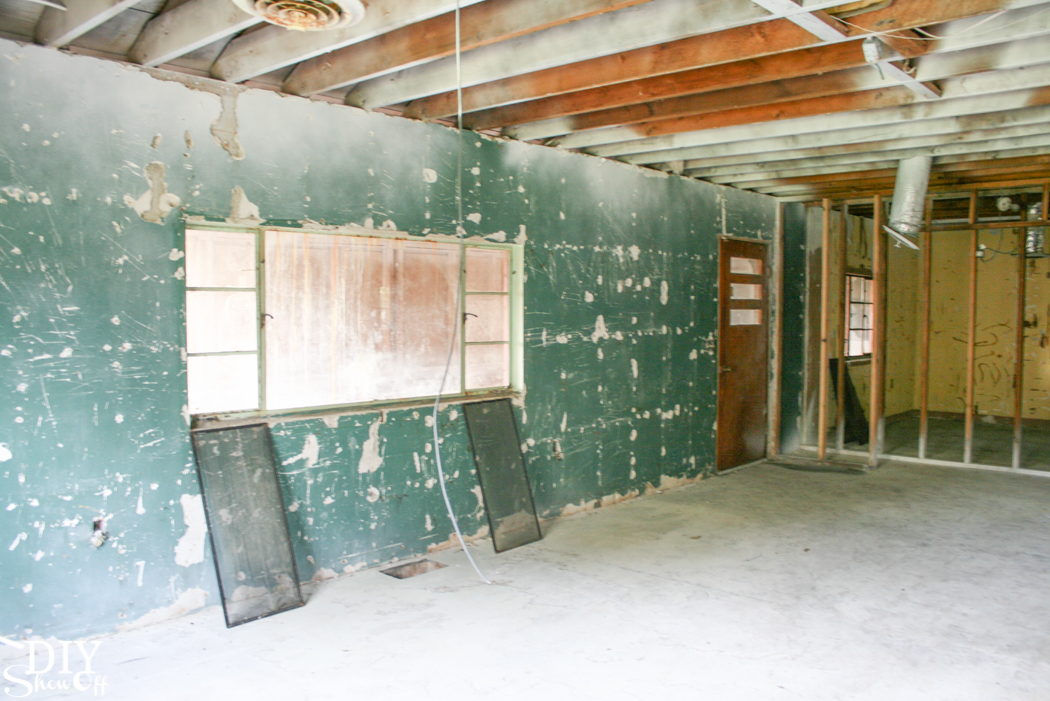
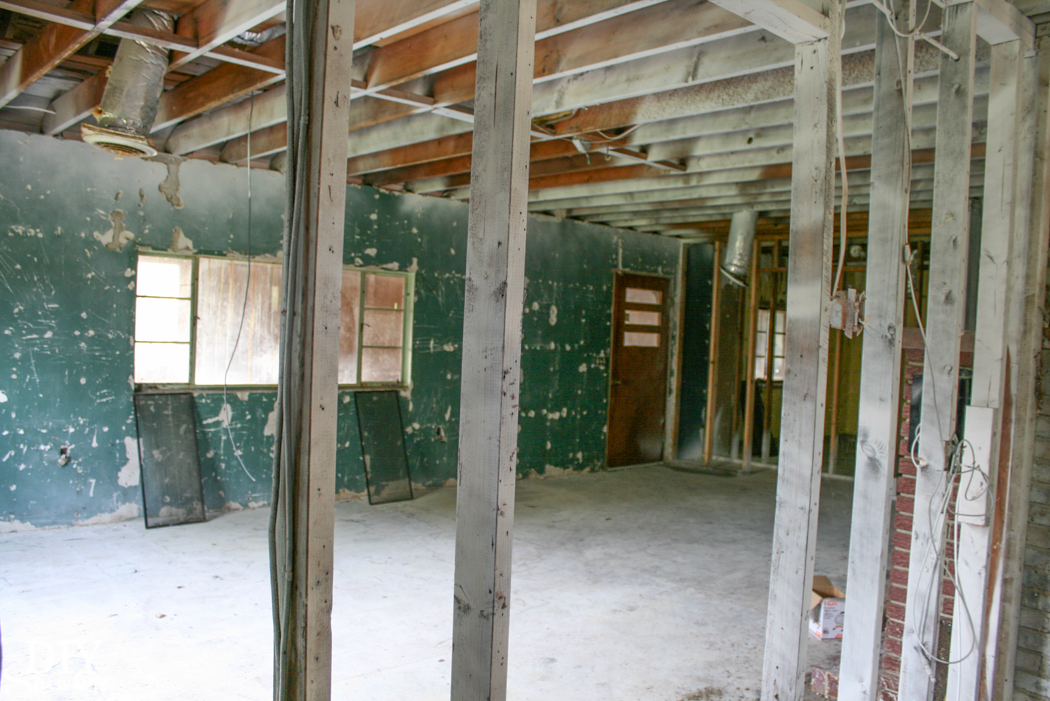
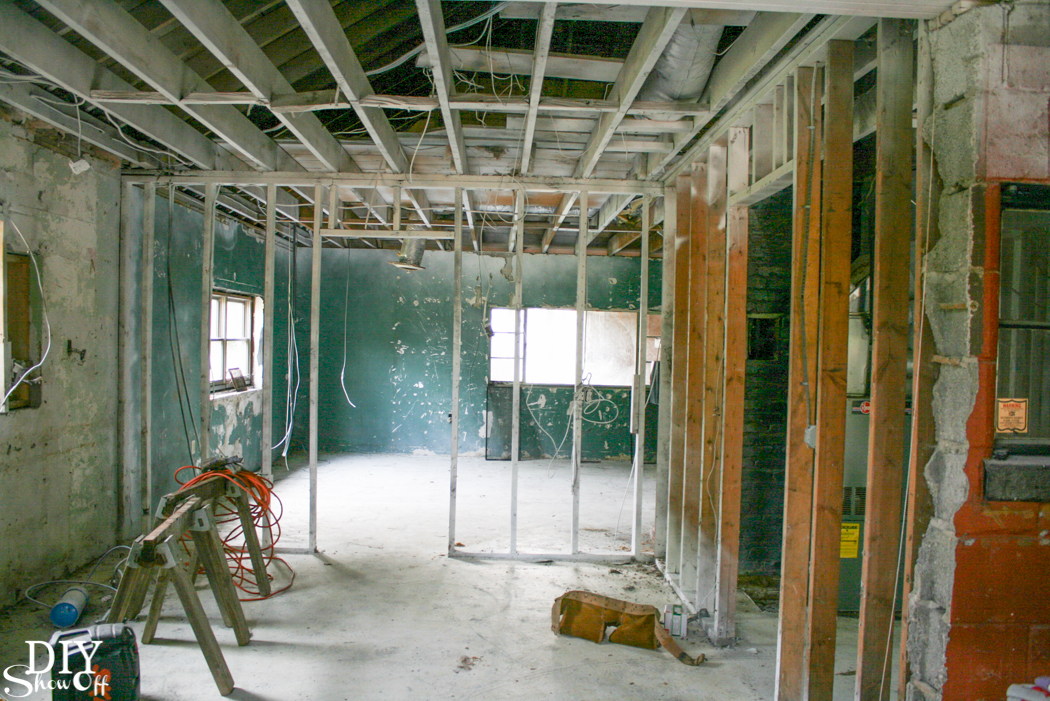
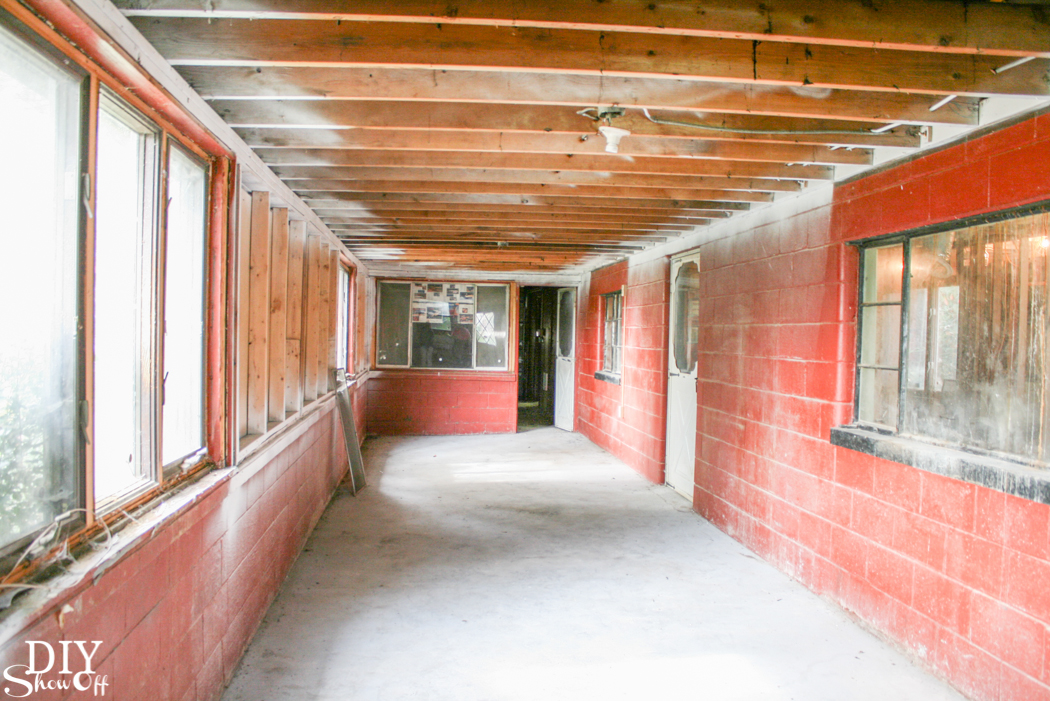
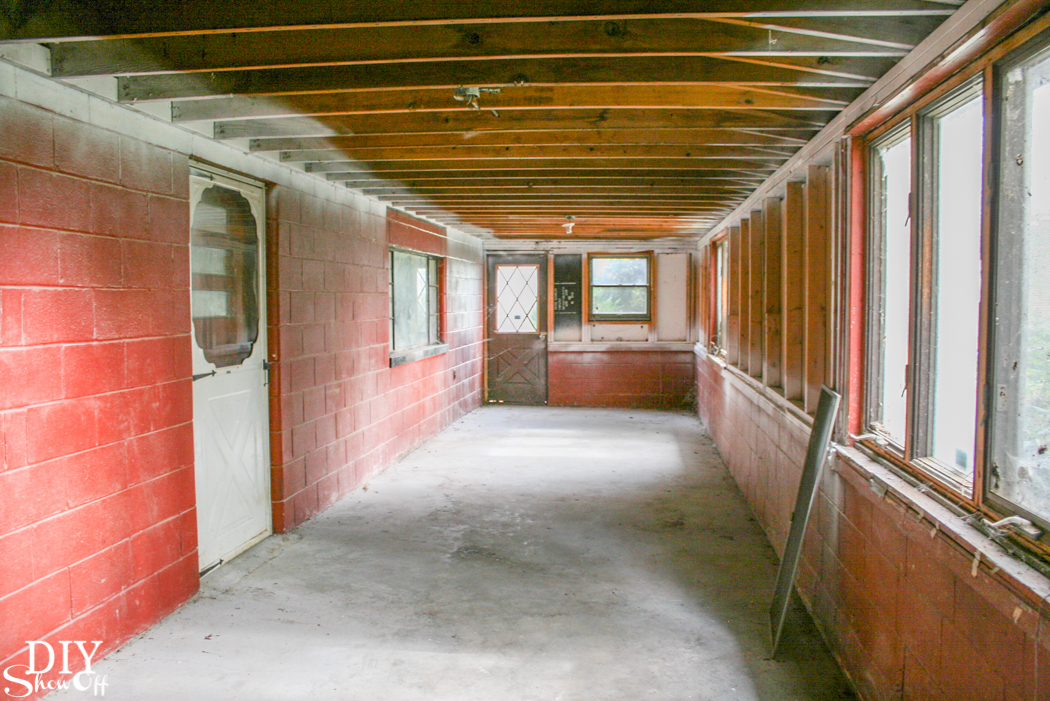
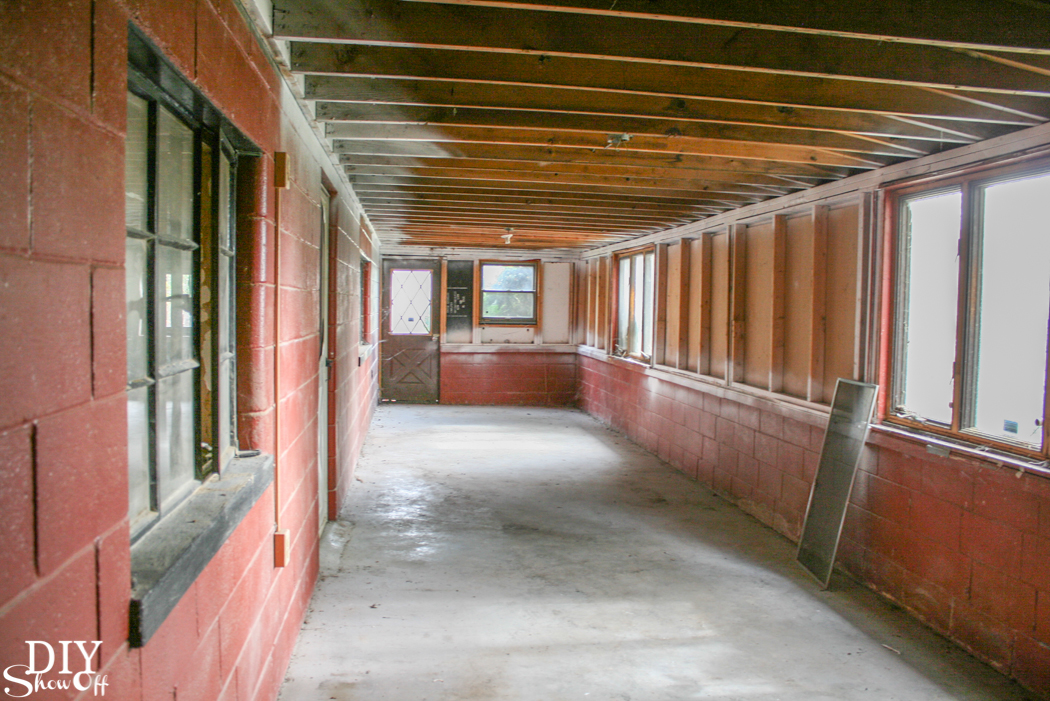
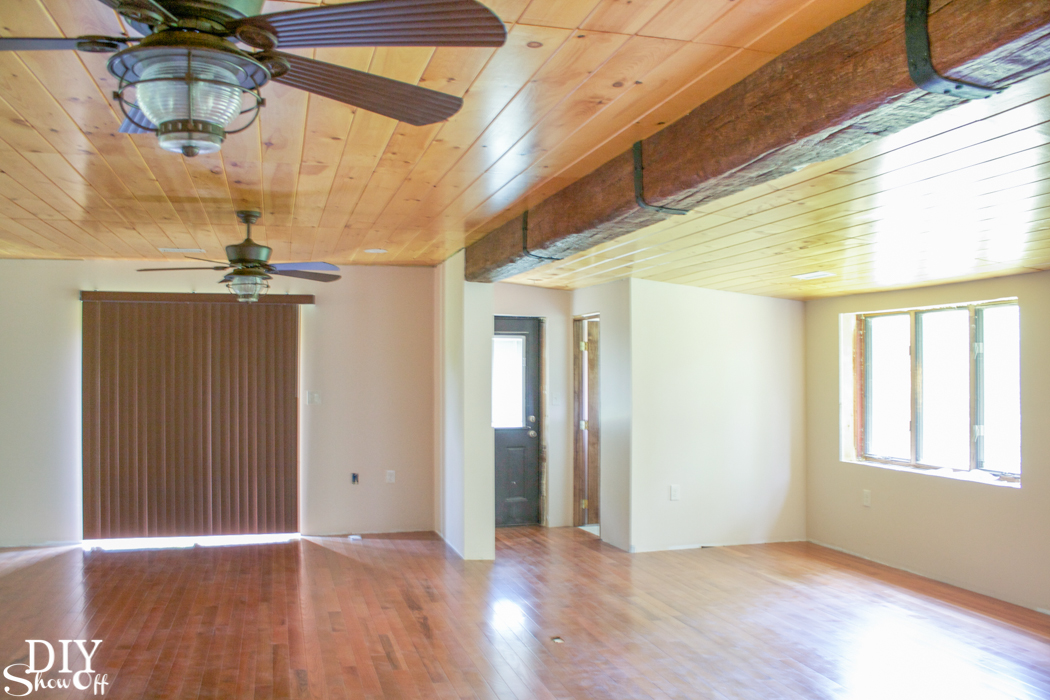
The living room before was narrow with a outside concrete wall separating what may have been a sun porch. See the green wall above? That’s the living room area and where it ends. See the red room below? That’s the sun porch(?) on the other side…

Before and after home improvement project - ceiling with a gorgeous faux beam @diyshowoff Before and after home improvement project - ceiling with a gorgeous faux beam @diyshowoff Before and after home improvement project - ceiling with a gorgeous faux beam @diyshowoff

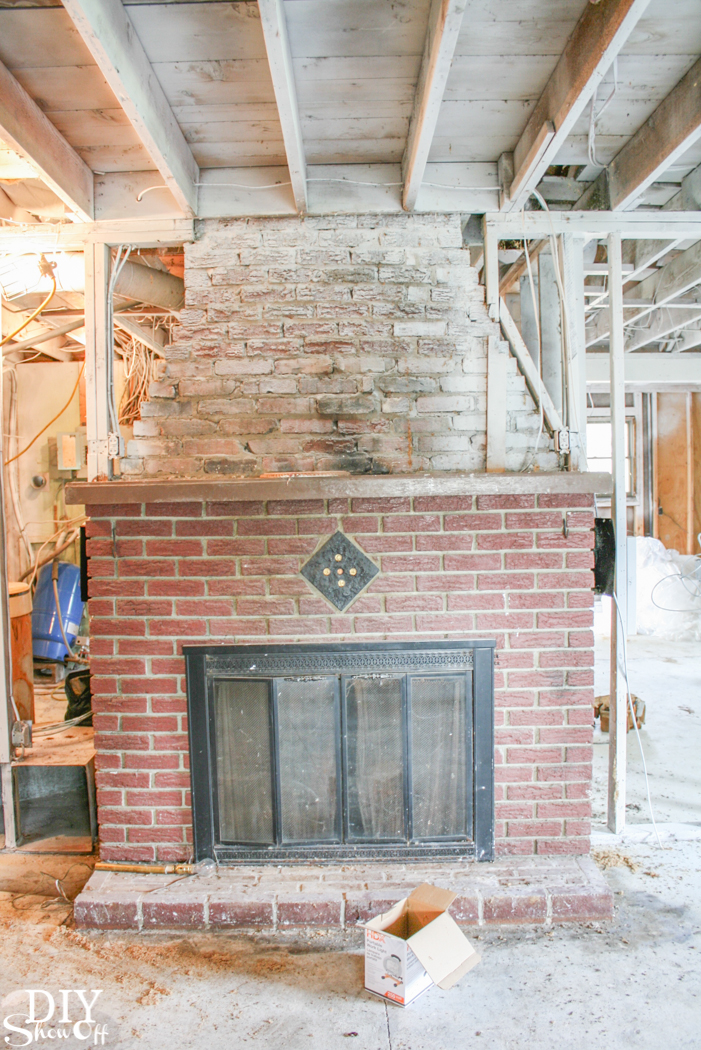
and the fireplace wall before…

Before and after home improvement project - ceiling with a gorgeous faux beam @diyshowoff Before and after home improvement project - ceiling with a gorgeous faux beam @diyshowoff

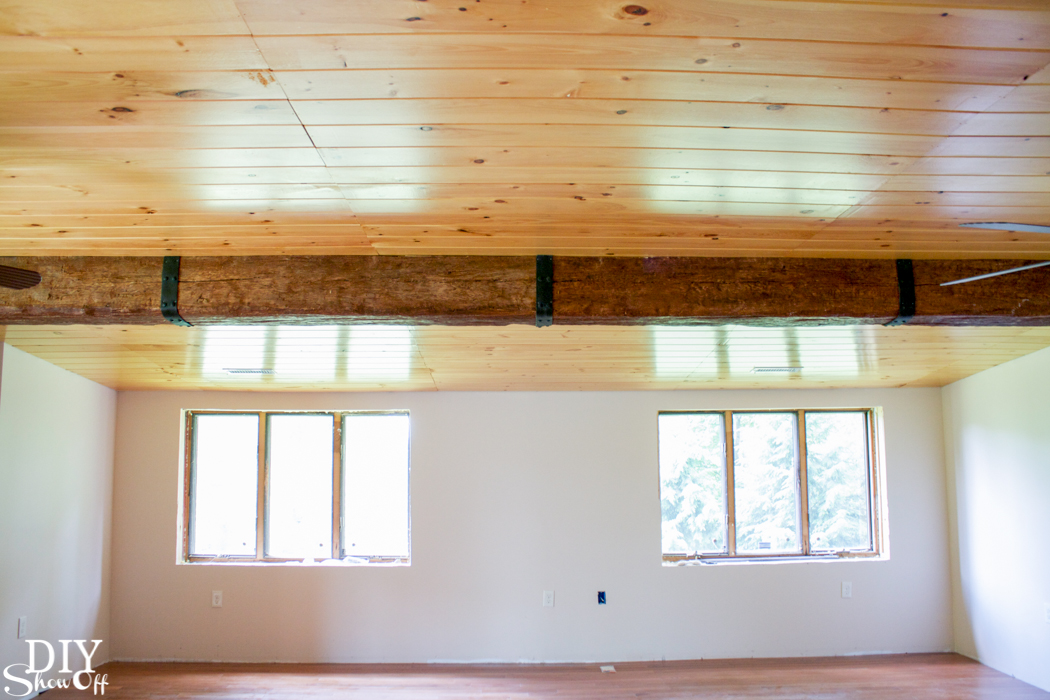
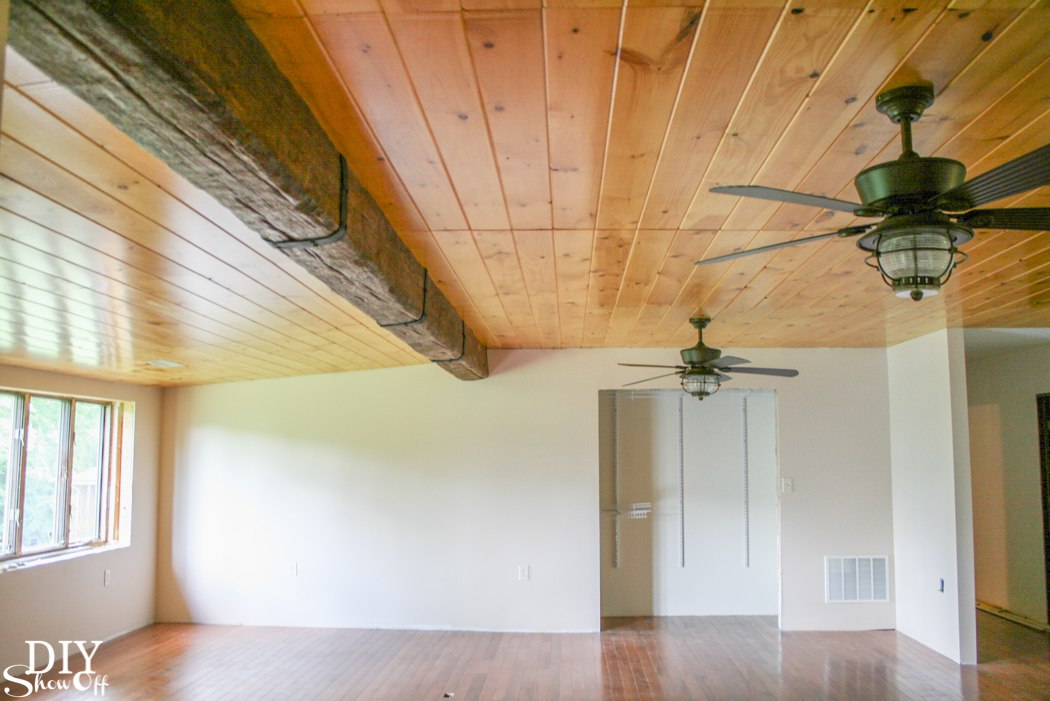
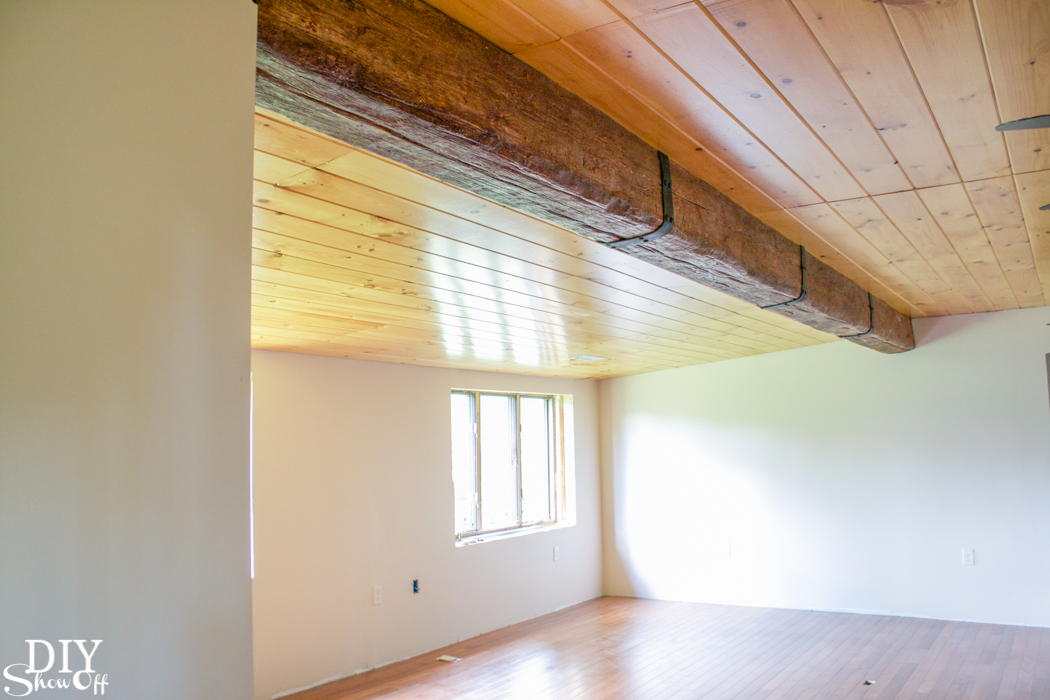
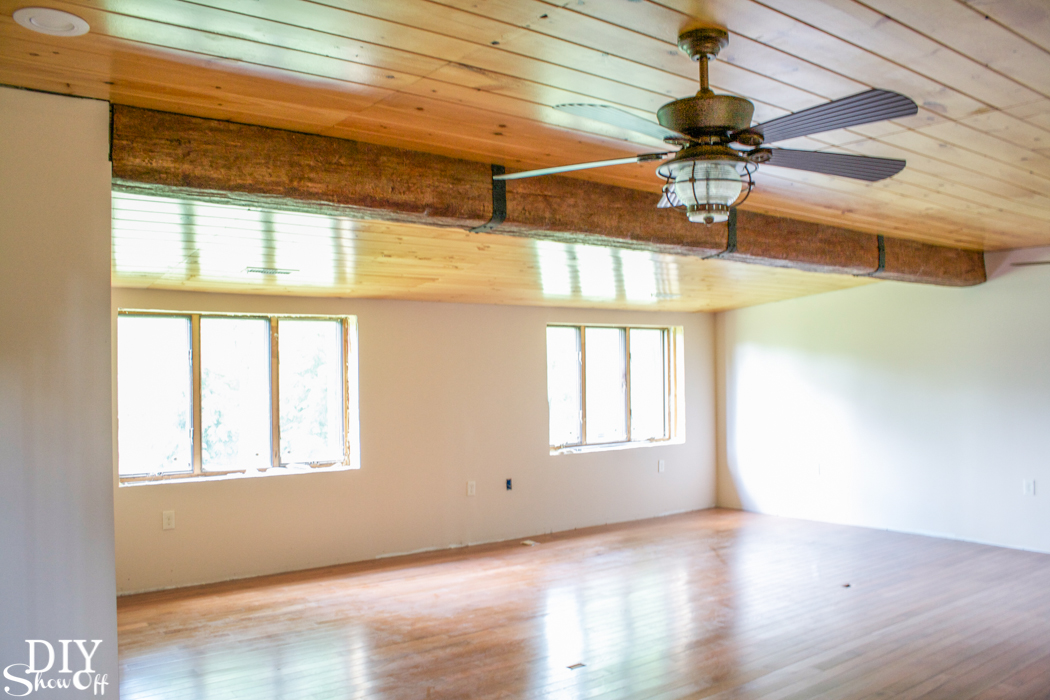
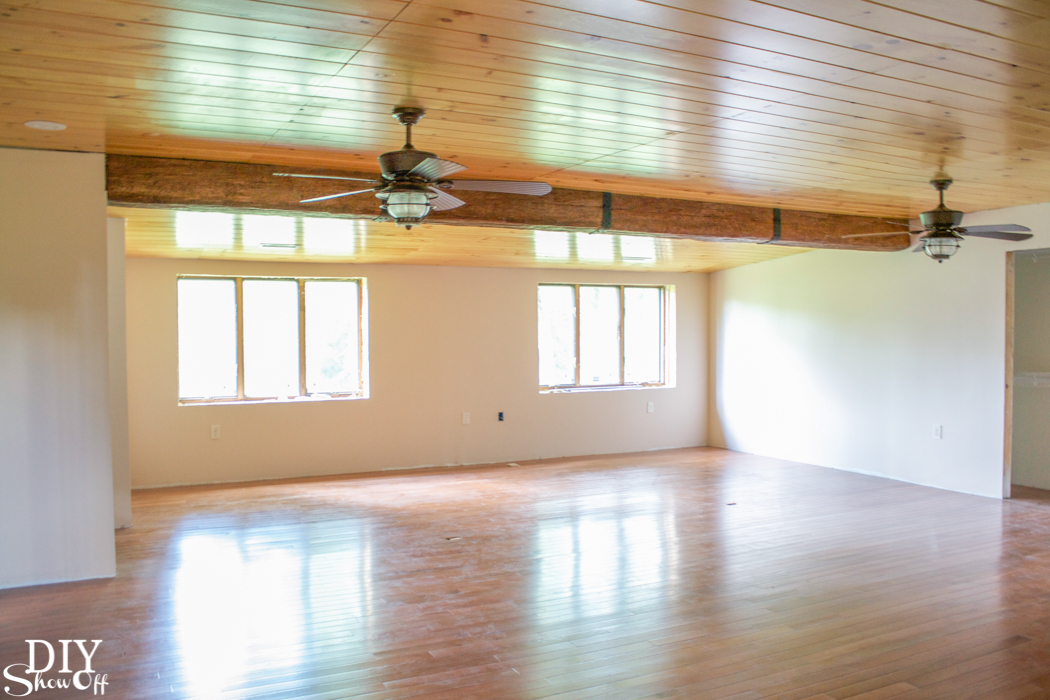
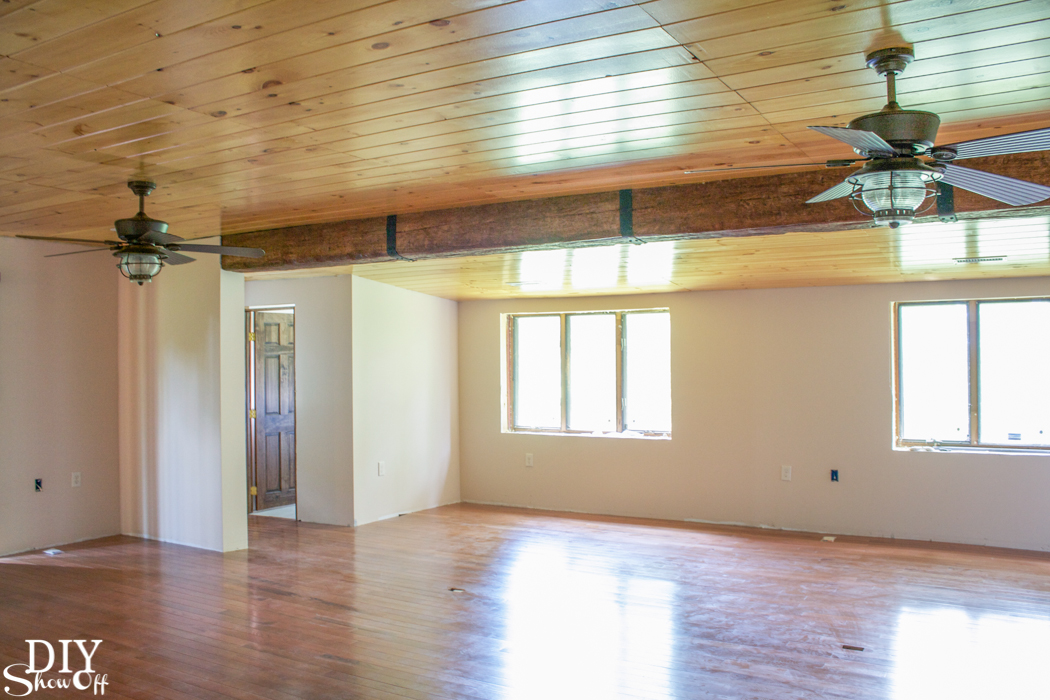
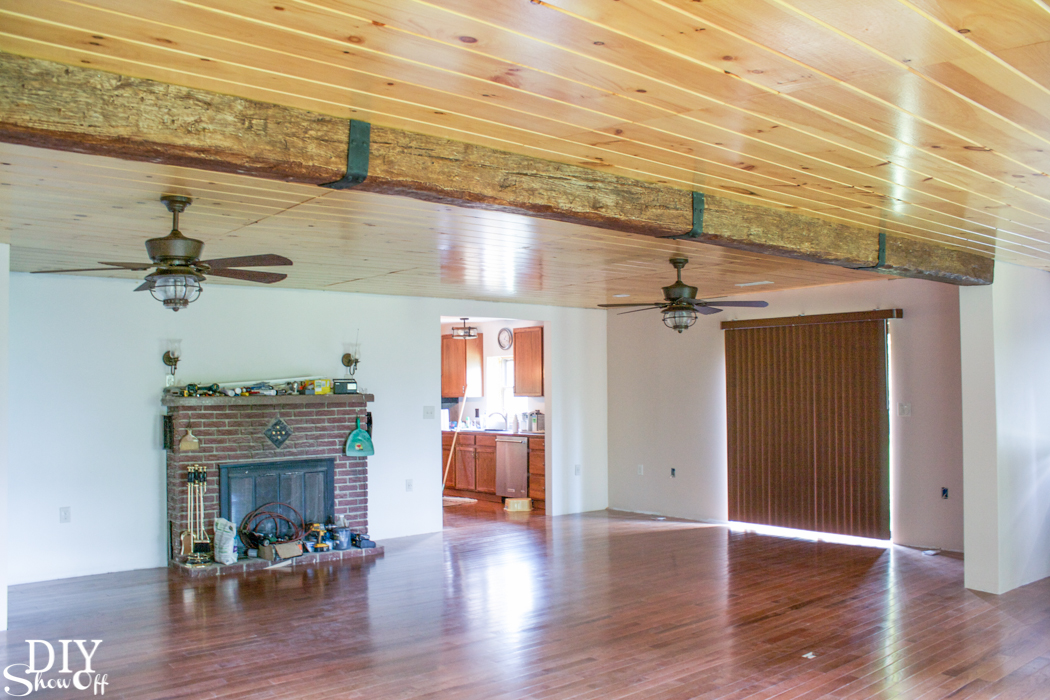
After…To make the living room space larger to accommodate our family gatherings, the concrete wall was removed. I love how the space is now flooded with light with the concrete wall gone, new drywall in place, a wood-planked ceiling in progress and the installation of sliding glass doors. 

Before and after home improvement project - ceiling with a gorgeous faux beam @diyshowoff Before and after home improvement project - ceiling with a gorgeous faux beam @diyshowoff Before and after home improvement project - ceiling with a gorgeous faux beam @diyshowoff Before and after home improvement project - ceiling with a gorgeous faux beam @diyshowoff

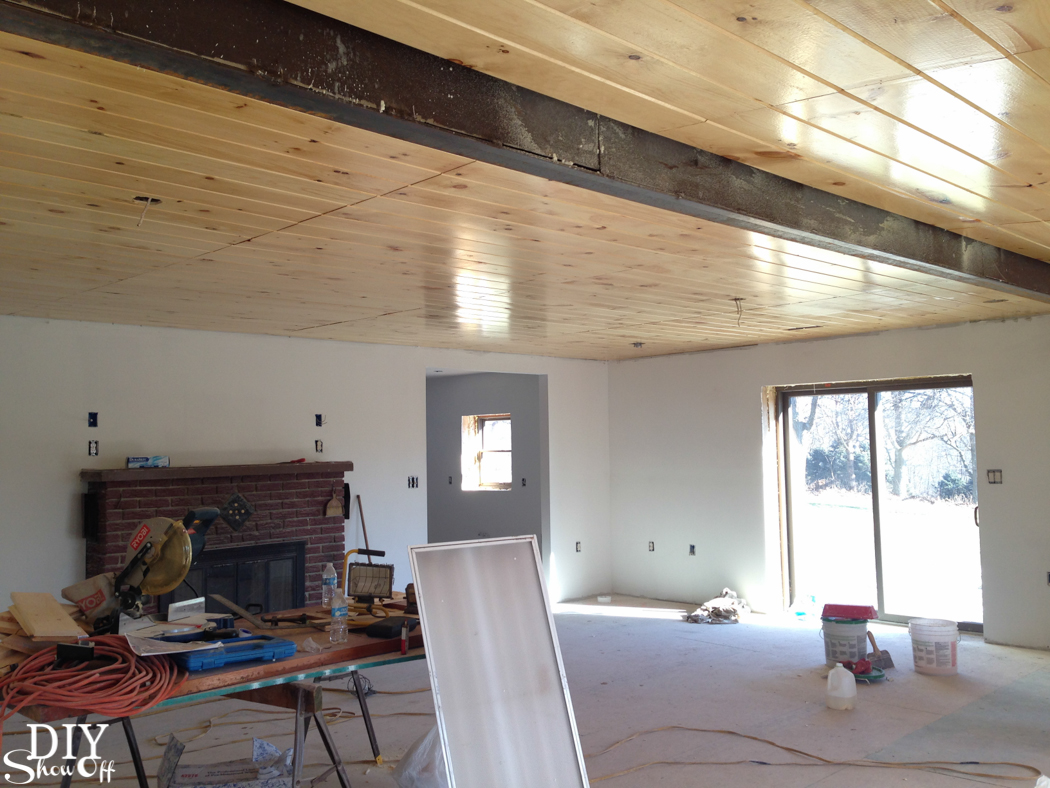
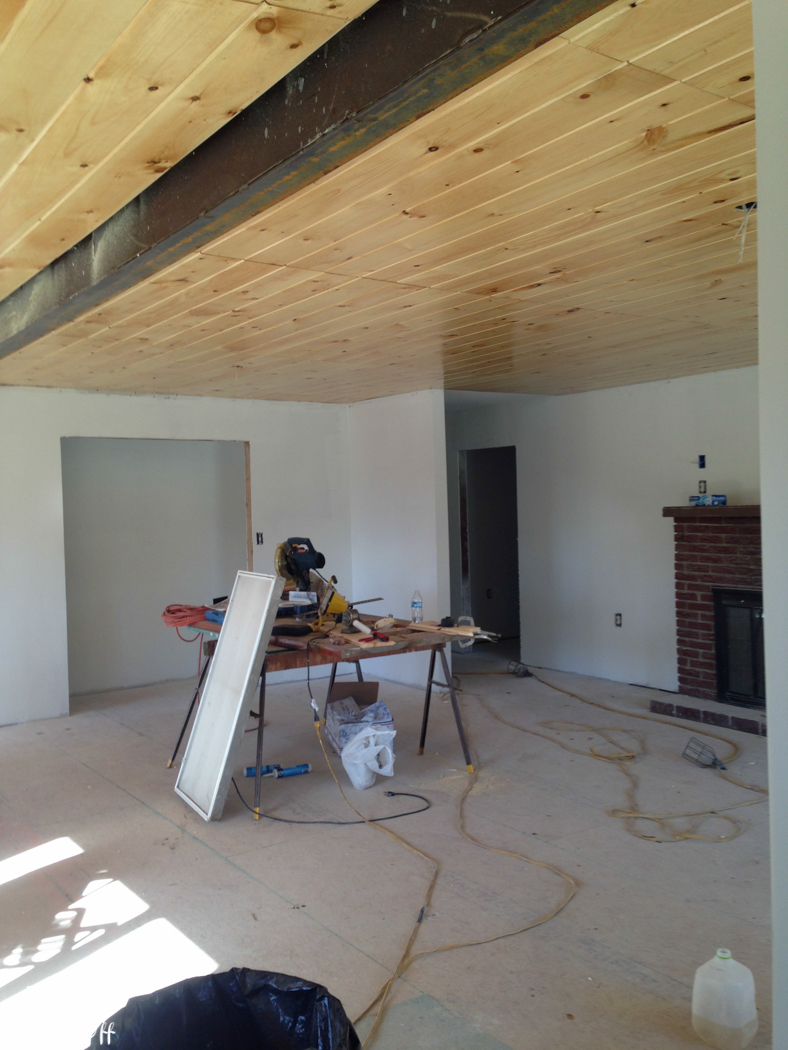
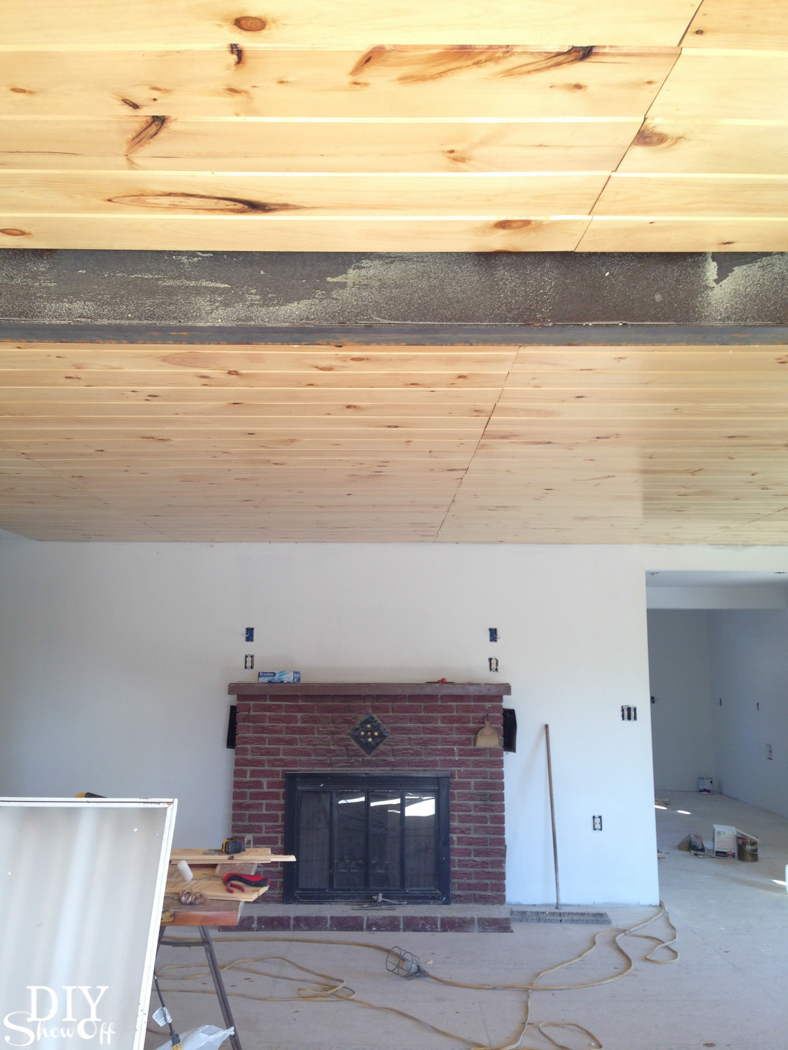
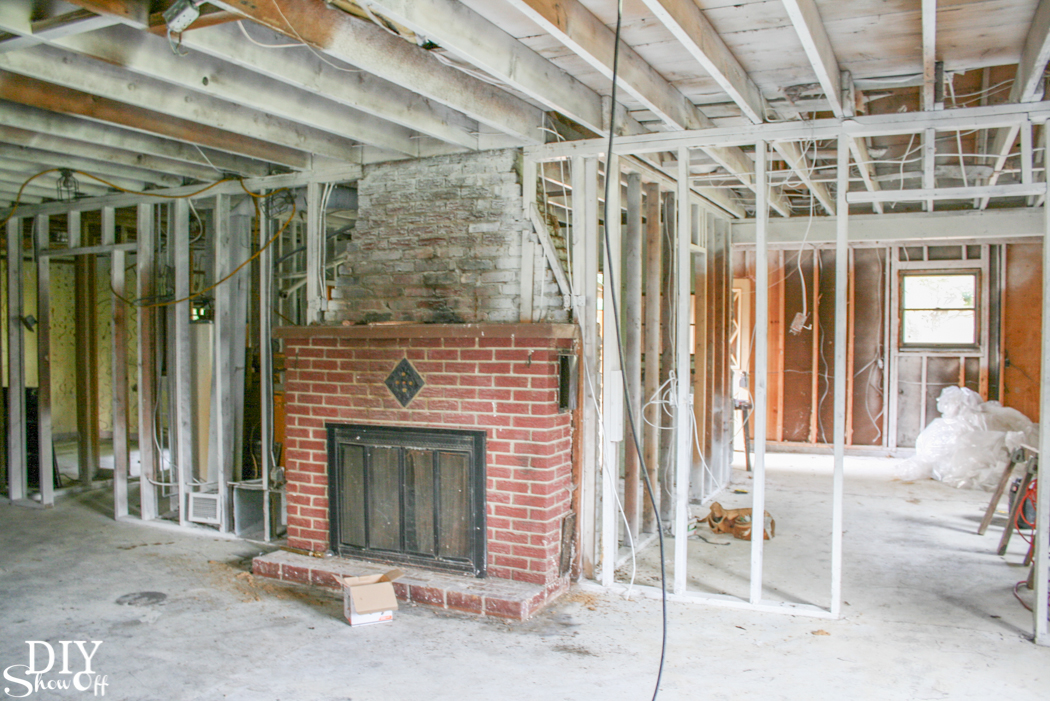
But now there’s an eye sore on the ceiling. There’s no missing that big steel beam in the photos above.

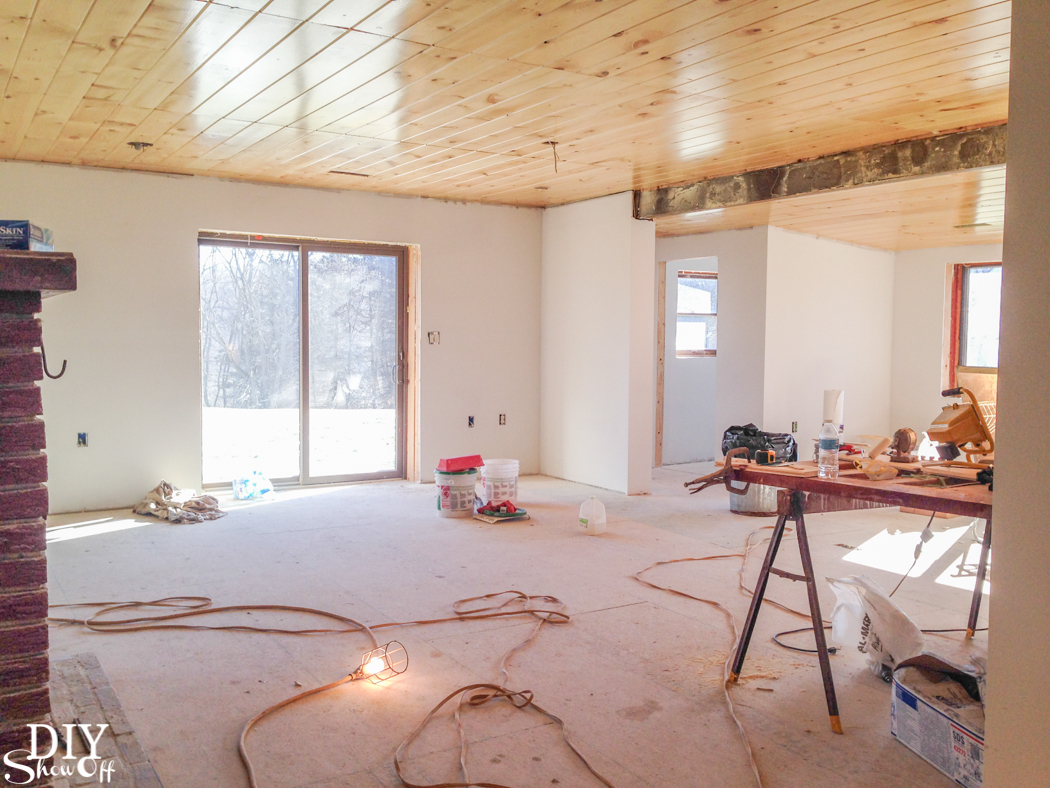
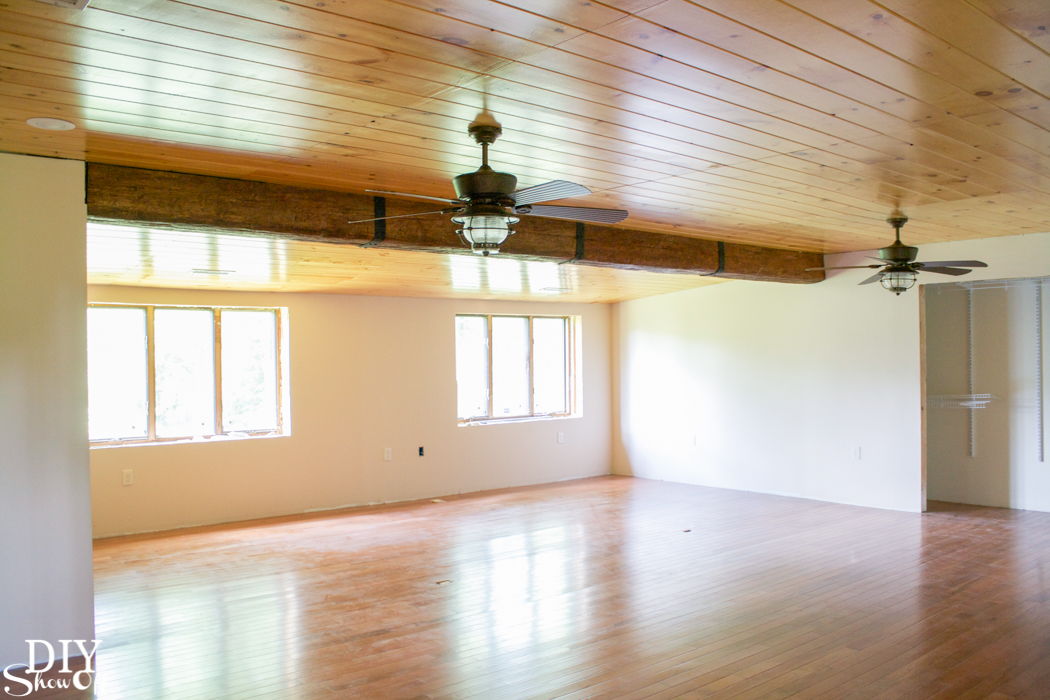
And now there’s not…WOW!

Before and after home improvement project - ceiling with a gorgeous faux beam @diyshowoff Before and after home improvement project - ceiling with a gorgeous faux beam @diyshowoff Before and after home improvement project - ceiling with a gorgeous faux beam @diyshowoff Before and after home improvement project - ceiling with a gorgeous faux beam @diyshowoff

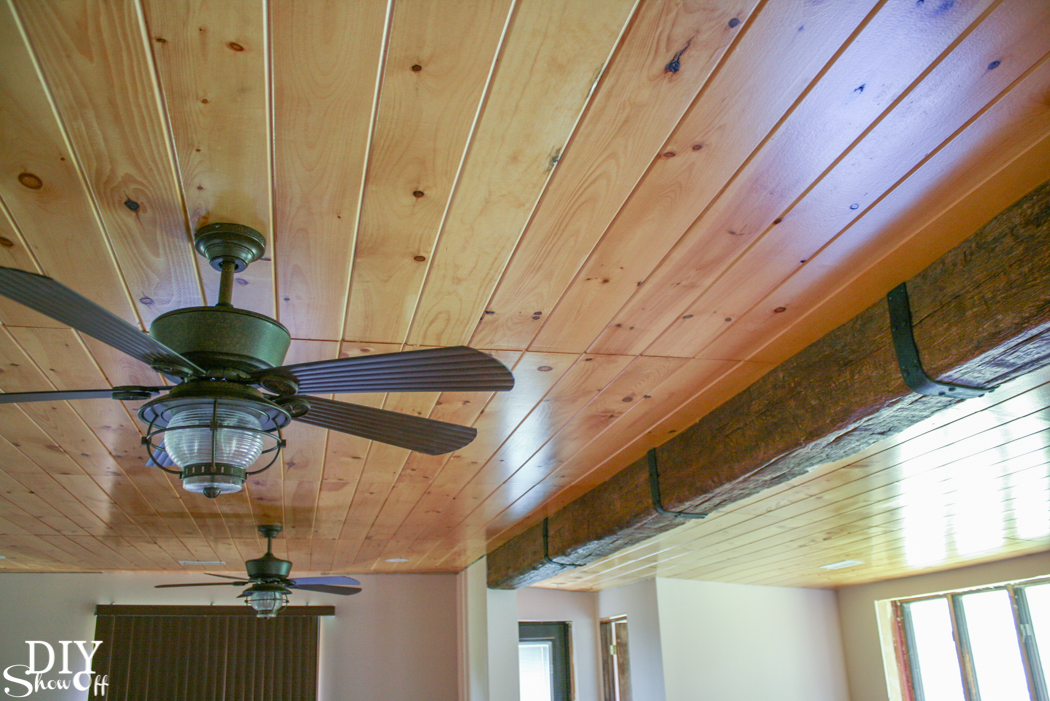
…it’s a gorgeous rustic wood beam with iron accents. Right? 

Before and after home improvement project - ceiling with a gorgeous faux beam @diyshowoff Before and after home improvement project - ceiling with a gorgeous faux beam @diyshowoff Before and after home improvement project - ceiling with a gorgeous faux beam @diyshowoff Before and after home improvement project - ceiling with a gorgeous faux beam @diyshowoff Before and after home improvement project - ceiling with a gorgeous faux beam @diyshowoff Before and after home improvement project - ceiling with a gorgeous faux beam @diyshowoff Before and after home improvement project - ceiling with a gorgeous faux beam @diyshowoff Before and after home improvement project - ceiling with a gorgeous faux beam @diyshowoff Before and after home improvement project - ceiling with a gorgeous faux beam @diyshowoff

That’d be quite labor intensive not to mention expensive. Want to know a secret?

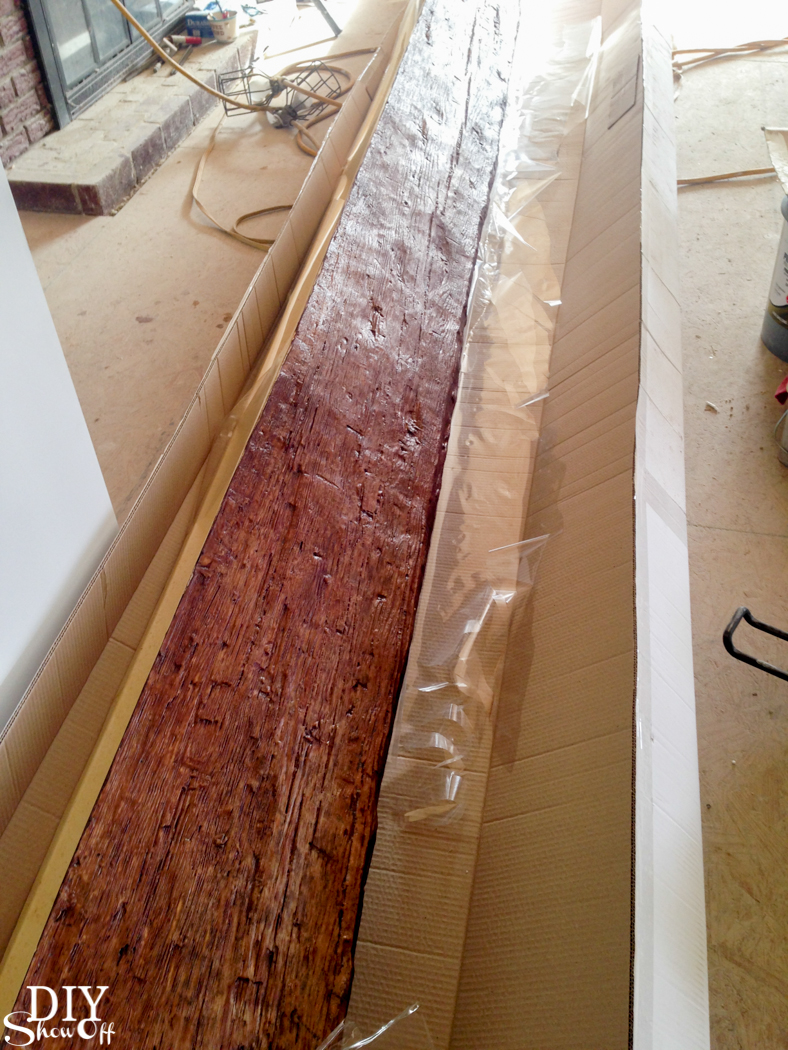
We received this amazing product from AZ Faux Beams. It’s a faux beam! “Old Timber” in ‘walnut’ to be exact. It’s lightweight and fake but looks SO real! And it’s stunning! 

Before and after home improvement project - ceiling with a gorgeous faux beam @diyshowoff

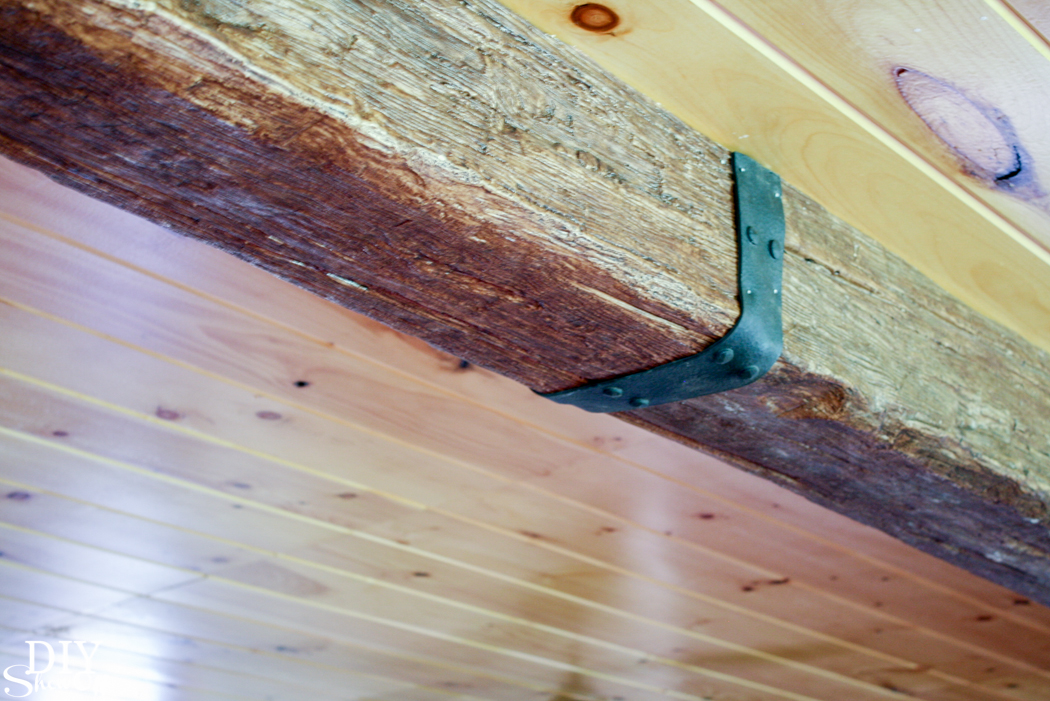
What it is: A hollow lightweight resin with a rustic wood look! What?! No way! Yes. It really is! 

Before and after home improvement project - ceiling with a gorgeous faux beam @diyshowoff Before and after home improvement project - ceiling with a gorgeous faux beam @diyshowoff

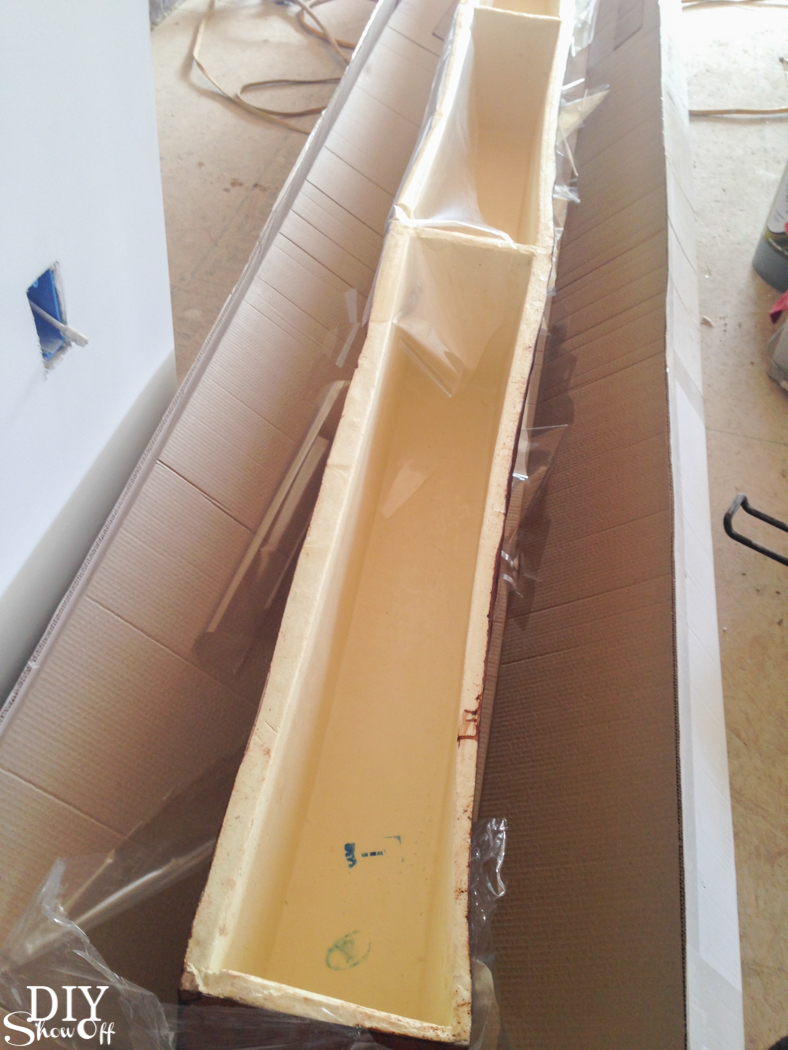
What we did. And by we, I mean my mom and I did the measurements, design/color selection and ordering. Butch and my brother Christopher did the manual labor involved with installation. Oh, we supervised too. 

  1. Measurements. 
  2. Order.
  3. Cut to size, shave inside down if needed.
  4. Install.
  5. Secure.
  6. Caulk and add decorative trim. 

Isn’t it gorgeous? It draws your eye to their pretty planked ceiling and compliments the beautiful rustic ceiling fans. Check out AZ Faux Beams to see all of the options! Let’s take a look at repeat before and after shots: 

“Before” (two spaces separated by a concrete wall)

Before and after home improvement project - ceiling with a gorgeous faux beam @diyshowoff Before and after home improvement project - ceiling with a gorgeous faux beam @diyshowoff

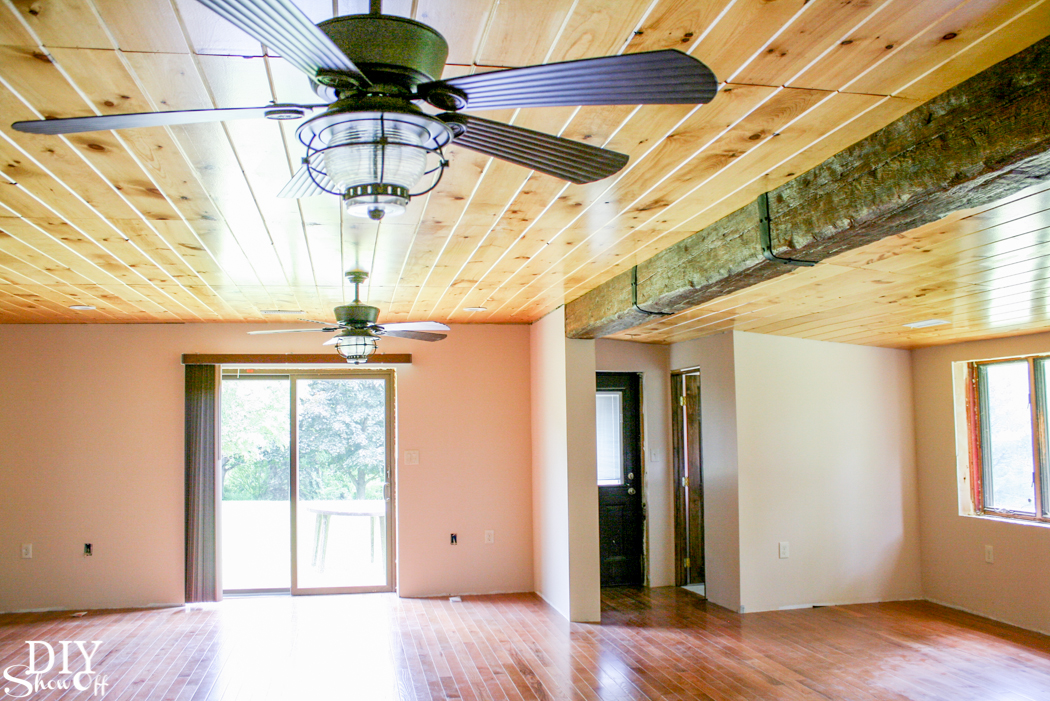
Same angle “After” (wall is gone and there is an addition of a half bathroom on the right…for guests and quick access once the swimming pool is installed outside those sliding glass doors).

Before and after home improvement project - ceiling with a gorgeous faux beam @diyshowoff

before…

Before and after home improvement project - ceiling with a gorgeous faux beam @diyshowoff

after (wall removed)

Before and after home improvement project - ceiling with a gorgeous faux beam @diyshowoff

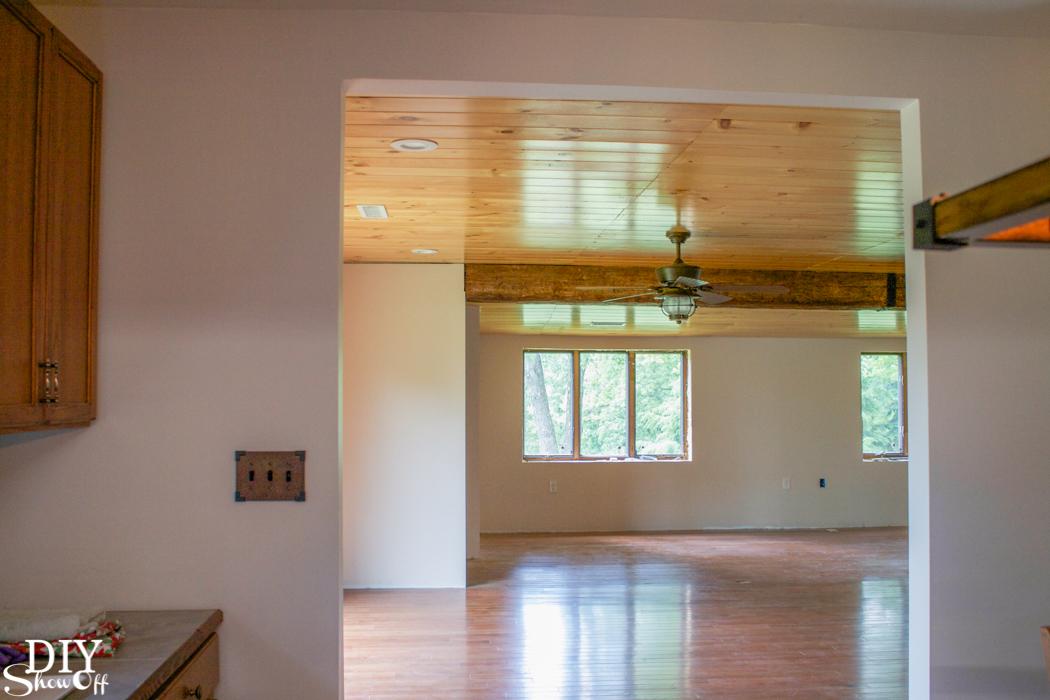
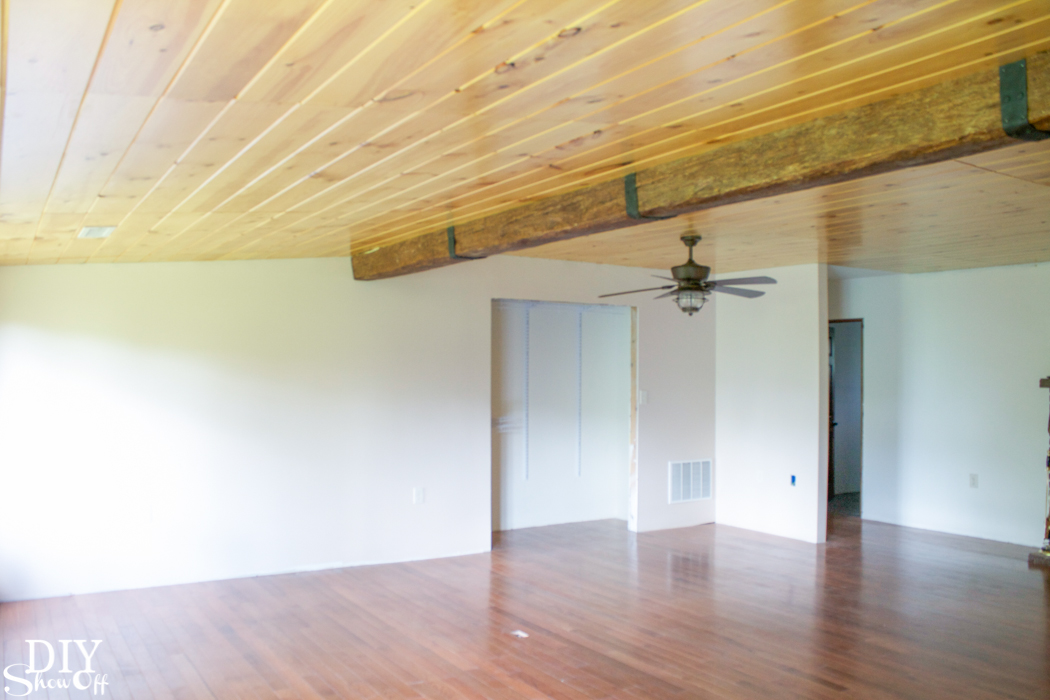
 before…looking from the kitchen

Before and after home improvement project - ceiling with a gorgeous faux beam @diyshowoff

after, standing in that  widened doorway

Before and after home improvement project - ceiling with a gorgeous faux beam @diyshowoff

Crazy transformation, right? I promise it’s the same space! The story continues! 

Next up: Moving in is right around the corner. I can’t wait to show you the complete before and afters of the entire house from gut to renovation to reveal. 


16 Fabulous Leather Tutorials for the Home

Hello there friends of Roeshel! My name is Corinna and I’m the blogger behind For My Love Of. I love my home, and the process of making it a beautifully decorated home. For the past 2 years I’ve been learning and sharing different DIY home improvement and decor techniques on my blog. It’s a fun journey and I’m hoping it encourages others to take passion in their homes too. My most recent obsession in home decor is leather, so I’m pretty excited to be sharing today’s post with you- 16 Fabulous DIY Leather Tutorials for The Home!

*Please remember to pin from the original sources listed below.

16 Fabulous DIY Leather Tutorials For The Home Ugly Sofa Upcycled Into Leather Safari Sling Bench
Might as well start big or go home, am I right? Ugly Sofa Upcycled Into Leather Safari Sling Bench by Mandi of Vintage Revivals. Incredibly impressive, using the fabric from one couch to create a sofa from bare materials! DIY Leather Herb Labels DIY Leather Herb Label by Chris Loves Julia. If you’re growing your own herbs, dress them up with cute leather labels! leather studded stump Leather Studded Stump by Anythingology blog. Everybody loves a good tree stump stool, and you can amp up a raw one with leather and upholstery tacks!

DIY Stitched Leather Stool

DIY Minimal Leather Stool Cover by Meg Kemner for Design Milk. Another fantastic stool, and so minimalistic! Personally, I think it could look really neat with colorful legs too! DIY (faux) leather accent pillow DIY Leather Accent Pillow by For My Love Of for The Love Nerds. For an easy touch of leather, and minimal tools, try adding a leather accent pillow!

hand sewn leather pillow tutorials

Pump up a basic pleather pillow with neon embroidery floss and some time and create a Hand Embroidered Leather Pillow with Pop of Neon by For My Love Of. Wood & Leather Suspended Shelf Wood & Leather Suspended Shelf by Camille Styles. Add style and texture in one easy DIY shelf!

DIY Leather Coasters

DIY Leather Coasters by Carly of Create Live Blog. For all the remnant leather fabric from other projects, you could create these fabulous coasters! DIY Leather Plant Hanger DIY Leather Plant Hanger by Steven Soria of Make Smith Leather Co. for Design Sponge. The honeycomb pattern created by the cuts in the leather is too cool for words. DIY Braided Leather Hanging Planter Tutorial DIY Braided Leather Hanging Planter by For My Love Of. And because hanging planters are so practical, here’s another one using leather-like materials. DIY Leather Cabinet Handles DIY Leather Cabinet Handles by Veronica Loves Archie. Another great project for leather remnant pieces. Definitely takes the boring out of those basic white cabinets.

Wood + Leather Magazine Holder DIY

Wood + Leather Magazine Holder DIY by A Beautiful Mess. A bit more skill is involved, but the end result is a stunning piece. Woven Stool Tutorial Woven Leather Stool Tutorial by Matt of Wood & Faulk. A great dose of leather and would make a fantastic footstool! Modern Leather Bench Tutorial

DIY Modern Leather Bench w/Hairpin Legs by Home + Style Report. I feel like this would be so practical for those of us with kids and it’s so stylish too!

 DIY Home Decor: How to Make a Leather Valet Tray

How to Make a Leather Valet Tray by Paul for Apartment Therapy. Couldn’t you find lots of uses for a leather tray like this one? DIY Leather Organizer Organize paperwork and add a dose of leather to your work space with this DIY Leather Organizer by Mandy Pellegrin for Design Sponge.

I hope you’ve enjoyed this collection of fabulous DIY projects and are inspired to try the material (faux or real) in one of your next home decor projects! Please share any of your leather projects in the comments below!

Facebook | Pinterest | Twitter | Instagram | Google+
Blogger behind For My Love Of

Easy DIY Indoor Outdoor Honeycomb Wall Art

As a member of the Lowe’s Creative Ideas team, I have the opportunity to participate in monthly DIY challenges. One of the themes for April is outdoor wall art. I just happen to have a bare outdoor wall. This easy DIY indoor/outdoor honeycomb wall art project is super easy and perfect for decorating an outdoor wall in our covered party patio area. 

easy DIY hexagon wall art at diyshowoff.com

 Materials I used:

hexagon wall art tutorial at diyshowoff.com

What I did:

I spray painted the pieces of the drawer organizers (not assembled) using Valspar Outdoor Spray Paint. I sprayed one side Peacock Blue and let dry about 6 hours then flipped and sprayed the other side Koi Pond and let dry overnight. 

Once the paint was dry, I assembled my pieces. The honeycomb-shaped organizers simply snap together. No tools required!

easy honeycomb wall art tutorial

Since I have 3 sets, I assembled two sets with closed ends and one with open ends (both options shown on pamphlet with instructions included in the box).

easy DIY hexagon honeycomb wall art

You could even leave them white = the only DIY is snapping them together! I hung mine using Command outdoor light clips. 

Face on: 

Easy DIY hexagonhoneycomb wall art tutorial at diyshowoff.comDIY honeycomb hexagon wall art at diyshowoff.comeasy hexagon wall art at diyshowoff.com

From the side:

honeycomb wall art tutorial at diyshowoff.comDIY honeycomb wall art at diyshowoff.comhex wall art at diyshowoff.com

From above: 

DIY hexagon wall art tutorial at diyshowoff.com

They’re very light weight so not ideal for displaying heavy items but a great way to add color, dimension and interest to an otherwise plain outdoor or even indoor wall. I tucked in a few succulents for now.

outdoor hexagon patio wall art at diyshowoff.com

My covered patio area still hasn’t been cleaned up for summer. I just grabbed some accessories for photo-staging. Pardon the leaves and dirt!

outdoor honeycomb patio wall art at diyshowoff.com

The outdoor hexagon/honeycomb wall art is going to look great on that back wall when the patio is cleaned up. See the patio when it IS ready for summer lounging and entertaining here.

barn patio makeover

LCI Spring

I received a Lowe’s gift card to complete this challenge. Opinion and above idea is 100% my own. More DIY ideas at Lowe’s Creative Ideas, follow Lowe’s on InstagramPinterest and sign up for the Creative Ideas magazine and app!  

More of my Lowe’s Creative Ideas challenges:

DIY hanging organizer - Pantone radiant orchidDIY Chalk Finish Paint Recipepipe shelving how toDIY foldable luggage rack tutorial DIYShowOfftire flower planter tutorial at DIYShowOffLCR dice game tutorial