DIY Holiday Highlights and True Value Pipe Fitting Candle Holders

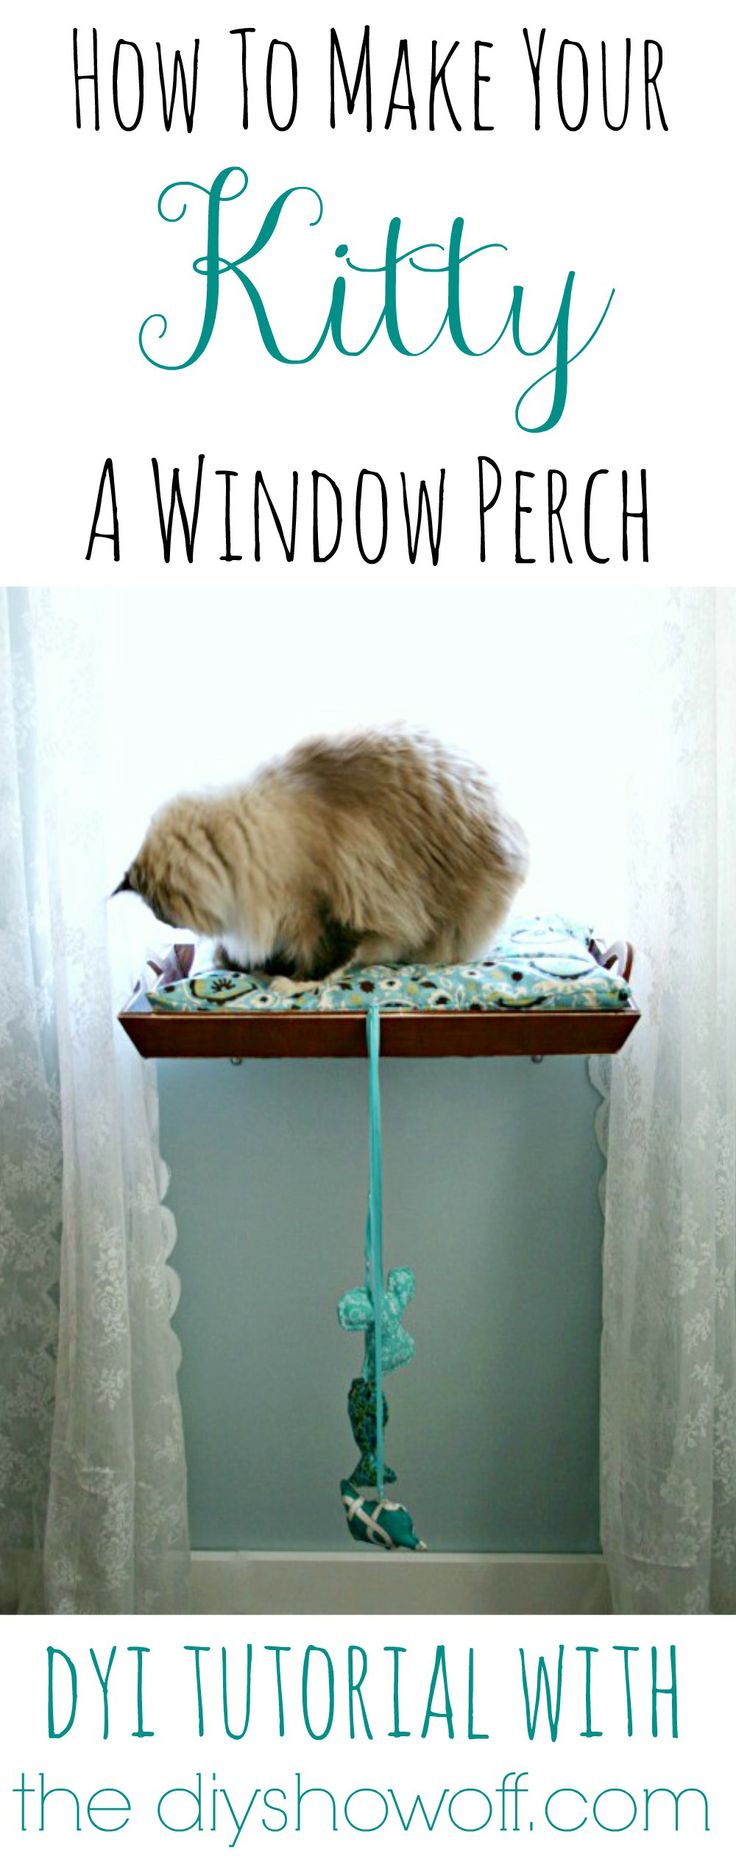
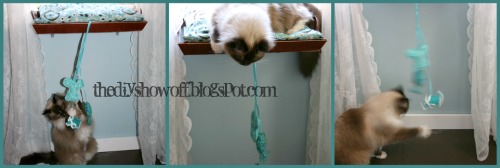
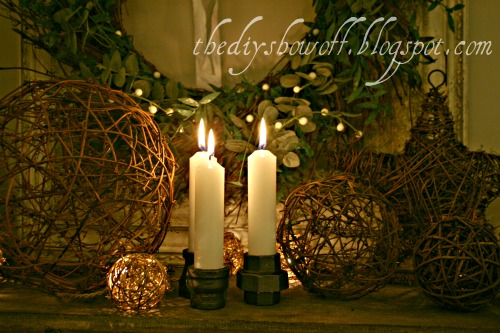
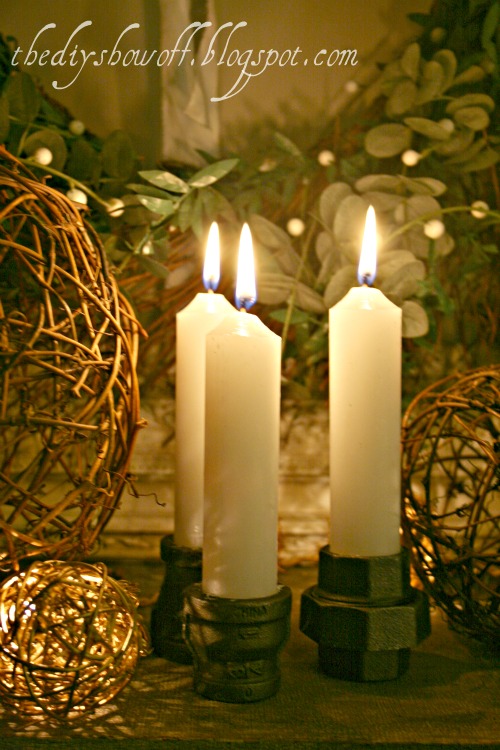
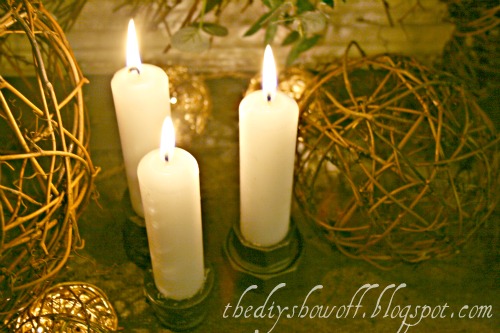
Who knew that True Value Hardware sold decorative decor?  Well, mine actually does sell holiday decorations (and TRAINS!), but this is just about the most simple DIY project ever. Just something I picked up while shopping for another DIY project.  It’s got a little industrial character. Just a little creative repurposing that even the most DIY-challenged person (like one who’s brain is already into next week’s vacation)…

Thick emergency candles
+
 
Pipe fittings
=


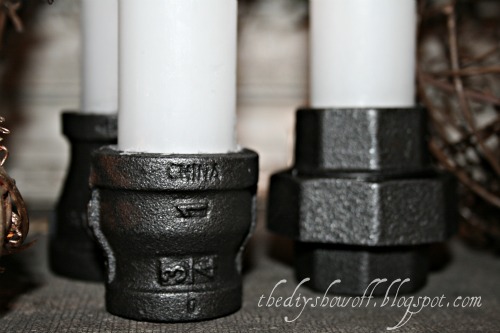
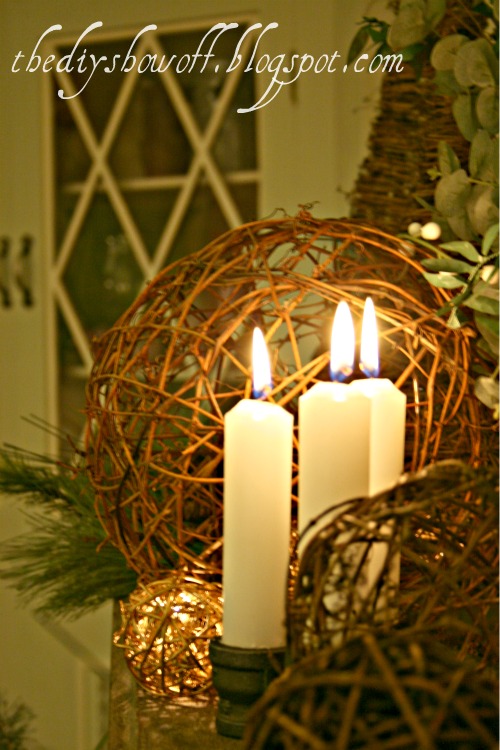
(you could even spray paint the pipe fittings but I love mine the way they are)

Instant Industrial Candle Sticks…
 
Restoration Hardware price would be ridiculous.  True Value Hardware price is less than $10 for a set of 3.
 
Not just for Christmas…I love unique objects turned decorating and when was the last time men in your family noticed or commented on your decor? I think this one will get an admirer or two. What do you think?


It’s December – I know you’ve been decorating and working on festive DIY, right?  Let’s see!

 
  • You must use the button above in your blog post or side bar to share the linky love.
  • Add your permalink (not your blog url, but your holiday project post url which is the web address that goes directly to your holiday project blog post, not your blog address). Feel free to link a Past Post, just be sure add the DIY Holiday Highlights button to your side bar.
  • Or email your link to thediyshowoff@gmail.com and I will add it for you.
  • If you notice your link has disappeared please check the content of your post. Is it holiday related? Add the link back to The DIY Show Off to your post today with a quick note to your readers about the party and try again! 


*~*~*~*~*~*~*~*~*~*~*~*~*~*~*~*~*~*~*~
 
I was one of the bloggers selected by True Value to work on the DIY Squad. I have been compensated for my time commitment to the program as well as my writing about my experience. I have also been compensated for the materials needed for my DIY project. However, my opinions are entirely my own and I have not been paid to publish positive comments.
~*~*~*~*~


~*~*~*~
Learn some fun things you didn’t know about me. I’ve answered 10 random questions over at Making a House a Home where I’m hanging out with my awesome DIY friends, Lana & Joey today!
 
~*~*~*~


12 Bloggers
12 Colors
12 Days of Holiday DIY
 
Dec. 1st ~ GREEN ~ The Design Confidential
 
Dec. 2nd ~ WHITE ~ Domestically Speaking
 
Dec. 3rd ~ BLUE/PURPLE ~ Fireflies & JellyBeans
 
Dec. 4th ~ SILVER ~ Freckled Laundry
 
Dec. 5th ~ GRAY ~ Primitive & Proper
 
Dec. 6th ~ SPARKLE/GLITTER ~ A Girl and a Glue Gun
 
Dec. 7th ~ MIRROR/CLEAR ~ The DIY Show Off
 
Dec. 8th ~ EARTH TONES ~ Making the World Cuter
 
Dec. 9th ~ RED ~ It’s So Very Cheri
 
Dec. 10th ~ GOLD ~ 504 Main
 
Dec. 11th ~ CHALKBOARD ~ WhisperWood Cottage
 
Dec. 12th ~ MULTI-COLOR ~ The DIY Club

Pin It

DIY Cat Window Perch and DIY Project Parade

Looks like a great day to sit near a window and enjoy the warmth of the sun on your face. 
DIY Cat Window Perch
 
Meet Lalka:  Enjoying her new window seat with a view of the barn and her new catnip stuffed dangly toys…
 
Fun!
 
A quick trip to the hardware store for brackets and screws and we were able to get started. Lots to choose from. We chose the shortest gray ones for this project. Bri made a window seat too. Hers is from scratch, mine uses an old breakfast tray. Tutorials for both are shown below.
 
TRAY TURNED CAT WINDOW PERCH
Materials:
Old Tray
Pillow
Shelf Brackets
Screws
Optional:  Line tray with scrapbook paper and secure with Decoupage. I used vintage wall paper.  New pillow cover. I used an old pillow and leftover fabric scrap. I also used scrap fabric, stuffing, ribbon and cat nip to make some toys attached with an eye screw.
 
Here’s what I did (using the optional steps mentioned above):
 
1.  I sanded and scuffed up an old tray.  I cut wallpaper to fit inside and secured to the bottom using Decoupage.  Let dry.
 

2. Using left over fabric, I sewed an envelope pillow cover for an old pillow to use as a cushion.

Cut fabric. Allow an extra 1/2 inch on the top and bottom. Triple the side of the width of the pillow.
You’ll have a large rectangle.  My pillow is approx. 12 x 18 inches. My fabric was cut to an approx. 13 x 54 inches.
 The short sides of the fabric: One edge of my fabric is the selvage end. I sewed a hem on the other end.
 One end is hemmed. One end is the selvage (or hem both ends if no selvage).
 Hem side:
 Fold fabric. Edges should be on top (back side up/out) and be near the middle. Anywhere in the middle works. 
 I want my selvage end to be inside, the hemmed side out. Make sure selvage is the top folded piece.
 
 Pin and sew both long edges. Reinforce over hem/selvage part of seams.
 Flip right side out and insert pillow.
 
3.  I drilled a hole and used an eye screw for attaching catnip stuffed toys on ribbon (see toys below).
 

4.  Measure and mark where the brackets will go. Pre-drill holes.


Our windows are not framed in this room and the tray is a perfect fit underneath the sash.
 
5.  Attach bottom screws of shelf brackets.
6.  Hold tray in place (my tray fit perfectly under the window) and mark where holes for short screws need to be inserted into the tray. Pre-drill holes.
 

7.  Attach tray to shelf bracket with short screws.


8.  Loop ribbon toys through eye screw.

 9. Add pillow!

How it looks from underneath…

Lalka loves her new space…

She’s a big girl for 1 year old. Perfect for watching for birds and squirrels or snuggle in a ball in the sun.

Catnip Stuffed Toys
Here’s what we did:
 
1.  Make toy patterns and trace onto scrap fabric. I made a fish, bird and mouse.
 

2.  Double fabric with right sides together and cut out shapes.

 
3.  Cut a piece of ribbon.  Mine are between 2-3 ft. Grab ends to find center.  Hold center and start rolling ribbon.
 
4.  Pin ribbon roll between two sides (right sides facing each other) of fabric. Ends should be sticking out past fabric.
 

5.  Sew around shape, leave an opening for stuffing.  I reinforced (back and forth) over the ribbon to make it more durable for pulling/playing. Sew close to the edge but be sure to grab both pieces of fabric. Snip curves.


6.  Turn right side out.  Alternate stuffing and catnip

 
7.  Hold open edge together, making sure edges are tucked in. Sew closed and continue sewing a border around the entire shape.

8.  All done.  I fed the top of the ribbon loop through the eye screw and secured animals to hang from cat tray/window seat.

EASY DIY CAT WINDOW PERCH
 

Bri made one for her cats too, we actually cut a board to fit the window sill…

Layout batting and fabric under board and cut to size, allowing fabric and batting to wrap on under side.


Wrap in batting, starting with stapling in the center of each side and working way to corners.

Cut away excess.


Repeat to cover in fabric.

 Bri covered a piece of cardboard with wrapping paper and stapled it to cover raw edges.

Follow steps 3-8 above under TRAY to CAT WINDOW PERCH.

Bri’s cats love it!

 
~*~*~*~
 
Let’s see what you’ve been up to this past week!
The DIY Show Off

 
1. You must use the button above (ADD BUTTON HTML CODE FROM SIDE BAR TO YOUR POST) and link to this post to share the linky love.
 
2.Include your name or blog name and project title. Add your permalink (not your blog url, but your DIY project post url). Feel free to link a Past Post, just invite your readers in a current post with a quick note.
 
3.Or email your link to thediyshowoff@gmail.com and I will add it for you.

4.If you notice your link has disappeared -please add the link back to The DIY Show Off to your post today, a button or a quick note to your readers about the party and try again! I love when everyone participates and readers check out everyone’s links, but I think the return favor of linking back is the nice thing to do so everyone plays fair and enjoys all of the projects and links. Also – this blog party is for DIY projects only. Links not related to DIY will be deleted.


5.  If reading this in an email, pop over to http://thediyshowoff.blogspot.com to see the inspiring DIY projects linked up!

 
6.  NOW you can “like” the links!  What a fun idea!  Most liked links may be included in a post of DIY Project Parade highlights later in the week


*~*~*~*~*~*~*~*~*~*~*~*~*~*~*~*~*~*~*~