DIY Tomato Cage Christmas Tree

Bringing back an oldie but goody.
{scroll down to see all 4 of my Christmas trees}
A couple of years ago, I made a lighted tomato cage tree – a DIY Christmas tree using lighted garland and a tomato cage. I was able to find everything I needed at my local True Value Hardware.
DIY Tomato Cage Christmas tree
Materials: 
  • Tomato cage.  Ask a store associate.  They should have them in the warehouse/storeroom since it’s not garden season.I got the largest they had.
  • 3 – 9ft. lighted garland
  • Thick rubber band
To make the tree:
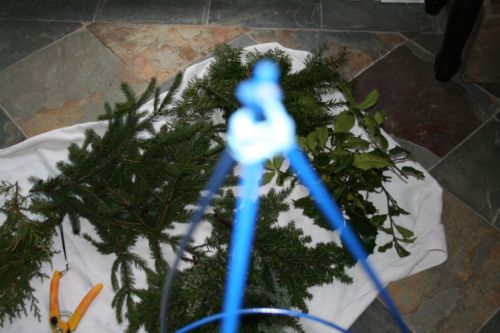
Using a rubber band, gather the “stakes” to make a tee-pee top and secure together (sorry for the bad picture! I didn’t check it before going to the next step…too late now!).
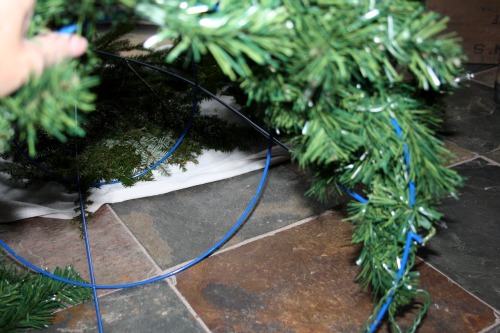
Starting at the bottom (with the plug end of the garland), start to wrap the bottom wire circle with the garland. Wrap a few branches here and there around the wire frame to secure.
Working around the frame, continue wrapping.
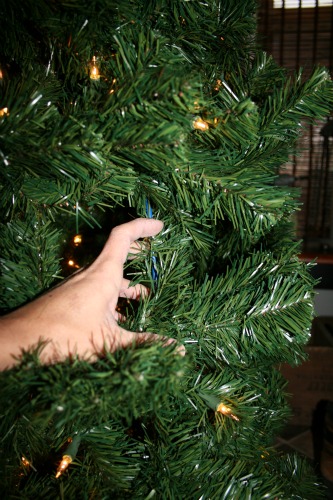
When one garland ends, plug in another and continue wrapping to the top.
Fluff.  If there are gaps, fill in by twisting branches around the frame or fluff branches to fill ‘holes’.
All done! We don’t have a live tree and I love the smell of pine. So I headed out to the backyard and clipped small pieces of different real pine.
Just tuck them in open areas for a fuller ‘real’ look with pine scent! (Mine are only tucked but you can use floral wire to make things more secure if needed.) I do this closer to the holiday since there’s no way to water the fresh sprigs or add only when entertaining.
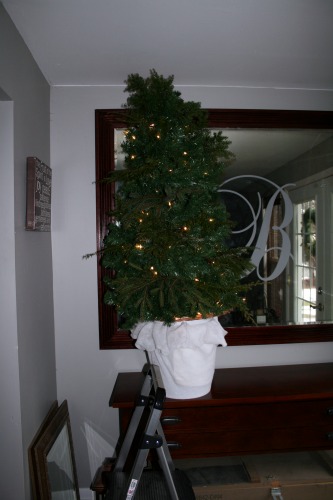
Need more height?  {This year I used an old small barrel}
DIY tomato cage Christmas tree tutorial
Or this also works great for a base:
  • 5 gallon bucket
  • fabric
  • large rubber band
Take the handle off of the bucket.
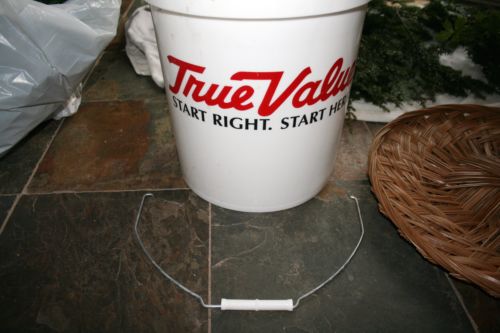
Stretch a rubber band around the top of the bucket.
Sit bucket in the center of a piece of fabric and tuck under the rubber band.
It’ll look like this:
 Add a round tray (aluminum cookie tray or rattan works) and it’s the perfect base to add height to your tomato cage tree.  If you have an out of the way spot, it can just rest on top. Otherwise attach with wire into the holes were the handles were removed.
You could also paint the bucket instead and fill with stones for weight to use outdoors.  The base was a little to high for my purposes so I didn’t end up using it…oops!
My tomato cage Christmas tree in 2010:
 This year…
 DIY tomato cage Christmas tree tutorial
Have you assembled your own tomato cage Christmas tree? They’re beautiful for outdoor entryways too!
3 more OF MY CHRISTMAS TREES
 colorful eclectic Christmas
DIYShowOff Christmas Tree
{tips for decorating your Christmas tree – can you tell lights are strung vertically? I create a faux root ball to give our 7.5′ tree another foot of height.}
vintage natural Christmas

For even MORE Christmas tree inspiration…

Christmas Tree Contestimage

We were chosen by True Value to be one of the members of the 2012 DIY Squad. I have been compensated for the materials needed for my DIY projects. However, the thoughts and opinions expressed are completely honest and my own. I have not been paid to publish positive comments and no one has twisted my arm to participate. 


Facebook
DIY Show Off - FacebookDIY Show Off - TwitterDIY Show Off - PinterestDIY Show Off - FeedDIY Show Off - HomeTalkDIY Show Off - G+

Must Have Tool {and a giveaway!}

THIS GIVEAWAY IS NOW CLOSED. WINNER is Judy D. who says: “Planning on starting a dyi kitchen project and have only a couple tools on hand. Great giveaway.” Congratulations, Judy!
As you know, we renovated an apartment over the summer. We had the opportunity to review a screwdriver. The timing was perfect and the Master Mechanic Swift Driver seriously rocks! If I didn’t think so, I wouldn’t be writing this. Seriously, it’s the one tool that was always within reach and made a lot of our DIY projects easier.
Master Mechanic Swift Driver
Here’s the official description:

A new twist on an old tool. Master Mechanic dual-drive screwdriver employs a patented gear drive ratchet design that doubles your screwdriving efficiency. Drives the screw when you turn the handle clockwise AND counter-clockwise. 29-pc. set includes flexible shaft extension and multiple bit sizes for a variety of applications. Includes 7 phillips, 3 slotted, 4 hex, 3 square, 4 star, 6 SAE nut driver bits, and bit case. Ergonomic handle has a non-slip rubber grip and can store bits.

What I love. . .

  • No electric, no batteries required.
  • The dual ratcheting action was a lot easier on my hand and wrist! Every time I turned my wrist, it was working to get the job done, both left and right. It’s lightweight too.
  • I loved that I didn’t have to go searching for a specific type of screw driver since it has multiple interchangeable bit sizes (which can be stored in the handle) and since the bits are universal…I could grab one for the cordless drill when needed.
  • We ran into several tricky tight spots and the flexible shaft extension came in super handy (and even attached to the cordless drill).

Take a look at how I used it A LOT during the apartment renovation {still use it!}. From removing and re-attaching cabinet hardware to changing out doorknobs to installing shelving brackets to tightening vanity screws to hanging a mailbox to assembling furniture, this tool was super helpful.

Using the Master Mechanic Swift Driver

Example: When I’m re-attaching cabinet hardware and place the screw into the pre-drilled hole, I turn the screwdriver clockwise. Then, when I turn counter-clockwise, it’s turning the screw, pushing it further into place too. I love that! I don’t have to change my grip! Just keep winding right, left, right, left. Then with a push of a button, the same works in reverse to remove the screw. So cool!

So, if you are looking for a great gift idea for a DIY’er a non-DIY’er too or stocking stuffer OR you’re tired of sore palms or digging for the right screwdriver, I know this would be a HUGE hit. The recipient is not going to be disappointed, won’t ask for the gift receipt and WILL use it!

The Master Mechanic Swift Driver is available {and on sale!} at True Value Hardware.

$100 True Value gift card Giveaway

True Value gift card

Need a little help with Christmas shopping for a Master Mechanic Swift Driver? Want to grab one for yourself too? One lucky DIY Show Off reader will receive a $100 True Value gift card. Open to US residents 18+ only. Giveaway starts with the publishing of this post (TODAY! Monday, 11/26) and ends Friday, 11/30 at midnight EST. Winner will be chosen randomly and announced shortly after.

What is on your True Value Hardware wish list? Answer in the comment and check +1 on the rafflecopter widget. Follow True Value on Facebook and share the giveaway for additional entries (be sure to +1 on the widget!). Good luck!

a Rafflecopter giveaway

We were chosen by True Value to be one of the members of the 2012 DIY Squad. I have been compensated for the materials needed for my DIY projects. However, the thoughts and opinions expressed are completely honest and my own. I have not been paid to publish positive comments and no one has twisted my arm to participate. 


6 Tips for decorating a Christmas tree {DIY Project Parade}

Decorating the Christmas Tree

This is the weekend that we {I} decorate for Christmas! Yesterday and today {probably tomorrow too}, Christmas decorations have exploded in the living room, family room and dining room. There are boxes everywhere. Is it like that for you too? {I apologize for the poor quality pics…but it wasn’t a priority. Not like getting great “after” decorating pictures will be!}

artificial Christmas tree decorating tips

Today I wanted to share a few tips for setting up and decorating an artificial tree, some that help make it look more ‘real’ and full. For our living room, we have a rather nice artificial tree. It’s always mistaken for being real but there are some things I do to make the best of having a fake tree:

Pine Scent

Tip #1: I do burn a Yankee Balsam and Cedar candle to create a real pine smell. Love it! Pretty pine scent without smelling like a pine tree car air freshener.

Yankee Balsam and Cedar candle

Faux Root Ball {and adding height}

Tip #2+3: Rather than a skirt for this tree (our main one where Santa leaves the gifts), we create a faux root ball and giving the tree more height. First, make sure you have room to lift your tree about a foot higher! I set a galvanized tub in the center of a circle of burlap. We add weights to the tub {25 lbs.}. Then I set the stand of our tree onto the tub. I use twist ties to secure two of the feet of the stand to the handles of the tub. I gather up the burlap and tie it around the tub and stand and secure with twine at the “trunk”.

directions: Christmas tree faux root ball

Pull the top of the burlap to make sure it’s over the tied twine. Fluff a little. Lots of room underneath as it lifts our 7.5′ tree about a foot higher. I love that about doing this too!

artificial Christmas tree faux root ball

Tip #4: I also use a 9 outlet Christmas tree extension cord. I like that the outlets are spaced along the extension cord. One plug into the wall outlet and an off/on switch for the Christmas lights. I found mine at True Value Hardware along with lots of lights and decorations!

Christmas tree extension cord

String lights vertically

Tip #5: I was surprised that not many Facebook fans knew this tip, so I’ll share here too: I add my lights to the tree vertically {up and down} rather than around. I can’t tell the difference and when the tree is in a corner like it is in our home, it’s a lot easier than trying to get around it’s width, pulling it out and pushing it back into the corner, moving a ladder all around while trying to “lasso” the tree with strings of lights.

Christmas tree with lights Filling in the tree

Tip #6: If your artificial tree isn’t as full as you’d like it to be, add faux pine garland or silk flower bunches to fill in the gaps {large faux poinsettias help to fill in space and look pretty too}. Even dollar store green garland pushed near the center of the tree will help hide seeing the “pole” through sparse branches. Try larger ornaments and use wide ribbon or tulle as a garland to help fill the empty spaces.

I only have the lights on at the time of writing this post but will share it all decorated soon. I do a traditional tree in our living room with red and gold. Dining room gets a more rustic decorated smaller tree and I can’t wait to do something fun in the family room this year {to go with our eclectic colorful decor}.

Sharing at Beth’s party:Home Stories A2Z

Now, let’s get this party started! Remember, there’s the DIY Show Off Holiday Highlights party every Wed., but you’re welcome to link up holiday related posts today as well.

DIY Show Off DIY Holiday Highlights

Show off your latest DIY project! I’ll be showing off your links all week, follow along:

DIY Show Off - FacebookDIY Show Off - TwitterDIY Show Off - Pinterest DIY Show Off - HomeTalkDIY Show Off - G+

DIY Show Off

{grab the html button code here}

1. Please use the button above or text and link to this post to share the linky love. Here is the link: https://diyshowoff.com/category/other/diy-project-parade/. I’d love for you to share a link on your FB or by tweeting too if you have the time. Thanks!

2. This blog linky party is for DIY projects only. Links not related to DIY will be deleted. Please share your link one week only.  Please do not link recipes, giveaways, linky parties, promotions or a collection of inspiration. 

3. By joining the party, you give permission for your project to be featured and ‘shown off’ via blog highlight, Twitter, Facebook, Pinterest, G+, etc.


Getting ready for Cyber Monday! How about you?

We were chosen by True Value to be one of the members of the 2012 DIY Squad. I have been compensated for the materials needed for my DIY projects. However, the thoughts and opinions expressed are completely honest and my own. I have not been paid to publish positive comments and no one has twisted my arm to participate. 


DIY Ceiling Mount Drum Shade Light Fixture Cover

In the apartment: Staying within a very tight budget inspires creativity. The main floor of the rental had a boring light fixture and we wanted to do something a little more fun. A thrift store drum shade was a great solution and worked with existing ceiling mounted light fixture base. {peek of the thrifty gallery wall}

DIY Drum Shade Ceiling Mount Light Fixture Tutorial

I originally purchased a steel nipple {are you giggling?! who decided that was a good name for hardware?} for a lamp kit, but it was too big in diameter to fit through the hole in the existing light fixture base. Lucky for us, True Value Hardware is within walking distance of the rental. So convenient. Great for finding last minute things and a huge selection of everything plumbing (and lamp kits too). I found that a ‘toilet’ plumbing piece {a rod threaded on both ends} was a perfect fit. We simply unscrewed the existing base, added a nut near the hole in the center of the existing base and screwed in the threaded rod and re-attached the base of the light fixture.

Next, Just center of the drum shade over the threaded rod and the finial holds it all into place.

threaded rod in DIY drum shade light

 But the ugliness is visible from underneath…

DIY drum shade light fixture

Solution: Measuring the diameter of the interior of the drum shade, I made a pattern/stencil from cardboard (tracing the interior of the shade).

cardboard template

We used the cardboard circle as a template for cutting plexiglass (2 circles). We found cutting plexiglass to be a challenge and cut a larger circle, wrapped the edges in FrogTape to help minimize cracking and chipping then used our Dremel Trio to cut the circle border on the FrogTape. Note: this project is NOT for perfectionists. Amateurs (like us) achieved a jagged circle but we’re okay with that. 

plexiglass with FrogTape

Remove FrogTape and transparent protective cover from plexiglass. We didn’t get a smooth cut, but it’s not extra noticeable when placed into the drum shade and hot glue and ribbon or beads can cover the jagged edge.

We also drilled a hole in the center of each piece of plexiglass for the threaded rod.

I ironed my doily and cut out the center circle…

ironing doily

and put the plexiglass into the drum shade {plexiglass, doily, plexiglass}, resting it on the lamp shade supports (drum shade will be installed ‘upside down’). Note: You may want to use a spray adhesive on one side of the doily to keep it from sliding as you’re layering plexiglass, doily, plexiglass. I also used hot glue to attach a string of beads to hide our jagged cuts.

plexiglass doily drum shade

So pretty DIY ceiling mount light {a little off center, hence the suggestion for spray adhesive as noted above}:

doily drum shade light

Then just put the drum shade into place, secured by the finial…

DIY drum shade light lit

We love how it turned out – but note: plexiglass is more expensive than we anticipated. So while it still worked out to be a less expensive option than a pretty drum shade ceiling fixture and prettier than a boob light, it wasn’t super cheap like I had planned. Approximate cost breakdown: plexiglass $25, drum shade $5, doily $10 + finial and threaded rod.

Facebook
DIY Show Off - FacebookDIY Show Off - TwitterDIY Show Off - PinterestDIY Show Off - FeedDIY Show Off - HomeTalkDIY Show Off - G+

We were chosen by True Value to be one of the members of the 2012 DIY Squad. I have been compensated for the materials needed for my DIY projects. However, the thoughts and opinions expressed are completely honest and my own. I have not been paid to publish positive comments and no one has twisted my arm to participate.  

This is a sponsored post brought to you by FrogTape. The opinions are completely my own based on my own experience and project results may vary.

 FrogTape Blog Squad

Tips for painting a herringbone patterned accent wall

Apartment progress!

Herringbone Accent {on textured} Wall

I’ve shown sneak peeks of the apartment renovation progress and you’ve likely seen the herringbone-like accent wall in the kitchen area…

painted accent wall

Base paint color: True Value Easy Care – Baby Elephant (soft neutral gray) & Accent color: True Value Easy Care – Sweet Honey

Since we own this rental space, I was able to get a little creative in adding a fun accent wall as a backdrop behind some open shelving. Before paint…

apartment walls before

Yes…I have ‘plans’ for a DIY radiator cover but I must confess that I feel it’s a LOT ambitious and I’m scared. Working up the courage to give it a try sometime this month. Anyway, after paint {including painting kitchen cabinets and Rustoleum Countertop Transformations}:

find center of wall

The open wall space above the wainscoting was the perfect spot to display open shelving as a solution for more storage/organization in this tiny apartment. True Value’s Easy Care Platinum and FrogTape were all I needed to add some interest to a flat textured wall. The pattern also helps disguise the un-hidden pipes. I put together a quick tutorial video using my iphone {pardon the portrait orientation, poor quality…amateur videographer but working hard on getting better!} explaining how I achieved the herringbone pattern:

The wall was finished and I was so happy to be able to move forward on the renovation! Shelves are budget friendly Ekby shelving and brackets from IKEA… IKEA Ekby

{installation was super easy using the Master Mechanic Swift Driver!}

Woo hoo! painted accent wall And just when I felt super good about a little DIY success, something went wrong upstairs with the plumbing. The joys of DIY… upstairs plumbing leak I was just too exhausted and heartbroken to deal with it. My Mr. DIY fixed the plumbing issue in the bathroom above and Bri’s boyfriend, Steve, saved the day by patching the ceiling below. patching ceiling textured ceiling and I set about touching up the paint… touching up paint Now, all done for real… herringbone accent wall If you missed it yesterday, I shared the hardwood floors before/after refinishing:

staining hardwood floors

More apartment renovation, decorating and furnishing coming soon!

TDC Before and Afterbest diy

We were chosen by True Value to be one of the members of the 2012 DIY Squad. I have been compensated for the materials needed for my DIY projects. However, the thoughts and opinions expressed are completely honest and my own. I have not been paid to publish positive comments and no one has twisted my arm to participate.  This is a sponsored post brought to you by FrogTape. The opinions are completely my own based on my own experience.  FrogTape Blog Squad

Refinishing Hardwood Floors {apartment progress}

How I refinished the apartment hardwood floors…

When we started the apartment renovation, I knew the hardwood floors would need to be refinished. Previous tenants had some sort of mishap and the finish was ruined…{I try not to think long and hard about the details of the mishap. ::shudder::}

condition of hardwood floors before:

hardwood floors before

We started by sanding the floors (well, by “we” I really mean, I supervised while my nephew controlled the beast known as the orbital sander). Once the steps to strip the old finish was completed and floors and sawdust were cleaned up, we were ready to refinish the original hardwood for a new look.

All sanded!

sanding hardwood floor

I headed to True Value for the materials I needed {and a few other things too but more coming on that soon}:

  • Minwax Wood Finish, stirred not shaken {Color is “Dark Walnut”}. Minwax has great informational guide too.
  • Minwax High Build Polyurethane (clear satin), stirred not shaken (martini is optional)
  • FrogTape
  • angled 3.5″ Purdy paintbrushes – “White Bristle” {recommended for stain}
  • angled 3 ” Purdy brush – “Black China Bristle” for polyurethane
  • old clean rags {I actually had these on hand but you CAN buy them at True Value too!}
  • Optional: latex gloves {I lived with brown stained nails for a day or two…oops.}
  • Suggestion: pillow for knees and definitely old clothes {not sold at True Value}
  • 220 grit sandpaper
  • Mineral spirits and clean rags

Staining Hardwood Floors

The process is a fairly simple DIY. The task is just time consuming (and a little labor intensive because of my position on ‘old knees’). Since I was working with two small rooms, I opted to use a brush and work on my hands and knees vs. a roller.

I started in a far corner of the room, working with the wood grain, with the direction of the wood planks, working my way out of the room – don’t work yourself into a corner – no fun being trapped!

For extra protection, tape off baseboards/shoe molding using FrogTape.

I dipped my Purdy brush into the can of Minwax stain, tapped off the extra and applied the stain in a corner, working along the baseboard along the length of the wood plank. When I noticed that some of the stain wasn’t absorbing, I let it sit for a few minutes then wiped away the excess with an old rag.

staining hardwood floors

I worked in 2-4 foot sections in length as I went along right to left in my room, working my way towards the door. Sometimes I did a larger number of planks as well, just find a rhythm that works for you.

refinishing hardwood floors

Bedroom done. I worked my way out into the hallway…

staining hardwood floors

down the stairs and around the bend…

staining stair treads

and started the main floor in a corner, working my way out the door.

staining hardwood floors

Sounds like I ended up at Grandmother’s place (over the river and through the woods) and a lot quicker than it actually took. ! 

TIPS: Since I’m working my way actually out of the apartment, I had to make sure to grab things I needed like purse, keys, cell phone, etc. Turn off things that you don’t want to leave on during the drying period. The radio blasted during our drying time. Oops!

Note: Two coats can be applied (see Minwax for further instructions). I loved the color one coat achieved so I skipped this step. Sealing the floor will also darken the color a bit. One coat of stain:

dark walnut hardwood floors

I let my floors dry a few days but we were working in an unoccupied space. I applied the stain on a Friday and returned the following week to resume refinishing by sealing the floors. Sealing the floors is NOT optional, it’s required. It’s necessary. Stain does not protect the wood, only colors/enhances the beauty.

Sealing the floors…

sealing hardwood floors

I used the same process as above to seal the floors. Starting in the far corner of the room, I repeated the same steps of dipping my paint brush into the polyurethane, tapping, applying in the corner, brushing right to left (the direction I was personally working), along the baseboards and working my way out the door.

It really enhances the rich beautiful color:

minwax high build polyurethane

I let the first coat of polyurethane dry 48 hours.

My most UN-favorite part: once the first coat is dry, lightly sand the entire floor with a 220 grit sandpaper. Clean floors of dust with mineral spirits and let dry. Then apply a second coat of polyurethane using the same steps. Repetitive. Time consuming. But so rewarding!

Allow to dry for 12 hours to resume “light use” (however – test the floor first!). Remove FrogTape.

Stand back, remember the before (try not to gag):

hardwood floors before

Admire the gorgeous after: 

apartment sneak peek alert!

dark walnut stained hardwood floors

Pinterest tip: Did you know that if you rub a wood scratch (floors and furniture) with a walnut (circular motions, filling in the scratch), the walnut oils will fill in the scratch and heal the wood wound? Great snack, too!

Estimated total cost of DIY refinishing 2 small rooms of hardwood (approx. 250 sq. feet) = $250.00 and a few days of recovery…but nothing that would keep you out of your True Value hardware store to prepare for your next DIY. 😉

Joining Sarah’s party today:

TDC Before and After

We were chosen by True Value to be one of the members of the 2012 DIY Squad. I have been compensated for the materials needed for my DIY projects. However, the thoughts and opinions expressed are completely honest and my own. I have not been paid to publish positive comments and no one has twisted my arm to participate. 

This is a sponsored post brought to you by FrogTape. The opinions are completely my own based on my own experience. 

FrogTape Blog Squad

Facebook
DIY Show Off - FacebookDIY Show Off - TwitterDIY Show Off - PinterestDIY Show Off - FeedDIY Show Off - HomeTalkDIY Show Off - G+DIY Show Off - Instagram