Must Have Tool {and a giveaway!}

THIS GIVEAWAY IS NOW CLOSED. WINNER is Judy D. who says: “Planning on starting a dyi kitchen project and have only a couple tools on hand. Great giveaway.” Congratulations, Judy!
As you know, we renovated an apartment over the summer. We had the opportunity to review a screwdriver. The timing was perfect and the Master Mechanic Swift Driver seriously rocks! If I didn’t think so, I wouldn’t be writing this. Seriously, it’s the one tool that was always within reach and made a lot of our DIY projects easier.
Master Mechanic Swift Driver
Here’s the official description:

A new twist on an old tool. Master Mechanic dual-drive screwdriver employs a patented gear drive ratchet design that doubles your screwdriving efficiency. Drives the screw when you turn the handle clockwise AND counter-clockwise. 29-pc. set includes flexible shaft extension and multiple bit sizes for a variety of applications. Includes 7 phillips, 3 slotted, 4 hex, 3 square, 4 star, 6 SAE nut driver bits, and bit case. Ergonomic handle has a non-slip rubber grip and can store bits.

What I love. . .

  • No electric, no batteries required.
  • The dual ratcheting action was a lot easier on my hand and wrist! Every time I turned my wrist, it was working to get the job done, both left and right. It’s lightweight too.
  • I loved that I didn’t have to go searching for a specific type of screw driver since it has multiple interchangeable bit sizes (which can be stored in the handle) and since the bits are universal…I could grab one for the cordless drill when needed.
  • We ran into several tricky tight spots and the flexible shaft extension came in super handy (and even attached to the cordless drill).

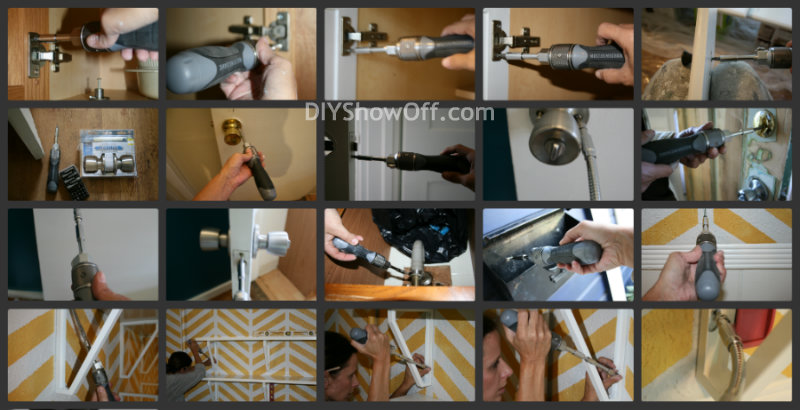
Take a look at how I used it A LOT during the apartment renovation {still use it!}. From removing and re-attaching cabinet hardware to changing out doorknobs to installing shelving brackets to tightening vanity screws to hanging a mailbox to assembling furniture, this tool was super helpful.

Using the Master Mechanic Swift Driver

Example: When I’m re-attaching cabinet hardware and place the screw into the pre-drilled hole, I turn the screwdriver clockwise. Then, when I turn counter-clockwise, it’s turning the screw, pushing it further into place too. I love that! I don’t have to change my grip! Just keep winding right, left, right, left. Then with a push of a button, the same works in reverse to remove the screw. So cool!

So, if you are looking for a great gift idea for a DIY’er a non-DIY’er too or stocking stuffer OR you’re tired of sore palms or digging for the right screwdriver, I know this would be a HUGE hit. The recipient is not going to be disappointed, won’t ask for the gift receipt and WILL use it!

The Master Mechanic Swift Driver is available {and on sale!} at True Value Hardware.

$100 True Value gift card Giveaway

True Value gift card

Need a little help with Christmas shopping for a Master Mechanic Swift Driver? Want to grab one for yourself too? One lucky DIY Show Off reader will receive a $100 True Value gift card. Open to US residents 18+ only. Giveaway starts with the publishing of this post (TODAY! Monday, 11/26) and ends Friday, 11/30 at midnight EST. Winner will be chosen randomly and announced shortly after.

What is on your True Value Hardware wish list? Answer in the comment and check +1 on the rafflecopter widget. Follow True Value on Facebook and share the giveaway for additional entries (be sure to +1 on the widget!). Good luck!

a Rafflecopter giveaway

We were chosen by True Value to be one of the members of the 2012 DIY Squad. I have been compensated for the materials needed for my DIY projects. However, the thoughts and opinions expressed are completely honest and my own. I have not been paid to publish positive comments and no one has twisted my arm to participate. 


6 Tips for decorating a Christmas tree {DIY Project Parade}

Decorating the Christmas Tree

This is the weekend that we {I} decorate for Christmas! Yesterday and today {probably tomorrow too}, Christmas decorations have exploded in the living room, family room and dining room. There are boxes everywhere. Is it like that for you too? {I apologize for the poor quality pics…but it wasn’t a priority. Not like getting great “after” decorating pictures will be!}

artificial Christmas tree decorating tips

Today I wanted to share a few tips for setting up and decorating an artificial tree, some that help make it look more ‘real’ and full. For our living room, we have a rather nice artificial tree. It’s always mistaken for being real but there are some things I do to make the best of having a fake tree:

Pine Scent

Tip #1: I do burn a Yankee Balsam and Cedar candle to create a real pine smell. Love it! Pretty pine scent without smelling like a pine tree car air freshener.

Yankee Balsam and Cedar candle

Faux Root Ball {and adding height}

Tip #2+3: Rather than a skirt for this tree (our main one where Santa leaves the gifts), we create a faux root ball and giving the tree more height. First, make sure you have room to lift your tree about a foot higher! I set a galvanized tub in the center of a circle of burlap. We add weights to the tub {25 lbs.}. Then I set the stand of our tree onto the tub. I use twist ties to secure two of the feet of the stand to the handles of the tub. I gather up the burlap and tie it around the tub and stand and secure with twine at the “trunk”.

directions: Christmas tree faux root ball

Pull the top of the burlap to make sure it’s over the tied twine. Fluff a little. Lots of room underneath as it lifts our 7.5′ tree about a foot higher. I love that about doing this too!

artificial Christmas tree faux root ball

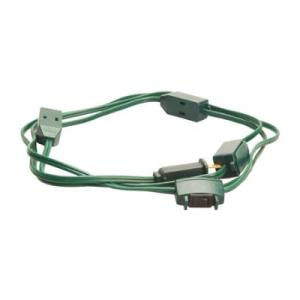
Tip #4: I also use a 9 outlet Christmas tree extension cord. I like that the outlets are spaced along the extension cord. One plug into the wall outlet and an off/on switch for the Christmas lights. I found mine at True Value Hardware along with lots of lights and decorations!

Christmas tree extension cord

String lights vertically

Tip #5: I was surprised that not many Facebook fans knew this tip, so I’ll share here too: I add my lights to the tree vertically {up and down} rather than around. I can’t tell the difference and when the tree is in a corner like it is in our home, it’s a lot easier than trying to get around it’s width, pulling it out and pushing it back into the corner, moving a ladder all around while trying to “lasso” the tree with strings of lights.

Christmas tree with lights Filling in the tree

Tip #6: If your artificial tree isn’t as full as you’d like it to be, add faux pine garland or silk flower bunches to fill in the gaps {large faux poinsettias help to fill in space and look pretty too}. Even dollar store green garland pushed near the center of the tree will help hide seeing the “pole” through sparse branches. Try larger ornaments and use wide ribbon or tulle as a garland to help fill the empty spaces.

I only have the lights on at the time of writing this post but will share it all decorated soon. I do a traditional tree in our living room with red and gold. Dining room gets a more rustic decorated smaller tree and I can’t wait to do something fun in the family room this year {to go with our eclectic colorful decor}.

Sharing at Beth’s party:Home Stories A2Z

Now, let’s get this party started! Remember, there’s the DIY Show Off Holiday Highlights party every Wed., but you’re welcome to link up holiday related posts today as well.

DIY Show Off DIY Holiday Highlights

Show off your latest DIY project! I’ll be showing off your links all week, follow along:

DIY Show Off - FacebookDIY Show Off - TwitterDIY Show Off - Pinterest DIY Show Off - HomeTalkDIY Show Off - G+

DIY Show Off

{grab the html button code here}

1. Please use the button above or text and link to this post to share the linky love. Here is the link: https://diyshowoff.com/category/other/diy-project-parade/. I’d love for you to share a link on your FB or by tweeting too if you have the time. Thanks!

2. This blog linky party is for DIY projects only. Links not related to DIY will be deleted. Please share your link one week only.  Please do not link recipes, giveaways, linky parties, promotions or a collection of inspiration. 

3. By joining the party, you give permission for your project to be featured and ‘shown off’ via blog highlight, Twitter, Facebook, Pinterest, G+, etc.


Getting ready for Cyber Monday! How about you?

We were chosen by True Value to be one of the members of the 2012 DIY Squad. I have been compensated for the materials needed for my DIY projects. However, the thoughts and opinions expressed are completely honest and my own. I have not been paid to publish positive comments and no one has twisted my arm to participate. 


Special Announcement and Our Next DIY Challenge

I can’t wait any more to share the news!

definition of true value

For the past two years, I’ve been honored and super excited to be a part of the True Value DIY Blog Squad. We’ve completed some fun True Value DIY projects in the past.

TRUE VALUE 2012 DIY BLOG SQUAD

We were so surprised when we were asked to participate again in 2012 and there may have been some big smiles and high fives. We humbly accepted because of this…

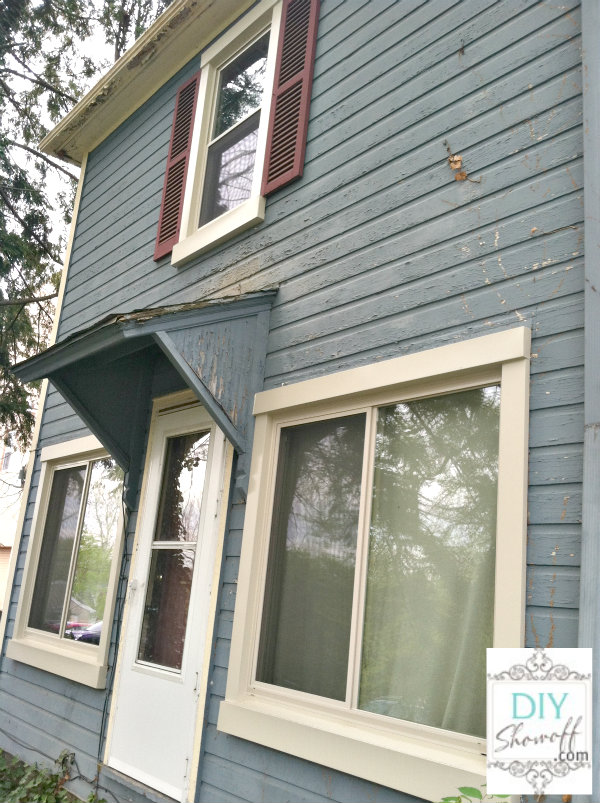
(scraping and painting the exterior is in the works)

apartment exterior

Side note: True Value Blog Squad is bittersweet for me. Niski was a part of our team that first year and I just miss her soooo much. 🙁

True Value DIY Blog Squad

We’ll have to motivate lazy Lalka to be a part of the team this year. 

Our plans include giving a tiny fixer upper one bedroom apartment (we’re the owners) a little fixing up and some cosmetic surgery here and there. We’re up for the challenge of making the most of this small space on a small budget and can’t wait to share the transformation with you.

Inside is teeny tiny and dingy/dirty. Previous tenant was there for years and years and it’s now been empty for quite a few years. It’s pretty dirty and run down. It only has 4 rooms – a small combined living room, kitchen, dining area

first floor apartment before

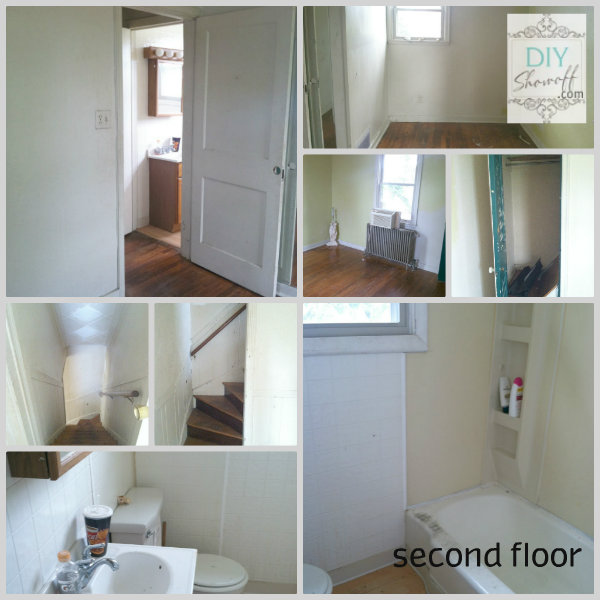
and a small bedroom and bathroom upstairs.

apartment second floor before

Do you see past the dirt to the potential? It’s darling! The goal is a fresh and pretty transformation with a little DIY magic in this cozy little home.

We’ll be sharing some of the DIY home improvement projects very soon along with some awesome giveaways! Here are the ways you can stay up-to-date with the entire True Value Blog Squad so you don’t miss a thing:

Any ideas for that little apartment (besides lots of cleaning and painting)? I can’t wait to get started on redoing those hardwood floors too. Love the wainscoting and those little curved stairs. If you had a completely clean slate with a big green light and super small budget, where would you start?

We were chosen by True Value to be one of the members of the 2012 DIY Squad. I have been compensated for the materials needed for my DIY projects. However, the thoughts and opinions expressed are completely honest and my own. I have not been paid to publish positive comments and no one has twisted my arm to participate. 

DIY Show Off - FacebookDIY Show Off - TwitterDIY Show Off - PinterestDIY Show Off - Feed