Grape Arbor Gazebo Makeover

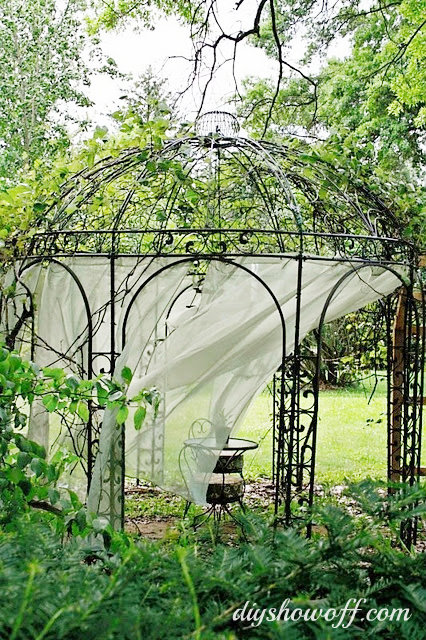
The grape arbor gazebo has been a work in progress for years. DIY takes patience sometimes, my friends. Especially when you’re working as time and money allow. I can’t tell you how GOOD it feels to have it complete!Grape Arbor Gazebo Makeover

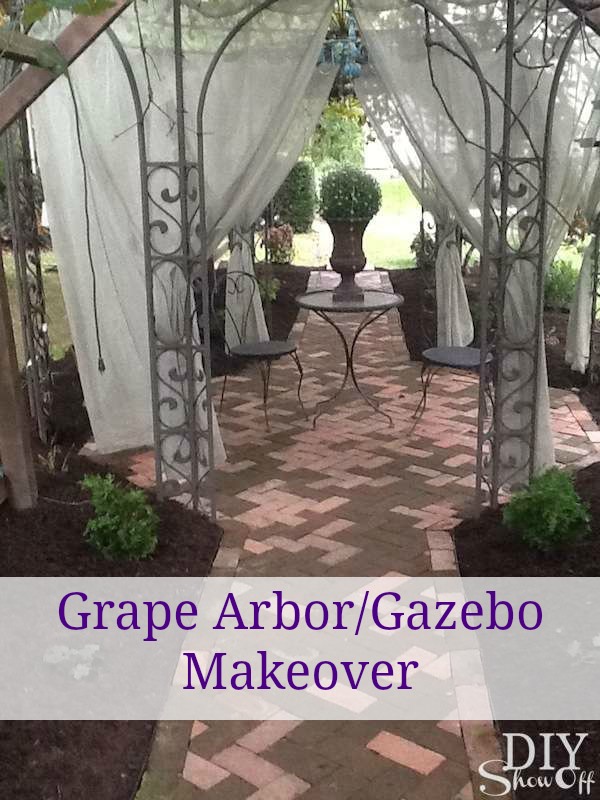
Let’s start at the beginning. When we purchased our home, we loved the grape arbor’s size and maturity.

 grape arbor before

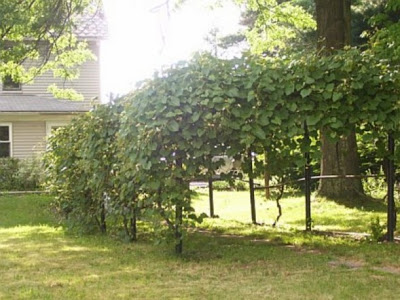
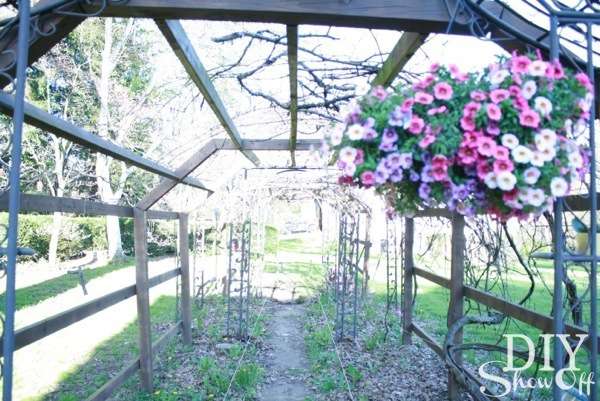
See those poles? Very, very rustic and home to some critters even…hello!chipmunk

As much as I love rustic and as cute as it looks in the picture below, it felt like a tetanus shot just waiting to happen not to mention, 6’2″ Mr. DIY had to duck to walk beneath it. 

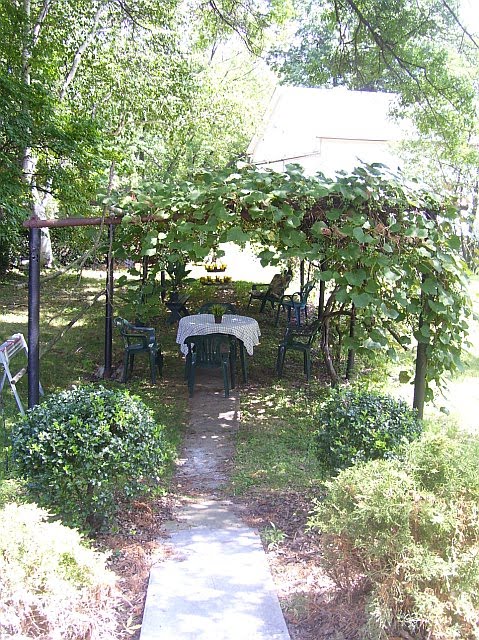
So the rebuilding process took place. Most of the roots to the vines are on the one side. We sort of ‘peeled’ those back one section at a time while a gazebo was installed in the center and more study wooden frame was built on each side. 
 
Mr. DIY and family {thanks, Butch!} built up the new wood structure around the old rusty iron skeleton, lifting and shifting the grapes in the process before removing the old iron poles. 
 
Rebuilding can be stressful but the grapes survived! Maybe they were even a little grapeful (haha!) for the home makeover. 
 
 
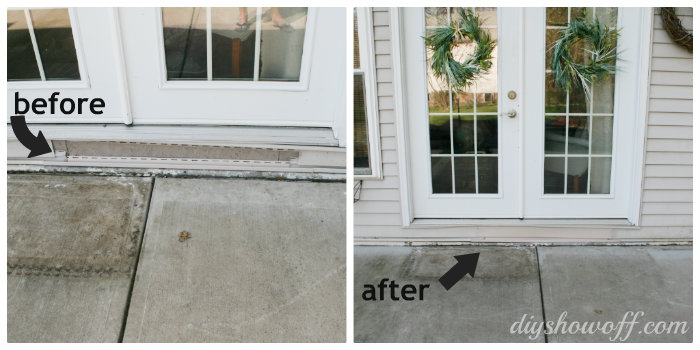
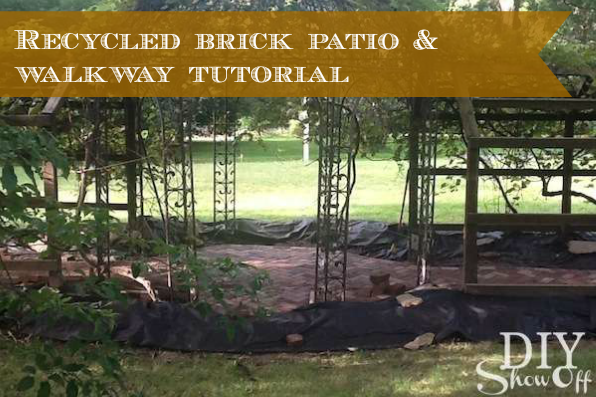
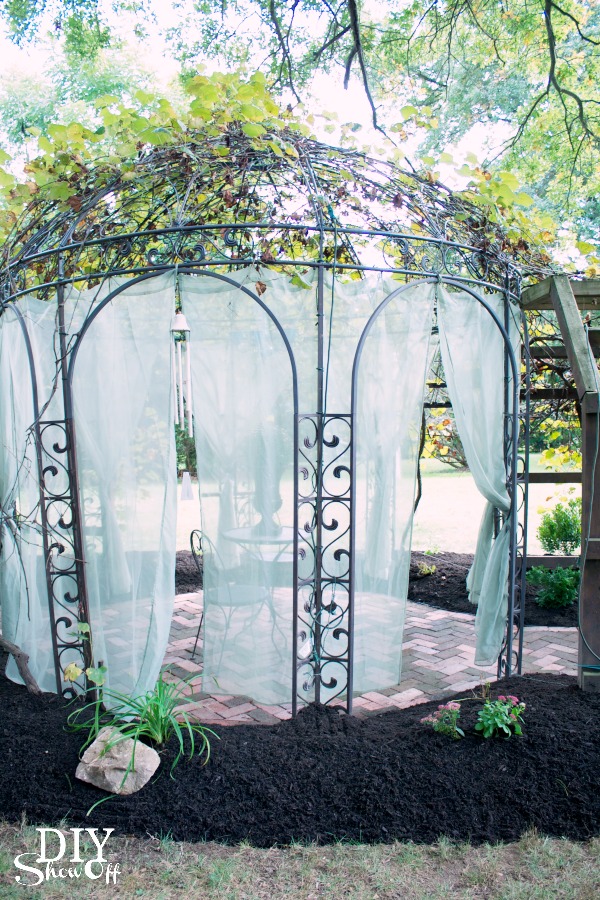
Beautiful! But then all that gorgeous-ness didn’t go with the overgrown messy underneath. 
grape arbor gazebo
And that’s where this summer’s DIY project of installing a recycled brick patio and path came into play. 
grape arbor path before
 
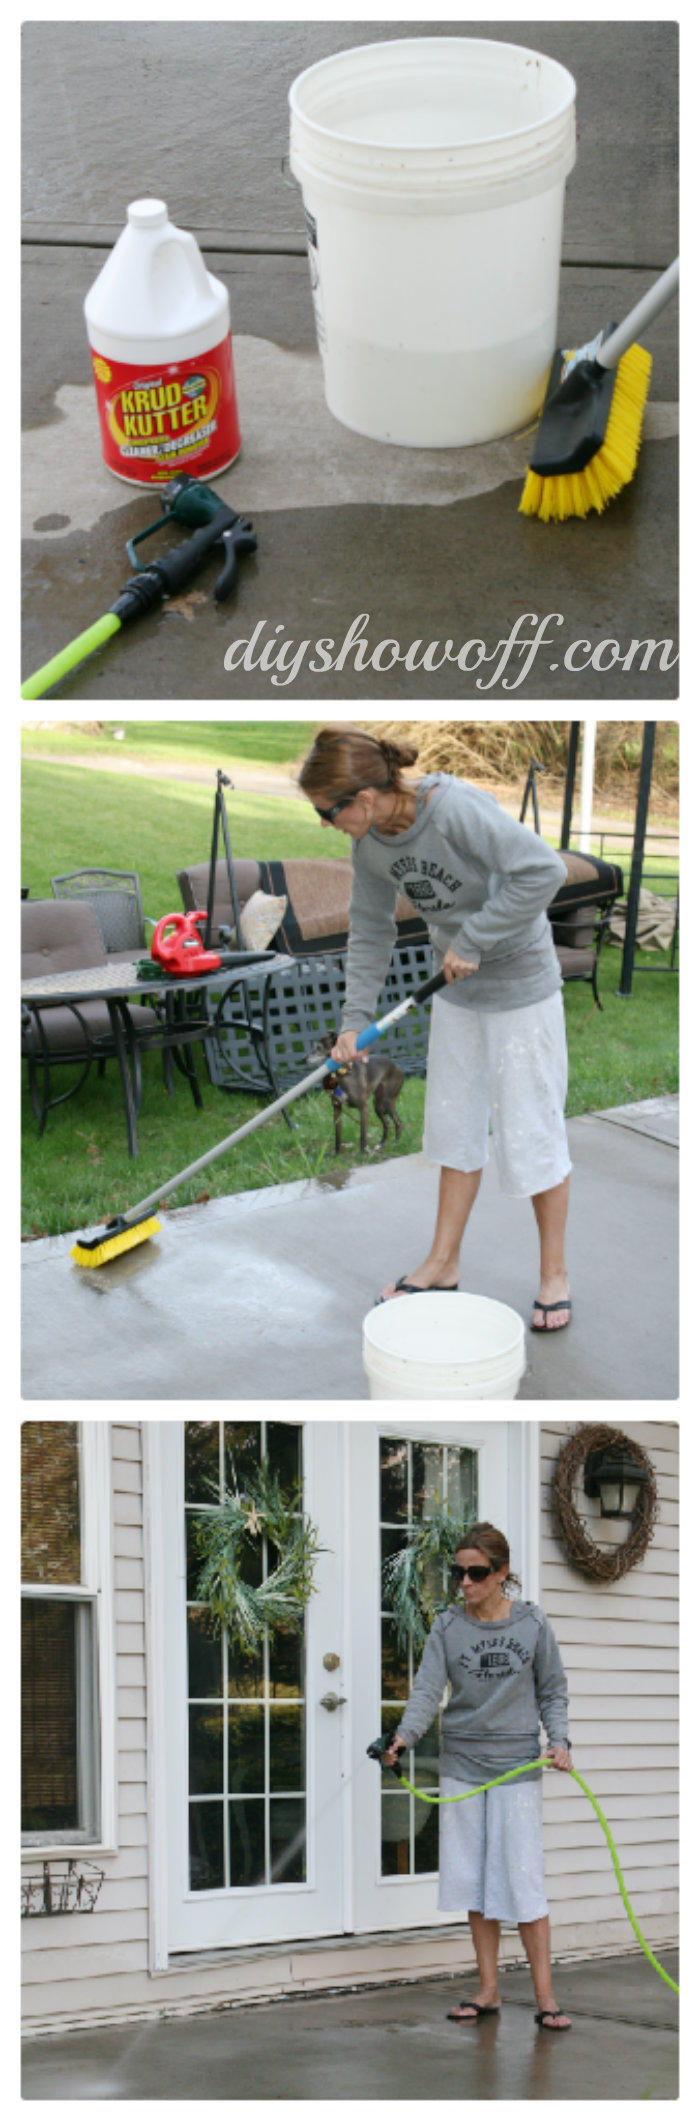
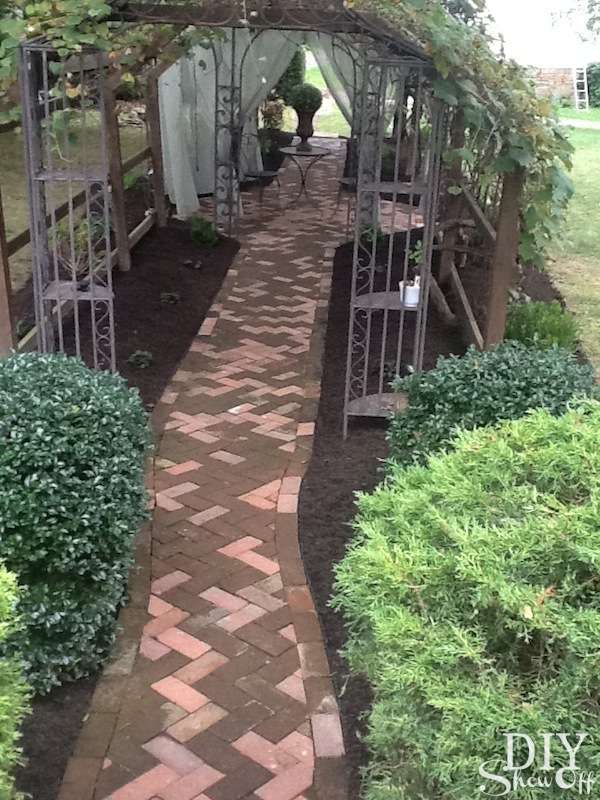
See the recycled brick patio and walkway tutorial for more details about the transformation and steps Mr. DIY took to install it with his own two hands. Great job, honey! xoxo
DIY brick patio
 
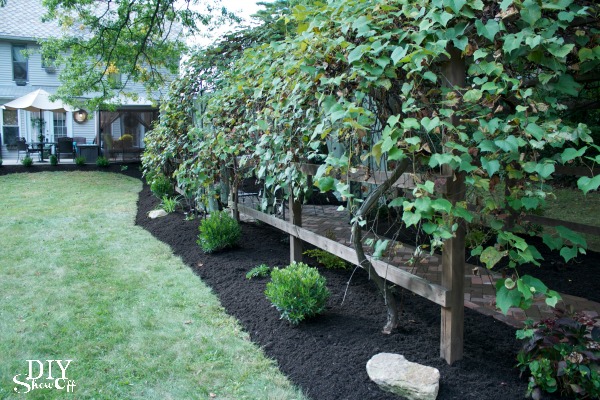
Once he finished the brick patio and walkways, it was time for some landscaping. I didn’t know where to start. I was so overwhelmed with the size, the work that it would involve. Plants intimidate me. So, the decision was made to hire professionals for weed clean up, planting, edging and mulching. 
 
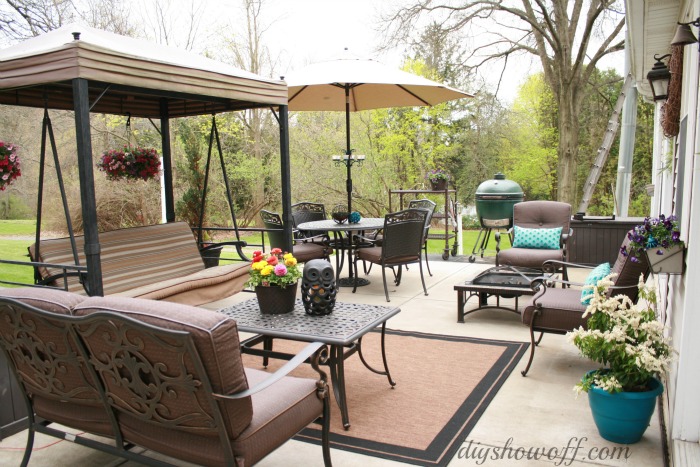
The view from our kitchen French doors: 
recycled brick walkway
Worth every penny. 
recycled brick walkway
Wow! It was a treat to watch what a team of 5-6 landscaping professionals with the right tools can accomplish in 3 hours. Yes. I said ‘three hours’. This would have taken me months of backbreaking labor. My back hurts just thinking about it. 
recycled brick walkway
Now I feel like I can maintain this area, plant more, decorate. And just enjoy every square inch. 
recycled brick patio
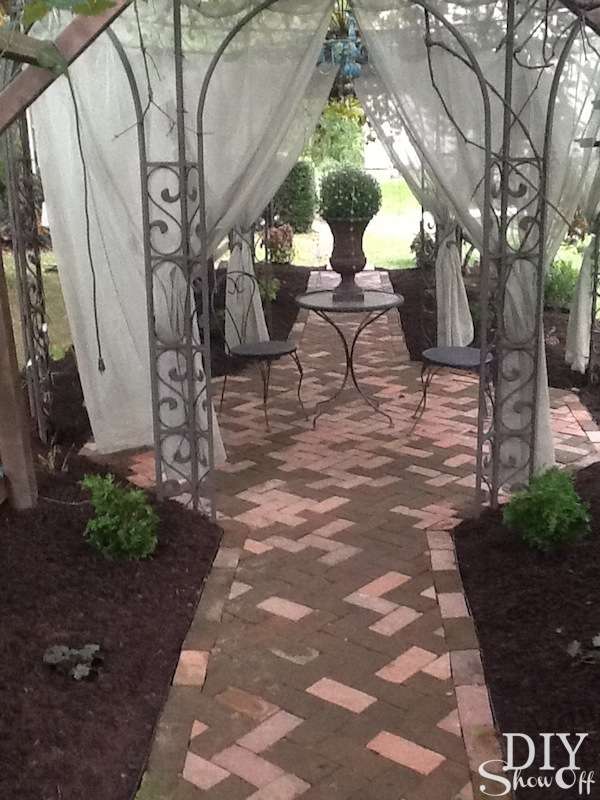
Isn’t it pretty? So romantic. So quiet and peaceful. 
recycled brick walkway and patio
 
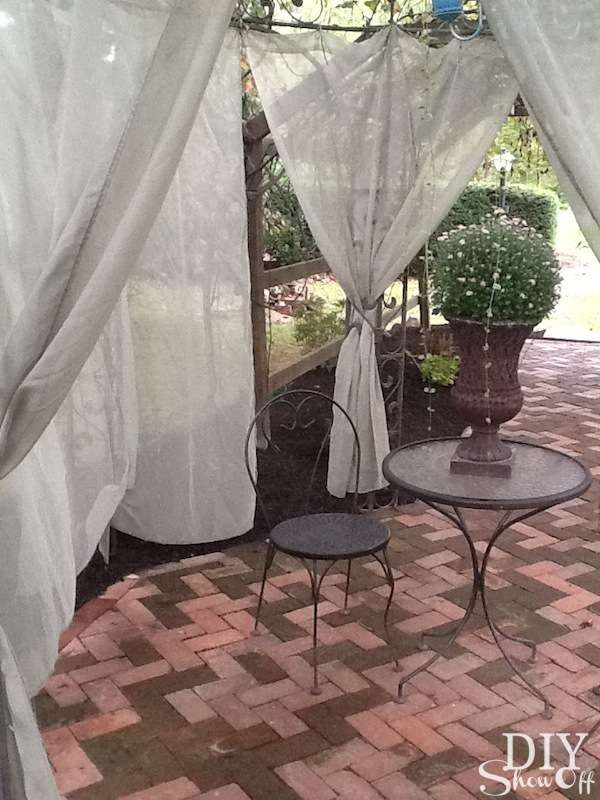
I’ve been window-shopping for furniture and ideas but will likely wait until spring. I’ve had the sheer drapes for years but this year, they look the best they ever have. 
DIYShowOff gazebo
 
grape arbor gazebo reveal
And scary… {ghost tutorial}
DIY ghost tutorial
haha!
 
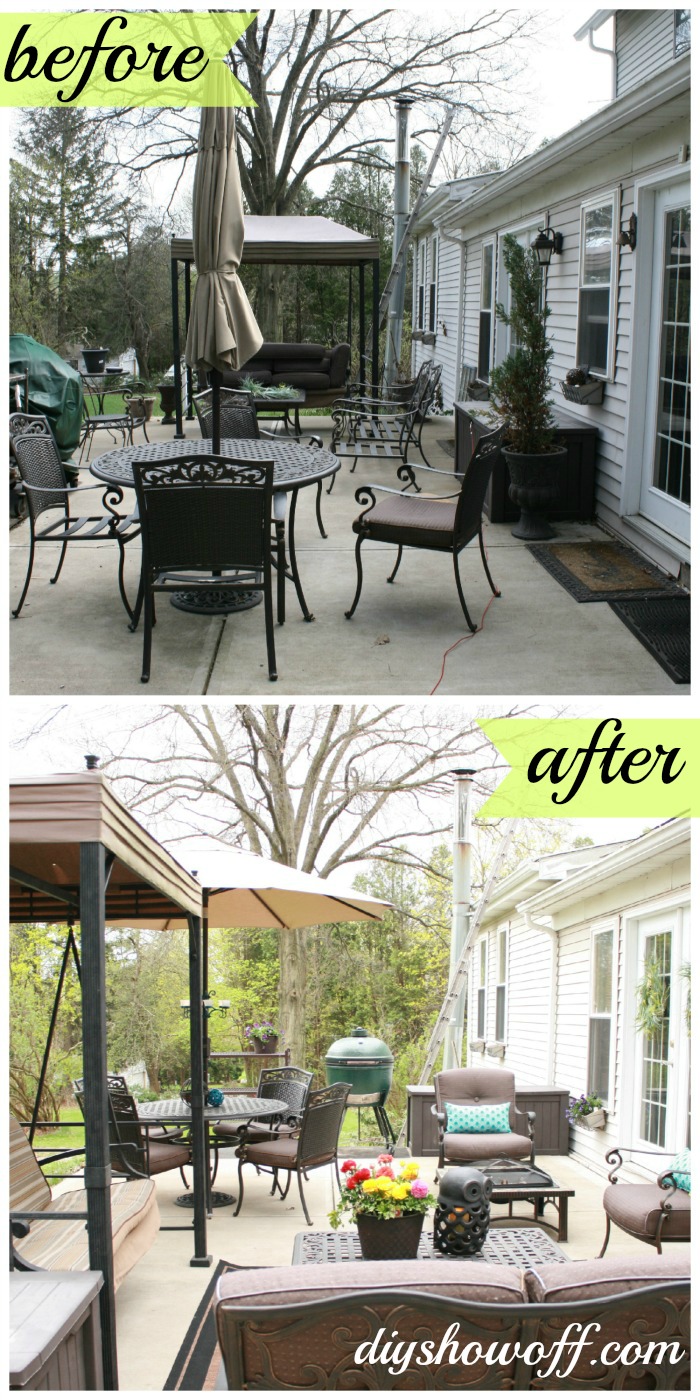
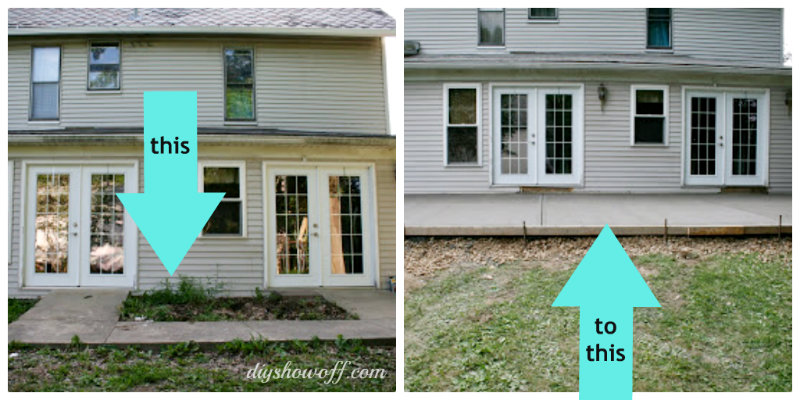
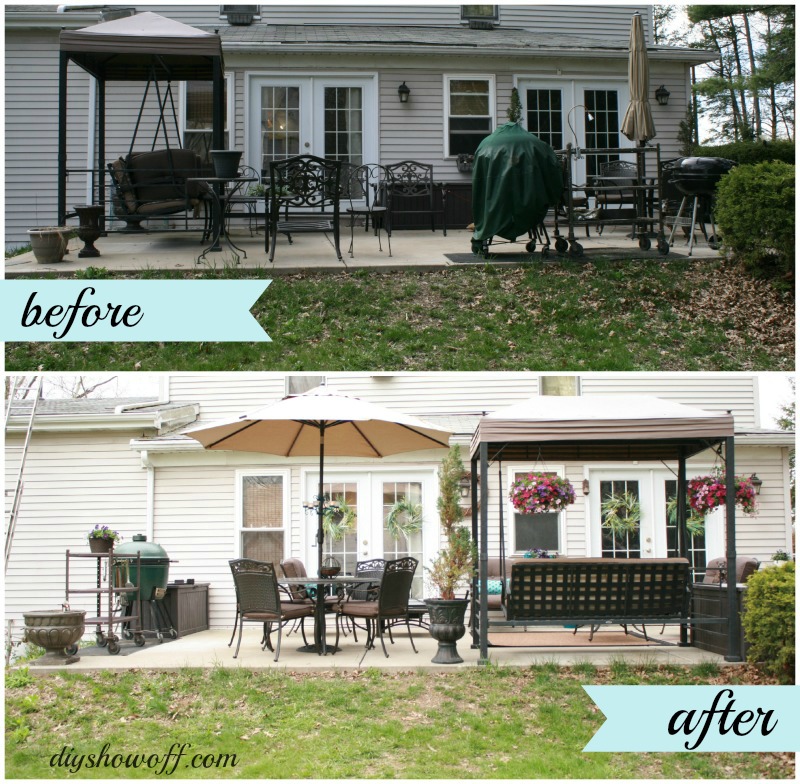
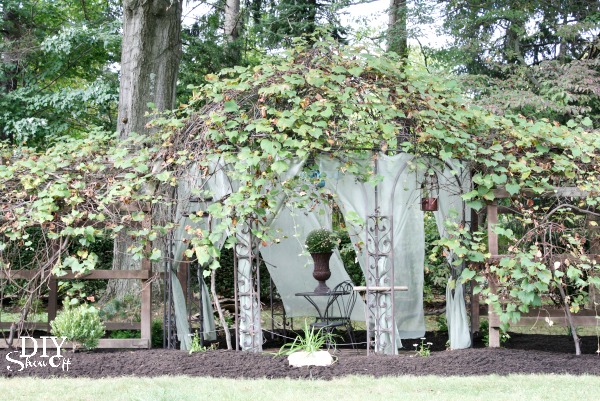
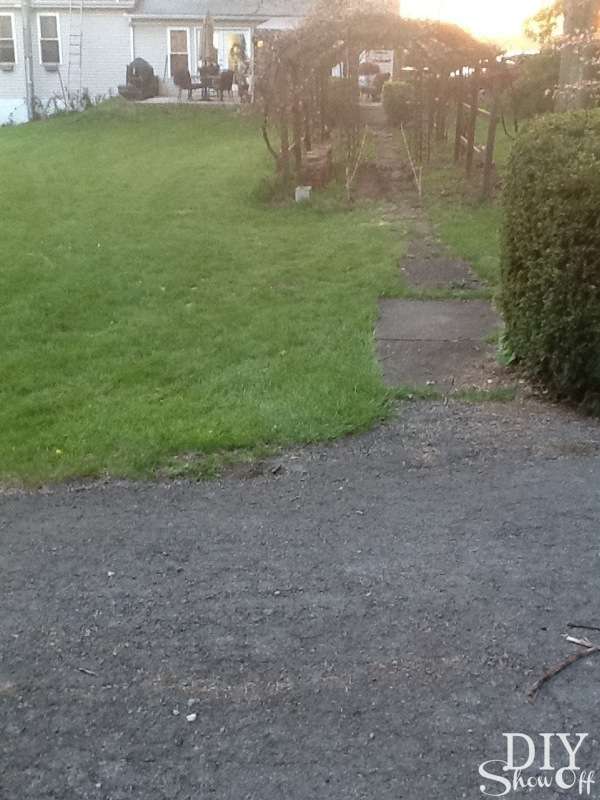
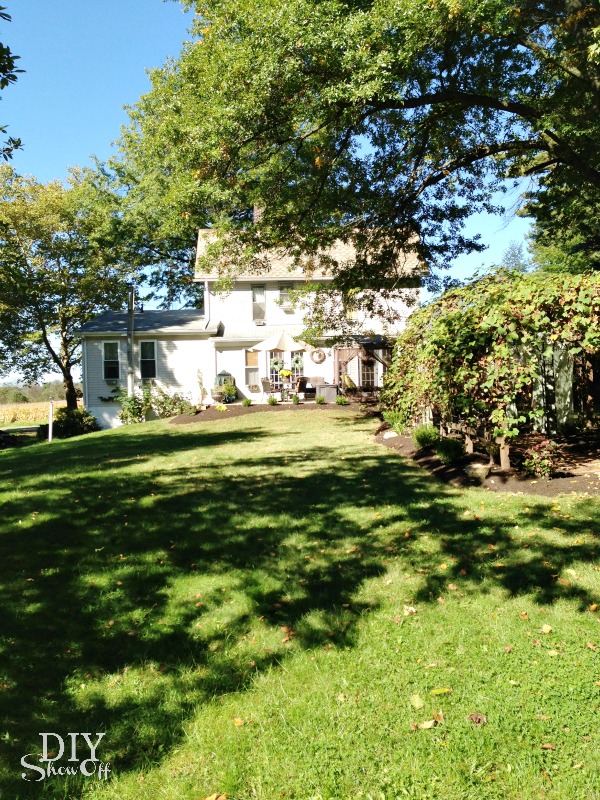
The back yard before…
backyard before
The back yard now…
backyard after
Grape arbor now.  
grape arbor
I can’t wait for the plants to fill in. I’ll be adding a few here and there this week too. Maybe something that will come up in the spring.
 
Now when you visit, we have a place to talk and catch up. Weather permitting. DIY brick patio
 
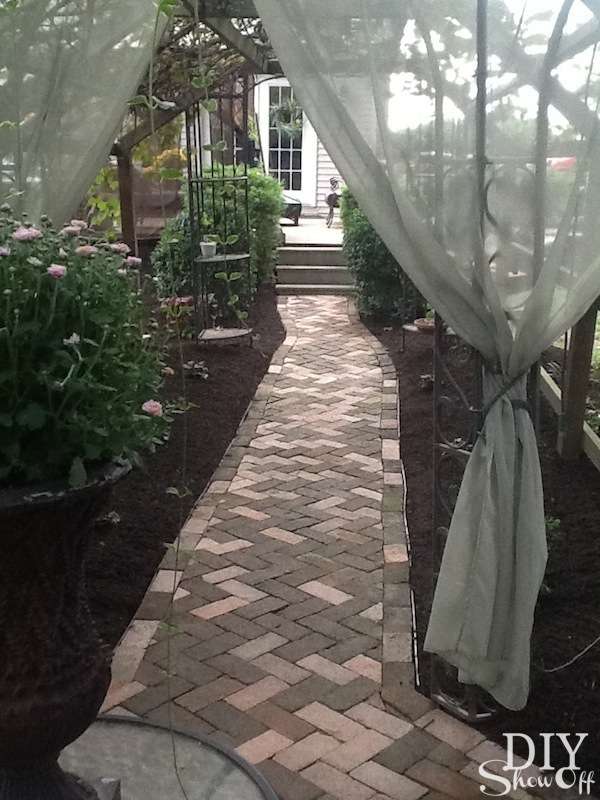
Do you have a special outdoor area at your home?
 

Decorating a Lamp Shade with Vinyl

Lamp Makeover

Plain white lamp shades are the perfect clean slate for adding a little DIY color and pattern to a room. I used vinyl on the inside of my shade to make it a little more special. When the lamp is turned off, the design is subtle, almost invisible but when the lamp is turned on, there’s a sweet little reminder to “shine bright”.

vinyl lampshade tutorial

Materials I used:

lamp shade and vinyl

  • old lamp
  • FrogTape® Multi-surface
  • spray paint (Valspar Indigo)
  • Ikea Jonsbo lamp shade
  • Glossy adhesive vinyl (turquoise) from Happy Crafters
  • optional: elastic gemstone bracelet

Tools: Silhouette Cameo

How I did it:

After taping off the light socket and cord using FrogTape®, I spray painted my old lamp a pretty navy and let it dry. Then simply removed the FrogTape to reveal a nice clean cord and nice clean switch and socket. 

spray painting lamp

For the vinyl wording: I created my lettering in the Silhouette Design Studio. Be sure to right click the text when finished and “flip horizontally” so it shows backwards. IMPORTANT: MIRROR IMAGE the TEXT!

mirror image text

I also used a flower garland shape for my design in addition to “shine bright”. 

vinyl flower design

I sent both to my Silhouette Cameo to “cut” once I adjusted my settings for vinyl. If you don’t have a vinyl cutter, you could also use vinyl decals if the design looks the same backwards (remember: text must be flipped horizontal/mirror image for this project).

Silhouette Cameo tutorial

I then removed all of the unnecessary vinyl from my designs by weeding away the vinyl that isn’t a part of the design…

vinyl lettering and design

and added the transfer paper. 

Happy Crafters vinyl

I removed the waxpaper backing and placed my designs on the inside of the lamp shade. I used a credit card to rub down the design for transferring. Then I removed the transfer paper. 

applying vinyl to lampshade

Note: I found cutting and adding my flower design in sections of two to be the best way with the rounded/tapered lamp shade. Keep vinyl pieces individual/smaller sized to go around the curved lampshade to prevent wrinkling when applying. 

applying vinyl to plastic lamp shade

I added the turquoise bracelet for a little additional bling. 

accessorizing lamp

Here’s a shot of the inside and outside. I do love how the turquoise vinyl lettering on the inside shows navy-ish on the outside. I couldn’t have planned that better if I tried!

inside outside of lampshade

It’s perfect on a side table in our family room for a little extra reading light…

lamp makeover

lamp makeover

Lamp off… 

lamp makeover

 Lamp on…

lampshade makeover


NEAT! Love it! I also thought “Note to self: Relax.”, a monogram or a damask pattern would have been pretty. What would your lamp shade say?

FrogTape Blog Squad*This is sponsored by FrogTape®. FrogTape provided by Shurtech. The opinions are completely my own based on my own experience. 

Happy Crafters supplied the vinyl for this sponsored blog post.

 HClogopngsmall

Patio Season {small updates}

I love that the weather is warming up! We have a patio off of the back of the house which we utilize as an outdoor room in the spring, summer and fall. We spend a lot of time in this space, weather permitting. It’s not a pretty sight by the time winter ends. Blah! The Lowe’s Creative Ideas challenge this month is outdoor mini-makeovers. Perfect timing!

patio update

Trip down memory lane: When we purchased this house, we installed two sets of French doors. There were concrete sidewalks with ramps to the old ‘single’ doors. When we bought the house:

house-before

A few years ago, we installed a concrete patio

concrete-before-after

but we never replaced the siding where the old ramps were located. (I also address the dirty concrete. Keep reading!)

missing-siding

I headed to Lowe’s with iphone pictures and measurements. The Lowe’s associates were super helpful in directing me to the siding supplies, advising what I’d need: a “J-channel” to match up/attach the vinyl siding. They even provided tin snips and a tape measure so I could cut it to fit in my vehicle.

j-channel

Installing the J-channels was easy, just nail into place. Then we just  a close-matching piece of vinyl siding (“heather”, also available at Lowe’s) and snapped it into place.

installing-vinyl-siding

Finally! No more embarrassing eye sore of missing siding…it’s those little things that really bother the home owner more than anyone else, ya know and one that is so surprisingly easy and cheap, I’m wondering why we put it off. Hopefully with some age, it will blend in even better.

before-after-siding-fix

I moved all of the furniture and gave the concrete a good scrubbing (water + Krud Kutter). It cleaned off the surface dirt and mildew but not rust or grease. However, it looks a much brighter!

scrubbing-patio

I used spray paint to freshen up some existing decorative accents, planters and a ‘grill cart’ and added some colorful flowers to planters and window boxes.

patio-accessory-update

Some new things available at Lowe’s:

Outdoor area rug defines the cozy seating area…

patio-makeover

Love this umbrella candelabra (misted with Rustoleum’s “Lagoon” spray paint to match other accents) and beautiful fat hanging flower baskets…

umbrella-candle-holder

The sun sets on the other side of the house. Sometimes evenings are chilly. This wood burning firepit is perfect for a little heat (and roasting marshmallows)…

firepit


Cutest decorative owl candle holder…

owl-candle-holder

When it’s warm and not raining, I start my day with a cup of tea here. When we entertain small groups and it’s warm, this is the party location…lots of family dinners/cookouts and since it’s right off the kitchen, hosting and clean up are super convenient. It’s also where we enter the house. Now it’s visitor-worthy, pretty and relaxing. C’mon over!

patio-before-after


BEFORE

patio-before

AFTER

patio-makeover

More pics…

patio-flowers

cocorosie


patio-makeover

patio-makeover

Next up for this space:

  • rearranging some of the furniture another time or two
  • pallet herb garden
  • canopied swing bling
  • patio pet bed
  • raised flower bed
  • grape arbor/gazebo path/patio is on the DIY list again (maybe this year?!)

Free Standing Pallet Herb Garden:

free-standing-vertical-pallet-herb-garden

Patio Swing Makeover:

how to add curtains to a patio swing


Sharing at Project Inspired.

See more fun DIY ideas at Lowe’s Creative Ideas, follow Lowe’s on Instagram, Pinterest and sign up for the Creative Ideas magazine and app!

Spring 13 Blogger Badge Subscribe Banner Version

*Disclaimer: As a member of the Lowe’s Creative Ideas Creators and Influencers network, I received a Lowe’s gift card to complete this project for a mini outdoor makeover challenge, however the tutorial images, instructions and opinions are my own.