


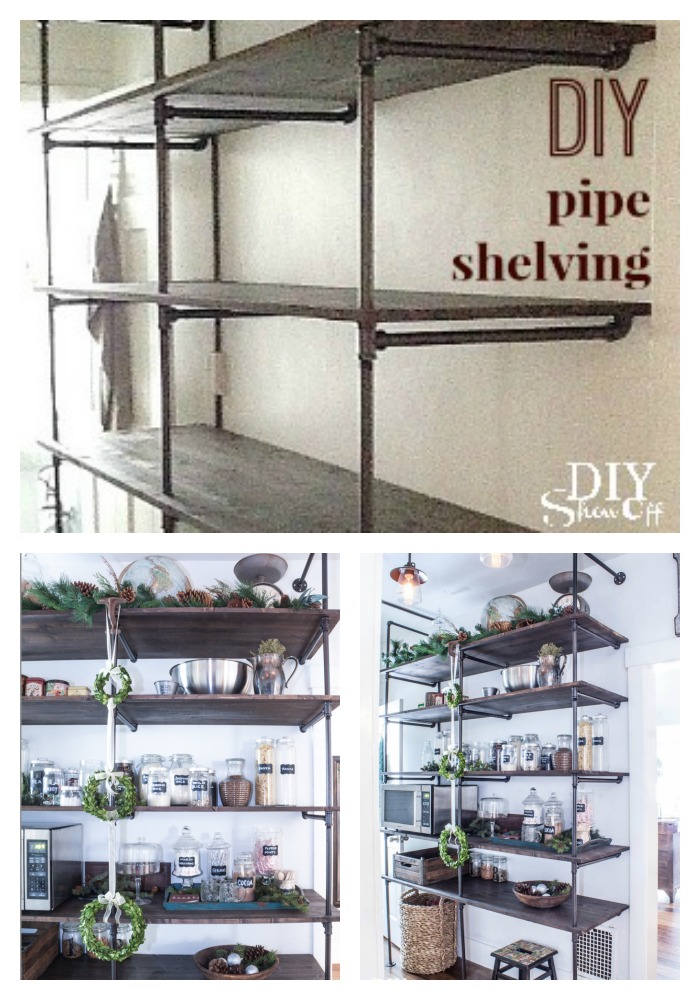
Getting started: The most difficult step (and not really that difficult when sketching a visual to help ‘build’ the correct size) will be your measurements and design. I’m no architect or artist, so my sketch is rough without fancy drafting software but it gets the job done and I was able to see where I needed to make adjustments. Start with measuring the space where the shelving will go. Length, height and width. I just drew the shelving (not to scale) on a piece of paper and labelled the measurements. Keep in mind that stock pipe comes in 12″, 18″ and 24″ pieces…any other size pipe will need to be custom cut/threaded (done by a Lowe’s associate).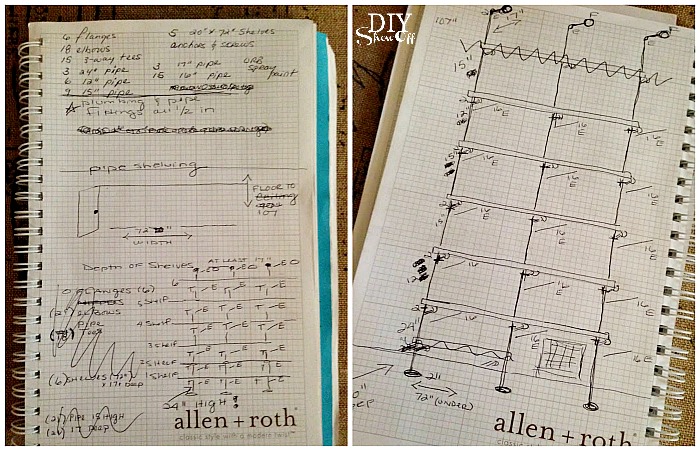
Understanding the construction: For 6 foot wide shelving, I wanted three supports for each shelf. Not enough support and the wood shelves may sag with weight over time.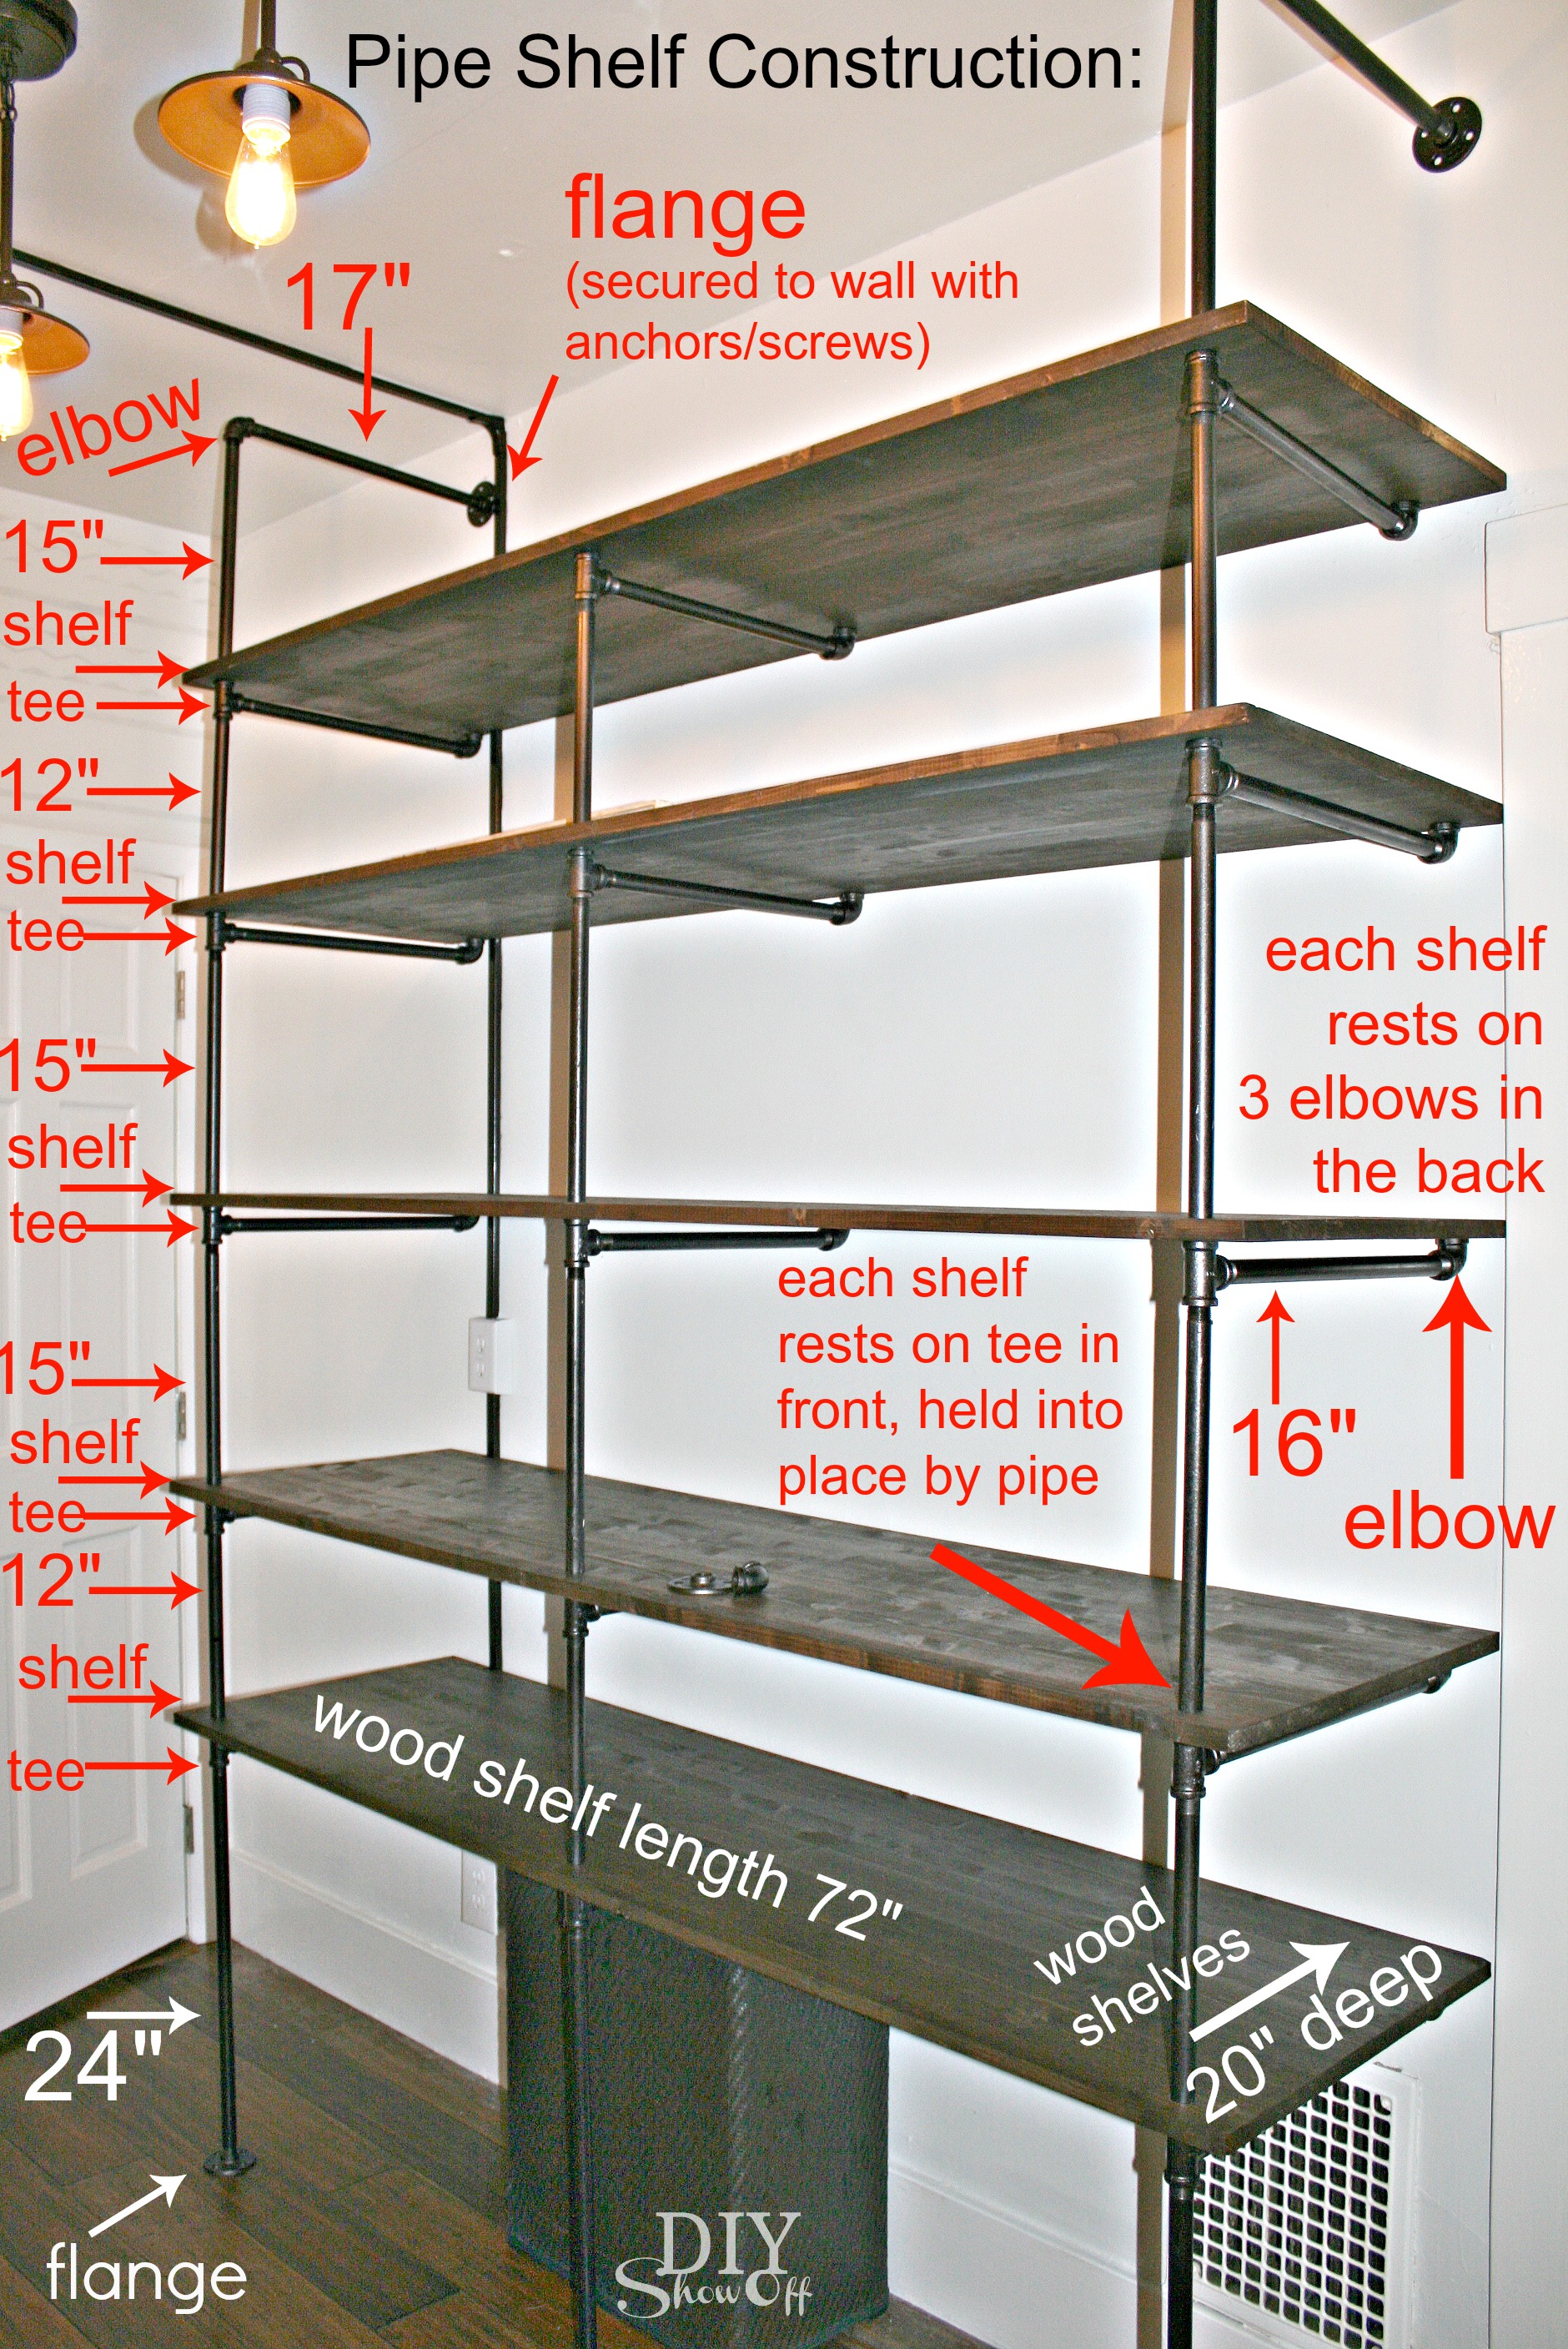 The pipe shelving frame is only connected horizontally by the wood shelving. Mine is only attached at the wall near the ceiling. I didn’t notice until assembling that my pipe cutting order was missing a piece so there should actually be another wall flange/pipe in the center top (and will be once I have more pipe cut). You could also screw it into the floor but we did not. It sounds as if it would be unsteady. Mr. DIY even had plans to add brackets for extra strength, however when installation was complete, even he was surprised by the how sturdy it is.
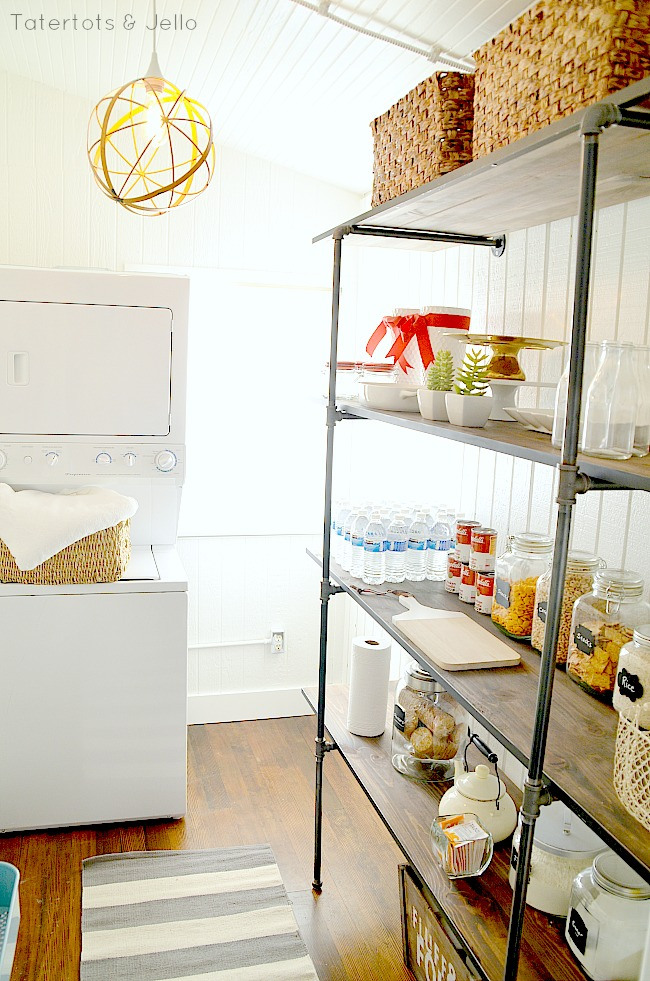
Each of the three built up/connected vertical pipe supports are individual and not connected to each other in any way. (Labeled on the left in the photo above as an example.)
Each wood shelf has three holes on the outer front edge (one on the left, one in the center, one in the right). Each shelf front is supported by resting on top of a tee in the front, threaded through a hole in the shelf with the vertical pipe. On the back, each wood shelf rests on an up-turned elbow. So each wood shelf is not anchored or screwed down in any way. It’s simply locked into place by the front pipe pieces through the holes in the shelf. Each shelf rests on a three tees in the front and three elbows in the back.
My (vertical) measurements are rough but I knew that I had a 107 inch cap (the height from floor to ceiling) and could not go higher. Adding the measurements visually helps with adding up the numbers. I estimated my fittings (the flanges, tees and elbows to be 2 inches – they’re actually smaller but it gave me wiggle room in my design so I knew my shelving would not be higher than 107″ and coming in a few inches lower is ideal). The wood shelving thickness does not come into play because it doesn’t add to the height of the unit. On my drawing, starting with the bottom of the shelving unit, I drew in the flanges and the number 2 for 2″. Then, because of heat vent placement, I knew my first shelf needed to be above that. I drew in the 24″ pipes. Then a tee (2 inches), then my next pipe length 12″, another tee (2 inches), 15″ pipe to accommodate our microwave height, another tee (2 inches), another 15″ pipe, another 2″ tee, a 12″ pipe, a 15″ pipe, 2″ elbow. Adding those up, my rough shelving unit height measured at 107. Exact in theory, but due to the varying heights of flanges, tees, elbows and pipe threads when assembling, actual finished shelving unit height came in at 102.5″ (so, overestimating measurements in the plan ensures that shelving unit will not be too tall for the space).
Horizontal: My wood shelves are 20″ deep. As shown in the photo above, in the front the shelving rests on 3-way tees, in the back, it rests on an upturned 90 degree elbow. I chose 16″ pipes for connecting the horizontal 3-way tee to the upturned elbow. (Because the tee sits 1″ in on the 20″ shelf, measures 2″, then 16″ pipe, then a 1″ elbow totaling 20 inches, meaning once threaded it won’t touch/rub/scratch the wall. Keep the total horizontal support measurement shorter than the shelf depth.) For my top three horizontal frame supports (only 2 shown in photos for now), I added an inch (17″) to reach threading the wall/flange.
Horizontal pipe pieces:
- 3 for each shelf (15 total for 5 shelves)
- 3 for top of industrial pipe shelving frame
Note: You may want to adjust pipe lengths to fit your own design. Maybe all one size or staggered shelving or a desk area. But once you understand the construction, you can customize each shelf’s height to fit your space. I used black iron pipe because the cost was a bit lower. Galvanized or maybe even PVC would work as well. All of my pipes and fittings are 1/2 inch. A Lowe’s associate made cuts and threads on pipes that were not an ‘in stock’ size.
Shop: Make a list of plumbing supplies by counting up each tee, pipe, elbow and flange in your sketch.
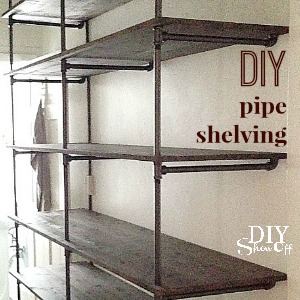
Materials for a pipe shelving unit measuring 72 inches wide x approx. 102.5 inches tall x 20 inches deep.
- (5) 1 x 20 x 72 inch stain grade pine planks
- Rust-Oleum Oil Rubbed Bronze spray paint
- Rust-Oleum Ultimate Wood Stain (I purchased 1 qt.) (color is Kona)
- Rust-Oleum Ultimate Polyurethane (matte finish)
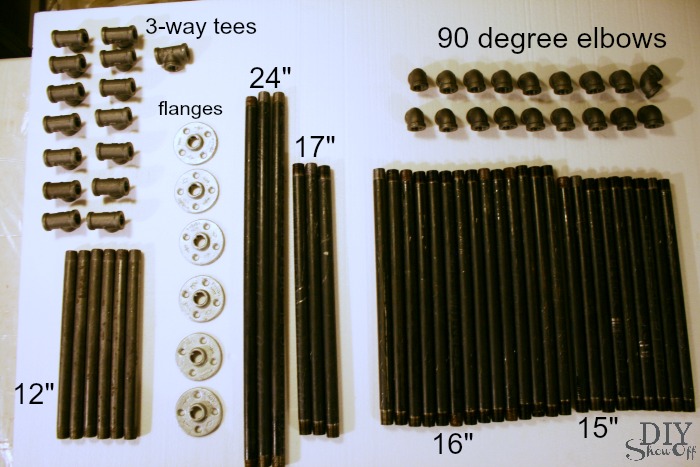
- (6) flanges (be sure to get the correct fitting size for 1/2 pipe)
- (18) 90 degree elbows (be sure to get the correct fitting size for 1/2 pipe)
- (15) 3-way tees (be sure to get the correct fitting size for 1/2 pipe)
- (3) 24″ pipes
- (3) 17″ pipes (custom cut/thread)
- (15) 16″ pipes (custom cut/thread)
- (9) 15″ pipes (custom cut/thread)
- (6) 12″ pipes
- screws and walls anchors
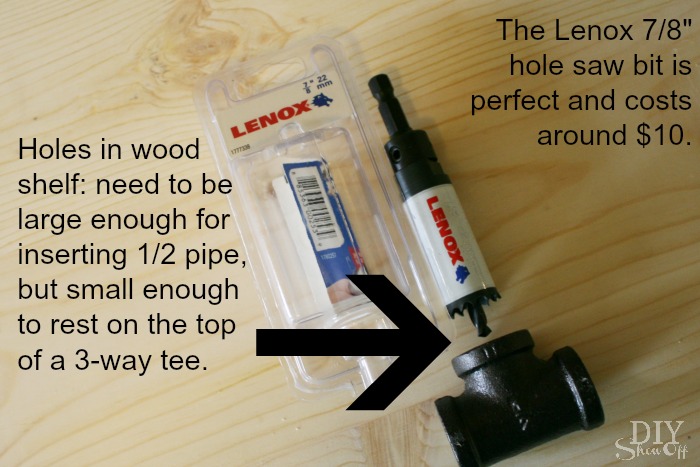
- 7/8″ hole saw bit (perfect circle cut for 15 holes)
What we did:
Prep: First step will be to clean the pipes. Because oil is needed for the cutting process, they will be filthy, dripping with oil and there are likely going to be pieces of pipe that have that annoying super tacky glued price stickers protected by packaging tape that will need removed. Since I used iron pipe, I could not let the pipes soak in soapy water (they’d rust), so I used grease-fighting Lysol wipes, paper towels and lots of patience.
Paint: Next I spray painted all of the plumbing pieces Oil Rubbed Bronze. I did not use primer. Because I chose black iron instead of galvanized, scratches or poor coverage aren’t an issue. 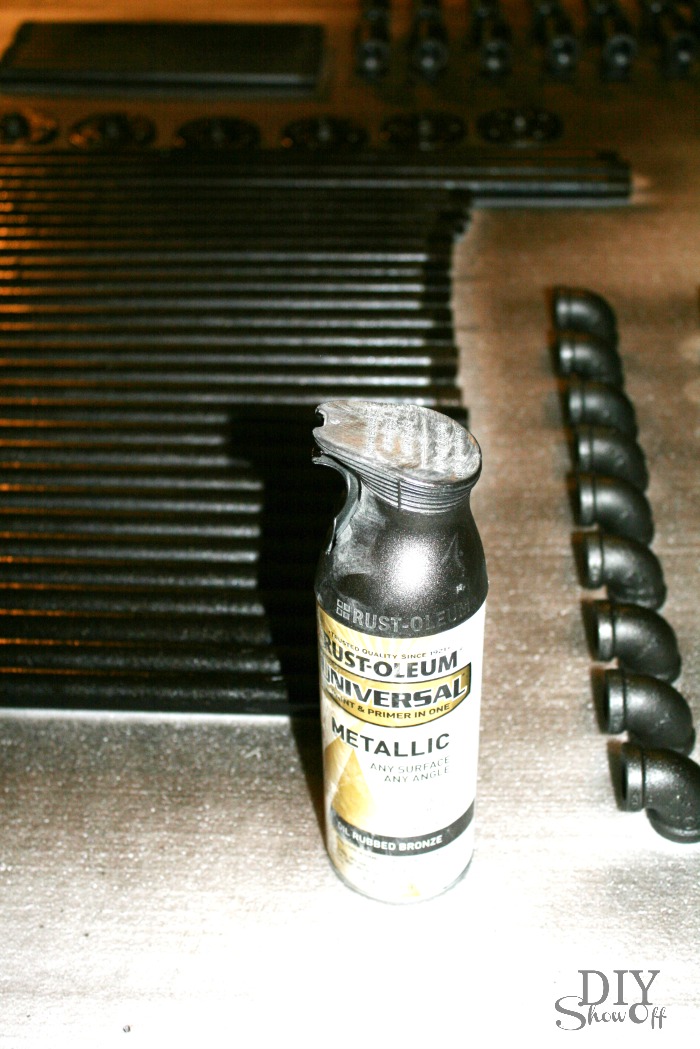
Wood shelves: We cut 1 inch off of our 72 inch length so we’d be able to open the half bathroom door the entire way. This doesn’t affect anything. Decide where you want the holes (for the pipe supports) to be placed. I decided about 1 inch in from the front, 2 inches in from the sides. I created a template from a piece of cardboard. It looks like this: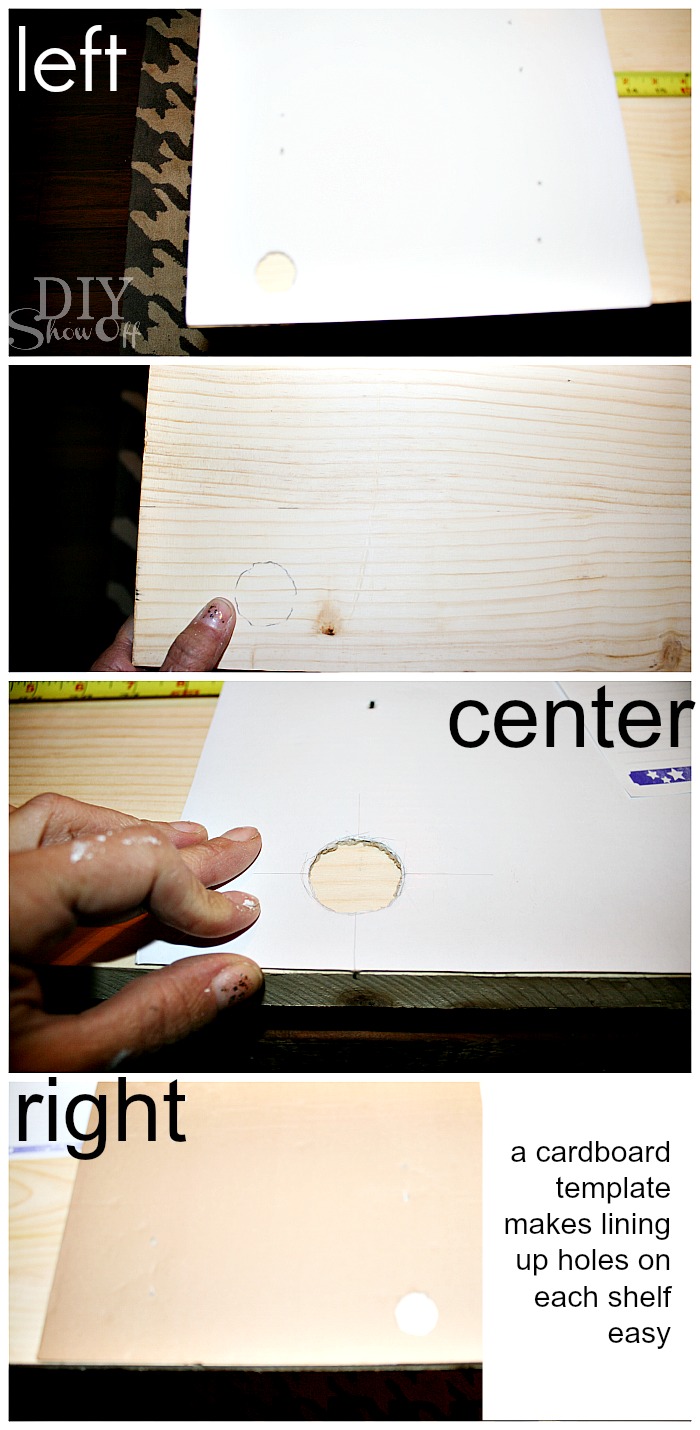
I simply lined up the edges of the cardboard with the left front edge of the wood shelf and marked my circle/cut mark with a pencil. Flip the cardboard and do the same for the right front edge. I measured the center of my 71″ length and pencilled in the circle/cut mark, lining it up with my template/stencil. I did this with each wood shelf.
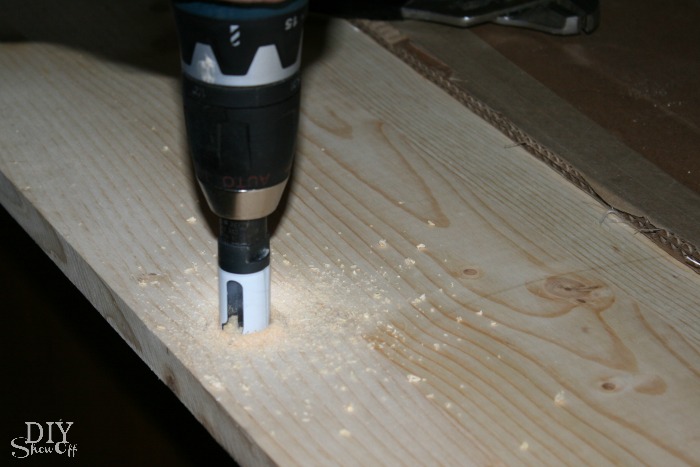
Cutting/drilling the holes: We drilled a tiny hole into the center of each penciled circle (made lining up the hole saw easier). We used the 7/8″ hole saw bit for perfect clean drilled holes. It made creating 15 holes all the same size a breeze! I lightly sanded and cleaned around the holes and our cut edge.
Because we have exterior wiring/conduit going up the wall behind the shelving, we had to create a notch on each wood shelf. We used our Dremel Multi-Max to to this. 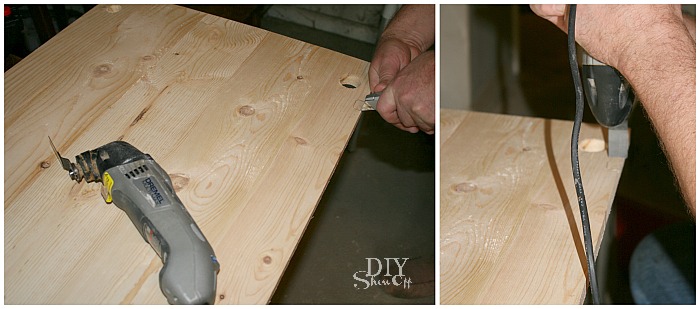
Staining and sealing each side of each wood shelf is the most time consuming part of the project. I love that Rust-Oleum’s Ultimate Wood Stain dries in about an hour. I only applied one coat…isn’t the color pretty? I did one side then flipped and did the other (the edges and inside of the holes too), applying with a foam brush and wiping off (rubber gloves and lots of rags are a must!). Watch for drips! Then I applied 5 coats of polyurethane to the top side (after this much work, you’re going to want to protect the finish on these shelves!), allowing to dry 2 hours between each coat. Again, watch for drips! No sanding between coats required. Once the one side was dry, I flipped the shelves and repeated brushing two coats to the bottom side, drying between each one. 
Time for assembly! I was super nervous about this part. The size of the room did not allow for us to connect and lift the shelving into place. So we propped up the first shelf using a hamper and books and assembled in place.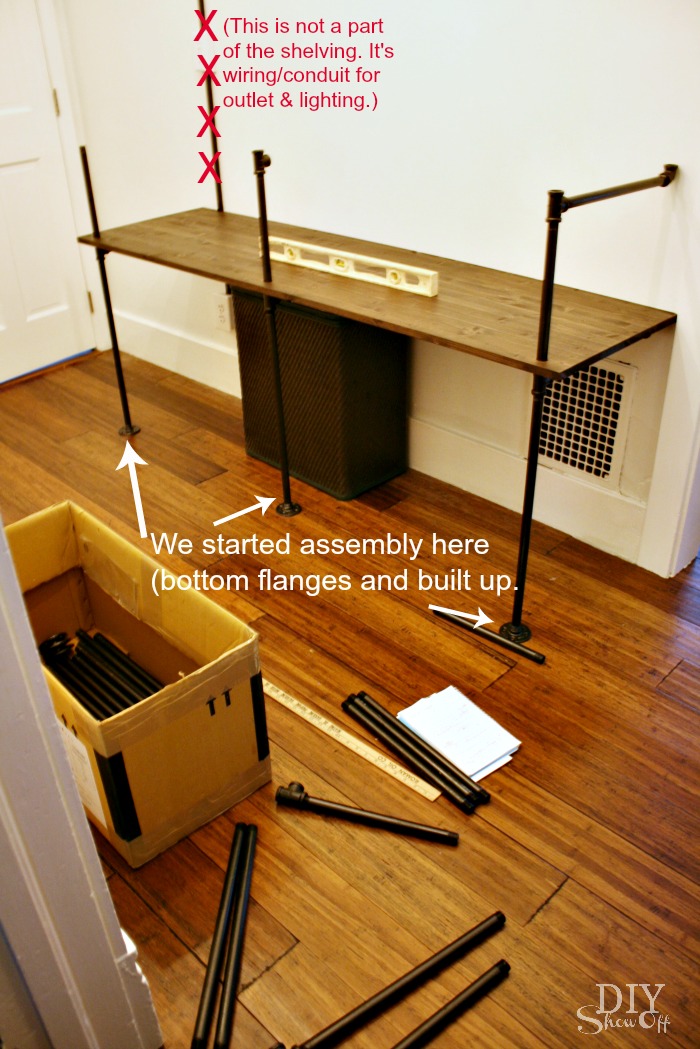 I can’t believe how easily and smoothly assembly went. I started by attaching flanges to the first three pipes. Then added a tee to each one. The tee should be placed in a direction with one opening facing up, another opening facing horizontal towards the wall. Next, attach a length of pipe (mine are the 17″ ones) to the horizontal facing tee. Attach an elbow at the end of the horizontal pipe. You’ll want the elbow to face up for supporting the wood shelf.
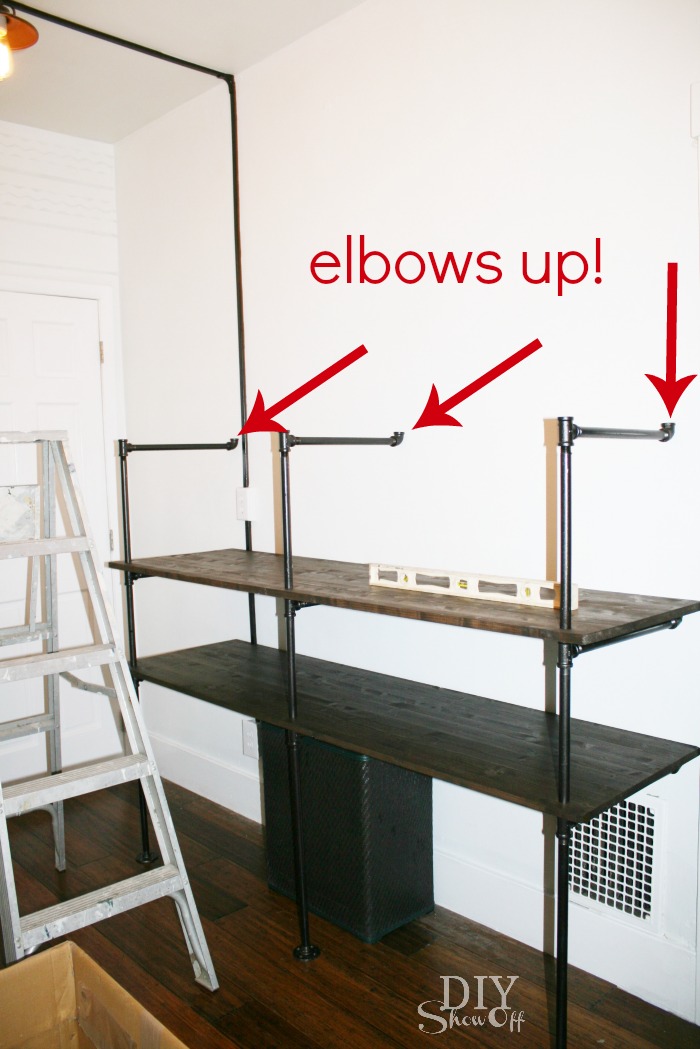 Hold that piece into place under the hole in the wood shelf. Thread the next length of pipe vertically (So starting order at the floor is flange, pipe, tee, wood shelf then next length of pipe). Continue building the shelf in this way. We kept the bar stools and books for support until the very end of the assembly process and securing the shelving to the wall.
Work with a level on the wood shelving to ensure everything is square and level. (Adjust threading as needed.)
The top: securing the shelving unit. After the last shelf is in place, add the last three vertical lengths of pipe. Add an elbow to each one. Add a flange to each horizontal pipe piece and thread into the elbow. The flange should be touching the wall (threads will allow for adjusting).
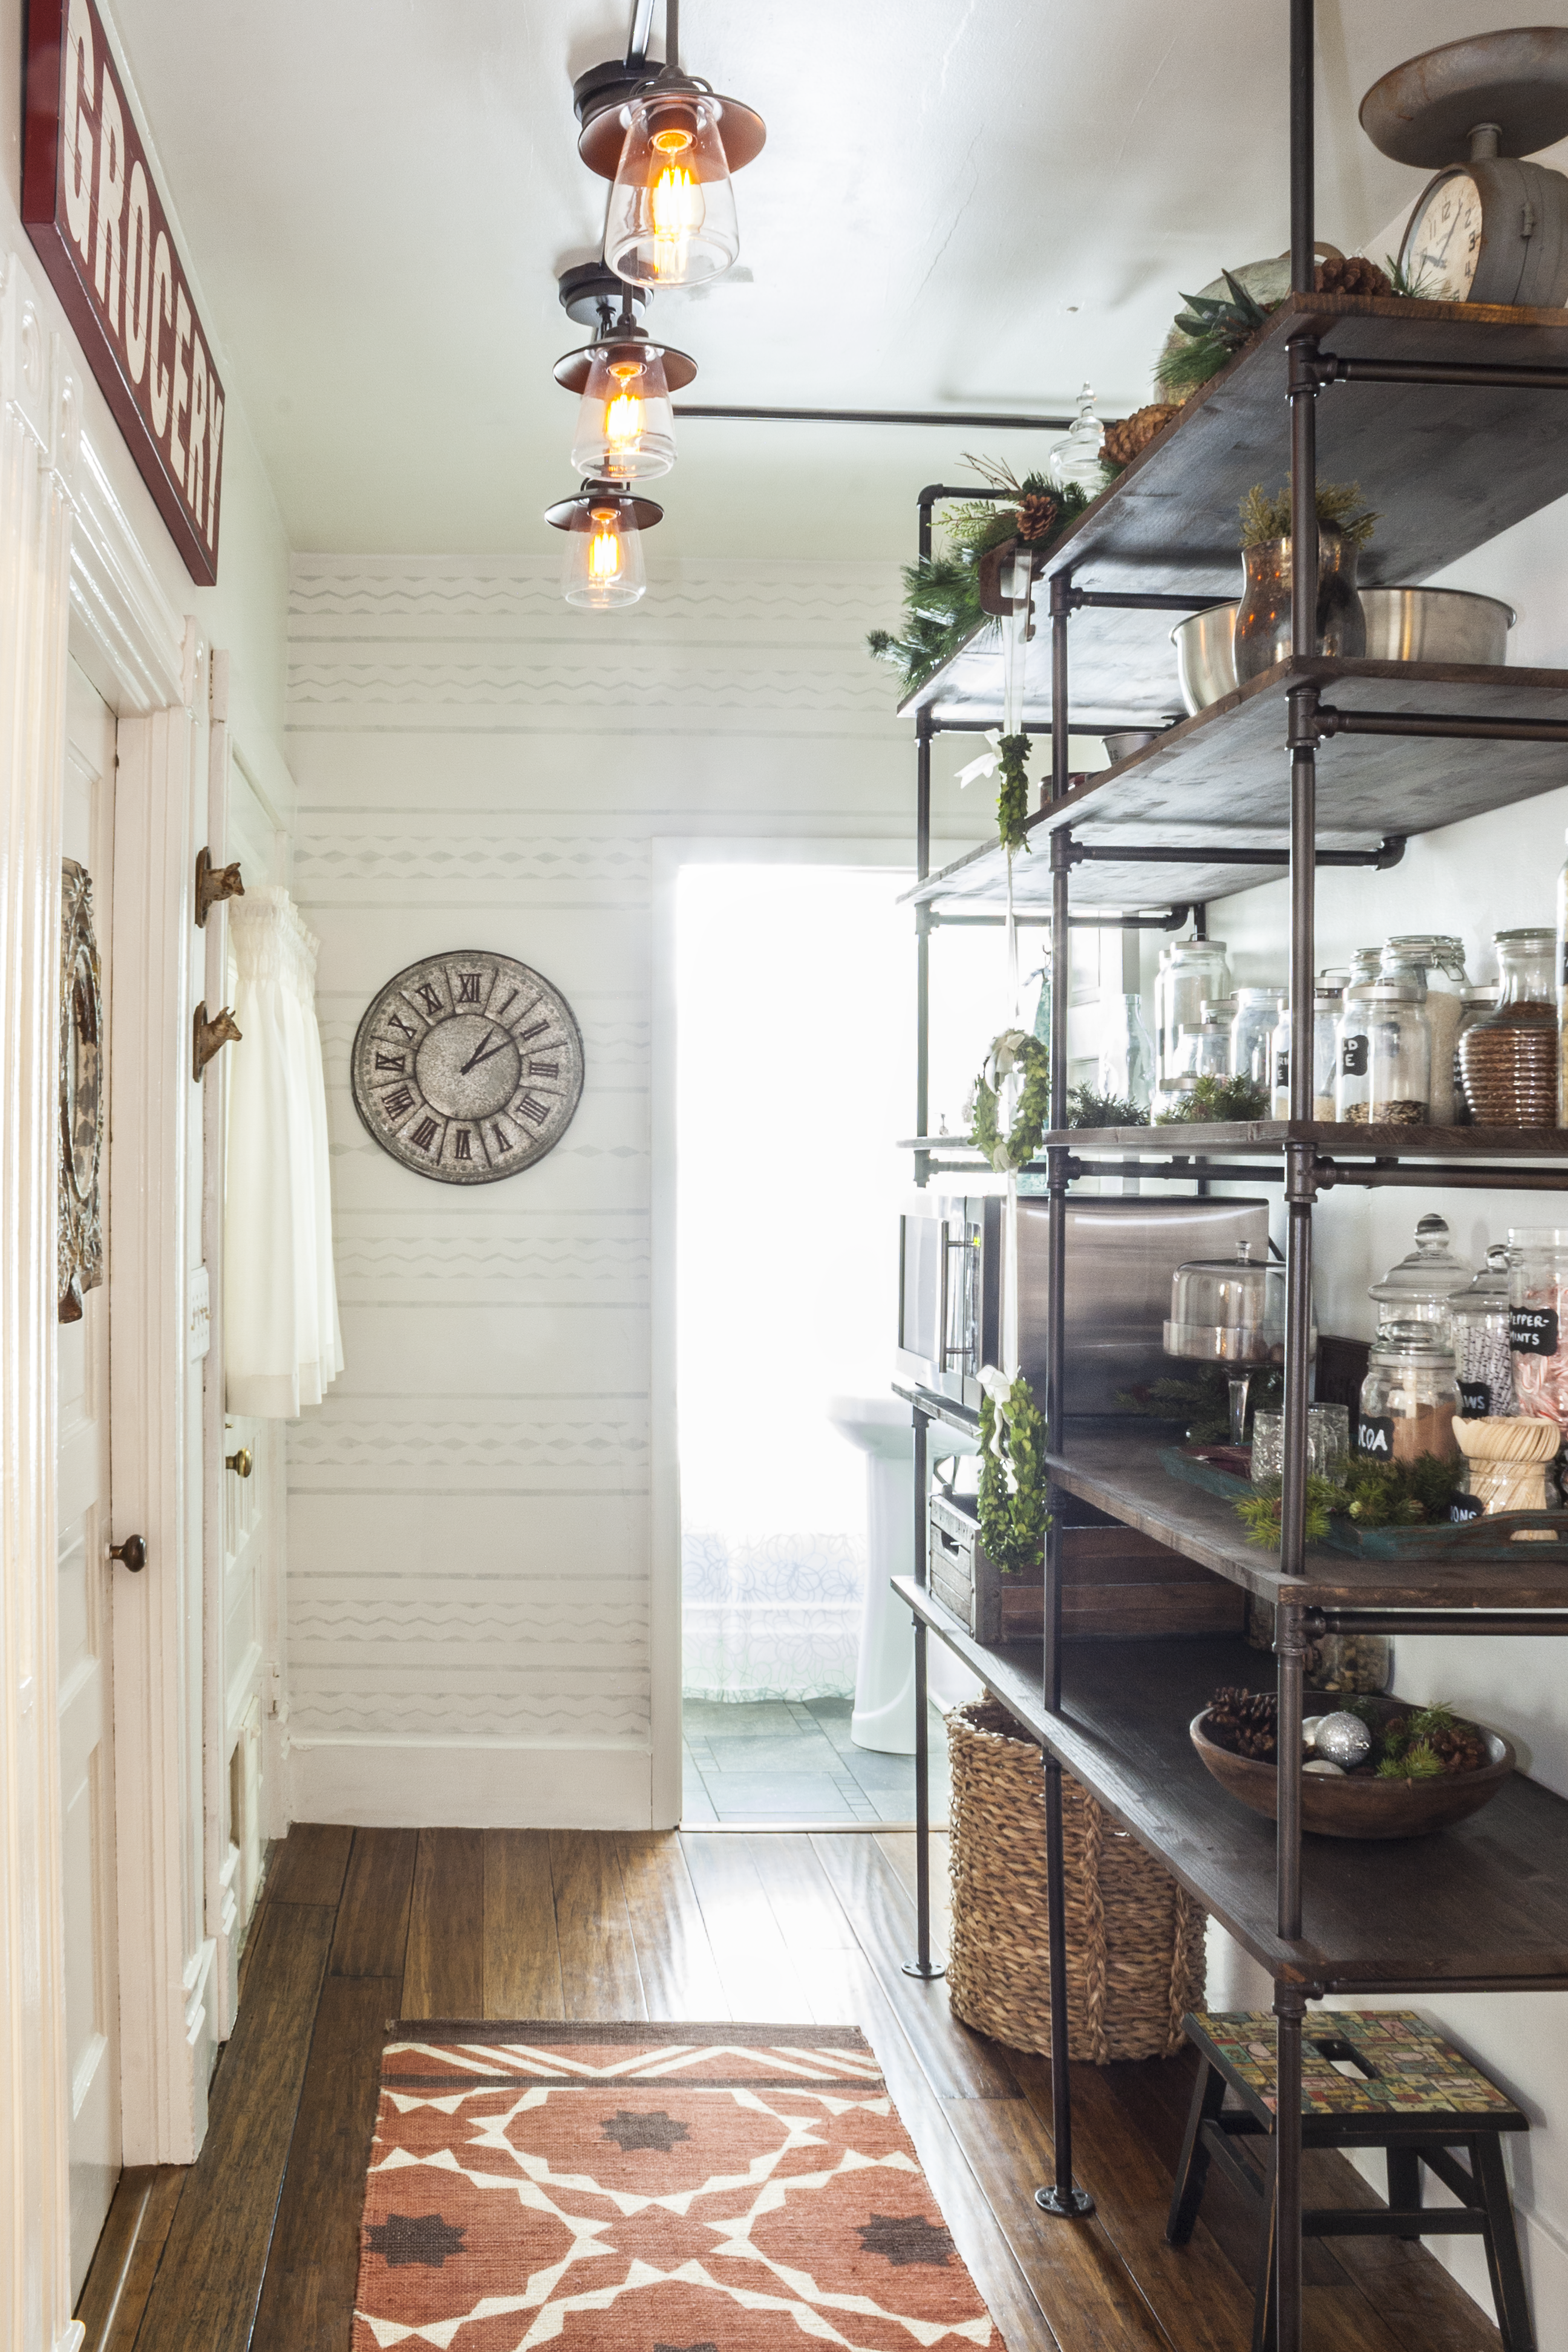
Using a pencil, mark the wall where screws (into the flange) need to go. Our walls are plaster so we drilled pilot holes and added heavy duty wall anchors. If you designed your shelf to line up with the wall studs…you’re good to go. Screw flanges into place. Sturdy. Beautiful! Ready to be stocked and decorated.
 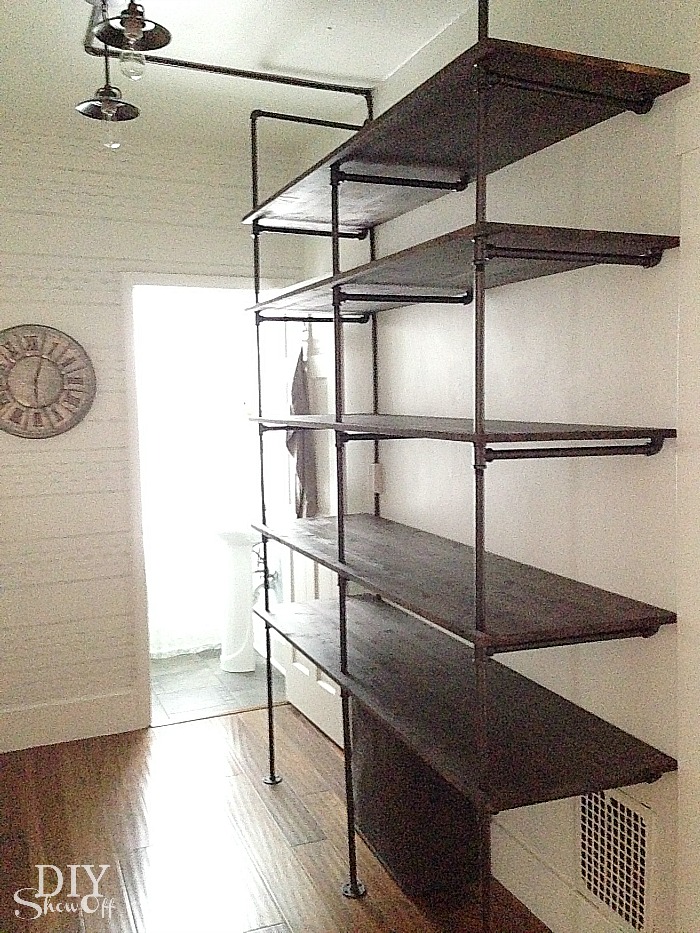 My cut pipe Lowe’s order was missing one of my top custom cut pipes so our shelving unit is only secured into the wall by the two outer pipe configurations and it’s still sturdy! But I do plan to add the top center piece to finish/secure it properly.
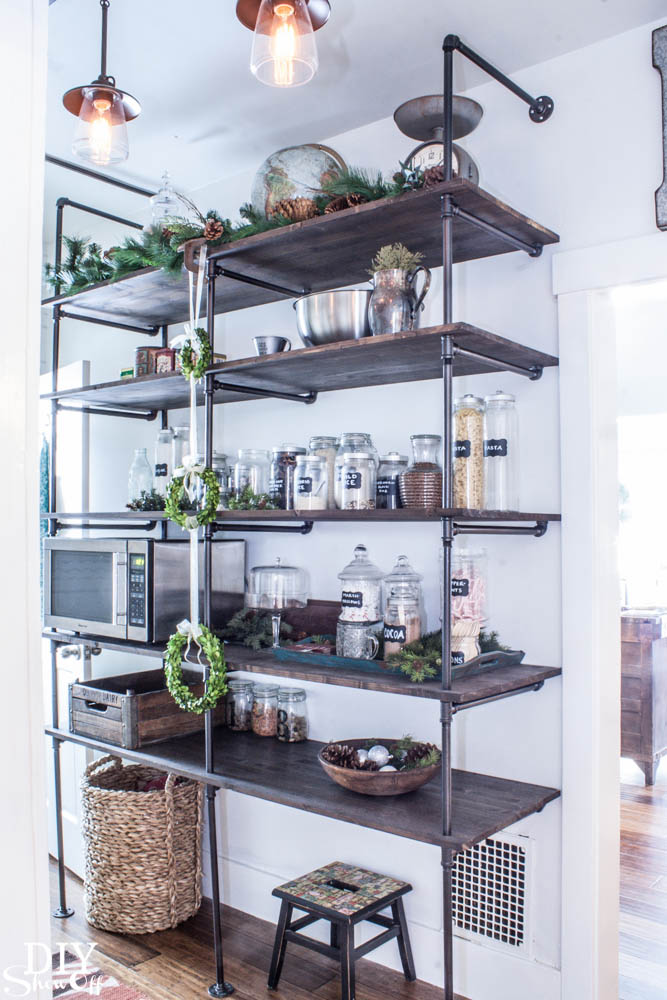 Closing thoughts: Whew! That sounds way too complicated and long, but I promise…I only wanted to include as many details as I could for your research into making your own. I was so happy that it was easier than I anticipated. The hardest part – the design and again, by drawing it out one piece at a time, even that isn’t so complicated. Trust me, math is not one of my strengths. The most time consuming part – the staining/sealing or maybe it was removing the sticker goo. But the reward? A gorgeous custom shelving unit way better than any manufactured piece. Wouldn’t you agree?
See the entire pantry before & after reveal here.
More DIY ideas at Lowe’s Creative Ideas, follow Lowe’s on Instagram, Pinterest and sign up for the Creative Ideas magazine and app! 
*Disclaimer: As a member of the Lowe’s Creative Ideas Creators and Influencers network, I received a Lowe’s gift card to complete this challenge. As always, all ideas and opinions are in my own words. The blog post above is what worked for me. Results may vary. Remember to work in a well-ventilated area and to take the proper safety precautions.
Links to more industrial pipe shelving:

- Vintage Revivals
- House Inhabit
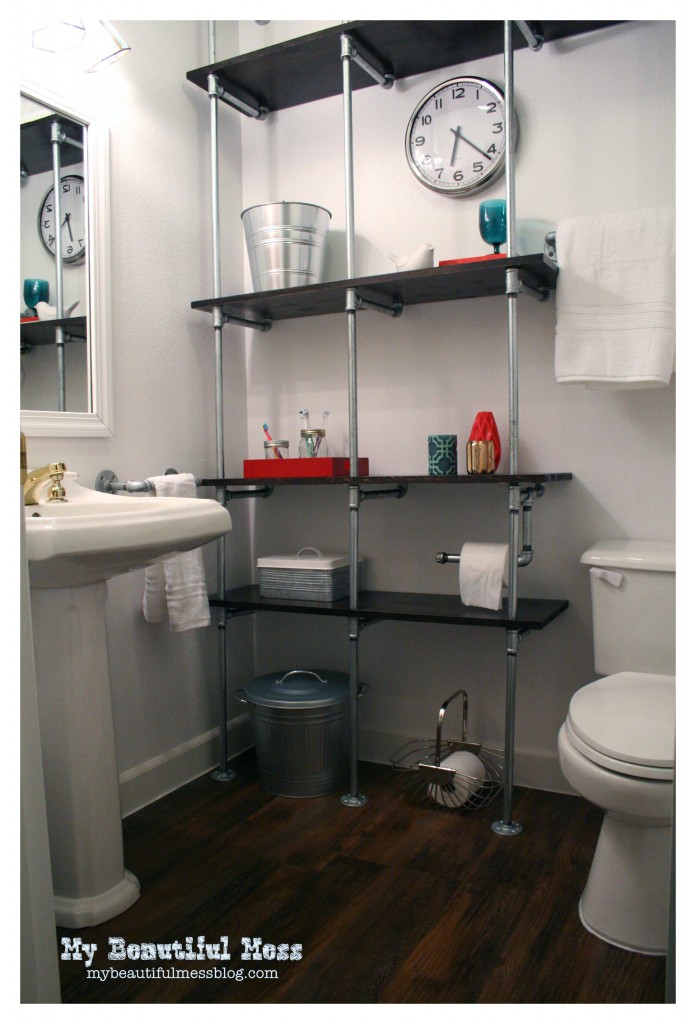
- My Beautiful Mess
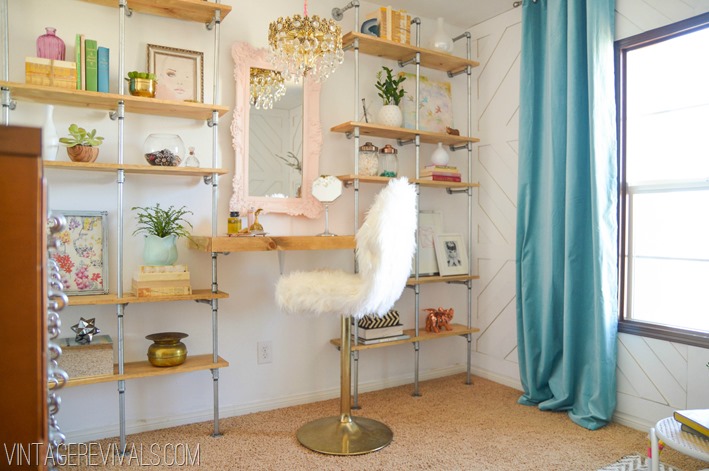
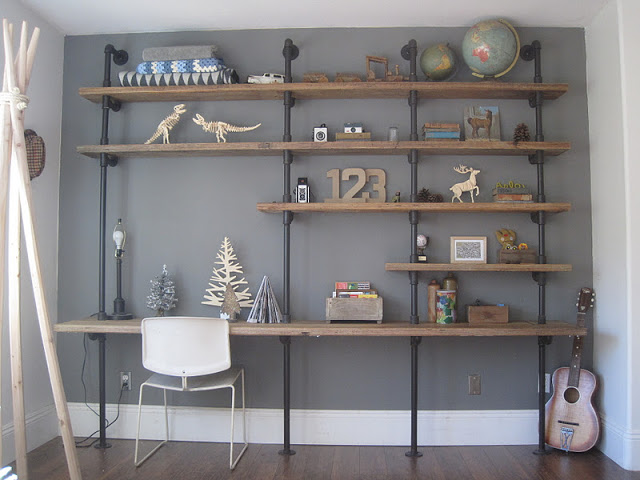
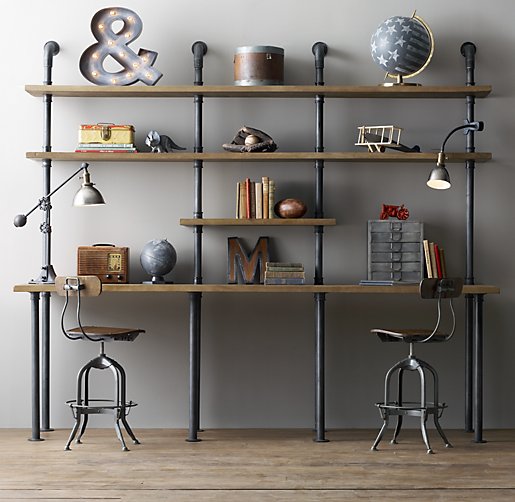
- RH & Child
- Pantry/Laundry Room Pipe Shelving at Tatertots & Jello
Have any questions? Let me know in the comments! Good luck!
Sharing at Home Stories A to Z

I am currently scouting every corner of my house to do this! One of my all time favorite blog projects!!
I hope you find somewhere! Shouldn’t be too difficult since you can built any size. It’s one of my top favorite projects too! 🙂
brilliant! I love it – and thanks a million for including all the details – I want to build a similar unit and this information will be invaluable! I designed and build a new display unit for my art shows out of galvanized piping – the guys at Lowe”s were so helpful in planning it out with me and cutting/threading all the pipe – really appreciated it. Your shelves are amazing – you must be thrilled with the outcome!
Thanks so much! I bet your display looks awesome! What a great way to show off art!
I just love your shelf. I still can not believe you did not have to bolt the back supports into the wall. And without it supports your microwave? Wow! But I think it sounds too difficult for me. Math and cutting the pipes…. uh, well that scares me. What kind of tools did you need? How much did it cost you? I mean if you didn’t have the gift card and all that stuff? I really, really want a smaller version for my tiny so called pantry, but scared to even try to do the measurements.
I am still wishing though.
I love your project. It turned out great. By the way, do you know when you all will be selling tickets for the Haven Conference?
Thanks, Roeshel
Thanks, Vanessa! I heard that they were going on sale in March. Hurray!
Wow, great job! I love piping…so many uses for so little money. 😉 I’m using pipes as curtain rods and I want to use some as legs for our desk. I never even considered using them for shelving, so, thank you for inspiration!
The straight piping is not too costly, it’s the fittings that really add to the overall cost and add up fast!
Yes! But it was still the cheaper option when I priced out bookcases. 😉
This is amazing! Love, love, love! Would you mind letting us know how much your unit cost you? I REALLY want to build one of these, but need to know what the budget is!
Thanks, Megan! My 6′ wide x almost 9′ tall (and 20″ deep) unit cost around $500 to build. 12″ wood shelves would be more reasonable, I think. And still – it’s over $300 cheaper than the 2 manufactured shelves I was looking at to buy. I love that these fit our space perfectly!
I’m terrified to ask what a project like this would cost. It is beautiful!!
Thanks! I estimate it came to around $500 for all of the plumbing, stain, spray paint and wood shelving. Not exactly cheap but reasonable for a custom fit 6′ wide by almost 9′ tall unit! 😉
New follower…loving this : ) Looks amazing! Want to do this in our playroom! What was the cost estimate on your layout?
Hi Ashleigh! Welcome! This wasn’t a cheap DIY but it was $300+ less than the manufactured shelving I was pricing (and not the ideal fit). I estimate it came in around $500 for My 6′ x almost 9′ unit.
Love it Roeshel! You and Mr. DIY did a fantastic job! Great tutorial and photos! laura
I absolutely adore this, Roeshel! Pinning it in the hopes that I can do something similar in my son’s room soon!
It looks like a lot of work, but it turned out fantastic, Roeshel!
Roeshel, I LOVE, lovelovelove your pantry. If someday we have an area we could make this work I definitely will. Thanks for sharing!
Who much did the pipe, flange, elbow and tee cost? Just trying to get an idea of how much I can expect to pay. Also, what type wood did you use for the shelves?
It is lovely!
Hi Judy! Thanks! My shelving unit 6 ft. wide by nearly 9 ft. tall and 20 inches deep cost around $500. Under “Materials” above are links to what I purchased at Lowe’s which lists individual piece prices. The pipe for my project totaled around $100…it will differ because for custom cut pieces, I had to buy pipe in four 10 ft. lengths (which is what they cut/thread for me). 12 inch sections (stock) were about $5 each, 24 inch sections (stock) about $8 each. My shelving (linked above) is pine and mine were more expensive because they are 20×72 but the smaller widths and lengths were less expensive. Hope that helps you estimate your project. Good luck!
LOVE the shelving. Makes me wish I had an area to make a pantry! I like the photo’s you provided of the shelving in a bathroom, while reading this post I thought this would be perfect in my master bathroom and then there was a picture! Thanks for stepping us through this. Victoria
Thank you so much for this amazing tutorial! My boyfriend and I are gonna try to make one aswell so this will come in very handy! Thank you!
http://www.lcnoir.com
Fantastic project! We were just talking about doing bookshelves in this exact fashion, and here is your super clear, step-by-step on how to get it done, with all of the crucial hardware shown and listed… Perfect! Your finished install looks really great – love the stain color too… Thanks for taking the time to document this construction – can’t wait to try building one here as well!
I love, love, love this idea.Actually I use plumbing fixtures in my home as curtain rods. Thanks for sharing.
Best wishes
Heidi
http://www.daheimbeiheidi.com
http://www.simplyfauxpainting.com
So cool, Heidi! I have a pipe curtain rod in our sitting room too. Love it! Thanks so much for stopping by! : )
Wow – thanks for all of the detailed instruction Roeshel! I’d love to make this for our basement and in my home office…oh yeah and my craft room! My head is spinning with ideas! Thanks for the inspiration – pinned!
Hi Roeshel! I am so in love with these shelves, especially in the iron/oil rubbed bronze finish. I read above that to get the pipes custom cut you had to buy 4-10ft lengths so, did the actually cutting and threading cost extra or was it included in the price of the 4-10ft lengths? Thanks so much for your help, I SO can’t wait to make some of these in our master bathroom.
Hi Meg! Yes, free of charge. It’s a “courtesy” so I’m not positive ALL Lowe’s will cut them. And if so, you may want to ask (in the plumbing dept.) on a day that’s not busy (not a weekend). I wrote down the lengths I wanted cut, gave them my phone number and continued shopping (even left and returned) because it takes a while. But, there was no charge. Good luck!!! I’d love to see a picture – they’re going to look awesome in your master bathroom!
Thank you for such a clear tutorial! We have been considering one of these for our TV room but have had lots of questions, many of which you answered. It will also be helpful to have the round-up at the end of your tutorial! Thanks again.
Your shelves are amazing! What a fantastic tutorial you shared as well. Thank you for being so inspiring.
Hopping over from BOTB. LOVE your shelving. Looks absolutely amazing!
Pingback: Centsational Girl » Blog Archive BOTB 1.17.14 » Centsational Girl
I agree with everyone else that you have done an amazing job. This will be moving to the top of my hope list of DIY’s. On another note, I love your step stool. Any chance you can tell me where you got it????
Thanks, Diana! Unfortunately, I can’t. It’s pretty old (not antique or anything but at least 10 years or more). Here’s what it looked like before a little paint and decoupage: https://diyshowoff.com/2010/09/06/little-stool-steps-up/. I’m actually looking for something a little taller for this area (those top shelves are still out of reach so looking for a wooden one with 2 steps). I did a Google search and it looks like that style/type is called a conductor step stool – I think that’ll help! There were links under the ‘shopping’ tab. Good luck!
Approximately how much did your shelves cost?
whoops!! I did not read the comments above first-sorry. I see that they were approx. $500. They are beautiful-thank you for your detailed tutorial:)
Your shelving unit is absolutely gorgeous! I just pinned! I absolutely love the way you styled everything.
I love this….great job!
I am curious roughly how much something like this costs?
Those are so gorgeous, Roshel! I absolutely love your pantry! The cardboard idea for the holes was genius! I wish we had thought of that! 🙂
xoxo
Pingback: Mixed Metals | home sweet blog
Pingback: Design Crush (DIY Show-off)
I love pipe and rustic wood shelving so much that we built shelves for our office. I never thought about using it in a pantry, but it would so beautiful AND functional. Thanks for the inspiration!
Wow, this is such an in depth tutorial and you put A LOT of work into it! Thank you so much for being so detailed I am hoping to build one of these soon!
I would love to hear more about the lighting in this room – any plans on doing a post about it?
Hi Lea! Yes, I plan to do a post (hopefully this week) with some more details and pictures, although not a tutorial on electrical/wiring since we did have help with that part.
Thank you SO much for the detailed instructions!!! I have been wanting to make a long set of plumbing pipe shelves, but hadn’t thought about how, exactly, I would mark all the spots for holes in my wood. Your details were perfect! The VERY BEST instructional I’ve seen on this type of shelving. Thanks again!
Thanks so much, Shanda! 🙂 Good luck! I’d love to see yours when you’re done!
your post helped me a lot!! I just finished building my bookshelf wall, turned out amazing!! thanks so much for sharing. 🙂
That’s awesome, Kitt! I’m so glad my post helped! I’d love to see it!
Very nice, Roeshel. I noticed this project, though a bargain compared to any shelving we have in mind from furniture stores, still costed a lot, considering these are pipes. I know they add up, but is it because of the custom cut pipes that made it more expensive? I’m guessing the big box stores would do it for a fee per pipe. Did I guess right? Thanks for the inspiration.
Yes, it’s not a cheap solution (unless you look at the life of the shelves – they’re super sturdy and will last forever). It’s really just the size, amount of wood and pipe that added up fast. Having the pipe cut is actually a courtesy at our Lowe’s store so no charge for custom cutting/threading.
Thank you, Roeshel. Sorry, I should’ve read all the comments closely because someone already asked the same question I asked and you responded already. Anyway, I wanted to create this project for a turntable and hifi equipment. Upon seeing the precut pine shelves at Lowe’s, I noticed warping already and a turntable won’t operate properly on a shelf that isn’t level. I’ve read that 1 inch plywood would actually be better compared to the basic pine, otherwise if I went with harder woods it would cost so much money. We’ll see. I’m excited and nervous about how it will be. I have to make sure the components I’m getting will fit onto the shelves. I’ll show you pictures of the finished project in the next few months.
Pingback: Challenge Accepted | Coffee Bar Design
How much did this cost?
Hi Mary. The size I made cost about $400-500 in materials. Not cheap but given that it’s custom sized to our space, well worth it (and the manufactured shelves I had picked out cost around $800).
This is a great idea that my girlfriend Susan and I are pretty convinced will work great in our apartment. She just moved in (yay!) and we need extra kitchen storage since she has many nice small appliances. One concern she has is whether you installed the wall flanges drilled into studs or whether they go into drywall or masonry. We plan on storing some fairly weighty items–espresso machine, toaster oven, stand mixer, microwave on a 7 or 8 ft high, 3.5 ft wide unit, but may not be able to install into studs in the wall. What would you (and sturdiness-doubting Mr. DIY) say to alleviate our concerns of it all coming crashing down and destroying our valuable appliances (and irreplaceable coffee mugs)?
Hi Graham! We did not screw into the studs but used wall anchors instead (each flange has 4 wall anchors/screws). When Mr. DIY was worried…he planned on adding brackets to the underside of the shelves (screwing into the studs that way…easier than working the measurements in with the flanges). Because ours feels VERY sturdy, we ended up feeling confident that our microwave/glass jars wouldn’t come crashing down but when in doubt – the extra security with shelf brackets screwed into the studs may help ease your fears.
Gorgeous shelving, thank you for the detailed tutorial, I feel I might just attempt to tackle this 🙂 I was wondering, do you experience any sagging at the back side of the shelves (the long edges resting on the wall)? It just seems odd to me that they would not give in under the weight, considering they are primarily supported at the front, but the back side is only resting on an elbow that is no attached to the wall or supported underneath.
Hi Soni. Thanks! Ours show no sign of sagging. Those pipes are very strong.
Pingback: Tips for Making a DIY Industrial Pipe Shelving Unit | CRAFT
Hi Roeshel. Here’s a silly question. The opening between shelves takes account for the length of the vertical pipe and tee, correct? So, the opening height of the shelf with the microwave (15” pipe + tee (2”) ) comes to 17”? Therefore, if I want shelves with an opening height of 16” I need 14” pipes? Am I understanding that correctly? Thank you.
Hi! Okay, I just looked. I used a 15″ pipe and tee is 2″. Space between shelves is about 16″ (because subtract 3/4″ where the threads sit into the bottom shelf and tee under the bottom shelf and 1/4″ for threading at the top tee). So in your case…definitely still 15″ but I’d probably do 16″ on that area/space/shelf just to play it safe/have a bit of wiggle room. Make sense? Mine has an extra couple of inches (great for storing placemats or serving tray on top of the microwave).
Hope that helps!
Yes, you are correct. The length of the vertical pipe and tee are what accounts for the space between shelves. There’s a bit of play in exact measurements because of threading.
Your tutorial is the most detailed and you respond to questions, so thank you. I am thinking of adding a half shelf in between the openings. And taking into account the threads of the pipes and tees. You have Brick House as another example and their project has 2 half shelves. I checked out the pipes they have. The left pipe has (18″, 43″, 32″ = 93″.) The other three has ( 18″, 12″, 30″, 12″, 18″ = 90″.) However the other pipes on the right has two extra tees each. Let me ask them a question how they came about their measurements and still able to create a level product. I know it is confusing what I’m asking. I wish to show you my illustration. And when I get to create it, I’d love for you to see it. Thanks, Roeshel!
How much did everything cost to make the shelving unit? What’s the max load per shelf, I would like to make this for a home bar and I want something study enough to hold bareware and bottles
Hi Nicole, the size and measurements of my shelving unit cost between $400-500 (6 ft. wide x nearly 9 ft. tall x 24 in. deep). And I can’t say about the max load per shelf. Ours is sturdy enough to hold a microwave and jars/canisters but we haven’t had it long enough to fill it to complete capacity. I can only speak from our own personal experience/what we did and not as a manufacturer with a tested product. I would be sure that your flanges are secure into wall studs and to prevent the shelves from bowing, I’d select a thicker/sturdier wood (which will increase the price too). Sorry I can’t be more helpful. Best of luck!
Pingback: DIY Curtains and Curtain Rods
First of all, your shelving looks great. I REALLY appreciate the detailed instructions and tips. I do have one question, because I am about to tackle the same task. In your diagram of the shelving with all of the red, penciled in measurements, am I correct that your pipe measurements (12″, 15″, 16″, & 17″) spans in BETWEEN each 3-way tee and are not spanned from the interior middle of the tee to interior middle of the joining tee?
Does that make sense? Thanks!
Hi Richard, thanks!
I think I understand your question. You are correct. I just double checked. For example: the total measurement (including threads) is 16″. After being threaded, it measures 15 3/4 inches. So, there is some play. And the shelf height with a 15″ pipe truly measures 15 3/4 inches (15″ pipe including threads but 1 1/8″ is buried/threaded into the bottom shelf, the tee at the top/before the next shelf adds 2 1/4″, minus about 1/8″ threading into the tee at the top = 15 3/4).
It is hard to describe and explain in words, but the tees/threads will add/subtract a little in measuring, so best to guestimate/round up when planning so that it potentially comes in under/a bit smaller than planned rather than being too big for the space.
Hope that helps!
Pingback: We Won’t Pipe Down About This Shelving | F 2 The G Designs
Hi Roeshel, I wanted to let you know I featured your pantry shelving today on my blog post about DIY industrial pipe furniture, I just love this! Have a great day! Sharon @ lilikoijoy.com
Thank you SO much, Sharon! Makes my day!
Hello Roeshel,
I was wondering if it would be just as sturdy on carpet. I will not be able to attach the bottom flanges on carpet, however I was hoping that it would be just as sturdy if I replaced some of the 90 degree elbows with more flanges on the wall. Love to hear your thoughts!
Hi Sarah,
I think it would be just as sturdy on carpet. I can’t say for sure since it’s not our experience but my flanges are not screwed into the floor (it’s only attached to the wall with top flanges). We also considered using shelf brackets under the shelves (screwed into the wall) but once we built it, we realized it was in fact strong without them. Hope that helps! Best of luck!
Hi Roeshel – thanks for the great step-by-step! I went to Lowe’s and Home Depot today to get all my supplies, but both stores told me they could not cut custom pipes shorter than 24″. Where did you get shorter-than-24″ custom pipes cut?
Hi Sam!
I know it’s done as a “courtesy” and not all Lowe’s may provide the service but my Lowe’s did cut my pipes. Sorry I can’t be more helpful.
Pingback: Be Bold Challenge Reveal: Industrial Pipe Built Ins - Primitive and Proper
Pingback: Industrial Revolution » Homeology
Thank you for a fantastic step by step. We also have plaster walls – when you say you used ‘heavy duty wall anchors’ – would you be able to provide a link to the product or similar product you used? Thank youy!
Hi Alex. I believe it was these ones from Lowe’s: http://www.lowes.com/pd_133193-10337-50550_4294934474__?productId=3183871&Ntt=toggler&pl=1¤tURL=%3FNtt%3Dtoggler&facetInfo=
Hope that helps!
Pingback: Summer Spotlight - DIY Show Off - Oh My Creative
Pingback: Summer Spotlight: Roeshel from the DIY Show Off - Kenarry
Hello! Love these shelves. Are they supported enough in the back by the elbow, or should you avoid putting heavy things towards the back of these shelves? Thanks!
We were going to add extra support but once it was all put together we were surprised by it’s strength. And right now everything tends to be pushed to the back of the shelf against the wall. No issues whatsoever! xo
Pingback: Easy DIY Storage Solutions - Start With Four Walls
Did you screw the bottom flanges into the grounf, or is there some sort of padding underneath them?
I didn’t do either, Jeremy. The flanges are just resting on the floor (no padding)/supporting the shelving unit. They could be screwed down or you can alter the design to allow for padding if you feel they’d damage your floor.
Did you screw your bottom flanges into the floor or are they just held up by the weight of the shelf?
Hi Mike. No, we did not screw them into the floor.
Pingback: Man Cave Makeover | Not a Passing Fancy
Hi, Where did you purchase your wood shelves?! can’t seem to find them at lows. thank you!
Hi Maria! I did get them at Lowe’s. Here’s a link to the ones I bought: http://www.lowes.com/pd_179367-99899-72820_0__?productId=50089214&Ntt=kiln+dried+pine+panel&pl=1¤tURL=%3FNtt%3Dkiln%2Bdried%2Bpine%2Bpanel&facetInfo=
Looks as if you may be able to purchase them online and ship to your local store for free.
Hope that helps!
Pingback: Summer Spotlight {DIY Show Off} - View From The FridgeView From The Fridge
This is the best shelving plan that I have ever found for DIY,I will be doing it soon. Thank you, yours looks great and thanks for all of the good directions.
Good luck, Etta! So glad you stopped by! Hope to see your finished version!
Beautiful shelving and decorations! How much did this project end up costing you?
Sorry I didn’t see the earlier comment. Thanks!
I love this! Your explanations really helped! I hope to do this in my craft room..and I want to build a dining table with the pipe base!
This is the best tutorial I have found for this so far!! Fantastic!!! I really appreciate all the effort you took to write as much detail for each step as possible.
Hi,
Love your site and projects…just found today as I was looking for a way to making some shelving. In your great tutorial for the pipes pantry shelving with wood shelves, I couldn’t find anywhere the mention of the cost. Could you tell me how much it cost to make them?
thanks!
mz
Hi Micki! The cost will vary depending on your size. It wasn’t inexpensive. It was around $400 for this large size. However it’s custom, we’ll have it forever and the two bookcases I was looking at in the store before this plan came to around $800 so definitely a good choice for us at half the cost. 🙂 Hope that helps!
I really love these shelves, they are beautiful! These were actually one of my inspirations when we were making our own industrial style shelves, check it out here!
Pingback: Blogging Tips from 25 Expert Bloggers - The Rustic Willow
I love this so much! Question, did Lowes charge to have an associate cut the pipe?
Hi Emily! Thank you! Lowe’s cut/thread the pipe as a courtesy. No charge.
Shelving looks good, specially in kitchen. It gives enough space and comfort. We can easily install it and easily manage it. Also we can put every kitchen item in perfect manner. I really like this PIPE shelving and i will recommend it to my friends as well.
Beautiful job. Where did you find the 1″ x 20″ pine?
Hi Keri!
I got them at Lowe’s. I hope that helps! Best of luck! xo
OMG I am thrilled to death with this shelf and the ENDLESS possibilities it has! Thanks for taking the time to map out such a thorough tutorial! We bought a house last year and have a desperate need for storage solutions. We will totally be installing this shelf!
Thanks, Heather! Best of luck! I look forward to seeing it! Congratulations on your home! xo
I Love this… Can’t wait to try it out… I have this awkward nook space that I think this will be perfect for.
Do you have an estimate of how much this project cost?? Also what type of wood did you use for your shelves?
Thanks so much!
Cassie
Hi Cassie. This size cost me around $450-500. Not exactly cheap but less expensive than the two bookcases I was looking at purchasing. What I love is that it’s custom fit for our space. And I just used pine boards from Lowe’s because the size was perfect. If you’re doing a smaller space, you may be able to get a better quality wood. Good luck!
Pingback: DIY Industrial Pipe Office Shelves - Table and Hearth
Pingback: DIY Industrial Pipe Shelves - Table and Hearth
Pingback: The Blogger Network | 65+ Bloggers Share their Top Post of 2014
It looks great, and I’m interested in trying it in my pantry, I only wonder why the shelves don’t sag at the back given that they are only resting on the horizontal pieces. I’m surprised that you can have a microwave sitting on a shelf without the shelf sagging towards the back… Have I overlooked a step along the way? Or does it really all hang together by resting on the elbows at the back?
Thanks, Julie
We thought the same thing, Julie. So we were prepared to add shelving brackets along the wall under each shelf. However, once assembled, we were surprised that it actually IS strong. The iron pipes with elbows don’t budge, so our shelves are not sagging. So if worried, add a few shelf brackets or braces to the back or choose a higher quality wood. Good luck!
Hi. Question, where did you find 20 in wide wood. Working on making this but have hit a roadblock with getting wide wood. So cool, btw, can’t wait to finish my project. Thanks!!
Hi Terri, I got my 20″ pine panels at Lowe’s (they’re not the best quality but work well … I’d advise something better quality or doubling up for heavy duty). I hope that helps! Good luck! You’ll have to send pictures, I’d love to see it!!!
Pingback: DIY Industrial Pipe Shelving for $250 | Wiley Coyote
Pingback: Tips For Making A DIY Industrial Pipe Shelving Unit - Lil Moo Creations
Hi, did you use solid wood for the shelves? Did you cut them yourself? What is the thickness of the wood? Thank you!
Hi Mary Grace! The wood I used are planks from Lowe’s and they’re not a great quality (thickness is about an inch). I believe I linked to the wood in the materials section. If you plan on having heavy items on the shelves, I’d recommend using a stronger/better quality wood. Hope that helps! Good luck!
what is the estimated cost of the plumbing fixtures?
Pingback: How to get the vintage farmhouse look? Think Fixer Upper! | Simply made by rebecca
Pingback: small space renter's bedroom solutions - the handmade homethe handmade home
Hi, I know this an old post but I am starting this project myself for our loft. I am adapting it to fit in a corner.
Two questions:
1. What type of wood did you use for the shelves?
2. What was the color stain?
Awesome project. Thanks!
Hi Robert, thanks! The products I used are linked in the post (they show in blue text under materials and bring the product up at the Lowe’s website). I used inexpensive 20×72 pin planks. I do recommend something a little sturdier though, especially if your shelves will be holding a lot of weight. We’ll likely be swapping ours out at some point for something better quality. Wood stain color is “kona”. Hope that helps! Good luck! I’d love to see a picture when you’re done!
Pingback: Industrial Pipe Projects - Design, Dining + Diapers
This is awesome! I appreciate you taking the time to give explicit directions and measurements.
Tomorrow I head out to get my materials.
Thanks again.
Thank you so much for writing this as detailed as you did! I’ve been searching for tutorials on how to build an industrial shelf and your post definitely gave the most helpful information. Thank you!
You did such an amazing job! This is absolutely gorgeous and functional! Do you have any idea about how much weight each shelf could hold? Thanks!
Hi Jean! Thanks so much! No, I don’t. I think it would depend on what type of wood you choose. Ours isn’t a great quality, so nothing too heavy. But it is holding our microwave with no problem. Good luck!
amazing! all theses ideas
Hi,
I’m based in the UK, where materials are far less available, so attempting something like this is more challenging. I’ve researching this type of shelving extensively for some months and have not seen a guide as thorough and easy to understand as yours. I think this page is exceptional.
One question I had was about how sturdy the shelf is. I’m attempting to build two separate shelves, each: room height, 25 cm deep and just over a metre wide. Is 1/2 inch pipe wide enough – it looks a little thin – thoughts welcome.
Also, the flanges on the wall are the most expensive part where I am. Your design uses upturned 90° bends near the wall which reduces the number of flanges and therefore the cost. Is this sufficiently strong if the shelves are packed with books?
Thanks again
I believe that the pipe frame will be more than sturdy enough, but I do recommend a stronger more durable wood shelf to support the weight of books. Good luck!
Pingback: 10 Best Kitchen Builds - Oh Everything Handmade
I cant find what thickness bored you used. The shelf looks amazing! I am looking a a 8ft long one that will be the kitchen focus. 4 verticals with a bit extra space in the middle to make room for a extremely big microwave. 2ft 6″ x1ft 4″ and 18″ between shelves. Two years later… would you make any changes? Thanks!
That sounds awesome, Miranda! I would do something different if I could go back…I’d choose a better quality of wood and perhaps a bit thicker. Believe it or not, the microwave is fine and the shelves too for the most part but I’m noticing that my cheaper quality boards are sagging just a tiny bit under the weight of our jars. So…sometime in the future, we will be dis-assembling and replacing the wood shelving with thicker/better quality. Pine just isn’t going to cut it super-long term. Darn it! lol But I’m probably the only one who notices the imperfection. Good luck!!!
Pingback: Organize it Thursday- My Answer to Open Shelving -
Thanks for the walk-through. How much weight do you think the shelves can hold? I was thinking about connecting each horizontal piece to the wall with a flange, instead of using an elbow. I thought it might support more weight that way. My shelves will only be 22″ wide so I was planning on using two pipes.
Hi Bret! Adapt as you see fit. We were going to add brackets for support but found it to be super sturdy without. I think the framework does provide a lot of support. It’s the quality of wood that will make a difference too. Good luck!
Thanks very much for the instruction. Using this and modifying it, I created one of the best looking shelving pieces in my house. My wife loves it!
Hurray! That’s awesome!!! (Thanks for taking the time to share with me too!) Enjoy!
Hey Roeshel! Thanks to your tutorial, and after a year of waiting, we started building our very own pipe shelving unit this week but have run into some trouble. We’re having some problems with our flanges as we’re building up- how did you secure the base? Did you have a lot of issues with the flanges moving around while you were twisting the pipes into place? I’ve propped our base board (like you did) on boxes/baskets, but they are wobbling all over the place & making it difficult to level the shelves. I hope this is making sense. Anxious to hear any recommendations you have- Thanks!
Hi Polly! Oh my! I apologize for the delay in answering. Just seeing your comment this evening. Our bottom flanges aren’t anchored at all (we didn’t want to drill into the flooring) but we didn’t have any problems with things twisting on us so I don’t have any advice. I’m so sorry I can’t be more helpful! I hope you found a solution. xo
Hello! I love your shelf that you provided directions for. I am going to be storing heavier items (microwave, heavy pots and pans). I noticed you have a microwave as well, but just wanted to know how your shelf has held up without the support in the back of the shelves? It just makes me nervous that my shelves/piping will bend over the years. Thank you!!
There is support on the back of the shelves (from the underside where the shelf rests on an upturned elbow). Hope that helps. No problem – I do recommend a sturdy wood for the shelving but otherwise, no issues with weight as the iron pipes are sturdy! Good luck!
beautiful!!! how much did the final price end up being?
Hi Kristin! I can’t remember (if it’s not included in the post). I do remember that I was looking at $800 for 1 store bought shelf (and needing two to get the same size) and that making this came under $800. I think maybe $600?! Sorry I can’t be more helpful than that. It wasn’t “cheap” but it was less expensive than buying something (something industrial/pretty) from the store!
spray painting black or galvanize pipe which do you prefer to paint
Your pantry shelves look great! And I appreciate the tutorial. Do you have an approximate idea of your material cost? Was it considerably cheaper than good quality stove-bought shelving?
Hi Paula. Store bought shelves were running around $800 for what I wanted. This project cost me around $500. Hope that helps!
How much did the whole project cost you?
how much did it cost you to do the shelves?
It depends on the size. Mine cost around $500. Much more affordable than the store-bought industrial style I was looking at (around $800).
Wow this is just great Roeshel, who’d think you could make something very useful out of these ugly pipes? 🙂 Great inspirational post!
A bit late to question maybe but what diameter pipe did you get as I can see there are various sizes?
It’s been a while but my guess is 1 or 1 1/2 inch.
This post was super helpful in finding out exactly what I would need to build my new closet. I have one tip for stripping the oil from the pipes, to use acetone. I thought maybe you could share with your followers. It is usually available at your local hardware store and should be used outdoors or in room with excellent ventilation. Rags or old t-shirts can be used to wipe the oil off. Again, thank you for sharing all of this. You are a life saver!
have you noticed any of your shelves sagging towards the back of the shelf from placing heavy items on them? I am looking to build a similar set of shelves for my wife’s sewing room but longer.
No. If anything, they’re a tad saggy in the middle from using a cheaper wood shelf. But definitely not on the back and not in the front. Choose a better quality wood or double it up (stack 2 pieces of shelving together). Good luck!
This looks like art! It is exactly what I was hoping to find and your pictures and detailed steps give me the confidence to tackle my project. Thank you!
Good luck, Tracey!
I’m so obsessed with this! I’ve been wanting to this for so long and your tutorial is easily the most detailed I’ve seen. Quick question, and maybe this is dumb of me, but does the length of the pipe include the threading? For example, is a 15 inch pipe truly 15 inches from end to end? Or is it 15 inches in between the threading and then a half inch or so of threading on each side?
Thanks, Emma! I’m glad you found what we did helpful!
And truly 15 inches from end to end. I didn’t add additional space for threading.
Good luck! I’d love to see it when you’re done!
Thanks for the reply! I have another question… when you were creating your cardboard template for the front holes on the shelves and you measured one inch from the front, did you start the hole one inch in? Meaning the outer edge of the circle is one inch from the edge? Or is the center of the hole at one inch? If that makes sense..
I had to get up and look. lol On mine, the outer edge is 1 inch in.
I was thinkgin fo doinng this but only 52 inches long. Do you think I would nee the center bar?
Great project!
Hi Robert! I have no idea! But my first thought is “no” because pipes are so sturdy. It’s really more about choosing a better quality of wood, I think. Good luck!
Instead of wipes to clean iron pipe try spraying oven off oven cleaner then wipe. It works great because it’s a degreaser. Also a solution to not dealing with all those stickers on the pipe for pricing is to buy the pipe and fittings from supplyhouse,com they don’t have them on theirs and they are a lot cheaper
very inspiring proposal!
I was wondering where I can buy all the pipe! Any suggestion?
thanks
michele
Hi Michele!
I purchased the pipe from Lowe’s. Hope that helps! Good luck!
The wood from Lowe’s, what size planks did you buy and do you have to buy a sheet and have it cut for you?
No, at that time, they had long runs of boards in the wood aisle that worked. 🙂