


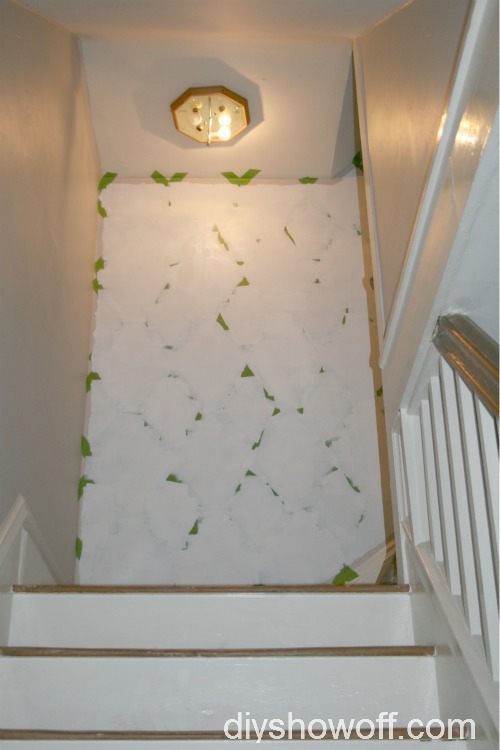
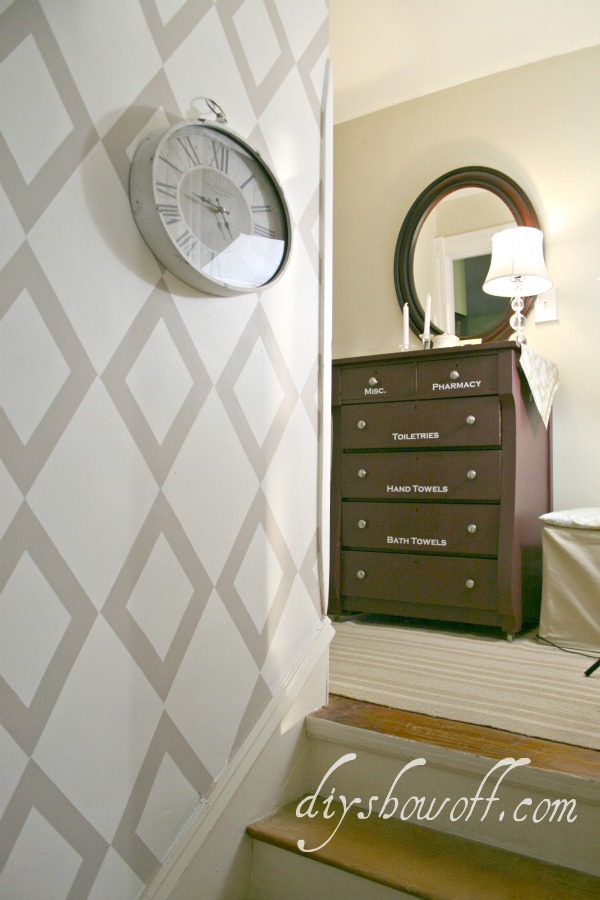
Inspired by Shoshana earlier this week, I decided to do an accent wall at the top of our stairs. My decision was that quick and crazy. I bought NOTHING for this makeover. Leftover paint, supplies, and decorative accessories we already had on hand (+ the felted reindeer head, rug and clock I got for Christmas). Before was boring. {Check out that brass and faux-oak light – niiiiiiiice, huh? Good-bye!}

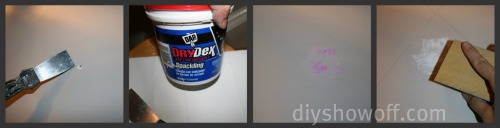
I had a little patching to do first from previous nail holes and a plaster wall boo-boo. Fill (it’s pink when wet/white when dry), dry, lightly sand.
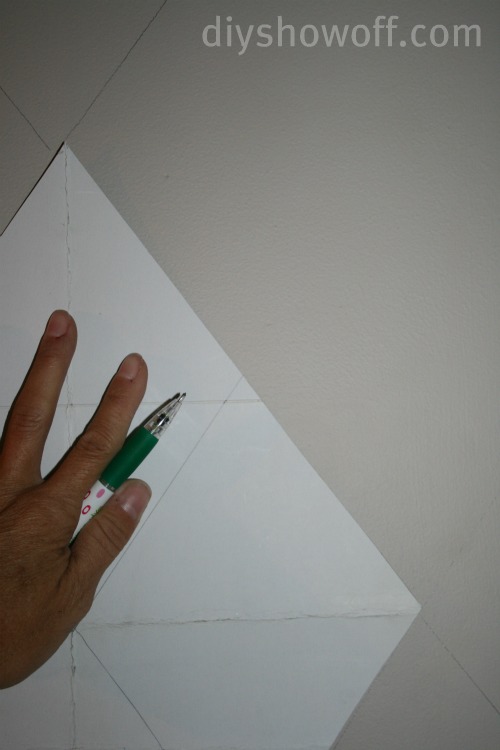
I cut out a diamond shaped stencil from posterboard and using a pencil, lightly traced the pattern on the wall.
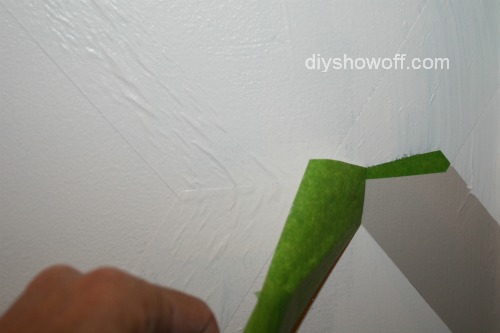
I taped off the pattern with Frog tape. Cutting tape at an angle made for easier taping in the corners of the diamond.
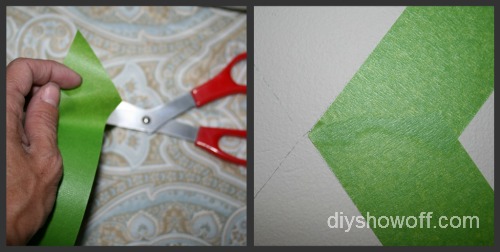
Important: use a credit card and rub all over the tape to make sure it’s all stuck to the wall for a crisp clean paint line. Otherwise paint will seep under the edges.

My original plan was for the pattern to turn out like this (just solid diamonds). More of the original wall color would show through this way…

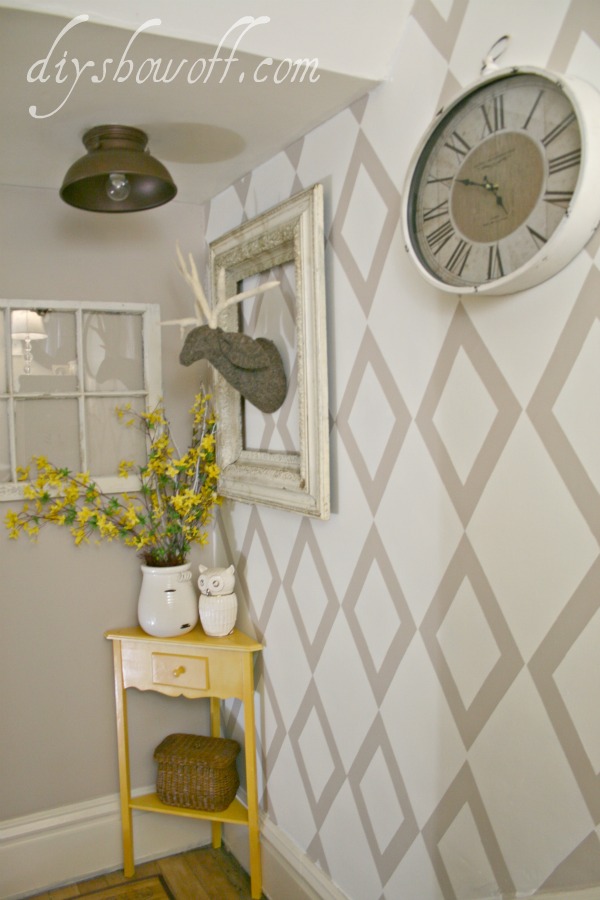
but I with taping, I decided to go with this pattern (more like a large diamond trellis)…
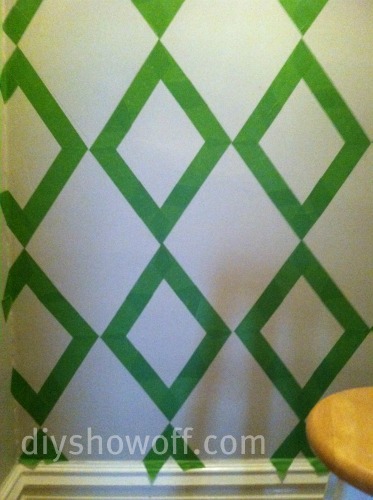
Original wall color {BM Smokey Taupe} is behind the tape. Top wall color (paint I’m using) is Glidden “Linen”.
I did two coats and peeled off the tape immediately after the second coat, while the paint was still wet. Touch up paint as needed. I’m not a perfectionist, so I didn’t bother but I doubt you’ll see anything noticeable in the after pictures.
Take a look at the before of the small landing one more time:
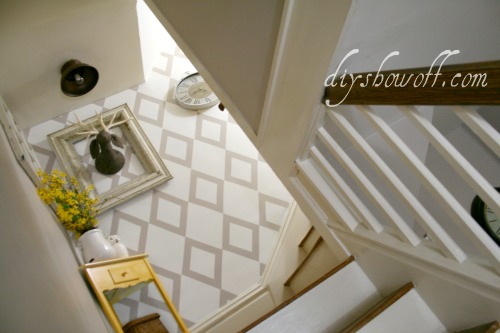
And now the stairwell landing reveal…
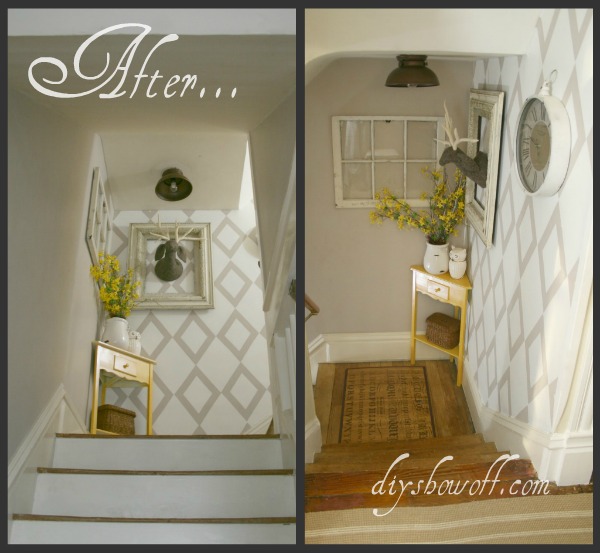
I’m thinking of adding more stencils/pattern/design to the accent wall {thinking. thinking.} but for now it’s a big improvement and fun compared to the boring before. At least I think so. Maybe a little crazy – but doesn’t it look so much better? Maybe that window needs a little Krylon Looking Glass treatment or photos or scrapbook paper or something fun.
{original hardwood floors upstairs need redone…please ignore those}
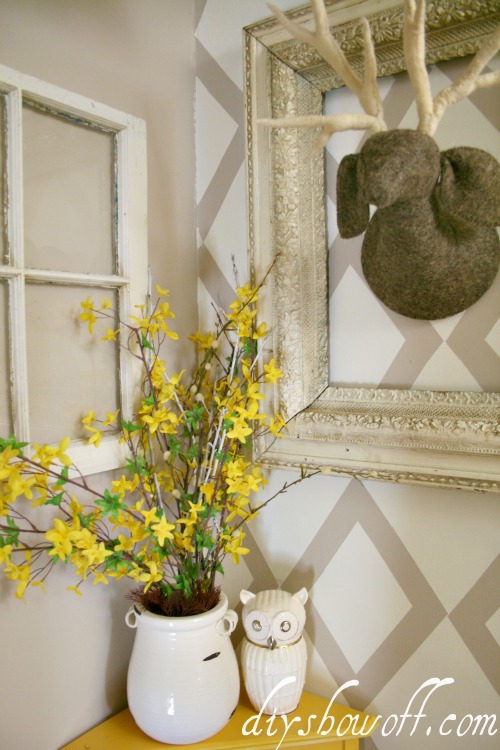
Old corner table before and after.There might be more coming with the corner table makeover too – I can’t just leave well enough alone and I ran out of the mustard paint color so it’s just a quick DIY that needs another coat…

I gave the actual stairs a makeover in the past {here}. Here’s a look at what we started with four years ago after we removed really gross carpet:
then I filled those gouges and repainted the risers…

Now the risers need freshened up because now they’re all scuffed – maybe another creative DIY. I’d also love to do wainscoting on the wall going up the stairs, a photo gallery (can you have too many of those?) and a little DIY on the light fixture. One project leads to more! A DIY girl’s work is never done. 😉
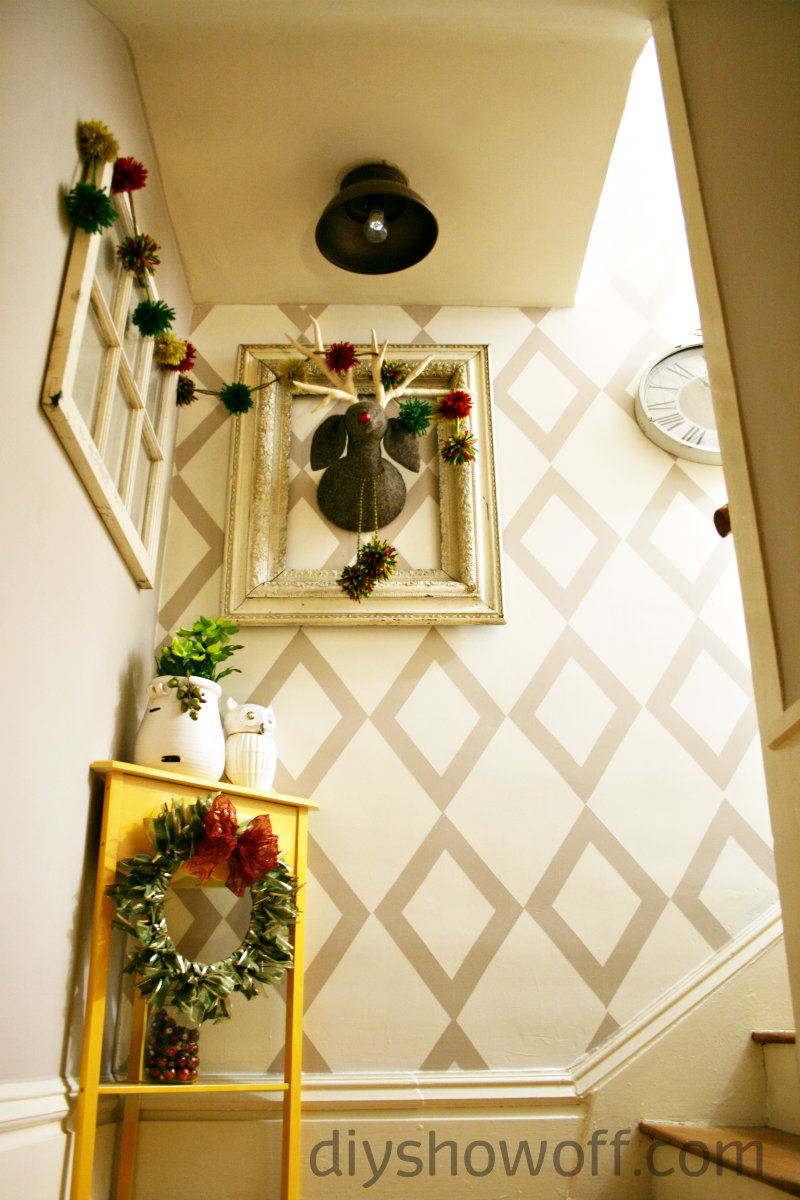
See it decorated for Christmas here with a ribbon wreath tutorial.
Let’s see what you’ve been up to!


A great transformation!
Thanks, Mel! 🙂
Awesome job! I love it! The painted wallpaper and the yellow table rock!
Thanks, Katie!!! 🙂
WOW. It looks beautiful, Roeshel. Love the splashes of yellow. It looks so much brighter too! (I need that light fixture for my kitchen makeover! It’s the perfect style and shape.)
Thanks, Jami! The light fixture is something we had for the kitchen but changed our mind. I’ve lost the globe and other pieces but I love it without all the parts too. I just shared a link to your home for hallway inspiration – I LOVE your hallway. Thanks so much for stopping by. 🙂
Love the easy stencil transformation! Who needs a pricey wall stencil? Thrifty DIY will always be my fav!
Thanks, Sarah! I do love those pricey stencils but you’re right – I’m just as happy with how my free stencil turned out too! Not spending anything for this small makeover was the best part! 🙂
Love the Landing – I wish I had a landing to do something cute. One of my next big projects is to re-do my stairs, these look great!
Thanks, Sunday! Redoing the stairs will be worth it! I have to redo mine too…all scuffed up now. Maybe something fun? Remind me to check it out when you’re done. I’d love to see the transformation!
Pingback: A Sunday Afternoon » Blog Archive » Super Cute Vintage Radio
Thanks so much for sharing! Woo hoo!
Thanks for hosting Roeshel! I am in LOVE with your new wall! : ) It turned out fabulous!!
Thanks, Ashley! Whenever I finish a makeover, that becomes my most favorite place in my home. lol. I might have to decorate for Valentine’s day there! haha!!!
Roeshel – your staircase landing is just beautiful! The diamond wall is my favorite part. The colors are perfect and your other decor finishes the look wonderfully. Really lovely!
Thanks, Suzanne! I’m happy with the colors on the diamond accent wall too. I have so much leftover paint – it was almost aqua! haha! Unfortunately the tone just wasn’t what I wanted so “linen” it was and I’m glad. Definitely more our style and I love how it goes with the mustard/yellow. 🙂
This is LOVELY!! I love it – wonderful transformation. I’m totally pinning this. You have inspired to try this in our foyer 🙂 Thanks so much for the step by step and advice!
Thanks, Lisa! Awe, thanks for pinning too! Make sure you remind me to check out your foyer makeover! I want to see what you do!!!
This looks fantastic!!! Nice job!
Thanks so much, Crystal! It makes me so happy when unplanned/last minute decision DIY works out! 😉
Incredible transformation
Thanks, Lori!!! 🙂
Looks wonderful!! I’d like to know more about what you used as that light cover….. I love it.
Thanks, Debora. It’s actually a light fixture we had in the kitchen but then changed our mind, so it’s been sitting in the basement for a year. It’s this one (although I know we got it cheaper so search the name: http://www.wayfair.com/Sea-Gull-Lighting-Sebring-Outdoor-Flush-Mount-in-Weathered-Copper-8869-44-GX3391.html?refid=FR49-GX3391). And as you can tell, I’ve misplaced the globe and other pieces…oops! But I do love it the way it is too (until I locate missing parts). lol!
Thanks for such a quick reply Roechel, and thanx for the link to that light…I love it. At first I thought you took an old colander or something similar and flipped it to make your own light.
Keep doing what you are doing….I always look forward to your next projects and idea.
Debbie.
Sorry…I spelled your name wrong.
Thanks, Debora! And old colander would be awesome too and so easy! I didn’t have to put much thought into it since I already had this on hand (other than ‘where is it’ and still looking for the globe!). Buying one of those generic light bases + a colander is so clever! And no problem – my name rarely gets spelled correctly…probably why my family just writes “Shelly”! haha!
It looks amazing! And I love your felted deer. Hes right up my alley:)
Thanks, Sarah! I could not resist that felted deer when I saw it in a catalog. Definitely went on my Christmas wish list and Santa delivered! 😉 He’s on sale! Here’s the link: http://www.vivaterra.com/felt-reindeer-head.html
I love the pops of yellow and the much needed character! I wish I had a space like that to do something fun. I have teeny tiny stairwells that don’t leave any space! I may do something with my little “hallway”.. .but it’s more like a rectangle with four doors on it – leading from our dining room to the bathroom and two bedrooms. It’s really need something since it hasn’t been touched by me in the four years I’ve lived here and the previous owner would touch up her white flat painted walls with semi-gloss white paint or vice versa. WTH?! Who does that?! Can she not see the shiny spots she creates?!?!
Thanks, Megan! I always wonder if someone else had this house if they’d be cursing us as previous owners. lol! But I definitely know what you mean! We’ve scraped layers and layers of painted wallpaper – even off of ceilings! Who does that?!!! Your hallway sounds like a great place to do something fun and different. Your description reminded me of this favorite makeover: http://www.freckledlaundry.com/p/my-home.html. I LOVE Jami’s hallway. Make sure you share what you end up doing…I’d love to see it!
Oh how cute! And definitely not boring any more. I bet you take your time on the stairs now – so much to enjoy along the way! … Thanks for hosting!
Thanks, Sharon! Even Mr. DIY likes it…score! Not boring, but a little different than what we’re used to so I was worried. I’m so glad it worked out! Thanks so much for stopping by!
Love your landing Roeshel! 🙂 Seriously! oh my. That light fixture fits in perfectly!
gail
Awe, thanks, Gail! What? You didn’t like that first light fixture? I need to repurpose it! You always inspire me to think outside the box. I’ll come up with something!
that is amazing!!!! i absolutely LOVE it, roeshel!
Thanks, Cassie! Oh – I finally have a ‘furniture’ makeover! LOL! Maybe after I get to the second coat/more fussing – then I’ll be over to link up!
Wow – I LOVE those colors & the design!! Amazing!! I’m totally pinning this now 🙂
THANK YOU, Christina! 🙂 I know – I’ve been wanting to accent with a gold/mustard color for a while. This was the perfect spot! 🙂
Oh that looks so great! I love the two colors together with the pop of yellow. I am trying to figure out a wall I can use a stencil on! And I love that light too. 🙂
Thanks, Anita! Using the tape to make my own pattern was super budget friendly – not something I’d recommend for a large wall. The light we had on hand (http://www.wayfair.com/Sea-Gull-Lighting-Sebring-Outdoor-Flush-Mount-in-Weathered-Copper-8869-44-GX3391.html?refid=FR49-GX3391) from the kitchen but changed our mind. As you can tell, I’ve lost a few parts over the past year. Oops! Still a big improvement though! 🙂
I love your stairwell makeover! It looks so cozy and welcoming.
Thanks, Tanya! I agree – I’m even thinking I should swap out the table for a bench. lol! 🙂 Have a great day!
I’m jealous your landing would be big enough for that! Lol. P.S. Thanks for the link love over at the nest forum. I appreciate you thinking of me and my little blog 🙂
(http://community.thenest.com/cs/ks/forums/thread/62556128.aspx)
Wow! I love that you used what you already had on hand! That’s the way to do it… Beautiful transformation! XO Cindy
Thanks, Cindy! That was the fun part – just making a quick decision and digging in using what I had. If only all DIY could be that easy! Thanks for stopping by!
Wow! That landing looks amazing! And also, being me, I’m digging that dresser at the top of the stairs.
Thanks very much for the link party. Have a great week.
Thanks, David! That old dresser got a makeover a couple of years ago (my husband’s baby dresser). Then, adding labels was a fun touch for a husband who never knows where I hide bathroom supplies. 😉
Oh my goodness, it looks AMAZING. I have a big ol case of stairwell landing envy. Thanks a lot 🙂
Thanks, Johnnie! It was completely a couple of hours work and even my husband likes it! Small cheap makeovers are so fun too!
What a wow factor for the reveal! I love the little pops of the mustard yellow juxtaposed with the neutrals. Looks great!
Thanks, Tonya! I’ve been wanting to do something with a mustard yellow accent – this was my perfect opportunity! 🙂
Your stairwell looks amazing. I love the dramatic pattern, and that pop of yellow.
Thanks, Rosemary! Not our usual ‘safe pattern’ but I do love the result – it’s about as crazy as we’re bound to get around here! haha! Thanks so much for stopping by and taking the time to comment! 🙂
WOW! a punch of pattern and design in a small space and it makes all the difference! 🙂
Thanks, Meg! I’m so glad you stopped by!
Wow, your stairwell looks great. It’s amazing what a difference a little paint can make. I love your stencil tape project, adds such a wow factor. Oh, and thanks for hosting the party! 🙂
Your wall looks amazing! I am sitting here thinking “Do I have a wall I could do this too?” Followed by “Do I have enough patience to tape that kind of design?” LOL I think the answer may be no! Thanks for hosting! Have a great week!
haha, Trish! Thanks so much! You can do it! 😉 Not something I’d want to invest in a large area or wall, but this small spot wasn’t too bad. Done in a few hours’ time.
Wow! Now you’ve got me looking at any walls I can turn into an accent wall. Just love it. Hope you have a grand day. Toodles, Kathryn @TheDedicatedHouse
Hi Roeshel –
What a nice update – WOW – lots of taping, but worth the result you achieved. The power of paint is pretty AMAZING! The yellow pop just makes the whole staircase landing come together. Fun, new decorative accessories always help, too. 🙂
I always find so much inspiration in your link party every week – love the big thumbnails, too -it is my favorite party to check out.
My best- Diane
Thanks, Diane! It was a lot of taping – definitely not a project I’d want to take on for a huge wall!
I’m so glad you stopped by! I did change things up a little so that the thumbnails could be larger/stretch across the page better. Glad you noticed and like it! Have a great day!
See? This is why you are so awesome. I love the pop of yellow and the light fixture, but the felted reindeer really makes it wonderful! Nice job.
See – that’s why I love you! You’re so sweet! You know I love your creativity and style too! Thanks so much, Suesan!
GORG!!!! I love it all! How did you hang your old window. I have a few antique windows needing to be hung but I don’t want the wire showing at the top, any advice?
Thanks, Chelsea. I use these: http://www.google.com/products/catalog?ix=heb&q=sawtooth+hangers&um=1&ie=UTF-8&tbm=shop&cid=5427952729495658984&sa=X&ei=BU0cT_ffFsLt0gHm-aXdCw&ved=0CHUQ8wIwAA. Reinforce with glue or if impatient like me, Gorilla tape.
I love the way it turned out. I never seem to have that kind of luck with painters tape :(. But after seeing this I might have to give it another try! Just Beautiful!
nicely done…amazing difference! Esther
I LOVE your landing transformation! It is absolutely beautiful! The pattern on the wall really makes the space. Great job!!
Love it Love it Love it! Roeshell you are a genius to think of that!!
Thanks SO much, Olga!!!
The pattern you did with the tape looks great Roeshel! Great party as always, and thanks for hosting!
Roeshel, I just love everything about what you did! Beautiful transformation … I’m pretty sure I would be finding many, many excuses to use the stairs!
Linda
itallstartedwithpaint@gmail.com
P.S. That dresser at the top of the stairs is to die for! I must pin that for a future project …
Thanks, Linda! 🙂 That dresser is so helpful for the ‘finding things’ challenged in our home (ahem…mister). lol!
I love it…first when I saw those diamond tape I didnt like them but girl you got a good vision…it is just prefect
I love it! It’s perfect in that spot and the yellow table looks lovely there too. You always know exactly what a space needs!
Roeshel; You never fail to amaze me and I LOVE the whimsical felt deer head. Did I miss a tutorial on him?
Heather
Thanks, Heather! No – he was a Christmas gift (http://www.vivaterra.com/felt-reindeer-head.html). (On sale now.) But I did see a cute moose head tutorial over at the DIY Club’s monthly party for January! 🙂
Roeshel! This is gorgeous! You’ve done an amazing job. Love the diamonds on the wall – you’re the smartest one! I’ve always known that! 🙂 The little yellow table is just darling!
Thank you so much for always hosting your inspiring party.
Be a swetie,
Shelia 😉
Oh my goodness, that is FANTASTIC! Love it, might have to try this somewhere in my home…! xxx
What? That is awesome! Have the people at Frog Tape seen this?? Im gonna have to tweet them…you should post this on their FB wall…I’m painting a diamond checkered pattern on my kitchen floor soon…so this is very helpful…
Thanks, Michell! Thanks for tweeting too! 🙂 I do love Frog tape – I always have success with it! Looking forward to seeing your kitchen floor!
I love so many things about this — aside from the fantastic paint treatment on the wall! That frame with the animal head . . . well that is just amazing! How did you do that? What is it made of . . . that just made me smile!
Thanks, Lauren! I actually got the felted reindeer (http://www.vivaterra.com/felt-reindeer-head.html) for Christmas and the vintage frame from a yard sale last year.
Your accent wall looks great! I love the trellis look and the fact that you made your own stencil. You’ve inspired me to go hang some art or something 🙂
Another gorgeous and inspiring DIY crusade, Roeshel. Love the yellow, love the DIY stencil, and LOVE that adorable owl!
I linked up a passel of projects, including my kitchen reveal you liked from a while back (don’t know why I never, but I don’t think I ever linked it before??).
Hope your weekend was fabulous!
~Abbie
oh my goodness gracious land sakes alive that is gorgeous!!!!! You have unbelievable patience to do that without a stencil. Wow. Love it. Can you tell? 🙂
You, Madam, have been pinned. I love what you did. It makes me want to go upstairs and explore. Is it weird that your reindeer setup reminds me of Winnie the Pooh and the Honey Tree?
Wow…what a difference that makes. It looks spectacular. I need to get brave and do a feature wall. Have a wonderful week.
Oh Roeshel! You can make a simple landing look like a masterpiece. I love it and it makes me wish I had stairs!!! Love the wall treatment, I’d like to do something like that maybe in my bathrooms. Such a huge impact for a small space. Thanks for coming to my party too :))
Thanks for hosting! Wow! Love your stencling in the stair well! Beautiful!
wow! this turned out beautiful!
I LOVED THIS IDEA! It’s so pretty. Great execution on the taping, too.
It looks absolutely perfect.
Today, I linked up my tutorial on my DIY Children’s Book with Audio. I made these for everyone in my family as Christmas gifts. I thought it would be fun to show you how I did it, so you can too! Have a great week!
Rebekah-www.potholesandpantyhose.com
Looks gorgeous! I love the color you picked so the pattern is not too overpowering.
Oh my! I love this so much. It gives it such a fresh, modern, bright, up to date look. And to think, you didn’t spend a dime! Awesome girl!
Your stairwell transformation is FANTASTIC!
This wall is ah-ma-zing!! I have been debating whether or not to buy a stencil to use in my master bedroom, but after seeing this (and the wall you linked from Shoshana) I’m thinking I could make my own. But seriously, the patience that is required! It looks great, I’m sure you’re enjoying it every time you walk upstairs 🙂 Thanks for hosting the party!
Wow –that is an awesome wall! Love it and thanks for the inspiration. 🙂
LOVE your version of stenciling…tape! Great idea, thanks for sharing.
Looks great. Love the whole project from start to finish.
Wow, what a great transformation! Love the feeling in that space. You never cease to amaze.
What’s on the landing floor – A mat?
Sarah – yes. It’s this Typography bamboo mat: http://wuslu.com/?product=display&pid=16351
Ps. Except that it’s a 2×3…not 3×5. That one is sold out though.
Just love what you did on the landing wall. And especially love that you did it with what you had!
I love your accent wall! Thank you for sharing and thank you for hosting! Have a great week! 🙂
WOW!!! I love, love, love it! Seriously fabulous. I love how small changes make such a big impact!
Thanks so much, Stacy! 🙂
It is gorgeous. Can I hire you to come decorate my house!
This turned out BEAUTIFUL! I love the colors and the shape – so pretty! Awesome!
I love love LOVE the landing!
Go you!!! Two projects in the top 12 at WhisperWood Cottage. Great job.
Congratulations on making it to the top 12 on Whisper Wood Cottage! Beautiful space!
congrats on having two top 12 projects!!!
I adore what you have done! That paint and pattern adds so much to your space – and I really like the addition of the adorable mustard colored table. Cheerful!
Just saw that your stair re-do was chosen as the winner over at WhisperWood Cottage! Congrats, girl! They are amazing!
Thanks, Gwen!!! Beyond excited…I’m dreaming! 😉
CONGRATS! Can’t wait to see the feature in Cottages and Bungalows!!!!
Pingback: I’m SO excited! | DIY Show Off
Congratulations! on winning the Cottages & Bungalows feature! I can’t wait to see your beautiful stairway and landing in print! It was really cool to be in the running along with you and many other talented women. I wish you the best!!!
Pam
Congratulations!
I can’t wait to see the magazine feature!
Happy Valentine’s Day to you!
Congrats on the magazine feature! I’m so excited for you — you deserve it!! XO, Clydia {threemangoseeds.blogspot.com}
Congratulations on the Magazine feature! So excited for you. A beautiful job well done.
Oh my gosh, I love this! It’s the perfect solution for my very boring stairwell. I love what you did, it looks so cosy and the yellow table is just perfect. I’d love to pin it for future reference if you don’t mind.
Looks amazing! How did you hang the window? I bought a couple of old windows from a thrift store for $5 and have been trying to figure out the best way to hang them on the wall. I’m afraid they’re pretty heavy for drywall alone… would love to know how you did it!
Thanks!
Thanks, Jen! I used two of these hangers on the back of the window: http://www.ooks.com/p-313-ook-large-nailess-saw-tooth-hanger.aspx. Our wall is plaster. I start by placing a piece of painter’s tape where I want to add a nail (but I use these because they’re sharper: http://www.onlinefabricstore.net/upholstery-supplies/upholstery-tacks/no-3-upholstery-tacks-1-pound-.htm?utm_medium=shoppingengine&utm_source=googlebase&cvsfa=2700&cvsfe=2&cvsfhu=3731353031&gclid=CKakgruvo64CFYmK4Aodz1w_QA) and hammer into the plaster/where the tape is. It’s secure and holds the weight of the window. I’m not sure if that helps with your drywall, but it’s how I display the window.
Came here from YHL. You did an awesome job there. I recently did a stenciling project of my own, though I didn’t make my own stencil.
http://whatsurhomestory.com/stenciling-not-so-superfragilisticexpialidocious-after-all/
I love this, it is so fun and bright! Where did you get the light fixture from?
Thanks! We got the light fixture a couple of years ago but changed our mind. It’s this one (although I don’t remember where we got it…probably Lighting Direct): http://www.wayfair.com/Sea-Gull-Lighting-Sebring-Outdoor-Flush-Mount-in-Weathered-Copper-8869-44-GX3391.html?refid=FR49-GX3391. As you can tell, I’ve misplaced the other pieces. lol But I do love how it looks in the meantime until I find them. 😉 That’s what happens when it sits around in the basement. The rest of it’s there somewhere in the chaos.
Hi there, I love your make over! The colors are great and I love the styling.
The light fixture is exactly what I’m looking for for my own make over. Where is it from?
Hi Jennifer! Thank you so much! 🙂 I’m so happy you stopped by. You could do a DIY colander light fixture, but we had that light fixture sitting around. We got the light fixture a couple of years ago but changed our mind. It’s this one (although I don’t remember where we got it…probably Lighting Direct): http://www.wayfair.com/Sea-Gull-Lighting-Sebring-Outdoor-Flush-Mount-in-Weathered-Copper-8869-44-GX3391.html?refid=FR49-GX3391. As you can tell, I’ve misplaced the other pieces. lol But I do love how it looks in the meantime until I find them. 😉
I love it! I’m curious about your light fixture? What is is and where did you get it. I love it so much. Visiting from YHL. 🙂
Thank you so much! I’m so happy you stopped by. You could do a DIY colander light fixture, but we had that light fixture sitting around. We got the light fixture a couple of years ago but changed our mind. It’s this one (although I don’t remember where we got it…probably Lighting Direct): http://www.wayfair.com/Sea-Gull-Lighting-Sebring-Outdoor-Flush-Mount-in-Weathered-Copper-8869-44-GX3391.html?refid=FR49-GX3391. As you can tell, I’ve misplaced the other pieces. lol But I do love how it looks in the meantime until I find them.
What a fabulous makeover! The walls look wonderful and the yellow is such a fun addition. I wish Santa would have brought me that sweet clock – any idea where it came from? Can’t wait to see your next project.
Thanks, Melinda! The clock came from WUSLU.com. You have to join and get the daily specials (the clock isn’t available right now but sometimes things come back). Although warning: Daily emails of beautiful/fun things to buy is dangerous to you budget and wallet! 😉 At least that’s what I Santa said when I forwarded him my wish list! 😉
LOVE THIS! Where did you get that clock?! 🙂 LOVE it! Please email me love1213@aol.com and let me know if you can! Thanks so much. Great blog!
Oops! I see where u bought clock! Sry, Thanks for posting!
I can’t remember if I already left a comment on this post telling you how much I love your stairwell makeover because I’ve been back several times to look at it! Love it. I mentioned it on my blog today because I think my readers will like it, too.
Thanks for the inspiration, Roeshel! 🙂
Pingback: Non-IKEA slipcover: The DIY SHOWOFF slipcover review | Comfort Works Blog
Pingback: I Heart My Room | 6 Tips For Decorating On A Budget
Pingback: IW: Accent Walls « perpetuallydaydreaming
Pingback: Looking back: 2012 DIY recap | | DIY Show Off ™ - DIY Decorating and Home Improvement BlogDIY Show Off ™ – DIY Decorating and Home Improvement Blog
Pingback: 45 Amazing DIY Projects!
I love the faux deer head, so cute and awesome! I would hang one of those up in my house! Very cool look.
Mandy
http://www.thecomfycrafter.com
Hi Roeshel,
I just have to dig your project gallery to find this awesome make-over. I love how you transformed this space into something fabulous.
Judy
pursuitoffunctionalhome.com/
I would love to know where you got your clock! It’s beautiful!
Thanks, CB! I think I got the clock through Decor Steals…so not something that I can direct you to since they have a sale once a day. Sorry that doesn’t help! But here’s a similar one: http://www.bedbathandbeyond.com/store/product/pocket-watch-horizontal-wall-clock/1017616196?utm_source=google&utm_medium=cpc&device=c&network=g&matchtype=&mcid=PS_googlepla_nonbrand_none_&gclid=CM6VruD88bkCFSVgMgodR0IAbg