Porch Floor Makeover ~ Home Repair Tutor

Good day, DIY’ers! Today I’m excited to introduce you to Jeff from

Home Repair Tutor blog

Like most of us DIY’ers, Jeff started working on home improvement projects on their home and rental properties in order to save money. He shares his knowledge and experiences with the hopes of helping others realize they can save time, money and DIY. I love that he shares his bloopers as well…a great “don’t do what I did” approach to learning.

Recently, Jeff researched the best products and ways to refinish a wooden porch floor and is sharing that secret here today!

Materials for stripping old paint (optional): 

  • Behr Stain & Finish Stripper
  • foam roller (One thing that makes reading enjoyable at Home Repair Tutor is that Jeff uses technical terms like “hot dog” roller! It throws you off for a minute while you giggle but you definitely know what he means!)
  • wire brush
  • tape/drop cloths to cover anything not being stripped (and to cover plants)

Materials for painting the porch:

  • 5 gallon bucket
  • 4 gallons of Restore paint (2 gallons will cover 100 square feet but you will need 2 coats)
  • paint stirrer
  • Restore paint roller kit that comes with a paint grid (some may say screen) for the 5 gallon bucket (Color shown below is Fieldstone)
  • 4 inch paint brush (cheapest available)
  • extension pole for paint roller (optional)
  • paper towels
  • painter’s tape/drop cloths to cover parts not being painted or to prevent splashing

Restore Paint materials

Tutorial:

How to strip a painted porch floor

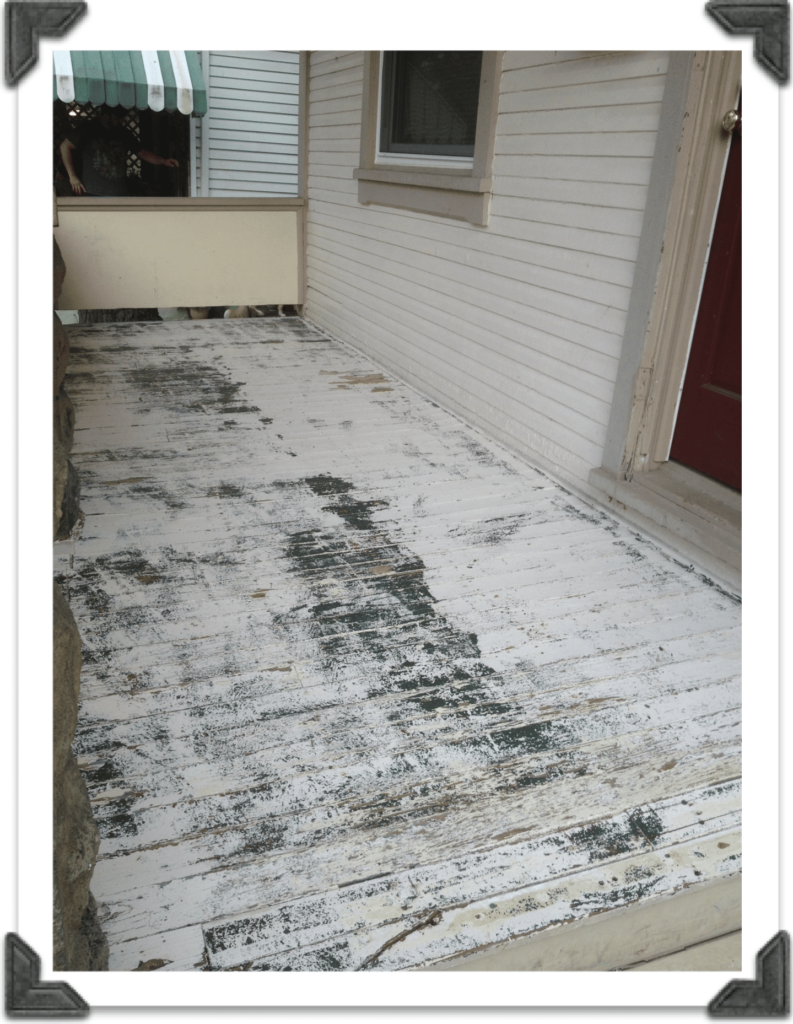
Jeff started the process with stripping away the old paint in order to achieve an even finish by rolling on the Behr Stain and Finish Remover with a foam roller. He worked in 3-4 rows of floor boards then waited 5-10 minutes before etching the boards with a wire brush. After finishing about 5 square feet of wood, he carefully used a hose to spray off the excess paint and repeated this process until the entire porch was done and let it dry overnight. The next day, this is how it looked:

paint stripped porch

How to painting a porch floor

Pour about 1 gallon of Restore into the white 5 gallon bucket and stir with the wood stirrer to ensure an even consistency. Place the paint screen into the 5 gallon bucket then dip the Restore roller into the paint and move it back and forth on the grid to remove excess paint.The Restore paint roller covers are what provide the rough texture.

Restore Paint Roller Cover

Jeff’s technique for painting with Restore consisted of rolling the paint onto the floor boards with the roller in one direction, moving from right to left. He did cut in first using a 4 inch paint brush and painted the quarter round trim and any other areas that butted against support beams, etc. Moving on, he found that painting 4 to 5 boards with the paint roller then smoothing them with the paint brush worked best. He overlapped the paint brush strokes by one half the width of the paint brush to ensure a consistent & smooth finish. You can see Jeff’s Restore Project video for a better visual explanation.

Jeff states that you can choose to leave the rough texture created by the Restore roller or smooth it out using the brush like he did. He chose the smoother finish over the concern that dirt and grime may get trapped in the textured surface.

The final feel of the Restore paint is grainy and it definitely did an awesome job of making the wood boards more even. There is absolutely no splintering poking through the two coats (recommended by the manufacturer and Jeff).

After one coat:

First Coat of Restore

After letting the paint dry for 24 hours, apply a second coat.

After two coats of Restore paint…

Restore After Second Coat

Once again, here’s the before:

Paint Stripped PorchA freshly painted, slip resistant surface after:

Restore After Second Coat 2

Tips:

  • This does seal the spaces between the boards and rain water will puddle. Best used on porches with a slight downward pitch.
  • Remove painter’s tape as you finish sections. Otherwise, it may be permanently stuck if painted and allowed to dry.

Project cost: $150 (and lasting more than the usual two year period of other finished outdoor areas)

Time involved: Approximately 7 hours (*includes paint stripping time and applying two coats).

Pretty awesome, right? It reminds me of our brushed concrete patio. The Restore paint comes in a variety of colors and is a great alternative to staining. Love the texture. Now…if only I had a outdoor wooden area to paint, this would be my preference. With a stencil involved in those steps. haha!

~*~*~*~

Thanks to Jeff for sharing his helpful porch painting tutorial and Restore paint review! See more of his projects at Home Repair Tutor. (I spy some bathroom tiling tips that I’ve bookmarked for an upcoming project).

I have to tell you that I’m always excited to make new DIY friends around the world wide web. I recently learned that Jeff is local geographically to us. Woo hoo! Another Steeler fan (well, for Mr. DIY since I’m not really into football other than being in the same room while the game is on). But the best part?! If I hit a snag with the apartment renovation, guess who will be getting a call? Be careful when you say “If I was local, I’d totally be helping you!” You just never know who might live next door!

DIY Project Parade and 13 Outdoor DIY Highlights

It’s time for the DIY Project Parade! My favorite time of the week for sharing DIY home improvement and decorating projects, visiting friends, sharing ideas.

I have to tell you – I had the most amazing week meeting so many of my DIY blog {and non blogger} friends at the Haven Conference. I was seriously so star struck. Blog. Friends. In real life!  We’ve virtually visited each others’ homes, shared and laughed and cried and seeing friends in person and hearing their voice (instead of their words in my own reading voice in my head) was truly a special treat. I even made new friends! The Haven team did an awesome job coordinating a super fun and interactive event. More on that and pictures as soon as I’m back home and caught up. I’m blogging from Atlanta, “ya’ll”. 😉 Oh, oh, oh! And guess who won $1000 worth of Purdy paint supplies AND a Home Depot garden crate gift basket full of goodies? Yep…this girl! Woo hoo!

Back on topic: Last week you shared your creativity. I’d highlight everyone if I could but you’ll have to visit the 6/17 DIY linky party for the complete list of links. Here are just a few amazing outdoor related projects that made me gasp with DIY delight {which goes something like this…”OMGosh! I’m so doing that! Why didn’t I think of that? I want that!” ::pin:: ::pin:: ::pin::}…

{please pin from original site}

Dawn from Creative Cain Cabin invited us to her welcoming, relaxing front porch for a little lemonade and some oohing and aahing over her beautiful outdoor retreat.

cottage front porch

Northern Cottage inspired us to take a break from the indoor projects and to get some fresh air outdoors and dig in with her beautiful DIY potting table

diy cottage potting table

{wouldn’t that look perfect here on our barn patio?! yes, i think so! useful + pretty!}

*SNEAK PEEK ALERT*

white cottage barn

Last year, our patio looked so pretty and fresh:

This year not so much (it looks like someone pulled out the patio furniture and walked away so far…oh, that’s exactly the situation).

BUT Kelly’s patio reveal at Eclectically Vintage is motivation to go out, fluff some pillows, move around some patio furniture and get the patio all primped and ready for summer. I’m the only one who hasn’t done that yet, aren’t I? I love her mix of eclectic and vintage (hmmm, where have I heard those two descriptions used together before? 2 happy words.)

eclectic vintage patio reveal

Keeping with the outdoor theme, Kelly’s DIY stamped garden markers (must see her clever garden container!) are super sweet…

diy stamped spoon garden marker

Marji at Ashbee Design has this amazing daisy ladder in a corner on her porch and holy cow! It’s something we all need! Looks DIY-easy enough and it’s another way fun way to decorate seasonally! Love it! Must check back to see what she does for the 4th of July with it!

diy daisy ladder

Okay, last week I shared a look at my DIY garden sign

summer decor

and last week, Shelley from Sew & Dipity shares the DIY garden sign jackpot with so many great ideas, inspiration and quote suggestions… for indoors or out!

diy garden signs

Did you have a chance to stroll through Cathy’s front yard, i.e. cottage garden? It’s a story-book fairy-tale dream-come-true at My 1929 Charmer in the summer time. It’s beautiful…

cottage garden

Outdoor umbrella getting a little tired? You won’t believe the umbrella transformation by Katie at Creatively Living…genius!

painting outdoor umbrellaSpeaking of genius DIY’ers, Peggy at Pig Logs and ‘tater Berries shares how a tomato cage turned into a beautiful outdoor cage chandelier. It’s a beautiful makeover story…

diy cage chandelier

YOU CAN DO THIS! Addicted 2 Home Decor makes repurposing an old lamp base into a beautiful DIY bird bath look super easy! So creative!

diy bird bath

Summer get-togethers are so much fun, even a party for two. Have you seen the gorgeous DIY outdoor mini bar and entire patio from Barb at Turtles and Tails? This girl knows how to entertain!

DIY outdoor mini bar

My blog friend, Daune from Cottage in the Oaks has my favorite summertime porch this year. Inspiring and full of charm. I know you’ll do a double take. I thought it was an inspiring photo straight from a Pottery Barn catalog. So much summer decorating goodness…

summer front porchMelissa from Daisy Mae Bell has a back yard that you won’t want to leave. Ever. In fact, I might head over there and camp for the summer. It’s amazing!

back yard makeover

Have you been working outdoors or indoors? Let’s see what you’ve been up to!

DIY Show Off
<div align="center"><a href="https://diyshowoff.com/category/other/diy-project-parade/" title="DIY Show Off"><img src="https://i899.photobucket.com/albums/ac195/Roeshel/DIYprojectparadebutton-1.png" alt="DIY Show Off" style="border:none;" /></a></div>
1. Please use the button above or text and link to this post to share the linky love. Here is the link: https://diyshowoff.com/category/other/diy-project-parade/.

2. Your post must be recent, shared at one DIY Project Parade only (not continuously) and be DIY related.

3. Include your name or blog name and project title. Add your permalink (not your blog url, but your DIY project post url).
4. Or email your link to thediyshowoff@gmail.com and I will add it for you.
5. This blog linky party is for DIY projects only. Links not related to DIY will be deleted. Please share your link one week only.  Please do not link recipes, giveaways, linky parties, promotions or a collection of inspiration. 
6.  NOW you can “like” the links!  What a fun idea!  Most liked links may be included in a post of DIY Project Parade highlights later in the week, featured on DIY Show Off Facebook or Pinterest.

7.  Visit a few other links to make some friends and to collect some creative inspiration!

*Don’t forget to enter to win*

Granite Gold cleaning kit & $50 Bed, Bath & Beyond gift card

granite gold products Bed Bath & Beyond gift card

DIY Show Off - FacebookDIY Show Off - TwitterDIY Show Off - PinterestDIY Show Off - Feed


Spring Time Porch Primping

Spring is the season to freshen up the porch! Meet: Amy from

The Blissful Bee blog

Amy is a very new blogger (welcome to blogging, Amy!!!) who has a strong passion for creativity and a real talent for stunning decorating. I’m just sharing one part of her gorgeous home…how her porch went from blah to beautiful!

Continue reading