How to install a tiled backsplash

We’re finally shopping for tile for behind our stove area so I wanted to revisit how our kitchen has evolved and the tile we chose for our back splash as well as review the steps we took to install the tile. Our kitchen when we bought the house was outdated…

When we moved we only paint the walls green, inserted new SS appliances and range hood. We lived with it for 3 years then painted the cabinets and finally replaced the countertop with granite (Virginia Jet Mist). Working as time and budget allow sometimes mean waiting for the things we want.
tile-backsplash-tutorial
We had a savings to get started on our dream kitchen (the dream where we have savings but the dream without winning the lottery.
The back splash:

Materials:
Venatino Polished Marble Tiles 12×12 mosaic, 5 Venatino Pencil Borders
OmniGrip Maximum Strength Adhesive
Tile Guard Natural Stone Penetrating Sealer
QuartzLock Grout – silver
FrogTape
Caulk

Tools:
Tile saw
Trowel
Float
Putty knife
Bucket
Sponge
Bucket
Paper towels
Rags
Caulk gun
DAP Pro Caulk Tool Kit

Back Splash Tutorial:

1.  Apply caulk to gap where countertop meets the wall.

2.  We used a DAP Pro Caulk Tools to make an even/straight line, but a using your finger (and water) works just as well.

3.  Prep area.  Cover countertop or clean as you go to protect the counter top.

4.  Upper cabinets sit back further than the edge of the countertop. We wanted out backsplash to cover the entire area. We started at the edge of the counter for our backsplash. Decide how your tile edge will be finished.  We used a matching border from the countertop’s edge vertically and ended at the bottom of the end of the wall cabinet.  We mitered the joint where vertical meets horizontal.
5.  Apply border and tile with OmniGrip Adhesive using a trowel.  Coat the wall (can be done directly on drywall).  OmniGrip is pre-mixed so there’s no guessing on consistency and this product works really well for a back splash.
6.  To lessen breakage and crumbling when cutting (the vibration nearly pulverizes edges of the marble), we used FrogTape on cuts.

7.  Apply pressure to ‘set’ tiles in place.

Another shot of how we ended the tile on the countertop/cabinet edge.

8.   Let dry at least 2 days.

9.  Seal tiles using Tile Guard.  Wipe on with a rag.  It dries within seconds.

10.  After drying, prep area by covering countertops or clean as you go – dried grout {We chose Quartz Lock in a darker gray} will be hard to remove.

Have a bucket of water handy.

11.  Apply generous amount of Quartz Lock to the float using a putty knife.

Quartz Lock is pre-mixed. We cover with a plastic grocery bag, then the lid with a tight seal and save leftover for a future project.
12.  Add grout to spaces between the tiles, filling every gap, working in small areas going to next step and starting again with the next area.  Smoosh it in the gaps.
13.  Using a well-wrung wet sponge, wipe in a diagonal motion (except when necessary against countertop and cabinets), wiping away grout from tile.  Grout should stay in the cracks and gaps, but be cleaned away from tiles.

14.  Rinse sponge.

15.  Repeat.

16.  Let dry.  Grout will hide imperfections/crumbled edges of marble tile.  Don’t stress with tiny chips. Grout will disguise them. We have an old farmhouse, so our motto is “imperfection adds character”.
Before Grout:
After Grout:
Kitchen before:
Kitchen after:
We’re thinking of stainless steel tiles for behind the stove but I haven’t decided on the pattern or shape of tiles yet.
stainless-steel-tile
We just calculated that we’ll be in our house 7 years this summer. And we’re ready to put the finishing touches on the kitchen. About time, right?  We’ll be removing the cabinets above the stove to install a proper vent. It means losing those two cupboards but more on a pantry coming soon too. What do you think?
tile-kitchen
I think the chef’s dream stove/range is on that ‘winning the lottery’ dream kitchen and he’ll have to make do with what we have but it’s functional. Sorry, Mr. DIY.
See more about our kitchen makeover at our Home Tour
DIY Show Off farmhouse kitchen makeover
Similar products for this project:
Star Quartz Quartz Lock 2 Ug Tile Grout-Birch 18lb bucket
Carrara Marble Italian White Bianco Carrera 3×6 Marble Subway Tile Honed
Custom Building Products TLOSQT-3 TileLab OneStep Cleaner and Resealer
Frog Tape 82021 Pro Painters Masking Tape, 1-1/2-Inch by 60-Yards, Green
Pro Caulk Complete Caulking Kit (As Seen On TV)
Goldblatt G02391 1/4-Inch By 3/8-Inch By 1/4-Inch Square Notch Trowel With Plastic Handle
TBC Margin Trowel Float 6″x 2-1/2″ Professional Gum Rubber Face Bonder to Foam Rubber Pad. Speciality Grout Float Designed for Hard to Reach Areas. Narrow Width & Offset Handle Allow Work Under Toe-Kick Space Under Cabinets and Small Areas. Float 11″
SKIL 3540-02 4.2-Amp 7-Inch Wet Tile SawThis is a sponsored post brought to you by FrogTape. The opinions are completely my own based on my own experience. FrogTape Blog Squad

Rustoleum Cabinet Transformations {apartment progress}

I am no stranger to painting cabinets (painted kitchen cabinets). I get a lot of questions about Rustoleum Cabinet Transformations and I love that I had the opportunity to test the product for myself. My honest opinion? I seriously LOVED the kit. Reason #1 – no sanding! That step is my least favorite (and most time consuming and messy) part of re-doing kitchen cabinets.

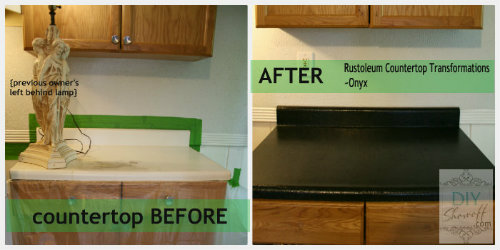
The apartment kitchen before was looking outdated and sad…(and super dirty!)

apartment kitchen makeover before

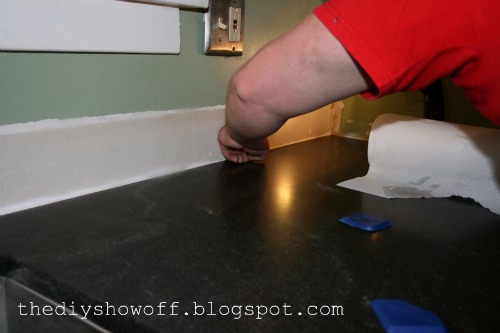
and after some clean up and the Rustoleum Countertop Transformations {review} definitely made even the cabinets look better…

Rustoleum Countertops

but with such a small space, I really wanted to lighten things up.

I chose “pure white”. This kitchen is super tiny but I used Rustoleum’s how to measure guide to confirm that one kit would cover our space. It turned out to be more than enough.

painting kitchen cabinets prep work

I removed the doors and hardware. I used FrogTape to label my doors

prep for painting kitchen cabinets

and to prepare my space for painting (where cabinets met the wall and floor in certain areas).

paint prep using FrogTape

 Rustoleum Cabinet Transformations

The first step in the kit is ‘deglossing’. Simply generously apply the declosser to the wood (or laminate or even metal!) with the provided green scrubby. Rinse with a wet rag and let dry. This removed a lot of the dirt, grease and the “shine”.

Rustoleum Cabinet Transformations

The next step is applying the bonding coat (or … white paint provided by the kit).  I started with the front side of the doors and while they were drying, moved to the cabinet frames.

Elevating doors made them easier to paint.

When painting doors, I find that after painting the edges, that running my finger along the underside helps prevent ‘drips’. This means painted fingers and old paint pants come in handy but if you skip this, you will definitely have drips/extra paint on the other side!

Rustoleum Cabinet Transformations

I gave everything 2 coats. I decided not to use the glaze which was provided in the kit since I wanted a clean white look. I think that if you’re not doing the glaze, that two coats is enough (because it will help achieve an awesome glazed look) but if going for the pure white, I recommend using a primer first (not provided) or giving everything 3 coats of paint if you have enough (which I did). I gave the outside of the doors (the most viewed area) 3 coats. The sides of cabinets, which are not seen, got two coats.

painting kitchen cabinets

I removed my FrogTape as soon as I applied the last round of the bonding coat. I felt confident applying the clear protective coat without the FrogTape using an angled brush and didn’t want to pull off any of the bonding coat which can easily happen once paint dries.

removing FrogTape

Once the last bonding coat was dry, it was time to apply the protective coat. Only ONE coat is recommended. I brushed it on in the direction of the wood grain (do the same with the paint). It goes on shiny (wet) but has a beautiful, durable matte finish.

Rustoleum Cabinet Transformations

Once the protective coat is dry, re-attach doors and hardware.

attach cabinet doors

I was going to just re-use the old hardware but I found an awesome deal at a yard sale with a bit of a prettier look. So new knobs for $2.00!

thrifted cabinet knobs

I think the result is beautiful. Painting cabinets is always time consuming but I found that the Rustoleum Cabinet Transformations kit is a great easy way to give old cabinets a new durable look!

This is not recommended by Rustoleum but using the same steps, I even gave the dingy scratched fridge the same treatment. Time will tell if it will hold up but since it works on laminate and metal…I felt it was a safe option. I gave it a ‘light’ brushing of the bonding coat and a layer of protective coat. The fridge looked extra yellow and dirty next to the new cabinets. Who wants that? Now it looks brand new!

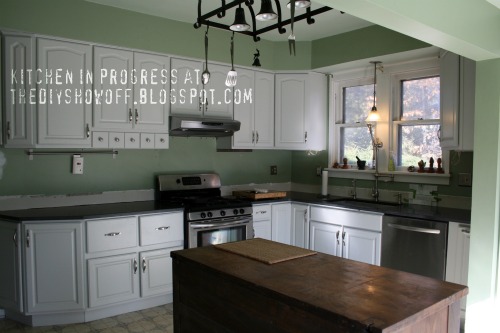
Once again, before: {I know – I keep sharing this before but with each new project, I want you to see the progress and what we started with.}

apartment kitchen before

After:

Rustoleum Cabinet Transformations pure white

a close up…

pure white

Yes! Time to move onto some decorative details in the kitchen! Wahooooooo! More to come!

kitchen makeover

I can’t wait for this clutter to be gone and for the decorating to begin!

painted white kitchen cabinets

It’s getting there!

More helpful links:

Rustoleum Countertop Transformations tutorial and review.

countertop before and after feature

·         Rust-Oleum has an appliance epoxy for painting appliances: http://www.rustoleum.com/CBGProduct.asp?pid=391

·         Rust-Oleum also has a product called Furniture Transformations http://rustoleumtransformations.com/furniture/

Sharing here: Home Stories A2Z
Best Sept. DIY party

*I share my experience in this post and it is not meant as a full tutorial. Rustoleum includes detailed written instructions and an instructional DVD tutorial with each kit with additional help at Rustoleum Transformations website. I received product in exchange for my review.

This is a sponsored post brought to you by FrogTape. The opinions are completely my own based on my own experience. 

FrogTape Blog Squad

Apartment Kitchen DIY – 1 before and 1 after

Hellooooo, DIY friends! So it’s almost midnight here and even up until about a half hour ago, I had high hopes of editing photos and writing up a painting kitchen cabinets tutorial and Rusteoleum Cabinet Transformations review but my long work days have caught up with me and I can barely keep my eyes open so um, yea…not happening. I sometimes tend to get a little ambitious with trying to squeeze so much into one day. When I say DIY is my passion, I’m not joking. And I love blogging but I discovered some times there isn’t enough time for both. You’ve noticed that too, right? This past week and the next few days will reflect all work, no play, no blogging, no socializing but lots of rewards!

I plan to be up at the crack of dawn (or maybe a few minutes after that) to head back to the rental to work on some more DIY. You all know I love me some DIY projects and it’s a three day DIY weekend, friends! At least in this household it’ll be 3 fun days of DIY (although we may be persuaded to spend an afternoon with family, food and swimming one day because that does sound like a lot more fun than our summer: DIY apartment part 452, doesn’t it?).

So anyway, as I head off to bed for a few hours of sleep before heading back to DIY, DIY and more DIY, in place of sharing a full tutorial and review today, I leave you with this…

This is one area of the apartment that we started with…

apartment kitchen before

{and that’s the cleaned up version…see the scary before here}

and this is what it looks like now (still some more to reveal yet/coming soon to a DIY blog near you. There will be much more to this kitchen than this current state!)

DIY apartment kitchen after

{Rustoleum Countertop Transformations review & tutorial}

Well, that is what it looks like now minus the clutter of additional tools and materials and MINUS that smooth ceiling to the left because there was a leak in the bathroom upstairs (uh oh!) and after a major freak out minor breakdown where I had to walk away to cry before gathering my strength, wiping my nose and wishing desperately that I could just run away to somewhere tropical and never DIY ever again –  to return to clean up wet crumbling drywall and water. I may have ran out the door an wailed. Ask the neighbors. It wasn’t pretty. ::sigh:: The joys of DIY. Not always smooth sailing and according to plan. But, nothing to do but persevere and just clean it up and mentally make up a drywall patch check list because it won’t fix itself and a huge 5 x 2 foot hole in the ceiling to expose floor joints and the wood floor above isn’t going to make for a pretty reveal.

Sooooo…if you don’t see me around for a few days, I will be working on this list:

  • painting faux tileboard, ceiling, trim
  • grouting a bathroom floor
  • patching a ceiling
  • installing baseboards
  • fixing a painted accent wall
  • working on a few other *fun* DIY projects (YAY! Finally!)
  • installing a bathroom vanity, sink and faucets
  • installing a bathroom light
  • installing a toilet
  • staining/poly’ing hardwood floors

Again, with the ambition! I’m optimistic. I’ll be working my butt off to get as much done as I can. I’m not kidding myself. I know I’m not going to make my deadline of it being ALL done this weekend but we’re getting closer! What are YOU doing THIS weekend? If you’re enjoying one of those Pinterest inspired recipes…I’m so envious! Anyone else notice that busy DIY days = unhealthy eating?

HAVE AN AMAZING LABOR DAY HOLIDAY WEEKEND if you’re celebrating!

If you’d like to see snippets of progress before it’s posted, I share updates on Facebook, Twitter and instagram. 

DIY Show Off - FacebookDIY Show Off - TwitterDIY Show Off - PinterestDIY Show Off - Feed

Thanks so much for stopping by! I love company! If you’re not available to patch a ceiling or grout tile this weekend, I invite you to catch up on past posts, links from the DIY party or our home tourvisit links on our project page or to start thinking about inspiration for fall!

Did you know that if you subscribe by email (left side bar)…you can view the full post delivered right to your email? A great alternative to the truncated feed!