When Ethan from One Project Closer asked if I’d like to participate, I was thrilled. Ethan was one of the very first bloggers I met last year (here) and OPC started their before/after series contest 5 years ago to raise awareness which is something I support too! You can get more details by clicking the button above because there is still time to enter to win!
It’s always so hard to choose just winner from so many amazing DIY projects…I’m just a fan of DIY. Period. And throw in some pretty amazing spaces competing and I want to choose them all. But narrow it down, I did.
And now, {drumroll please}, the winner is…
Kitchen Remodel ~ It’s Overflowing
This is Aimee’s kitchen when they moved in. Outdated, for sure! But look at all of those cabinets and all of that space. Lots of potential!
kitchen before
This is Aimee’s kitchen now:
kitchen after
Wow, right?
The sunny yellow accents with all of the fresh white make this one happy space to prepare meals and gather…
Love how everything looks so clean and bright…
There is so much to see! Even a DIY cabinet housing the microwave and adding additional storage!
I love beautiful materials Aimee chose and her DIY work in this kitchen:
white granite
subway tile backsplash
painting and framing the kitchen cabinets
You can see ALL of the details, more pictures and links to her DIY projects at Aimee’s Kitchen Remodel Steps post.
Congratulations, Aimee!
Now pop over to enter your DIY makeover for a chance to win!
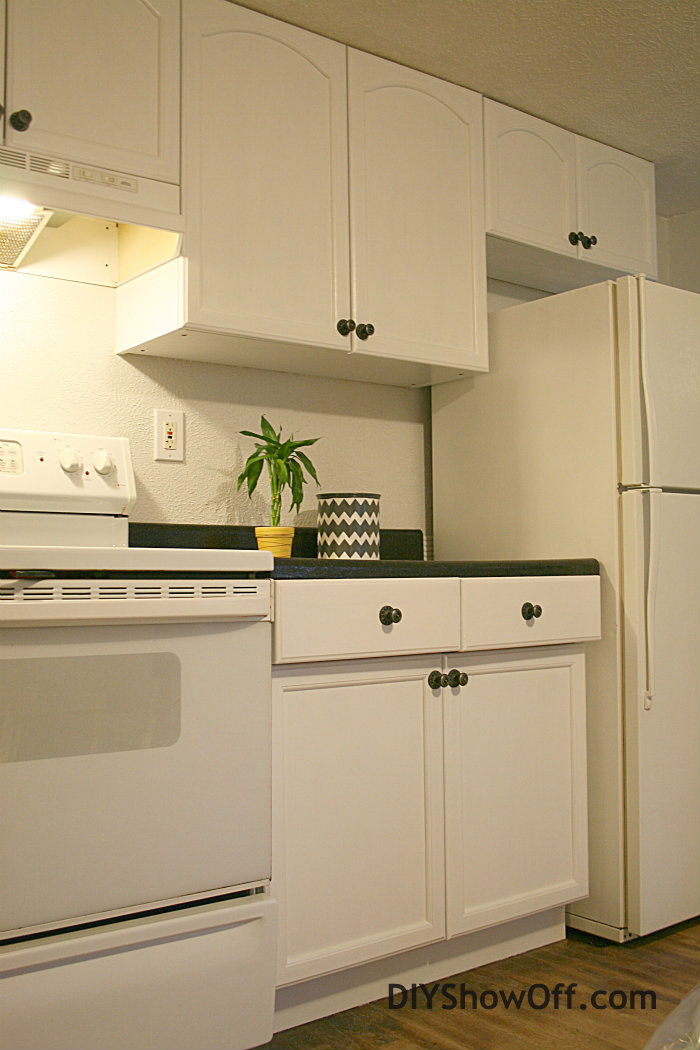
When I first saw the scratched, lightly burned and stained creamy colored laminate countertop in the rental, I knew I needed to either board up the door and run for the hills or an affordable and easy DIY solution. Rustoleum’s Countertop Transformations kit was a great way to rescue this kitchen.
kitchen before…
Rustoleum’s Countertop Transformations kit comes in 5 colors: Onyx, Charcoal, Java Stone, Desert Sand and Pebbled Ivory. Since the previous light color was stained, I decided to go with a darker color to avoid the same issue in the future. “Sleek and contemporary, Onyx is one of today’s most-sought after colors. Onyx’s black gleaming finish will modernize your kitchen and accent any decor. It perfectly complements kitchens with stark colors, white cabinets and stainless steel appliances.” The description sold me…an easy DIY way to modernize a kitchen?
A DIY option that doesn’t include removing the old and measuring for new, cutting new/etc.? Count me in! There’s a lot of DIY going on in this apartment and budget friendly, easy choices are a huge help!
I’m often asked about this DIY kit, so it was great to have the opportunity to give it a try for myself. Summary? Definitely worth the money and work to achieve the look of a brand new countertop!
My Rustoleum Countertop Transformations Experience
I read through the instructions. I also wrote down highlights when I watched the instructional DVD. The kit includes nearly everything but I did have to purchase 2 angled 2″ brushes, gloves, a 6″ microfiber roller and a 6″ foam roller (shown on the outside of the box). A shop vac is handy too.
I set up a work station close by with all of the materials on hand and ready to go.
and prepped the area using plastic drop cloths and FrogTape. I did not remove the sink, however removing the sink will make the process much easier.
Tip: I taped around the sink. However, if you have a steady hand and an angled brush, I think it’s easier to wipe away basecoat when you get it on the sink. Tape will peel away some of the finish and require touch ups but those are super easy to do too! More on that below. Tape off wall near backsplash, cover cabinets, appliances (if near by) and floor with plastic drop cloths.
The first step is to sand the counters using the diamond embedded sanding block (provided in kit) to remove the shine from the laminate, sanding in a circular motion. It actually not only removed the glossy finish but the some of the stains as well. This is by far the hardest step – not too difficult, just time consuming and requires some muscle.
{as you can see above, I removed the loose laminate side strips because they were not secure and applied each step to the non-laminated sides}
Once the sanding was done, I cleaned the countertops with a damp cloth, removing all of the dust (several times) then let them dry.
Step 2 is applying the adhesive base coat. Have the materials ready to go including: adhesive base coat, wetting spray, paint tray and microfiber roller, 2″ angled brush and decorative color chips (in the spreader). Stir the adhesive base coat.
Starting with the backsplash area, apply a heavy coat (like icing on a cake) of the adhesive base coat to the top and front of the backsplash and two inches of the countertop against the backsplash. Use the brush to apply the adhesive base coat to the sides and front of the countertop. Pour the adhesive base coat into the paint tray and roll onto the large flat area of the countertop. Make sure that none of the countertop shows through. Work quickly!
Once every spot is covered, quickly move to the next steps. Spray the wetting agent and spread decorative color chips using the spreader according to instructions. Take handfuls and apply decorative color chips in hard to reach places, covering every area of adhesive base coat. There are plenty of decorative chips. Spare no expense!
It does make quite a mess but don’t worry, they’re very easy to sweep up. I let this sit overnight then swept up the excess decorative color chips with a shop vac.
It’s starting to look awesome!
Using the scraper provided, start removing build up of dried decorative chips along the coated surfaces (being careful not to dig or remove too much).
Next, using the sanding block in the kit, sand down the decorative color chips. And sand some more. And sand again.
Vacuum up the dust
and compare the sanded countertop with the sample piece.
Sand and vacuum again if needed.
Clean with a damp cloth, making sure to get all of the dust removed and let dry. Score the FrogTape with a utility knife (we only had a razor on hand) and remove tape.
Touch ups: When I removed my FrogTape from around the sink, it did peel away some of the finish. Not to worry. Simply touch up with the adhesive base coat using a foam brush, (wipe away base coat if it gets onto the sink/etc.), apply decorative chips and wait four hours.
Sweep up the chips. Sand. Clean.
Tip: Note that this process is messy and remember to over protect areas you don’t want involved. I have a little paint touch ups to do.
Again, make sure countertops are completely dust/dirt free and dry. {looking better already, isn’t it?}
On to the last step! Once the countertop has been sanded and cleaned, gather supplies and pour Part A of the protective coat with Part B and stir.
Apply the protective clear coat starting with the top and front of the backsplash and onto about 2 inches of the level countertop. Pour some of the protective coat into a paint tray and apply to the flat areas of the countertop using the foam roller. Don’t forget to apply protective coat to the sides also.
Keep kids and pets out of the room until the protective coat dries to avoid fingerprints, pet hair, etc. in the finish.
The transformation is amazing. What a gorgeous finish and huge improvement!
Let dry 48 hours for light use and 7 days to fully cure for normal use.
Thoughts: This do-it-yourself Rustoleum Countertop Transformations kit is messy but easy to use, an affordable option and the result is gorgeous. Dried nice to a nice hard finish. The countertop feels durable and looks 100% better! We’re thrilled with the results! Thanks to Bri for her help with this project! Two people are definitely better than one!
What do you think? Have you tried the Rustoleum Countertop Transformations?
Thinking about it? I hope sharing our experience helps! This YouTube video shares DIY tips.
Up next…oh yes I did! I painted those cabinets! I’ll share the process next week. But here’s a sneak peek…
I did receive product (Rustoleum Countertop Transformations kit) in exchange for a review however experience, pictures and opinion are my own. For more information about Rustoleum Countertop Transformations including a how-to-guide, colors, virtual tool, photo gallery with before and after pictures and where to buy, visit Rustoleum Countertop Transformations.
This is a sponsored post brought to you by FrogTape. The opinions are completely my own based on my own experience.
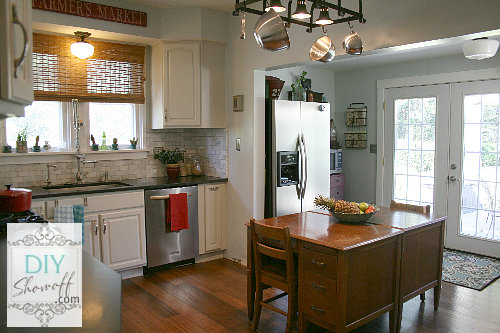
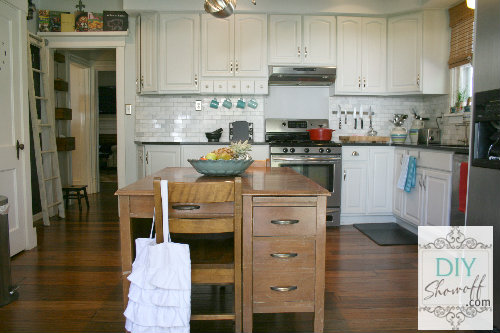
I just found some pictures from when we bought our house. I know you’ve seen the after shots but I thought you’d enjoy seeing a few before and ‘now’ pictures for comparison. This is one of the reasons I started blogging – watching the transformation of this old house and while I tend to see all that we have yet to do, these pictures are a reminder that we’ve come a long way, baby! Of course a really ugly before makes anything look like an improvement. So, even though our kitchen isn’t quite done, I have shared these after photos (there aren’t any super new ones) but it’s a reveal in reverse…before pictures to prove that we’ve made some changes. 🙂
Warning: The before photos are very scary and a lot of ‘yuck’ from neglect/previous owners. Our home sat empty for awhile. A year or two maybe? I don’t remember. But it’s the location and size and character of this old house that won my heart…not the dirt and outdated/cheap finishes. I saw past the grime. I had a vision.
Kitchen before – it’s love at first sight, right? ha! love the Mr. Yuck stickers on the bottom cabinets, don’t you?
kitchen now
Kitchen before: that’s a ceiling fan pull cord hanging down.
Kitchen after…
Kitchen before – what is that on the wall? I’m guessing the location of the previous owner’s kitchen garbage can? We don’t really want to know, do we?
kitchen now
Kitchen before…I’m amazed how much smaller this door makes that wall look!
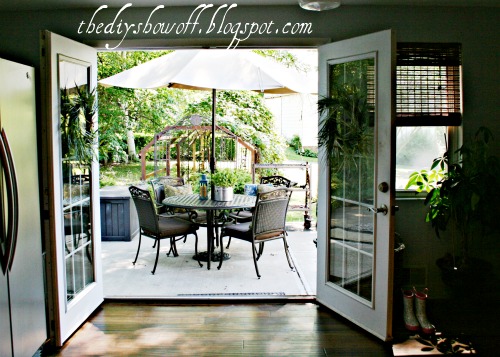
See the ugly sidewalk and rusty grape arbor in the background below? French door installation in progress:
Kitchen now…let there be light!
I know…these aren’t really “now” pictures as in “today”. They are at least six months ago before the move to WordPress as you can tell by the watermark. But, I did just return from Haven so you know my kitchen isn’t photography-worthy but thanks for looking – I was happy to find the before pictures!
{patio & grape arbor after too}
So, what do you think? A better idea of where we started and our home is a fixer upper for sure! If you haven’t already, you can see more in our home tour. 🙂
Now if only the upstairs bathrooms still didn’t look like the before pictures. I’m doubting it, but was your house move-in ready or did you have to work at cleaning some filth?