Refinishing Hardwood Floors {apartment progress}

How I refinished the apartment hardwood floors…

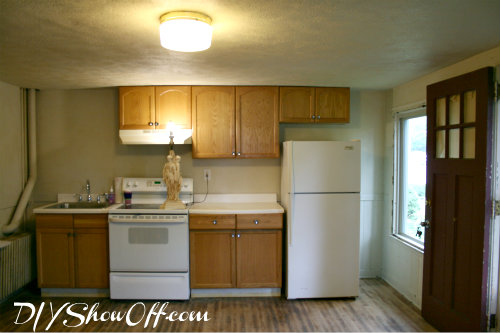
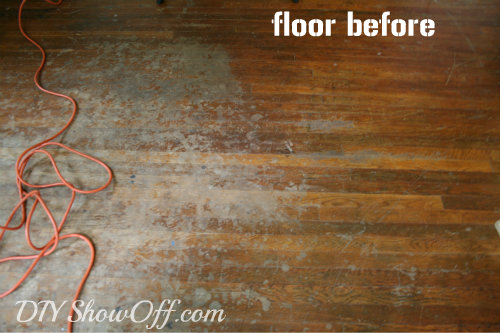
When we started the apartment renovation, I knew the hardwood floors would need to be refinished. Previous tenants had some sort of mishap and the finish was ruined…{I try not to think long and hard about the details of the mishap. ::shudder::}

condition of hardwood floors before:

hardwood floors before

We started by sanding the floors (well, by “we” I really mean, I supervised while my nephew controlled the beast known as the orbital sander). Once the steps to strip the old finish was completed and floors and sawdust were cleaned up, we were ready to refinish the original hardwood for a new look.

All sanded!

sanding hardwood floor

I headed to True Value for the materials I needed {and a few other things too but more coming on that soon}:

  • Minwax Wood Finish, stirred not shaken {Color is “Dark Walnut”}. Minwax has great informational guide too.
  • Minwax High Build Polyurethane (clear satin), stirred not shaken (martini is optional)
  • FrogTape
  • angled 3.5″ Purdy paintbrushes – “White Bristle” {recommended for stain}
  • angled 3 ” Purdy brush – “Black China Bristle” for polyurethane
  • old clean rags {I actually had these on hand but you CAN buy them at True Value too!}
  • Optional: latex gloves {I lived with brown stained nails for a day or two…oops.}
  • Suggestion: pillow for knees and definitely old clothes {not sold at True Value}
  • 220 grit sandpaper
  • Mineral spirits and clean rags

Staining Hardwood Floors

The process is a fairly simple DIY. The task is just time consuming (and a little labor intensive because of my position on ‘old knees’). Since I was working with two small rooms, I opted to use a brush and work on my hands and knees vs. a roller.

I started in a far corner of the room, working with the wood grain, with the direction of the wood planks, working my way out of the room – don’t work yourself into a corner – no fun being trapped!

For extra protection, tape off baseboards/shoe molding using FrogTape.

I dipped my Purdy brush into the can of Minwax stain, tapped off the extra and applied the stain in a corner, working along the baseboard along the length of the wood plank. When I noticed that some of the stain wasn’t absorbing, I let it sit for a few minutes then wiped away the excess with an old rag.

staining hardwood floors

I worked in 2-4 foot sections in length as I went along right to left in my room, working my way towards the door. Sometimes I did a larger number of planks as well, just find a rhythm that works for you.

refinishing hardwood floors

Bedroom done. I worked my way out into the hallway…

staining hardwood floors

down the stairs and around the bend…

staining stair treads

and started the main floor in a corner, working my way out the door.

staining hardwood floors

Sounds like I ended up at Grandmother’s place (over the river and through the woods) and a lot quicker than it actually took. ! 

TIPS: Since I’m working my way actually out of the apartment, I had to make sure to grab things I needed like purse, keys, cell phone, etc. Turn off things that you don’t want to leave on during the drying period. The radio blasted during our drying time. Oops!

Note: Two coats can be applied (see Minwax for further instructions). I loved the color one coat achieved so I skipped this step. Sealing the floor will also darken the color a bit. One coat of stain:

dark walnut hardwood floors

I let my floors dry a few days but we were working in an unoccupied space. I applied the stain on a Friday and returned the following week to resume refinishing by sealing the floors. Sealing the floors is NOT optional, it’s required. It’s necessary. Stain does not protect the wood, only colors/enhances the beauty.

Sealing the floors…

sealing hardwood floors

I used the same process as above to seal the floors. Starting in the far corner of the room, I repeated the same steps of dipping my paint brush into the polyurethane, tapping, applying in the corner, brushing right to left (the direction I was personally working), along the baseboards and working my way out the door.

It really enhances the rich beautiful color:

minwax high build polyurethane

I let the first coat of polyurethane dry 48 hours.

My most UN-favorite part: once the first coat is dry, lightly sand the entire floor with a 220 grit sandpaper. Clean floors of dust with mineral spirits and let dry. Then apply a second coat of polyurethane using the same steps. Repetitive. Time consuming. But so rewarding!

Allow to dry for 12 hours to resume “light use” (however – test the floor first!). Remove FrogTape.

Stand back, remember the before (try not to gag):

hardwood floors before

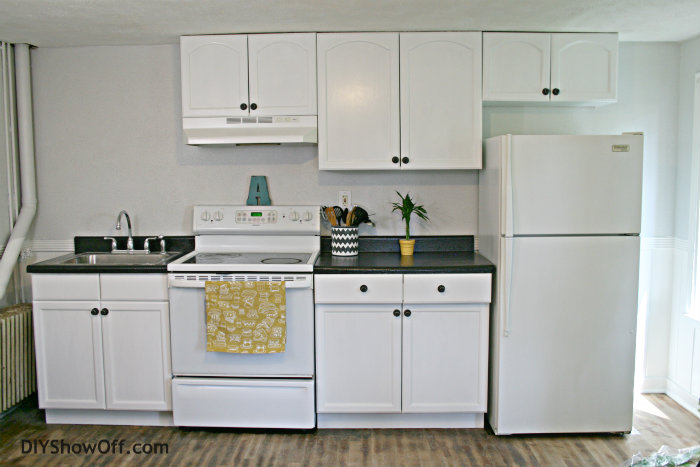
Admire the gorgeous after: 

apartment sneak peek alert!

dark walnut stained hardwood floors

Pinterest tip: Did you know that if you rub a wood scratch (floors and furniture) with a walnut (circular motions, filling in the scratch), the walnut oils will fill in the scratch and heal the wood wound? Great snack, too!

Estimated total cost of DIY refinishing 2 small rooms of hardwood (approx. 250 sq. feet) = $250.00 and a few days of recovery…but nothing that would keep you out of your True Value hardware store to prepare for your next DIY. 😉

Joining Sarah’s party today:

TDC Before and After

We were chosen by True Value to be one of the members of the 2012 DIY Squad. I have been compensated for the materials needed for my DIY projects. However, the thoughts and opinions expressed are completely honest and my own. I have not been paid to publish positive comments and no one has twisted my arm to participate. 

This is a sponsored post brought to you by FrogTape. The opinions are completely my own based on my own experience. 

FrogTape Blog Squad

Facebook
DIY Show Off - FacebookDIY Show Off - TwitterDIY Show Off - PinterestDIY Show Off - FeedDIY Show Off - HomeTalkDIY Show Off - G+DIY Show Off - Instagram

Painted Striped Curtains {apartment sneak peek}

Painting Horizontal Stripes on Fabric Curtain Panels

Renovating, furnishing and decorating an apartment = very tight budget. With the main floor needing six panels, Ikea’s Vivan panels were a perfect choice. A set of two panels for $9.99 – what a deal! And they’re huge! 52″ wide x 98″ long. I love all white curtain panels but for the main living space, I wanted to add a little texture, neutral accent and simple pattern. I love horizontal striped curtains. We decided to go with three large neutral stripes, starting from the bottom.

Not according to plan: My plan was to do an ombre design from black, dark charcoal to light gray. I ended up with something a little different. Here’s how I did it, my suggestions on what I would have done differently and why my stripes aren’t ombre.

What I did: 

Materials:

  • Ikea Vivian curtain panels
  • Paint (fabric paint or latex paint)
  • Sponge rollers (recommend trying foam rollers)
  • FrogTape
  • Tools used: yard stick, iron, sewing machine for hemming if needed

I started by pre-washing and ironing out wrinkles, then spread them out (one at a time) on the dining room table. I used a vinyl table cloth as a “drop cloth” for underneath the panel.

Ikea Vivian curtain panels

Using my yard stick, I started from the bottom and measured 12 inches, then drew a pencil line.

DIY horizontal striped curtains

I used my FrogTape on the outside of my 12″ line to create a crisp border. For the next stripe, I measured 12″ from the edge of the FrogTape. Note: My straight tape lines extended past the panel to secure the edges of the fabric to the vinyl tablecloth to help prevent shifting.

FrogTape for painting striped curtains

I purchased 3 large bottles of fabric paint in black. My plan was to add white to lighten each stripe. However even three bottles of fabric paint does not go a long way with six curtain panels. I ended up using the black fabric paint for the bottom stripe of each panel.

painting striped curtains

painting stripes on curtains

Dip in paint, roll on cardboard/paper towels then roll onto fabric. My cheap rollers meant I had to go over it a few times but once the roller was saturated with paint, it went quicker. 

painted horizontal striped Ikea curtains

Then…since we are on a budget, I used latex wall paint – which is the reason I ended up with a black stripe, gray stripe and greige stripe…not white ombre, but neutral! Tip: {figured this out after the fact}, water down latex wall paint for better absorption.

DIY painted striped curtain panels

I used a sponge roller from the dollar store for each stripe. Tip: DO not use cheap dollar store sponge rollers. Invest a couple dollars in a better quality foam roller. My cheap sponge roller is part of the reason for a “suede” look…which we were okay with and ended up liking the look, but I also would have liked a more solid result. The faded look is pretty too and when time is an issue, it looks even better. 😉

I painted each stripe, let it dry a little, then hung each panel to dry more thoroughly.  So, with six curtain panels, it did take me a couple of days.

drying painted curtain

I wiped the vinyl tablecloth in between laying out each panel. (Pleasant time saving surprise: The paint on my vinyl drop cloth could be seen through the white curtain panels, meaning after the first one, I didn’t have to measure/mark each panel – I just lined it up on the vinyl drop cloth and taped where the previous curtains’ FrogTape lines showed through.)

how to paint striped curtain panels

I immediately removed my FrogTape once painting was complete.

removing FrogTape from painted curtains

Once all of my panels were dry, I measure the length and cut from the top, adding 3 inches to create a rod pocket (cutting from the top or bottom means one of those needs hemmed and I found painting from the bottom up easier). I love using curtain rings, but again, 6 sets of curtain rings adds up, and this is a budget friendly makeover.

measuring and cutting curtain panels

cutting and measuring…

creating rod pocket

sewing a rod pocket

I creased the extra 3 inches with an iron,

ironing rod pocket

then folded about an inch under and ironed that.

creating and ironing rod pocket hem

I sewed a straight line near the bottom of the ironed fold to create a rod pocket.

sewing rod pocket

***I’ll share what I did with the “top” piece of the curtain panels soon – cutting from the top left me with 6 valances, just needing a hem.

I gave each panel another quick iron over and now they’re hanging!

Before apartment makeover:

door before

Just a peek of the apartment windows before:

chartreuse door

Door paint color is Valspar Gilded Pesto (beautiful chartreuse!).

Sneak peek windows after:

DIY painted horizontal striped curtains

Side note: Since the tiny apartment doesn’t have an entry way or closet, I attached some coat hooks (Hobby Lobby) to a board and screwed it to the door – instant cute coat rack. DIY Show Off bag is from Nest of Posies.

painted curtain after

Whatdoyathink? It might make more sense when you see the rest of the apartment, eh? Patience, my friends. I know – not one of my strengths either. 😉

Note: I haven’t washed the curtains after painting, but I’m assuming all will be well – after all, the paint doesn’t wash out of my paint splattered DIY attire.

Update: More apartment details! We are still working on some finishing touches and last minute issues that have come up {the joys of DIY!}, so the reveal has been pushed back. However, there are a TON of DIY details and I’ll be sharing those over the next week or two {and while we’re on vacation}. We think it’s awesome and can’t wait to hear what you think! Little by little…we’ll work up to the reveal!

This is a sponsored post brought to you by FrogTape. The opinions are completely my own based on my own experience. 

FrogTape Blog Squad

Show Your Colors

With so many before and after projects going on around here…and you know how I’m always so excited to share…well, sort of like DIY Show Off, MyColortopia.com has a new feature for readers to celebrate their completed projects. It’s called Show Your Colors and not only can you show off your before and after photos, but you’ll inspire others with your DIY talents. Sounds fun, right?

choosing paint colors, paint color inspiration tool, how to choose a paint color

This is how it works:

Remember the apartment kitchen area before?

apartment kitchen before

Blah. But after a lot of painting, the cabinets, countertops, walls and trim have a fresh new look:

Rustoleum Cabinet Transformations pure white

and a sneak peek of something you haven’t seen yet involving more paint {details coming soon}…

painted accent wall

It’s super easy. Create and log in to MyColortopia.com, click the “Befores &Afters” tab and upload up to 4 pictures of your before and after room makeover.

All done. You’re all set to browse the entire gallery of before/after photos. The MyInspiration tool will match your favorite colors. And you can share via social media your project or your selected favorites. Super cool!

There’s so much more information at My Colortopia.com to kick start inspiration for your next room makeover including a blog post full of ideas written by some of our favorite talented DIY bloggers. Check it out!

I have been sponsored by Glidden brand paint to write this post but the thoughts and opinions expressed are my own.