Show Off your Christmas Tree contest!

Show Off your Christmas Tree Contest

O Christmas Tree, O Christmas Tree! I’ve just finished decorating 3. If you celebrate Christmas, more than likely you decorate an evergreen tree (real or artificial) with ornaments and lights. It’s a Christmas tradition in our home. Throughout the day, the Christmas tree stops me in my tracks. It’s a moment when I’m reminded to Rejoice! I’m celebrating the birth of my savior. When the days are short and evening arrives early, there’s just something happy about twinkly lights on a Christmas tree that lifts my spirits and warms my heart this time of year.  Christmas Tree Party and Contest I’m a “do what you love” decorator. Classic, modern, French country, rustic, vintage, farmhouse. See what I mean? Our old farmhouse doesn’t have an open floor plan, so rooms aren’t all the same theme and color. I love so many different styles and our home reflects my indecision…I mean: appreciation for a variety of decorating styles. Here is a look at the trees in the DIY Show Off home:

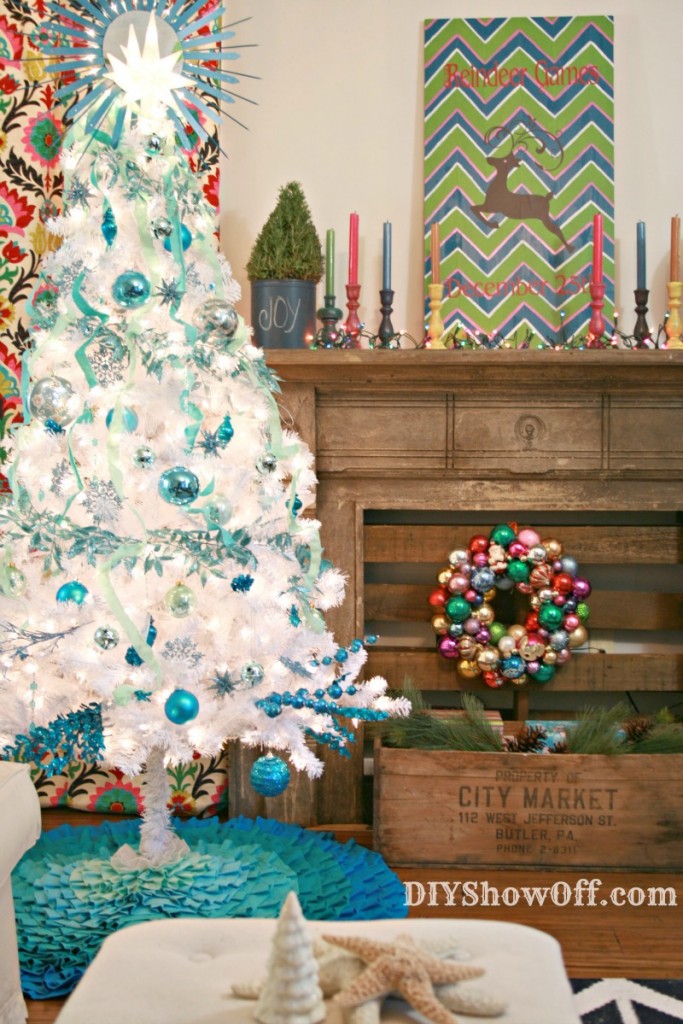
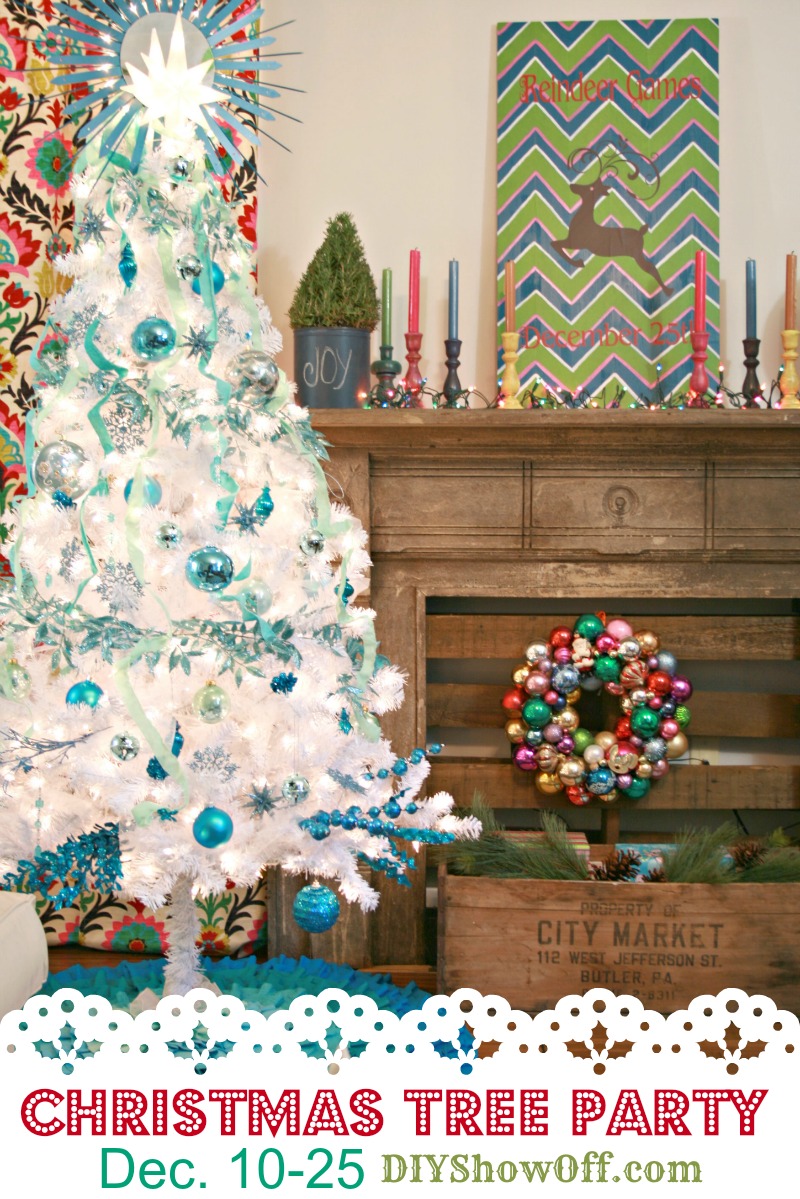
The family room Christmas tree is a white. I love how it glows and the fun bright colors are perfect for the eclectic vibe in this room.  Trimming the Christmas tree is such a fun part of the holidays!

colorful eclectic Christmas

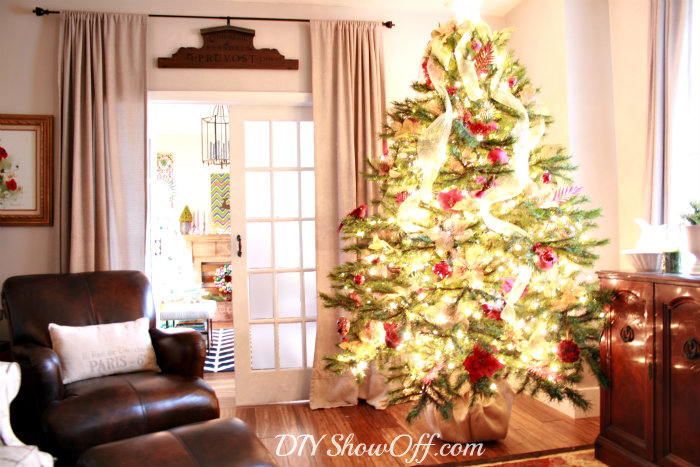
Our traditional red and gold tree in our living room: DIYShowOff Christmas Tree
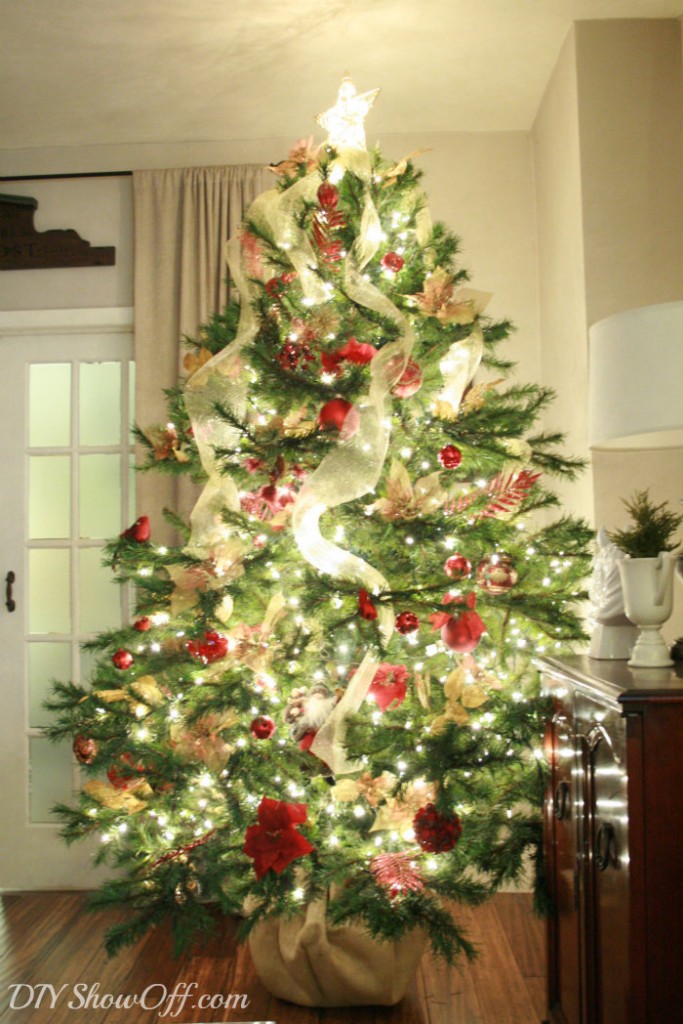
{tips for decorating your Christmas tree – can you tell lights are strung vertically? I create a faux root ball to give our 7.5′ tree another foot of height.}

A peek from traditional into bright and eclectic through the French doors…

traditional christmas living room

Our dining room tree is decorated with thrift store treasures, burlap ribbon browns, golds and a grapevine wreath star. Base is an old trunk and an old crate which give the tree some height {and charm}. vintage natural Christmas
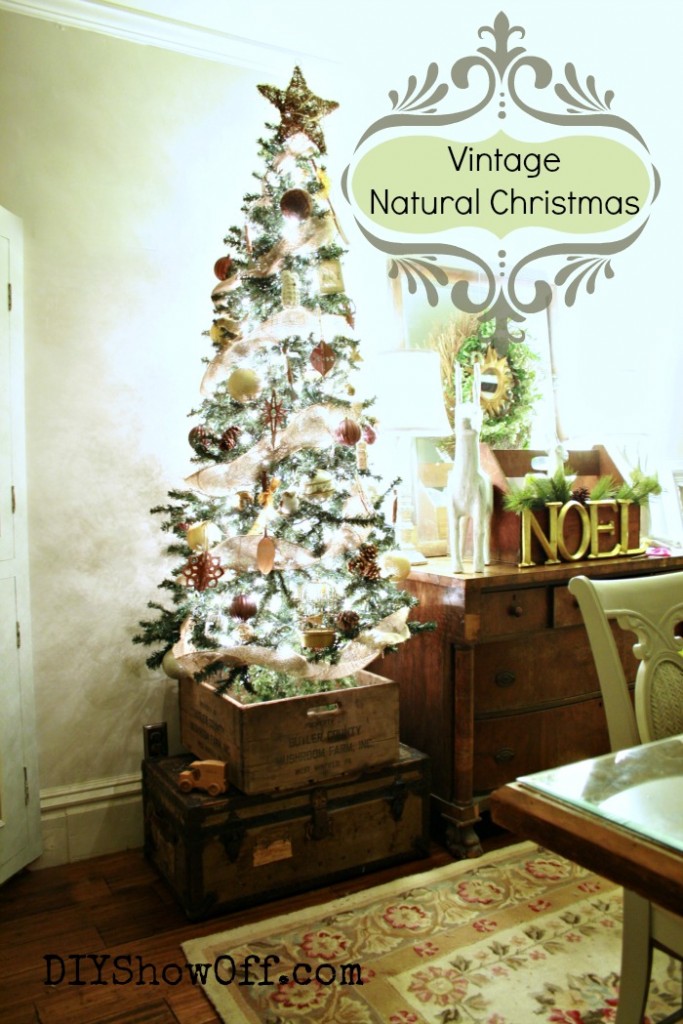
{More dining room Christmas decorating details and Holiday Home Tour coming this week!}

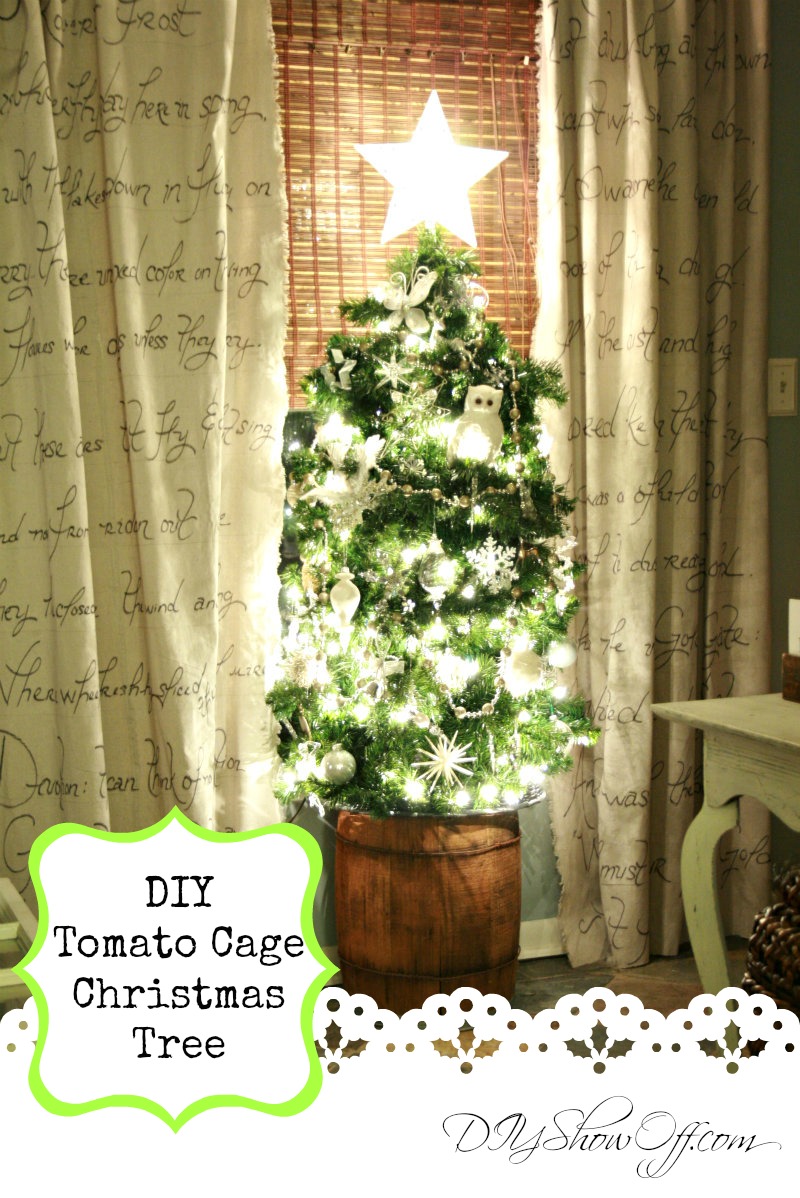
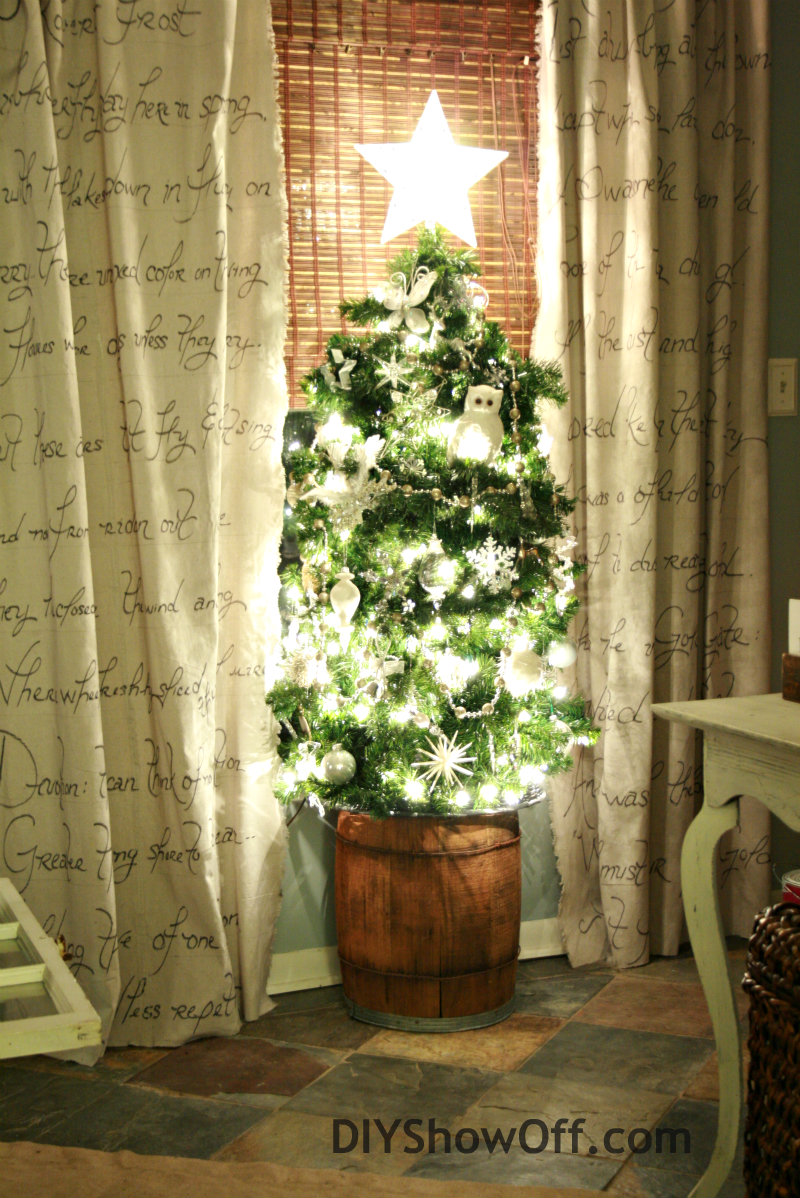
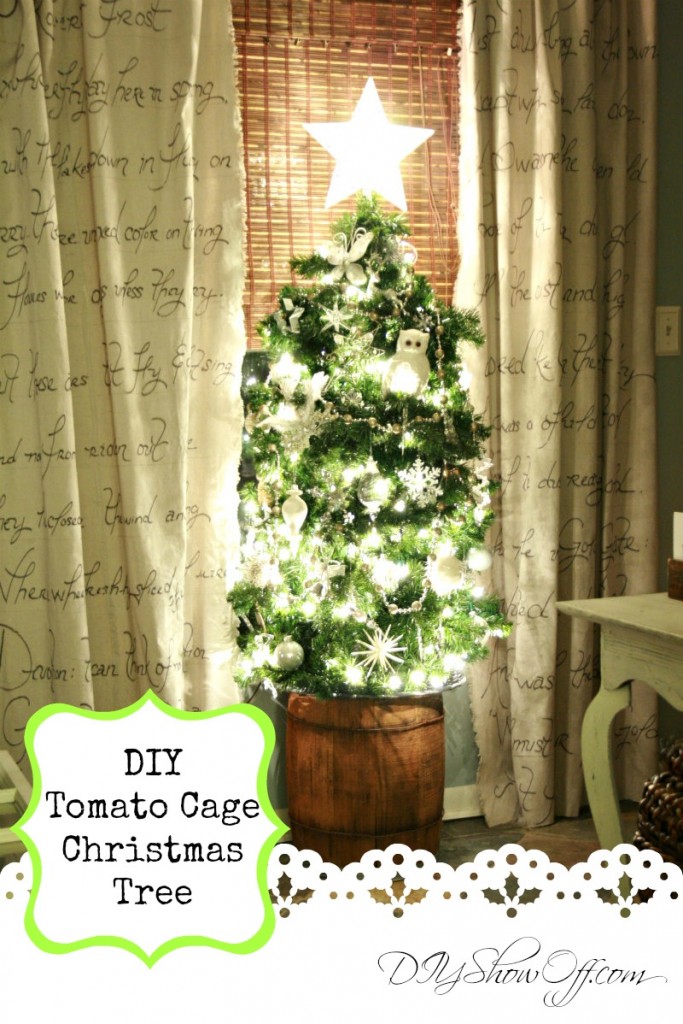
and a little DIY tomato cage Christmas tree in the sitting room: DIY Tomato Cage Christmas tree
How to show off your Christmas tree: 

Share your Christmas tree photos and blog posts by linking up. Show it off in the party below by adding your picture and linking to your permalink blog post. I just ask that you link back to this post to help share the love. Here’s a convenient html code to add to your blog post:

Christmas Tree Contest
<div align="center"><a href="http://wp.me/p27VkY-1Ru" title="Christmas Tree Contest" target="_blank"><img src="https://diyshowoff.com/wp-content/uploads/2012/12/Christmas-Tree-Party-button.jpg" alt="Christmas Tree Contest" style="border:none;" /></a></div>


Christmas tree with the most “likes” {you may want to share with your friends to “like” your tree!} wins $100 Visa gift card for some after-Christmas sales shopping or for a first DIY project of 2013.

Contest starts now and ends December 25th at midnight EST. Winner will be announced shortly after. In the event of a tie, another blog post will be written and DIY Show Off readers will choose the winning tree. DIY Show Off may choose the final winner if necessary. Non-bloggers may submit a photo to thediyshowoff@gmail.com with “Christmas Tree” in the subject line {DIY Show Off will link your photo and reply with your entry #}. Open to US and Canadian residents 18+ only.

Remember to “vote” by visiting some pretty thumbnail links and clicking “like”!

Christmas Tree Inspiration:


Facebook
DIY Show Off - FacebookDIY Show Off - TwitterDIY Show Off - PinterestDIY Show Off - FeedDIY Show Off - HomeTalkDIY Show Off - G+

DIY Lighted Starburst Mirror Christmas Tree Topper {tutorial}

DIY Lighted Starburst Mirror Christmas Tree Topper

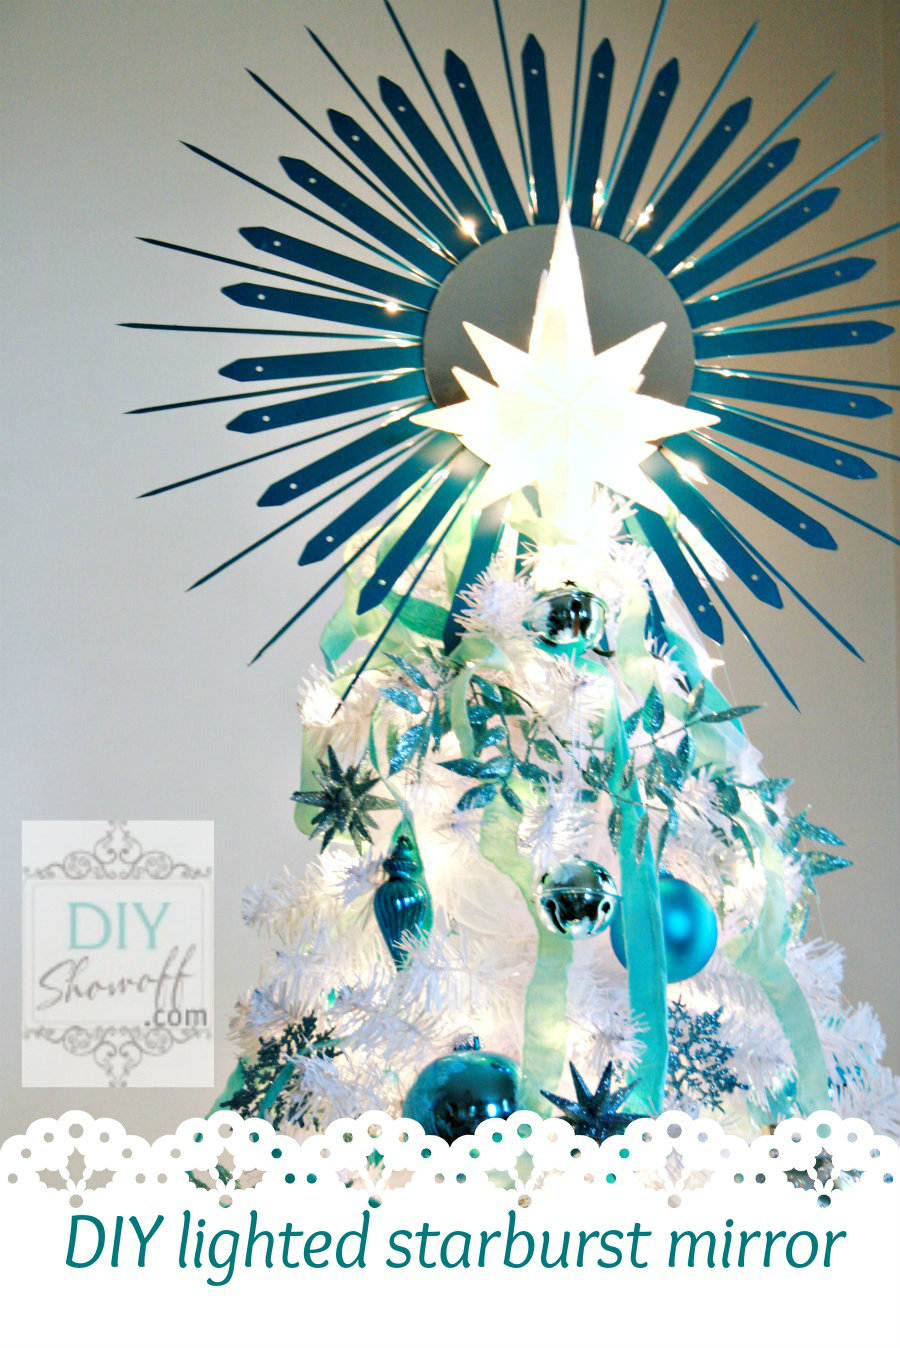
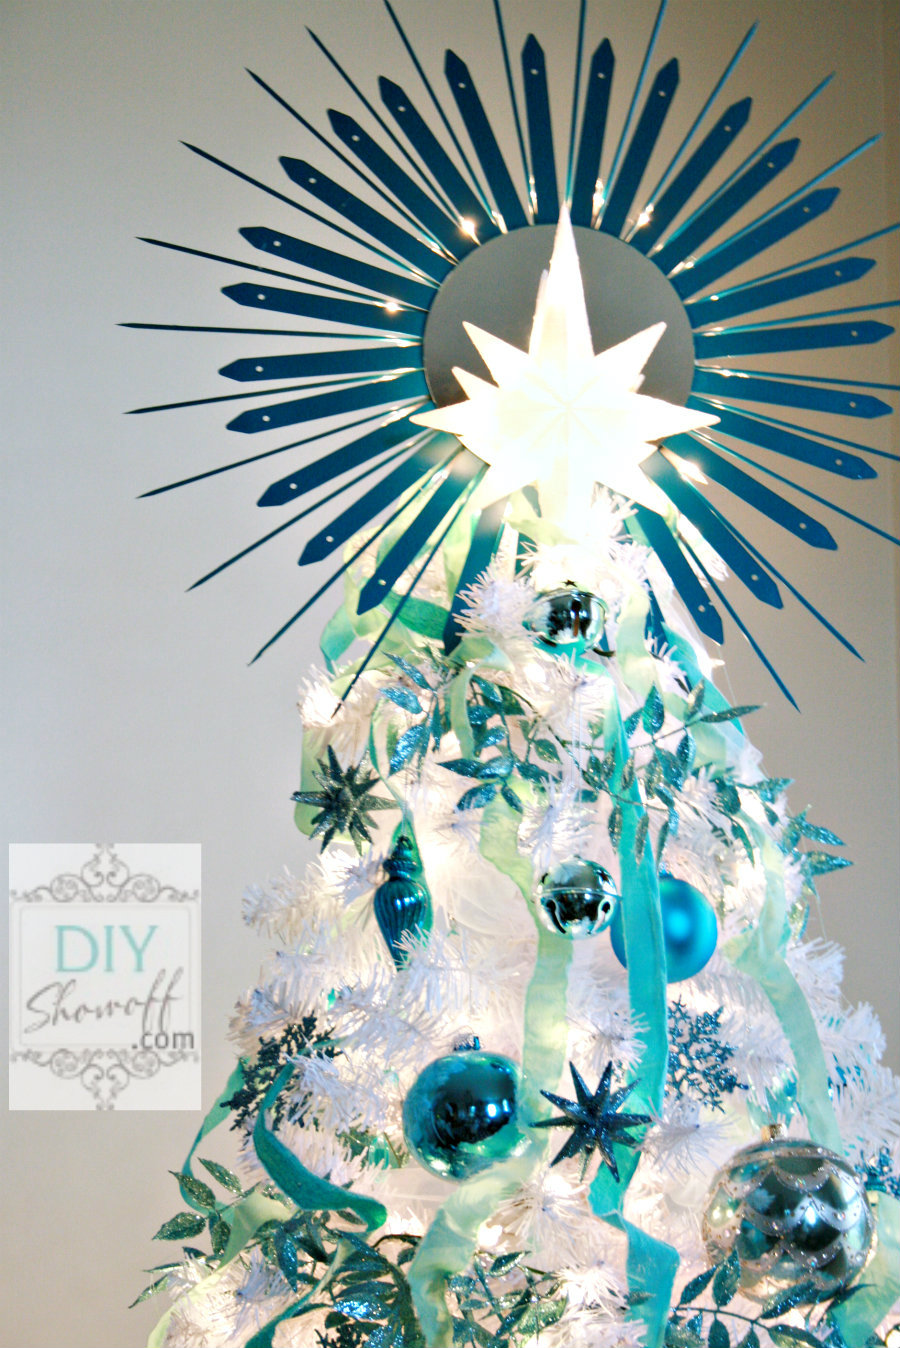
One thing I’ve never created but have always loved is a DIY starburst mirror. There are so many great tutorials, so many beautiful creations. The new white Christmas tree in the family room needed a topper. I have a white star (which you’ll see that I also used…there’s no such thing as too much bling at Christmas!). Here’s how I made the lighted starburst tree topper:
DIY lighted sunburst mirror Christmas tree topper

Materials:

  • about 30 BBQ skewers
  • about 30 plastic garden stakes
  • 7″ flat round mirror
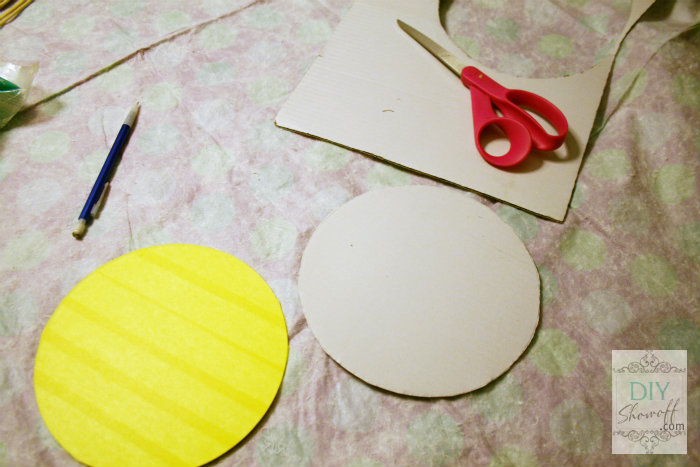
  • 7″ cardboard circle (I traced my mirror onto a piece of white cardboard and cut it out)
  • FrogTape Delicate Surface
  • string of lights (mine is a string of 20)
  • spray paint (I used Rustoleum‘s Satin Lagoon)
  • 1 pipe cleaner
  • hot glue

Tutorial:

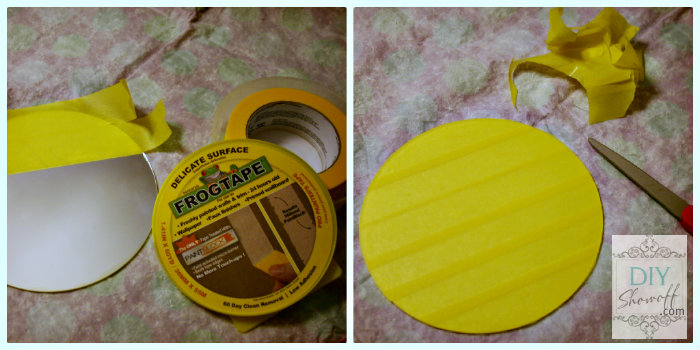
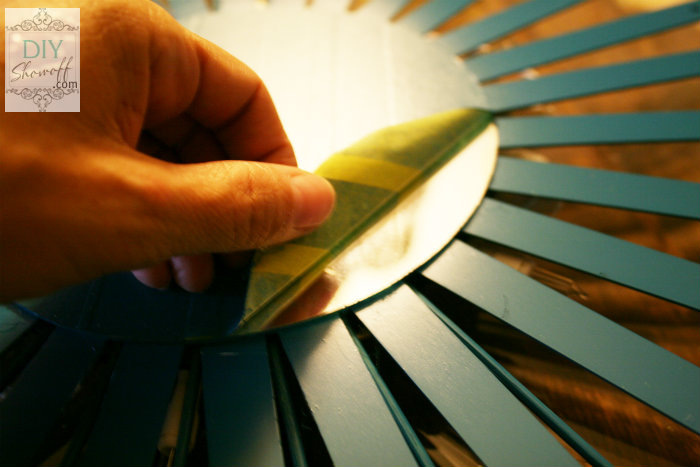
1. Using the FrogTape Delicate Surface, tape off the front of the mirror.

FrogTape Delicate Surface

2. Trace the mirror onto a piece of cardboard and cut out circle. Set aside.

DIY lighted starburst mirror tree topper

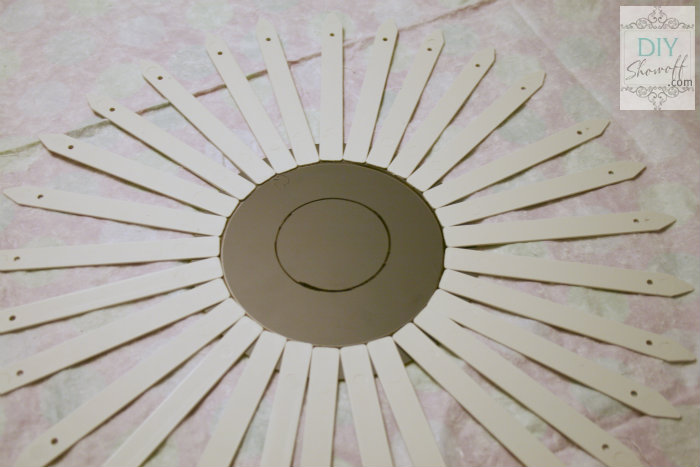
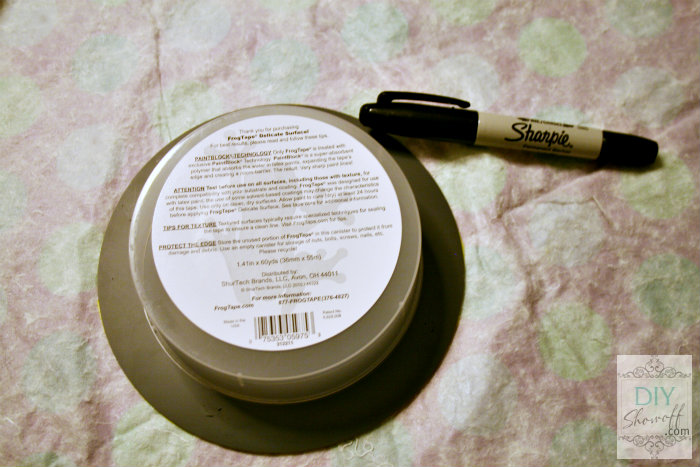
3. Flip mirror over. I used a Sharpie and traced the bottom of my FrogTape container, making a circle centered on the back of the mirror. I traced the lid of my spray paint can for a smaller inner circle.

DIY lighted starburst mirror tree topper

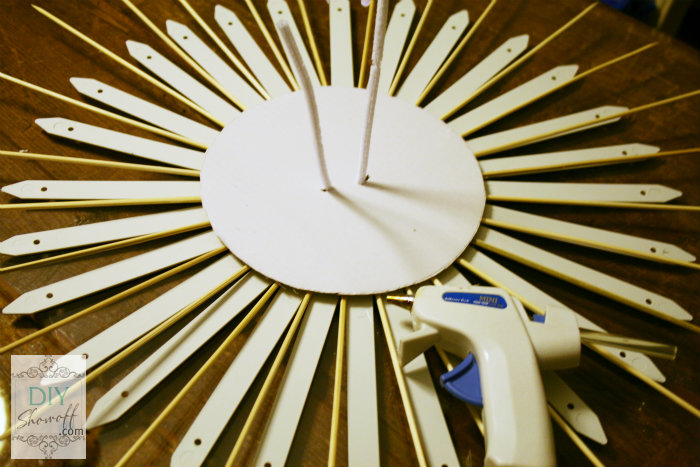
4. Lay out garden stakes round the outer circle to see if you’ll need to leave a small gap between each garden stake. Mine fit snug, just touching each other. I glued them into place on the outer circle.

DIY lighted starburst mirror tree topper

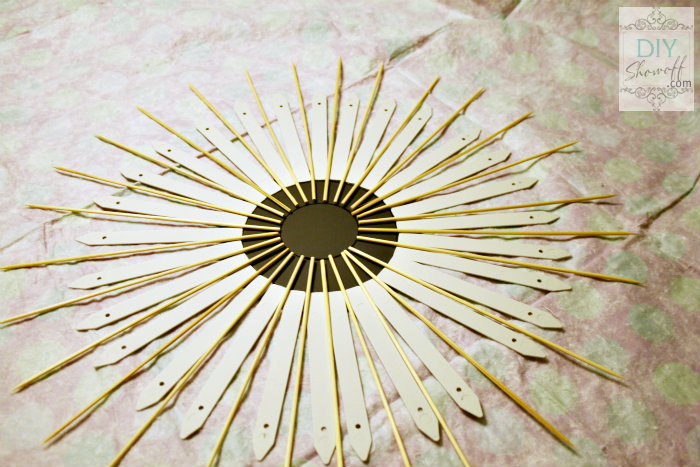
5. Next I glued a BBQ skewer, starting on the inner circle, spacing them between each garden stake.

DIY lighted starburst mirror tree topper

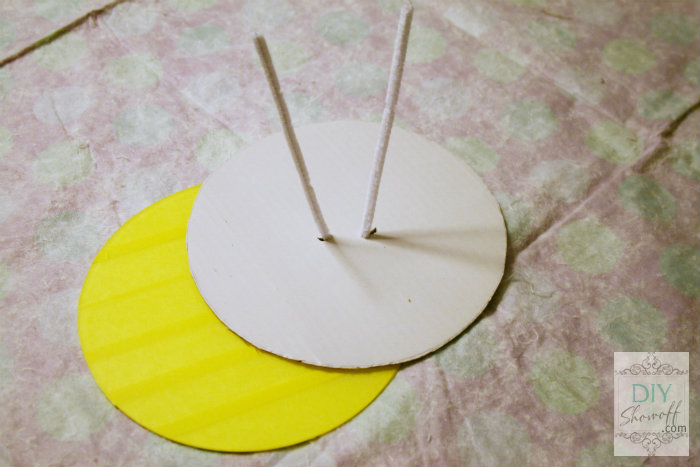
6. Mark the center of the cardboard circle. About 1/2″ from the center to the left and to the right, I poked a small hole using a pair of scissors.

DIY lighted starburst mirror tree topper

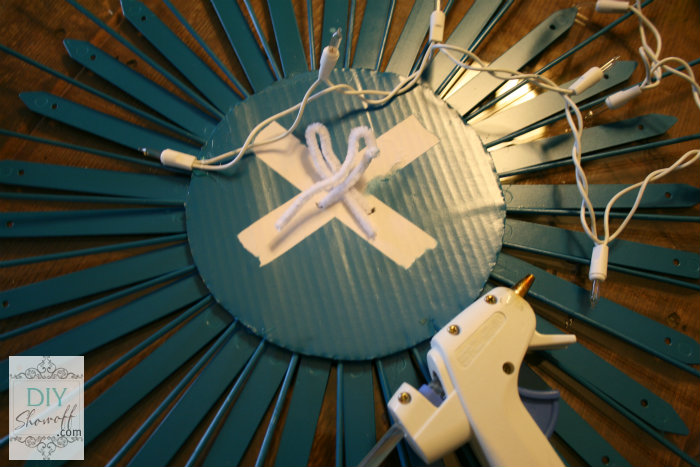
7. Thread through the pipe cleaner. Glue pipe cleaner into place on the back side but do not glue to the back of the mirror yet. The front side will be what attaches the starburst mirror to the top of the tree. I folded my pipe cleaner and covered each with a piece of FrogTape. {I realized after the fact, do not thread the pipe cleaner until after spray painting the cardboard.}

DIY lighted sunburst mirror Christmas tree topper

8. Spray the back of the mirror. Let dry. Flip and spray the front of the starburst mirror. I also gave my cardboard a light coat of spray paint. Let dry.

DIY lighted sunburst mirror Christmas tree topper

9. Glue base of lights (and some of the coated wiring if needed) into place. I tried to place the lights between skewers and garden stakes. The actual bulb sits above the mirror when looking from the front. My string of lights was enough to wrap around at few times. Be sure to leave the cord hanging for plugging in.

DIY lighted sunburst mirror Christmas tree topper

10. Once the lights are all glued into place, glue the cardboard backing into place over the lights/back of the mirror, back of the garden stakes and skewers. {I did not do this…as shown, my cardboard was glued to the back of the mirror before the lights.} Be sure the pipe clear is facing the correct direction to wrap around the top branch of the tree.

11. Remove FrogTape from front of mirror. All done!

DIY lighted sunburst mirror Christmas tree topper

It’s a pretty topper by itself, but I really like the reflection of the white star we already had on hand…

DIY lighted sunburst mirror tree topper

Reminder:  starting Monday, 12/10…

Christmas Tree Party

Keep up-to-date and get sneak peeks by following along:

Facebook
DIY Show Off - FacebookDIY Show Off - TwitterDIY Show Off - Pinterest
DIY Show Off - FeedDIY Show Off - HomeTalkDIY Show Off - G+

Instagram

Sharing here:DIY Show Off DIY Holiday Highlights

This is a sponsored post brought to you by FrogTape. The opinions are completely my own based on my experience. Results may vary.

FrogTape Blog Squad

DIY Tomato Cage Christmas Tree

Bringing back an oldie but goody.
{scroll down to see all 4 of my Christmas trees}
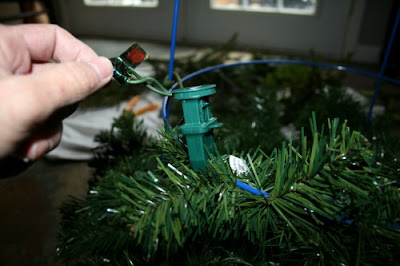
A couple of years ago, I made a lighted tomato cage tree – a DIY Christmas tree using lighted garland and a tomato cage. I was able to find everything I needed at my local True Value Hardware.
DIY Tomato Cage Christmas tree
Materials: 
  • Tomato cage.  Ask a store associate.  They should have them in the warehouse/storeroom since it’s not garden season.I got the largest they had.
  • 3 – 9ft. lighted garland
  • Thick rubber band
To make the tree:
Using a rubber band, gather the “stakes” to make a tee-pee top and secure together (sorry for the bad picture! I didn’t check it before going to the next step…too late now!).
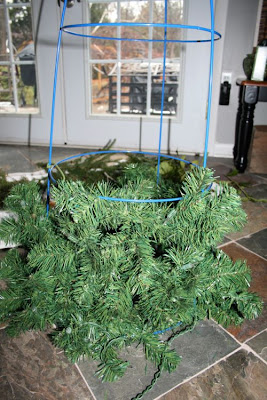
Starting at the bottom (with the plug end of the garland), start to wrap the bottom wire circle with the garland. Wrap a few branches here and there around the wire frame to secure.
Working around the frame, continue wrapping.
When one garland ends, plug in another and continue wrapping to the top.
Fluff.  If there are gaps, fill in by twisting branches around the frame or fluff branches to fill ‘holes’.
All done! We don’t have a live tree and I love the smell of pine. So I headed out to the backyard and clipped small pieces of different real pine.
Just tuck them in open areas for a fuller ‘real’ look with pine scent! (Mine are only tucked but you can use floral wire to make things more secure if needed.) I do this closer to the holiday since there’s no way to water the fresh sprigs or add only when entertaining.
Need more height?  {This year I used an old small barrel}
DIY tomato cage Christmas tree tutorial
Or this also works great for a base:
  • 5 gallon bucket
  • fabric
  • large rubber band
Take the handle off of the bucket.
Stretch a rubber band around the top of the bucket.
Sit bucket in the center of a piece of fabric and tuck under the rubber band.
It’ll look like this:
 Add a round tray (aluminum cookie tray or rattan works) and it’s the perfect base to add height to your tomato cage tree.  If you have an out of the way spot, it can just rest on top. Otherwise attach with wire into the holes were the handles were removed.
You could also paint the bucket instead and fill with stones for weight to use outdoors.  The base was a little to high for my purposes so I didn’t end up using it…oops!
My tomato cage Christmas tree in 2010:
 This year…
 DIY tomato cage Christmas tree tutorial
Have you assembled your own tomato cage Christmas tree? They’re beautiful for outdoor entryways too!
3 more OF MY CHRISTMAS TREES
 colorful eclectic Christmas
DIYShowOff Christmas Tree
{tips for decorating your Christmas tree – can you tell lights are strung vertically? I create a faux root ball to give our 7.5′ tree another foot of height.}
vintage natural Christmas

For even MORE Christmas tree inspiration…

Christmas Tree Contestimage

We were chosen by True Value to be one of the members of the 2012 DIY Squad. I have been compensated for the materials needed for my DIY projects. However, the thoughts and opinions expressed are completely honest and my own. I have not been paid to publish positive comments and no one has twisted my arm to participate. 


Facebook
DIY Show Off - FacebookDIY Show Off - TwitterDIY Show Off - PinterestDIY Show Off - FeedDIY Show Off - HomeTalkDIY Show Off - G+