DIY {dresser drawer} Dog Bed

As a part of the Lowe’s Creative Ideas team, I was excited that the May Challenge revealed using Pantone’s 2013 Color of the Year…emerald! I knew it’d be the perfect fun color for the new dog bed I planned to make for Rosie. Pantone’s Emerald is one of those colors that would look amazing paired with navy, yellow, tangerine, coral, raspberry, fuchsia or pink. I decided to go girly for our new female furry family member.

DIY Dog Bed

She loves to lounge around outside, especially since we utilize our patio a lot during nice weather. Sunbathing is one of her favorite past times although there are occasions when she seeks shade and Italian Greyhounds are prone to sunburn because of the short fur. The hot pink parasol provides a bit of shade and a ton of cute-ness paired with Emerald and coordinating fabrics.

diy-dog-bed-tutorial

Materials I used:

What I did: 

1. An old free/found dresser supplied the drawer. I gave it a good scrubbing. You may also want to sand your dresser drawer face board if needed or remove drawer handles for painting and replace when finished.

dresser drawer dog bed

2. I simply drilled pilot holes in the wider dresser front and back bottom boards then screwed in the feet.

legs for a DIY dresser drawer dog bed

CocoRosie is only 10 lbs. and this worked for us. There is also hardware (table leg plates) for furniture legs sold in the same aisle at Lowe’s for a sturdier option  (located near the decorative wood moulding).

3. The inside got a coat of Valspar’s Berry Brown.

valspar berry brown

4. Once dry, I taped off the inside using FrogTape, making sure the edges were sealed to activate the PaintBlock technology.

FrogTape

5. Next up, painting the outside two coats of the beautiful Pantone’s 2013 Emerald exclusively at Lowe’s.

Valspar Pantone Emerald

I love the consistency of Valspar’s Signature line.

painting dog bed

I removed the FrogTape immediately after the second coat…

FrogTape results

then let it dry overnight while I worked on a DIY box cushion…

DIY dog bed

6. Secure the parasol handle to the inside of the drawer using a hose clamp or pipe strap (however the box cushion I made has a snug fit and holds the parasol handle in place). I found that having the parasol positioned in the front of the drawer helps to be able to push it almost-flush against walls on the back side.

7. Pop in a pillow or cushion.

dresser drawer dog bed

Seven or less steps. Easy as pie. A yummy  (Pantone) Emerald and Raspberry indoor/outdoor dog bed.

BeforeDon’t feel too bad, she does have access to patio furniture too. You’ve seen her on that patio daybed!

rosie-before

Now:

Up for providing shade…

dresser drawer dog bed how-to

Down for getting sun/overcast days…

DIY dresser drawer pet bed

No parasol for indoors…

DIY pet bed

I’m even thinking of personalizing it for her…

CocoRosie dog bed

Result is a pampered pooch. Maybe now I’ll have the patio daybed to myself! How do you spoil your pets?

Pantone Emerald pet bed

Of note: 

*I do not leave the dog bed outside in the rain.

Notice the chandelier flower planter hanging in the tree? See the DIY Chandelier Planter Tutorial for more details. 

DIY Chandelier Planter

*See more fun DIY ideas at Lowe’s Creative Ideas, follow Lowe’s on InstagramPinterest and sign up for the Creative Ideas magazine and app!

Spring 13 Blogger Badge Subscribe Banner Version

*Disclaimer: As a member of the Lowe’s Creative Ideas Creators and Influencers network, I received a Lowe’s gift card to complete this project for using Pantone’s Emerald in Valspar’s Signature paint challenge, however the tutorial images, instructions and opinions are my own. Your dog’s behavior may vary. DIY results may vary.

Silhouette Portrait Giveaway

The promotion with GREAT savings ($7.50 for vinyl and transfer paper) using code “SHOWOFF” at checkout runs through 4/26.

This giveaway is now closed. Winner is Ruth: “I have been wanting to add a compass rose to an end table in my living room, so I think that would be my first project.” Congratulations, Ruth! I hope to see the table! I will contact Ruth by email.

One of the things I love about owning my Silhouette is the ability to create cute customized vinyl labels…

labeled storage dresser in hallway

labeled-dresser

And since welcoming CocoRosie to our family recently….

italian-greyhound-cocorosie

{awe! those eyes!!}, anyway…I wanted to transfer pet food to an airtight container rather than dishing out from a pet food bag. Nothing pretty about those, ya know? I love glass jars but the cat food and dog food look very similar, so cute labels are a great solution.

It’s super easy to design my labels using the Silhouette Studio and purchasing/ downloading ‘silhouette’ shapes (and extra fonts) from the Silhouette store. Most run around .99 and stay in my ‘library’ for repeated use.

pet-labels-silhouette-studio

Cutting the vinyl is a cinch too…just load the vinyl, set the blade and click “send to Silhouette” to cut.

cutting-vinyl

Peel away the un-used/negative part of the vinyl design (also called weeding).

weeding-vinyl

You’ll have a vinyl “sticker” but peeling away the letters and placing by hand for me means creating a slanted label that isn’t ‘level’ and guessing on spacing. This is where transfer paper comes in handy. It “transfers” the vinyl design while keeping the design exactly spaced/level as it shows on the paper.

vinyl-sticker

How Transfer Paper Works: Simply cut a piece of transfer paper to size.

  1. Peel away the waxy backside (the transfer paper is the sticky/tacky paper).
  2. Place the transfer paper over the vinyl design you just weeded.
  3. Rub (I use a gift card/credit card).
  4. Then peel the backing away (waxy thicker paper). The design is now stuck (backward) to the transfer paper.
  5. Place the design/transfer paper onto the glass. Rub with a credit card.
  6. Peel away transfer paper. Vinyl design stays adhered to the glass.

transfer-paper-tutorial

Here’s what I whipped up in less than 30 minutes {containers are from Garden Ridge and scoops from a local commercial restaurant supply store}:

Labeled Pet Food Containers

labeled-pet-food-containers

See MORE of my Silhouette projects here. 

If you’ve been waiting for the monthly promotion to get a Silhouette, now is the time!

Silhouette April Special (just use promo code “SHOWOFF” to get the discount)

Silhouette affiliate link

silhouette-promotion-showoff

Promotional Pricing Details: sale runs from 4/18-26th at Silhouette America.

  • 1 Silhouette Portrait™ + 1 roll of black vinyl, 1 roll of white vinyl, and 1 roll of transfer paper: $139.99
  • 1 Silhouette CAMEO® + 1 roll of black vinyl, 1 roll of white vinyl, and 1 roll of transfer paper: $269.99
  • All premium vinyl bought outside of a machine bundle is 25 percent off with promotion code: SHOWOFF.

Note that the vinyl discounted in the promotion is all 9” x 10’.  Also, and this is very important, vinyl is actually discounted BIG TIME. It used to cost $14.99 and is now reduced to $9.99 with an additional 25% promotional discount. I’m going to be stocking up!

diyshowoff-silhouette-portrait-giveaway

How to Enter to win a Silhouette Portrait:

a Rafflecopter giveaway

Giveaway runs from April 18th to the 20th. Open to US residents. Silhouette provided me with the vinyl for my project, the Silhouette Portrait for 1 lucky DIY Show Off reader and a small percentage of sales generated with the “showoff” promotional code. Thanks and GOOD LUCK!

Visit the blog friends below for MORE chances to win:

DIY Challenge: bookcase to free-standing small pet gate/display sign/game score keeper

I was recently invited to participate in a fun DIY challenge created by HomeTalk and Wayfair. A little DIY + creativity turned a bookcase into a free-standing gate with chalkboard for multi-functional use:

free-standing-pet-gate-sign

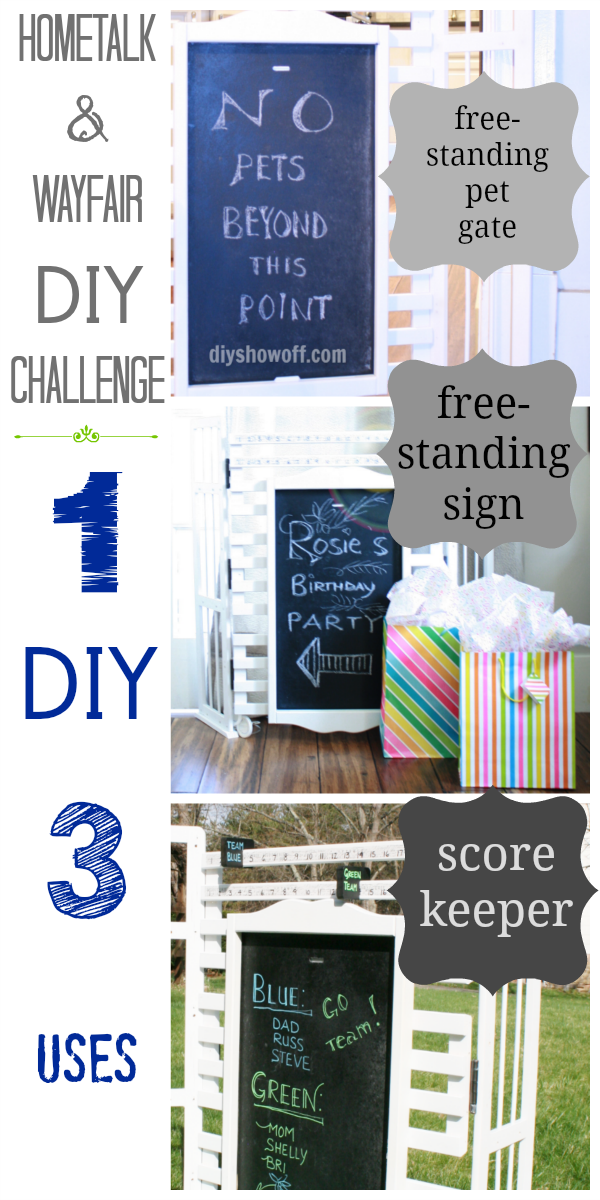
  • free-standing gate for small pets
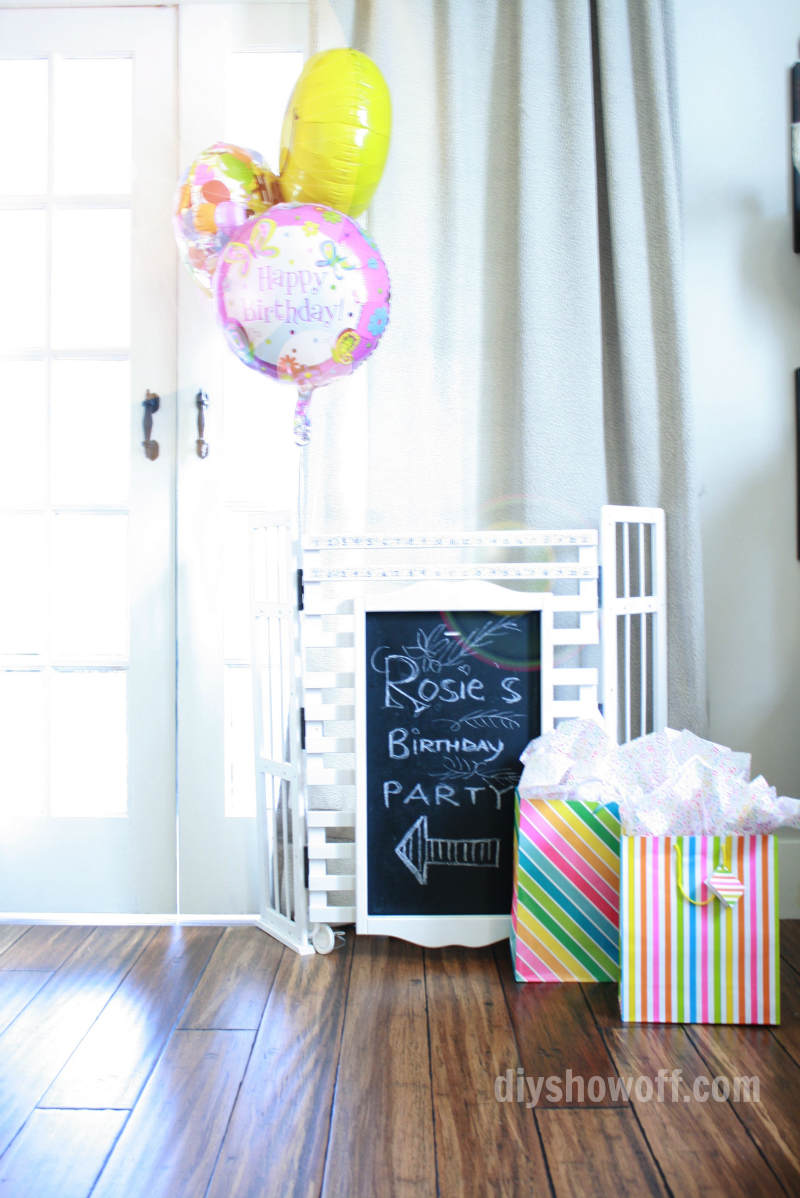
  • free-standing sign for parties and yard sales
  • free-standing game score keeper for outdoor family games this summer

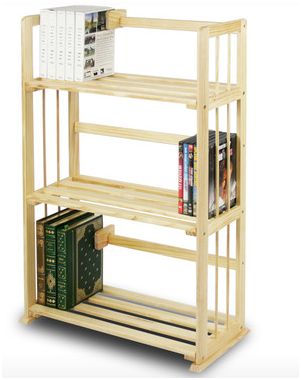
The challenge: Get creative! I chose to turn the Furinno pine 3 tier bookcase from Wayfair into something new according to a specific theme (geometric pattern, incorporate rope, or black & white). I chose the black & white theme.

furinno pine bookcase

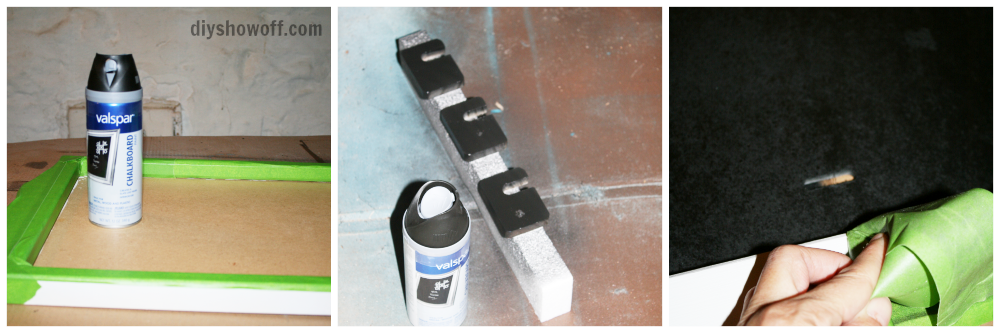
I started by giving the pine bookcase pieces and a thrift-store wooden calendar holder a coat of white spray paint (Rustoleum Satin Finish).

diy-pet-gate

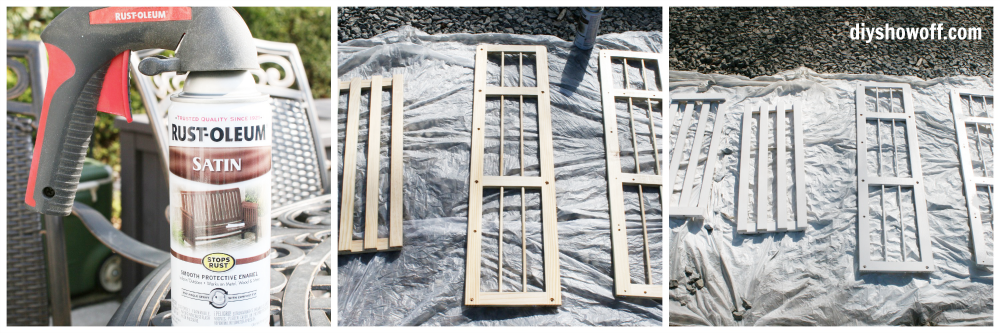
I used FrogTape to protect the frame of the wooden calendar holder and gave it a coat of chalkboard paint along with the “bookend” pieces that came with the bookcase. Allow to dry and remove FrogTape.

chalkboard-paint

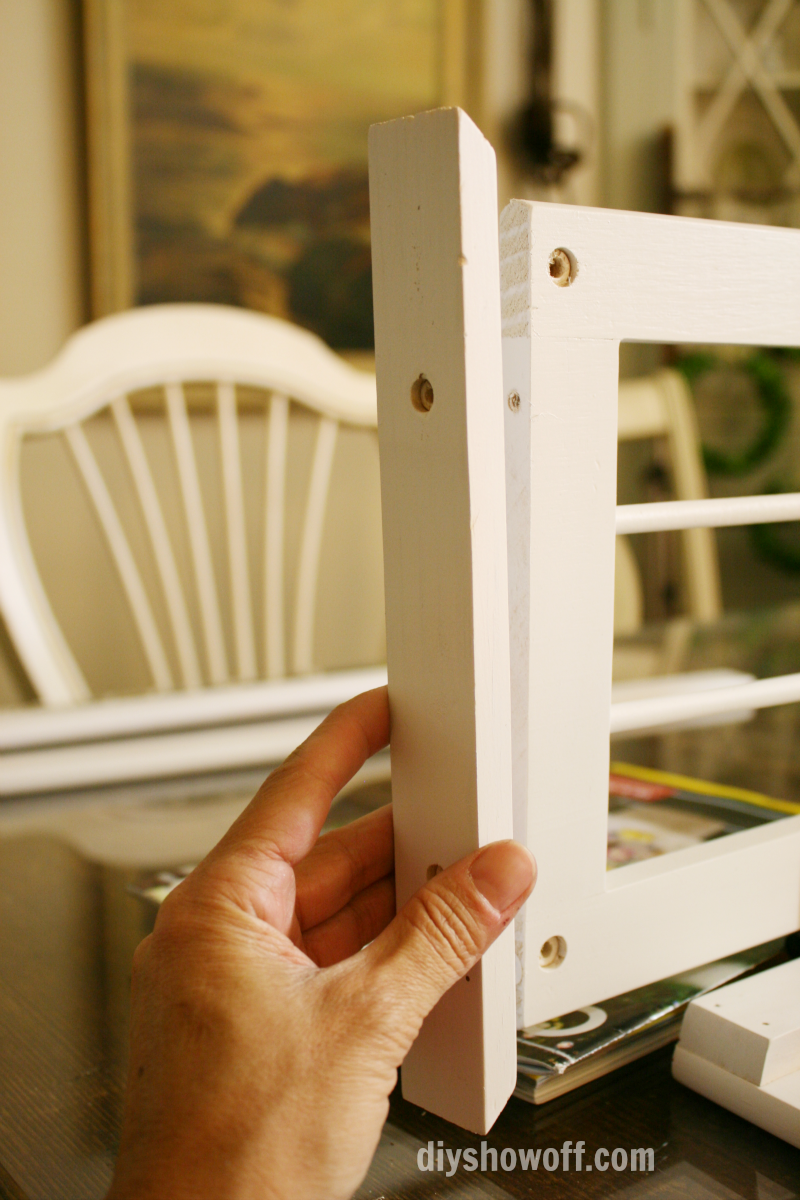
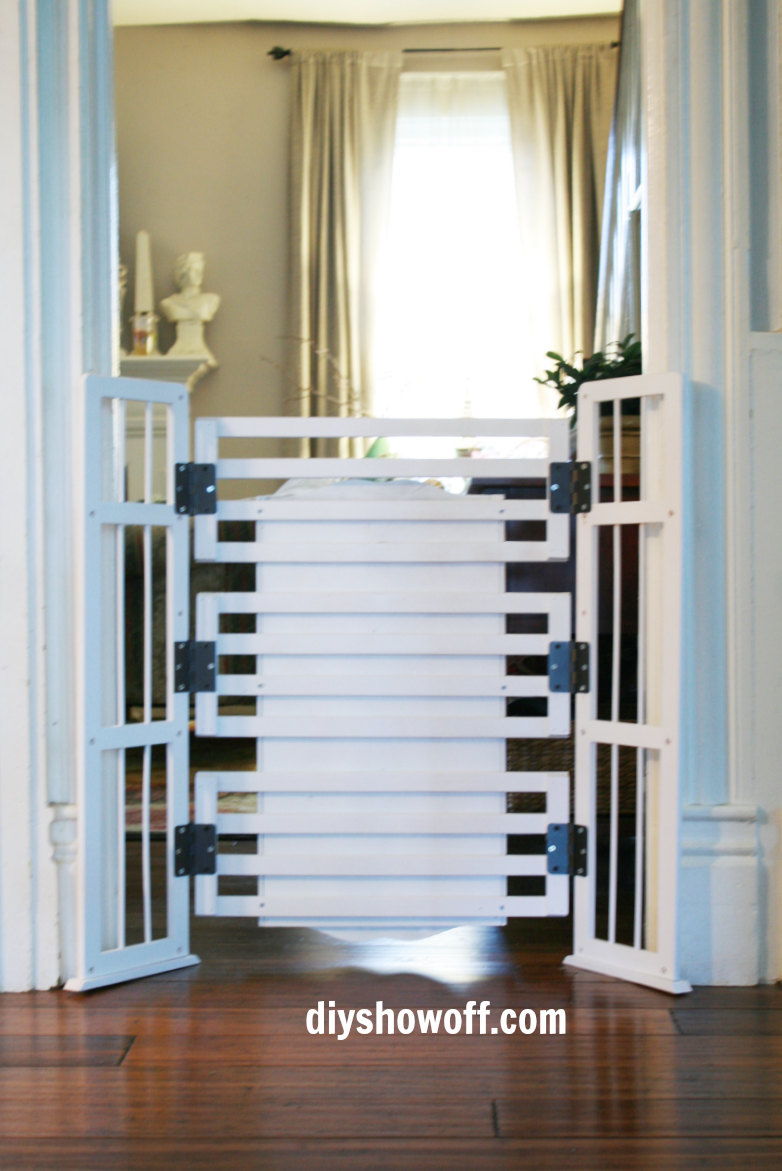
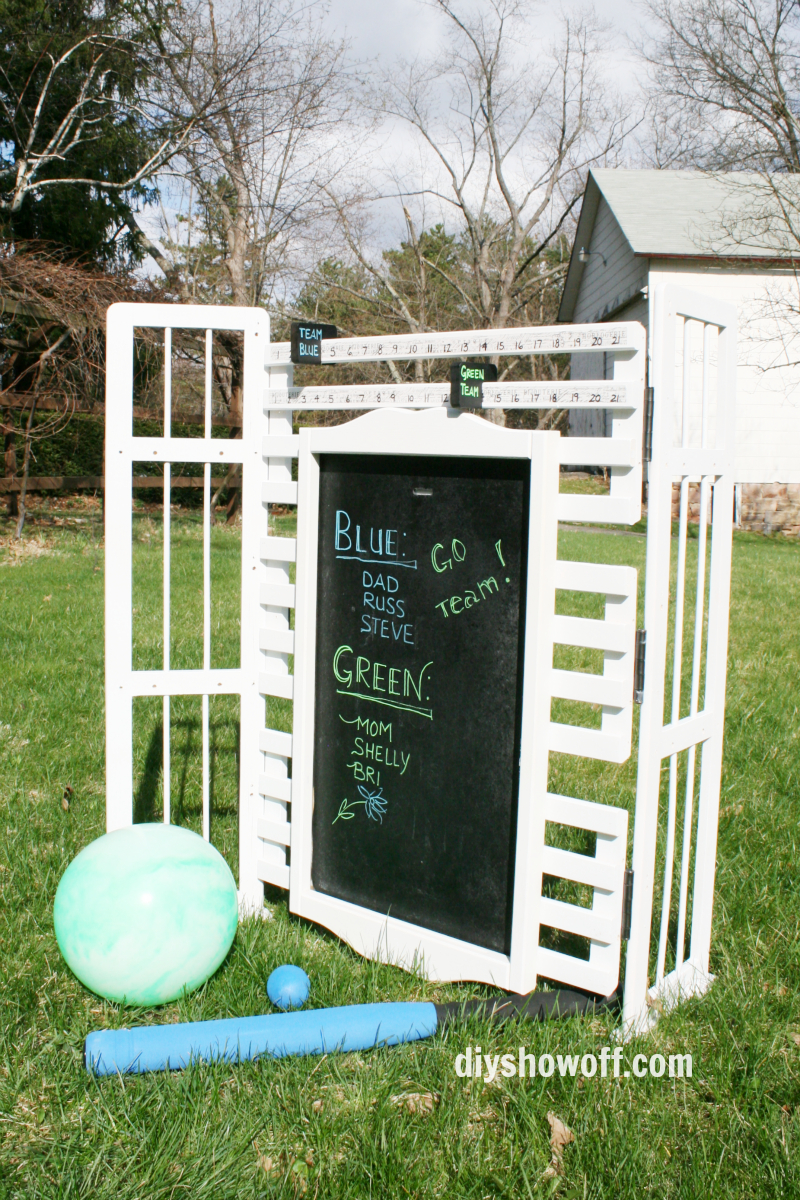
Rather than attach the 3 fence-like shelves to form a book case, I attached them to the bookcase end pieces using 6 hinges (I also used shorter screws where needed). I set it all out, measuring and marking with a pencil for equal placement of the hinges on both sides.

diy-free-standing-small-pet-gate

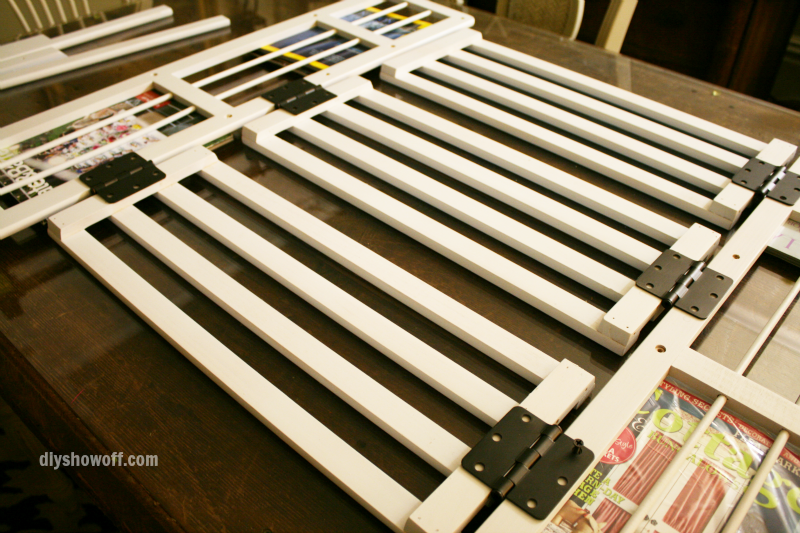
Then added the base bars according to the package instructions.

free-standing-pet-gate

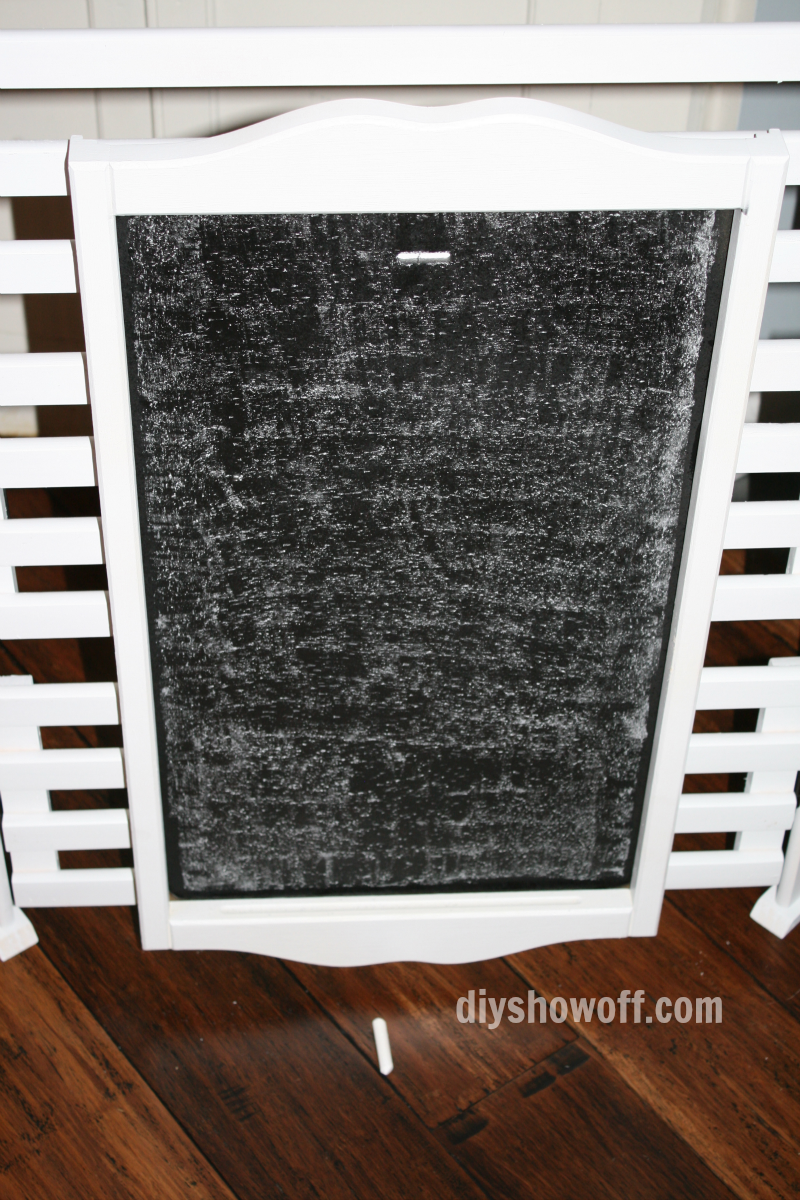
I attached the chalkboard with screws (from the back side) to the center of the gate and seasoned the chalkboard (season: rub side of chalk over entire chalkboard surface vertically then horizontally and erase with a felt eraser or dry soft cloth/paper towel).

seasoning-chalkboard

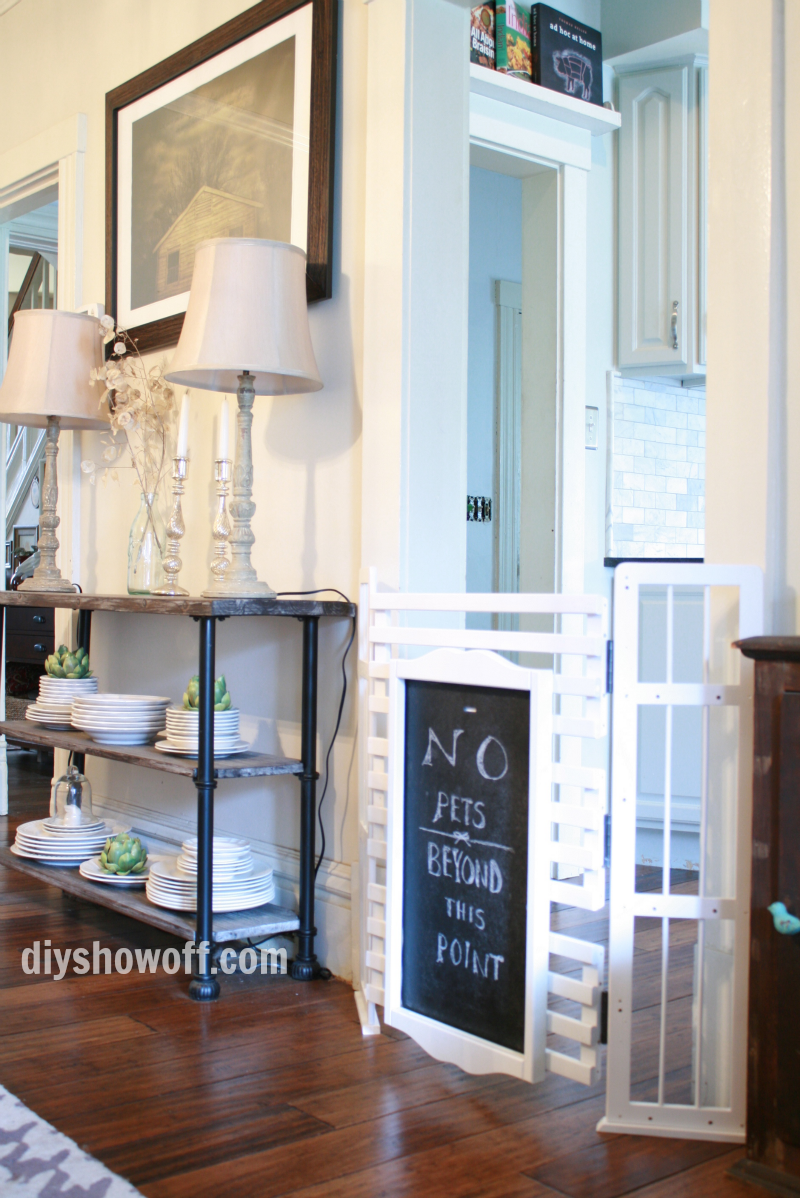
I still need to fill, sand and paint some of the manufacturer’s pre-drilled pilot holes, but loving it’s function for keeping the new dog away from the kitchen and out from under hubby’s feet when he’s cooking.  I specify small pet because this likely won’t keep a large dog from jumping over or moving it since it’s not locked into place.  However, our standard ‘baby gate’ is only 23″ high.  The center panel of my DIY free standing gate measures 32″ tall.

diy-free-standing-pet-gate

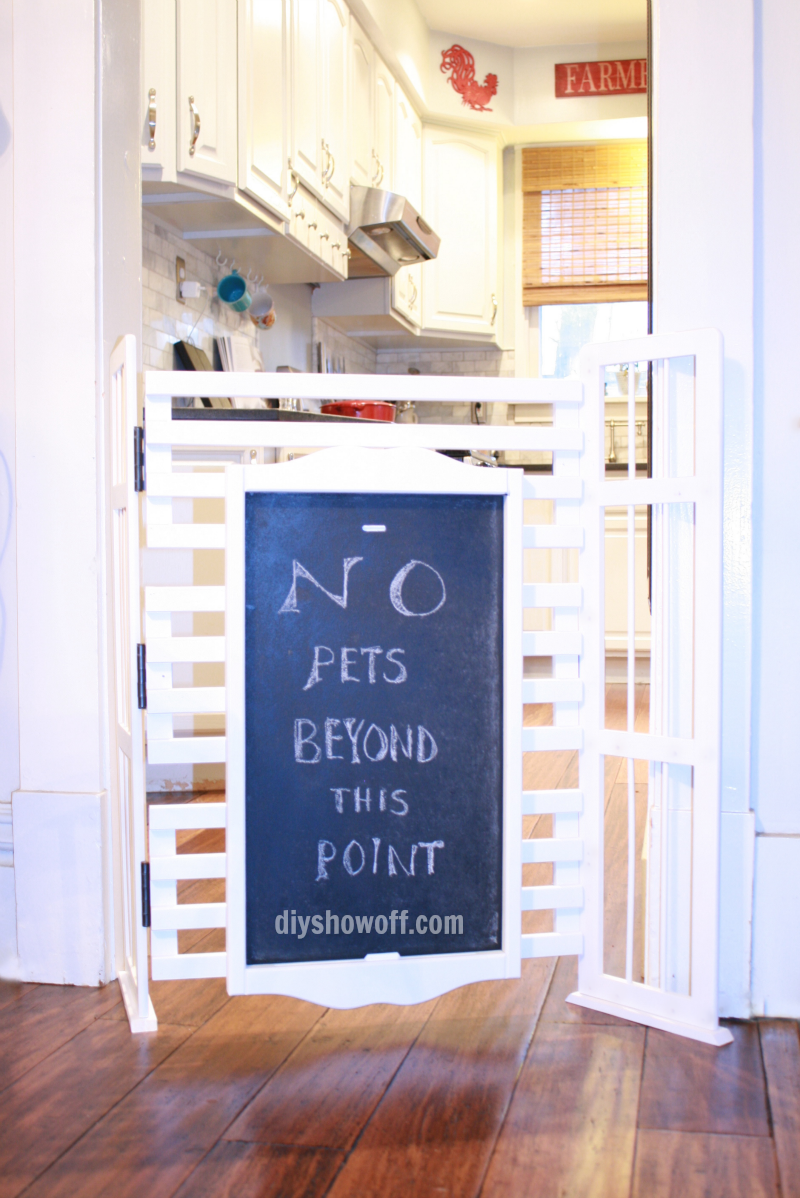
I understand that pets can’t read! lol But it helps the person who moves the gate to pass through know why it’s there. 

diy-pet-gate

Even the back side is pretty…

pet-gate-backside

It will double as a free standing sign for parties, picnics, family reunions, yard sales (or even a menu board when entertaining)…

diy-free-standing-sign

Where did the chalkboard bookend pieces come into play? Washi tape and a Sharpie were used to add numbers to the top two rows of the gate (chalkboard markers don’t smear)…

diy-score-keeper

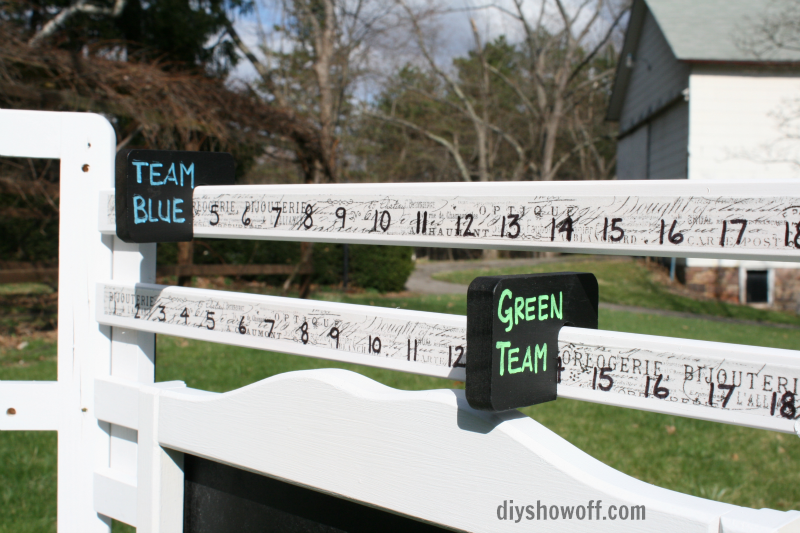
The bookend pieces slide along the numbers to ‘keep score’ for outdoor games.

diy-game-score-keeper

Thanks to HomeTalk & Wayfair for inviting me to participate! The bookcase made this a pretty easy DIY project which will get a lot of use!

free-standing-pet-gate-sign

Linking up to Funky Junk Interiors.

*I was provided with the bookcase and a $25 Visa gift card for this project.

*This post was also brought to you by FrogTape. FrogTape provided by Shurtech. The opinions are completely my own based on my own experience.

 FrogTape Blog Squad