DIY Shed Door

DIY Shed Door! You know those projects you procrastinate, something that just sits around unfinished for years? Until finally, you just can’t take it anymore and the time arrives for getting ‘er done? Yep, that’s this project.


For four years now, the shed at the my downtown property has been wide open! And while it always bugged me, it just kept holding it’s position at the bottom of the to-do list. Until now. 

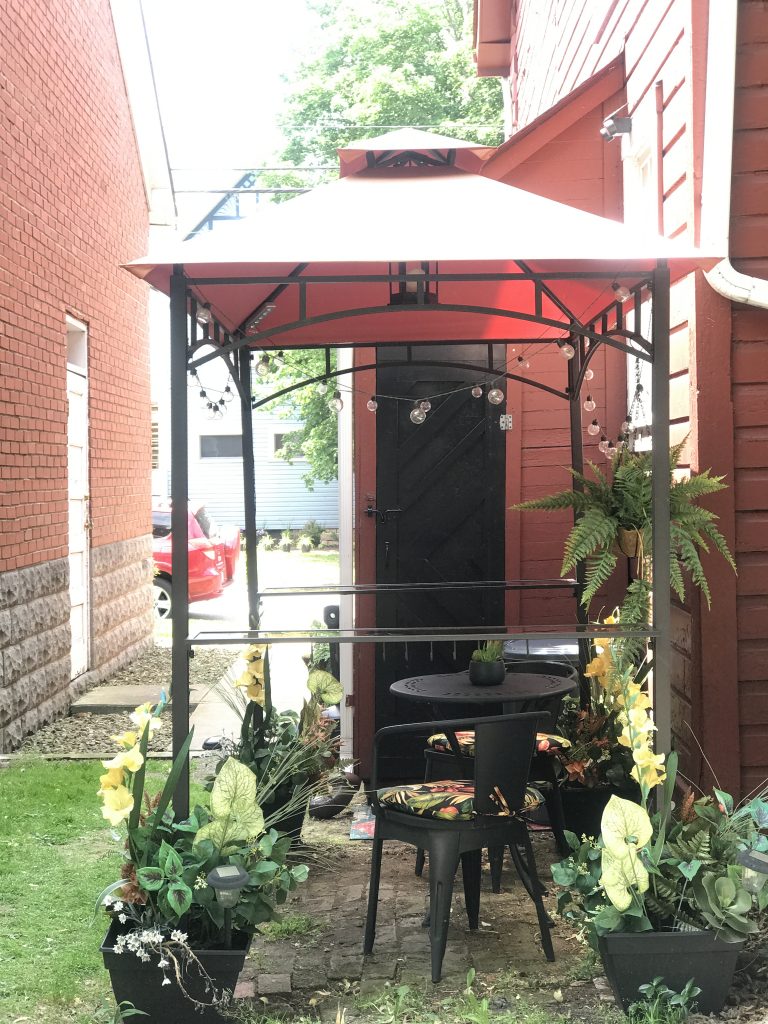
When I bought the property, there was only 1 plank with hinges for a door. lol And it wasn’t high on the list of priorities but with an upcoming photo shoot of the short term rental apartment (Suite Thyme) AND with the only quiet seating area right there beside it AND with summer coming, that eye sore worked it’s way to the top of the list. 

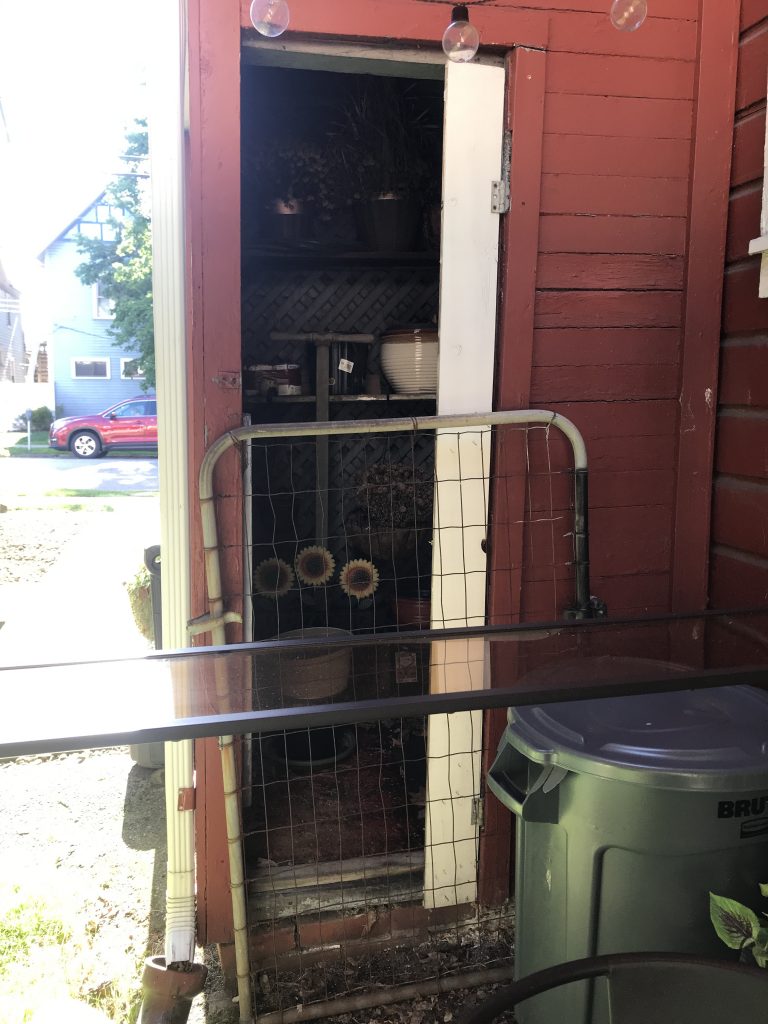
Before: just a small shed, filled with dead leaves, probably home to a few squirrels and lots of spiders. ::shudders::

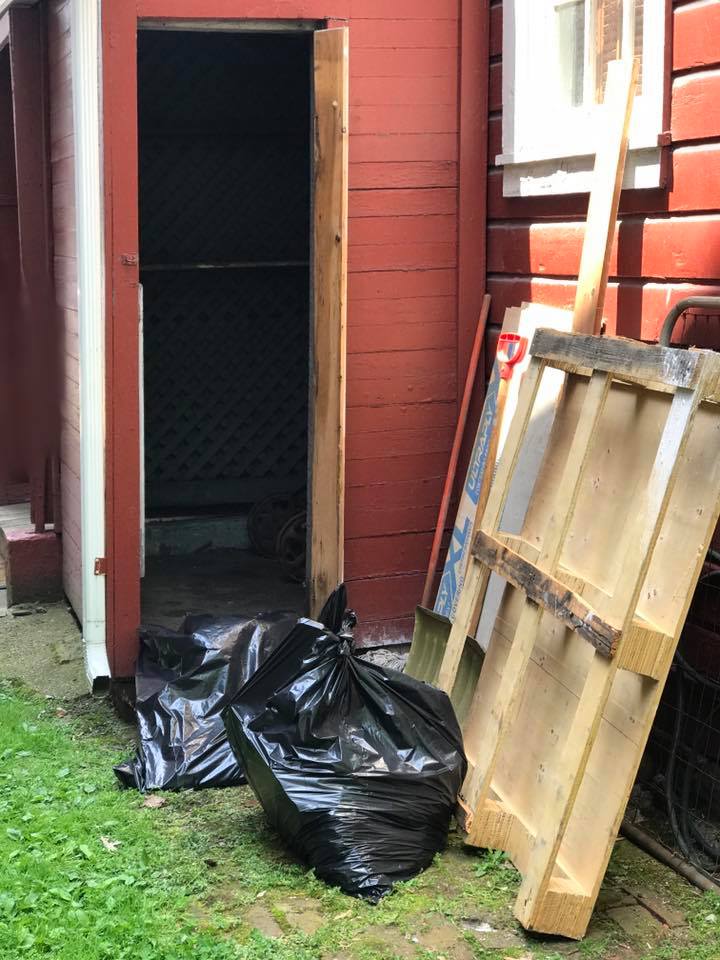
An old fence gate propped up…really didn’t serve any purpose. Other than it just came with the property and found it’s way there. I don’t even know how it got there. haha!

And so…

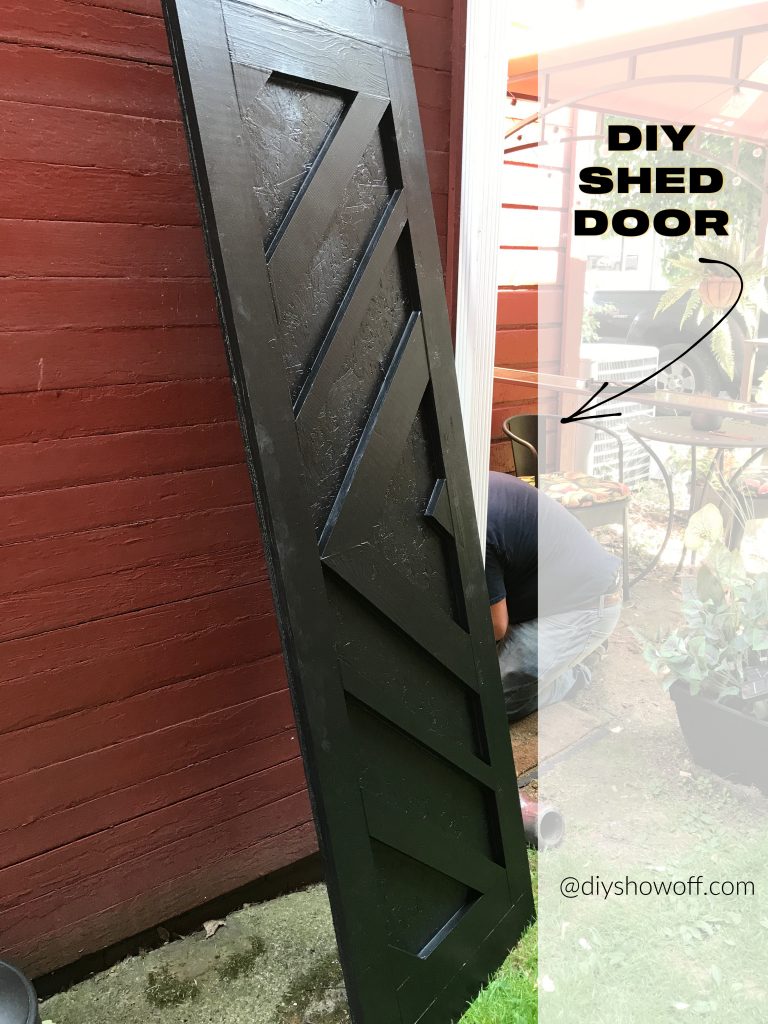
Supplies I used for a custom 22.5 x 75 inch shed door:

  • OSB cut to size. 
  • (5) 1×3 pine boards – I just guessed on what I’d need for all of the wood pieces and over-estimated a bit. I never mind having extra on hand. 
  • (3) 1×2 pine boards
  • (2) 1×1 pine boards
  • (1) paintable outdoor rated caulk
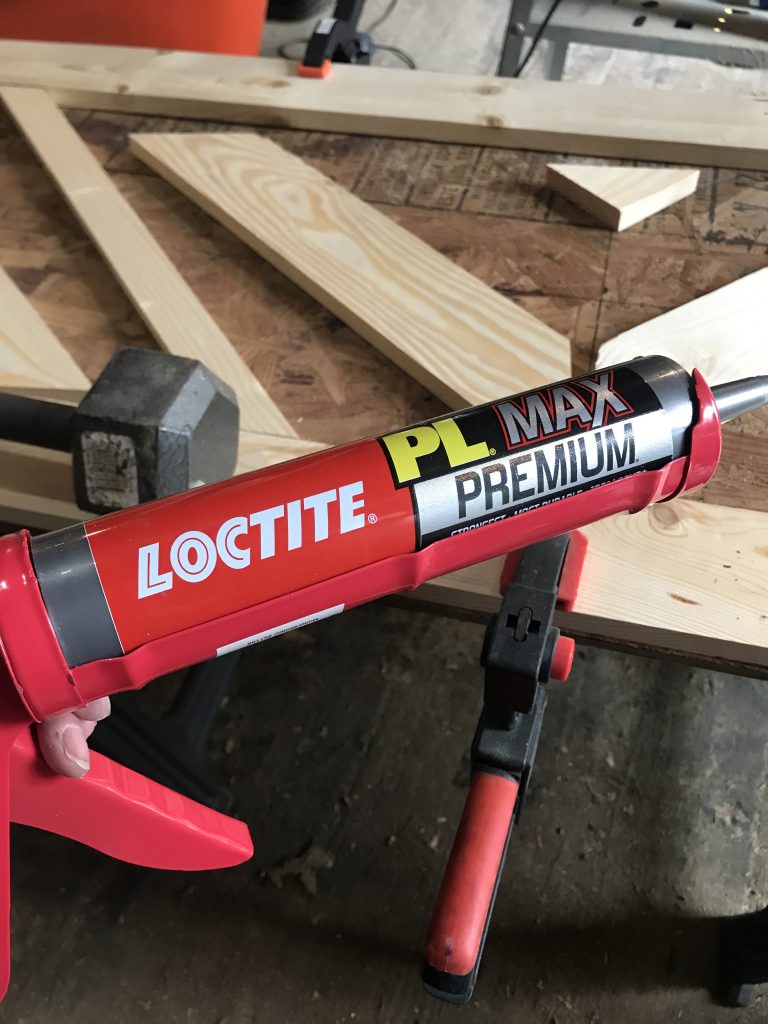
  • (1) outdoor rated adhesive
  • (2) outdoor rated primer
  • outdoor rated paint
  • this handle
  • this hasp
  • these hinges (not used, more on that later)

What I did:

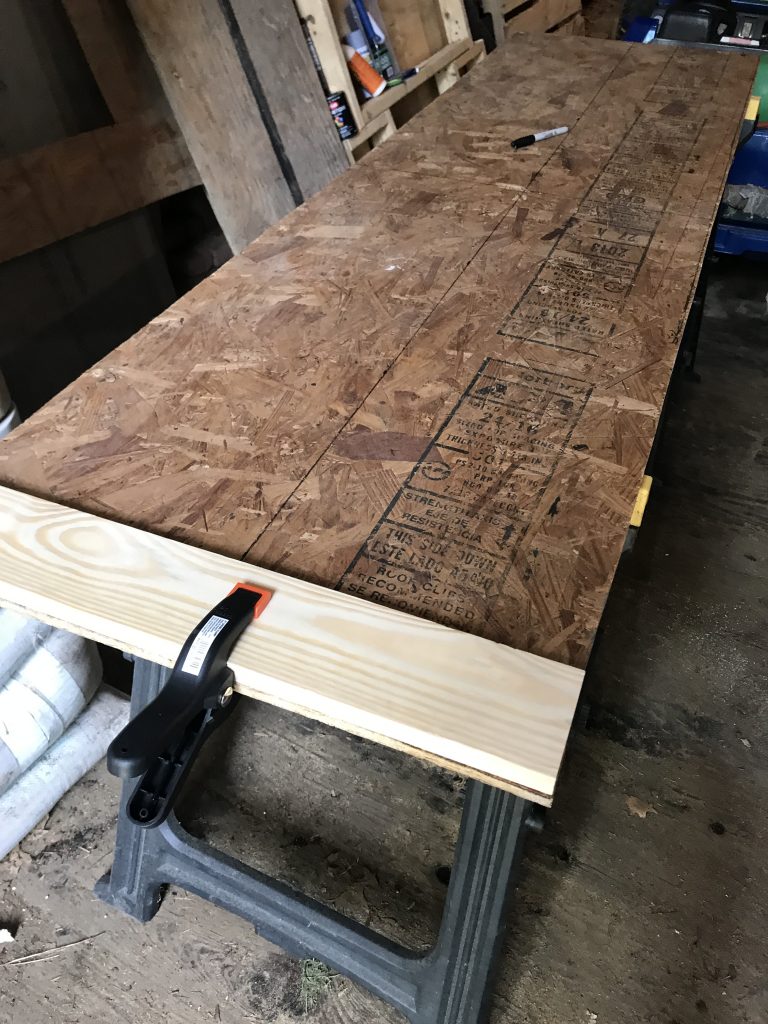
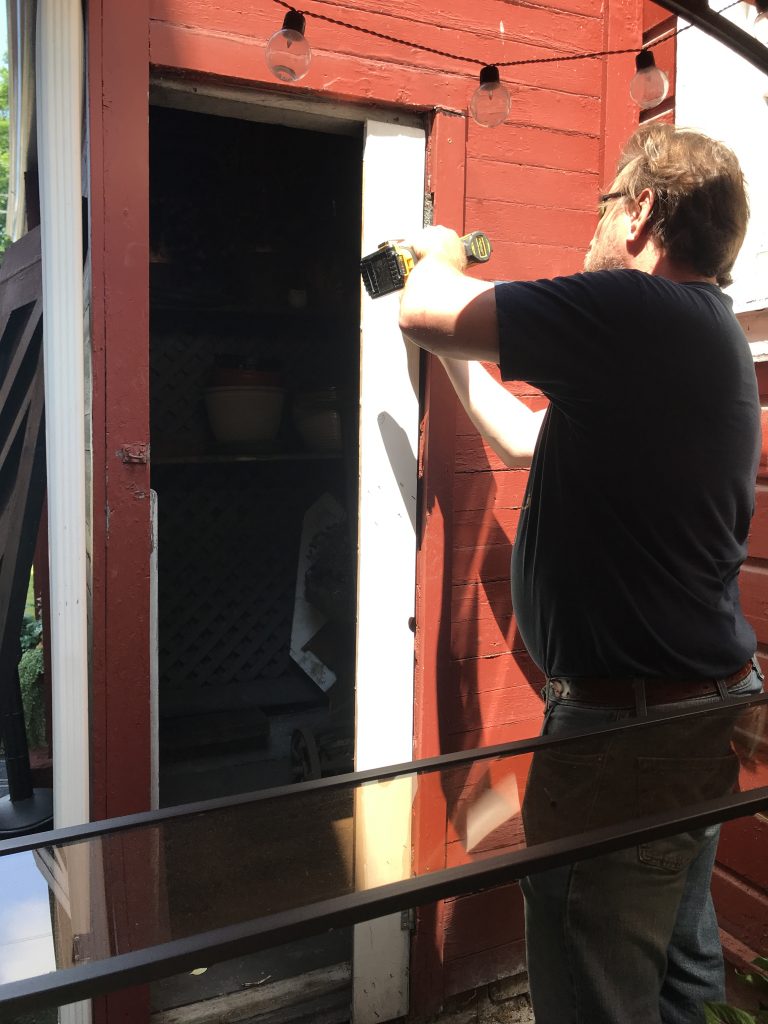
After measuring the space (and believe me, nothing in this old late 1800s property is square…so frustrating), Russ cut an old piece of OSB to size for me to use as my base. OSB isn’t the best product for an outdoor project, but this is the first door I’ve ever built and this was the best and easiest way for me personally to test my design skills. Fingers crossed that with it being the inside of the door/in the shed and that it’s good and sealed, that it works just fine longer term. 

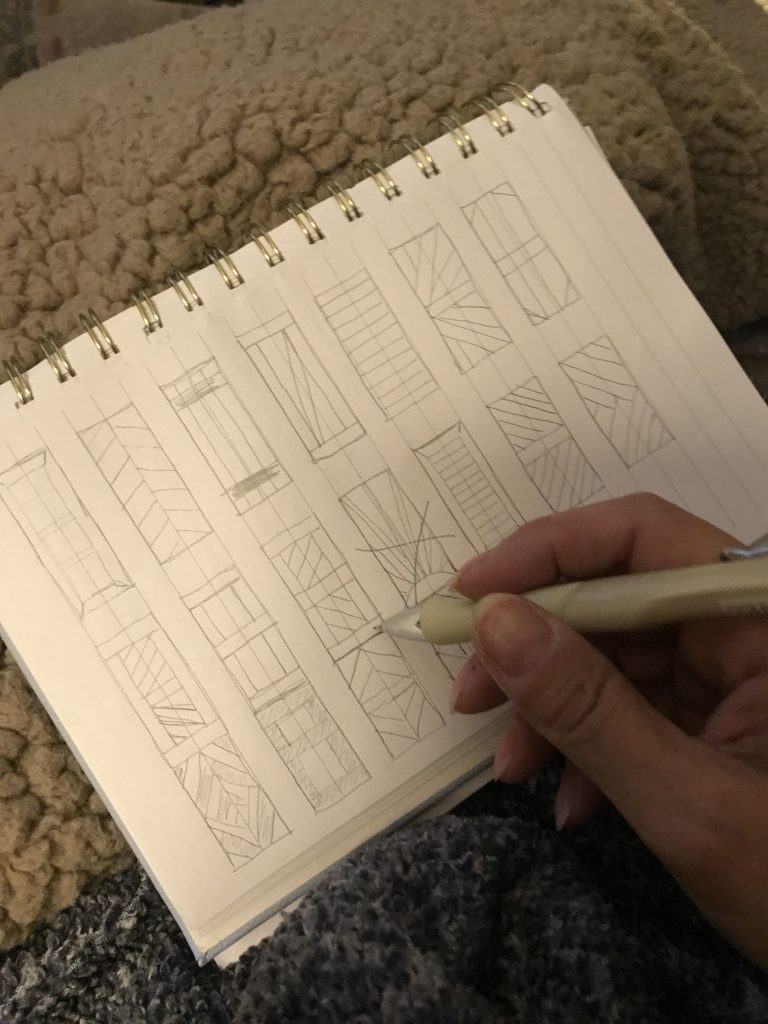
I then set about sketching up some inspiration, nothing to scale but I wanted to get an idea of what I was going for. Something with a little more detail and style than the standard barn style shed door. 

Then I set the OSB on saw horses and created a frame on the face of it with 1x3s. 

I messed around with the pieces a few times before I decided on a pattern. 


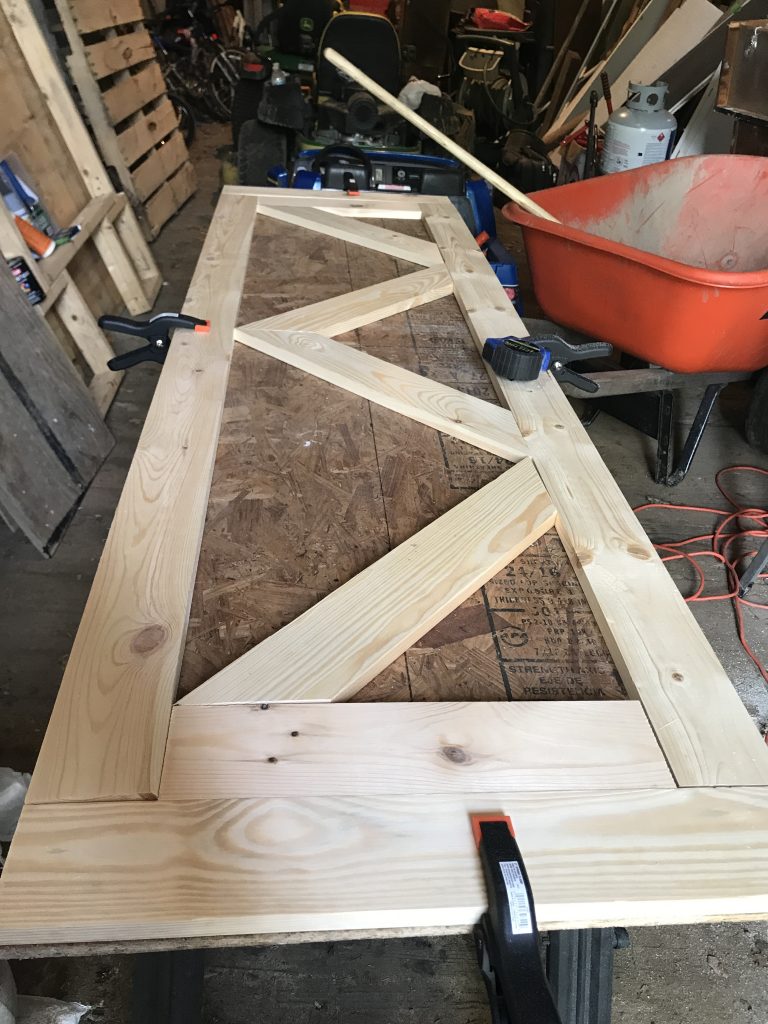
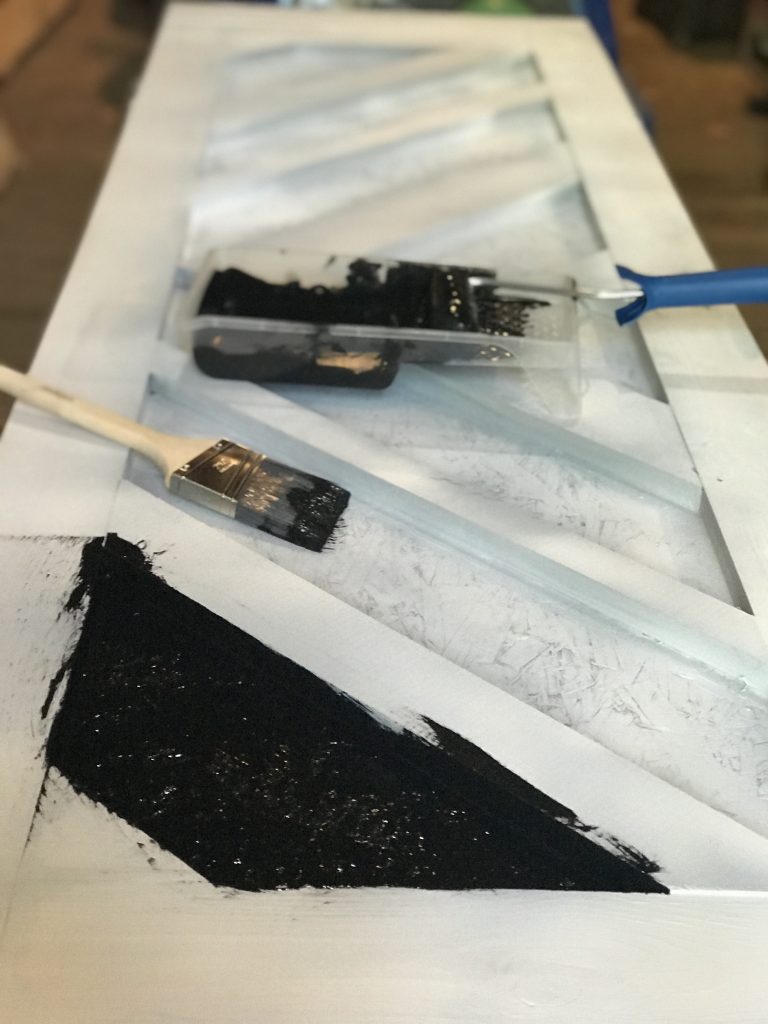
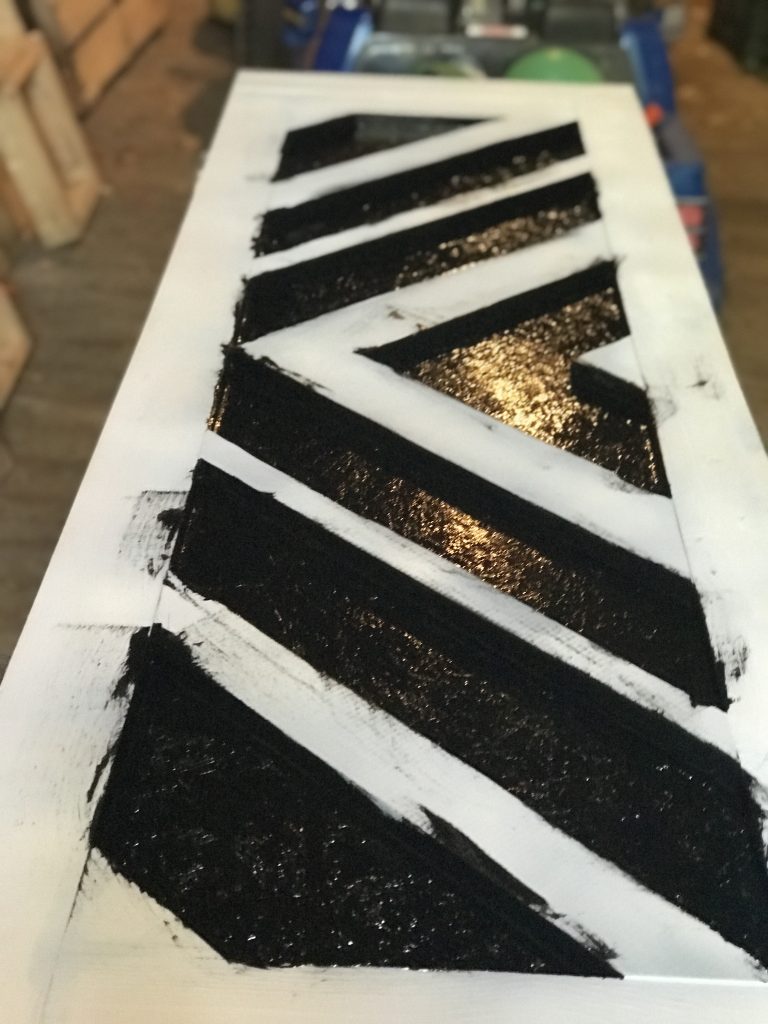
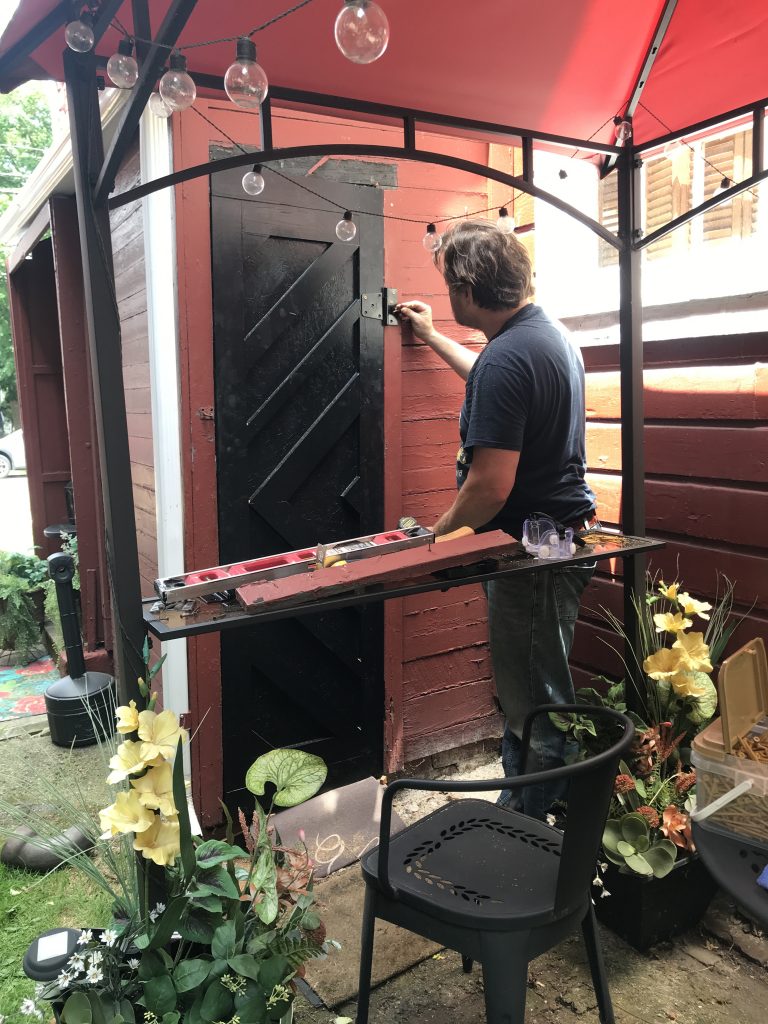
Utilizing a mix of mitered 1x3s, 1x2s and 1x1s, I settled on a chevron design. I enjoyed this part, like putting together a puzzle. 

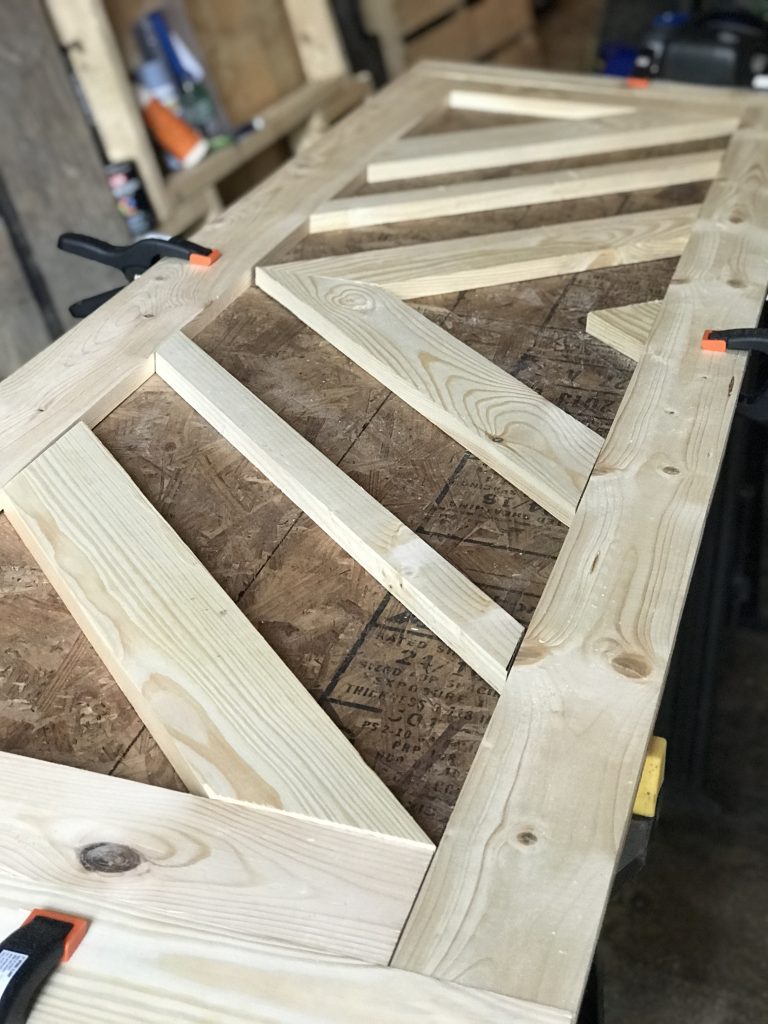
After cutting each piece, I adhered them to the OSB base with adhesive and clamped the edges and weighted the pieces where the clamps couldn’t reach. I did notice what putting them together with adhesive is different than just laying them out and re-cut 2 mitered pieces for a better fit during this process. 

Once dry, I caulked all of the joints and cracks. 

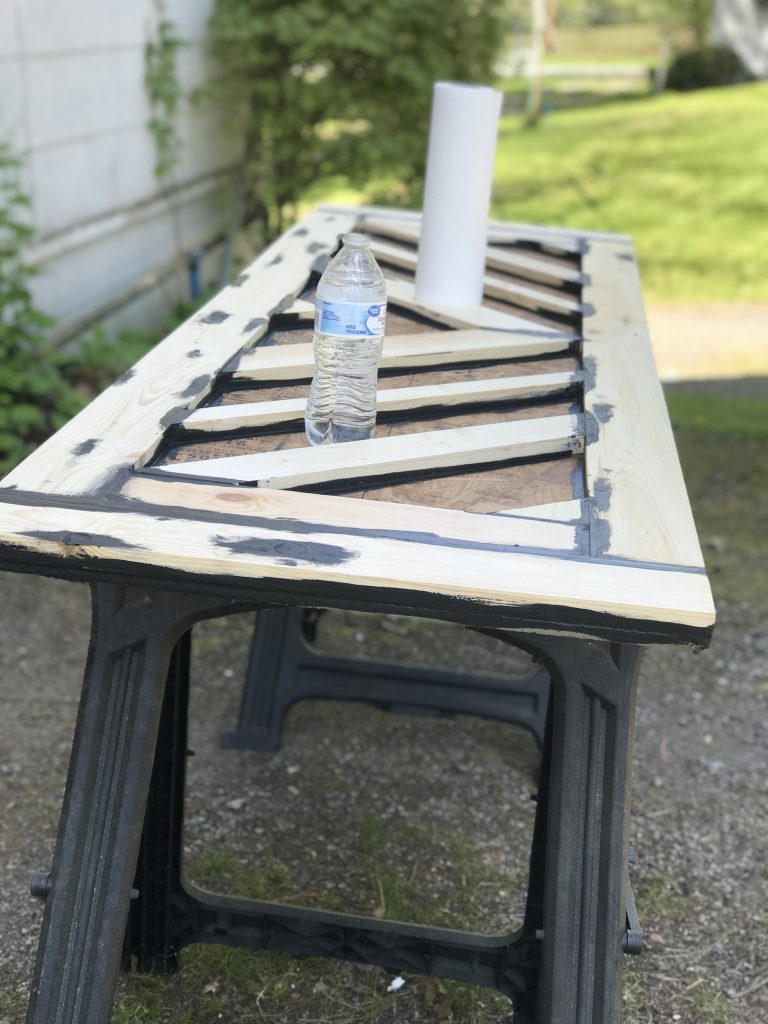
Then applied a coat of primer. I used a spray primer but next time, I’d go with (and recommend) applying with a brush and roller. 

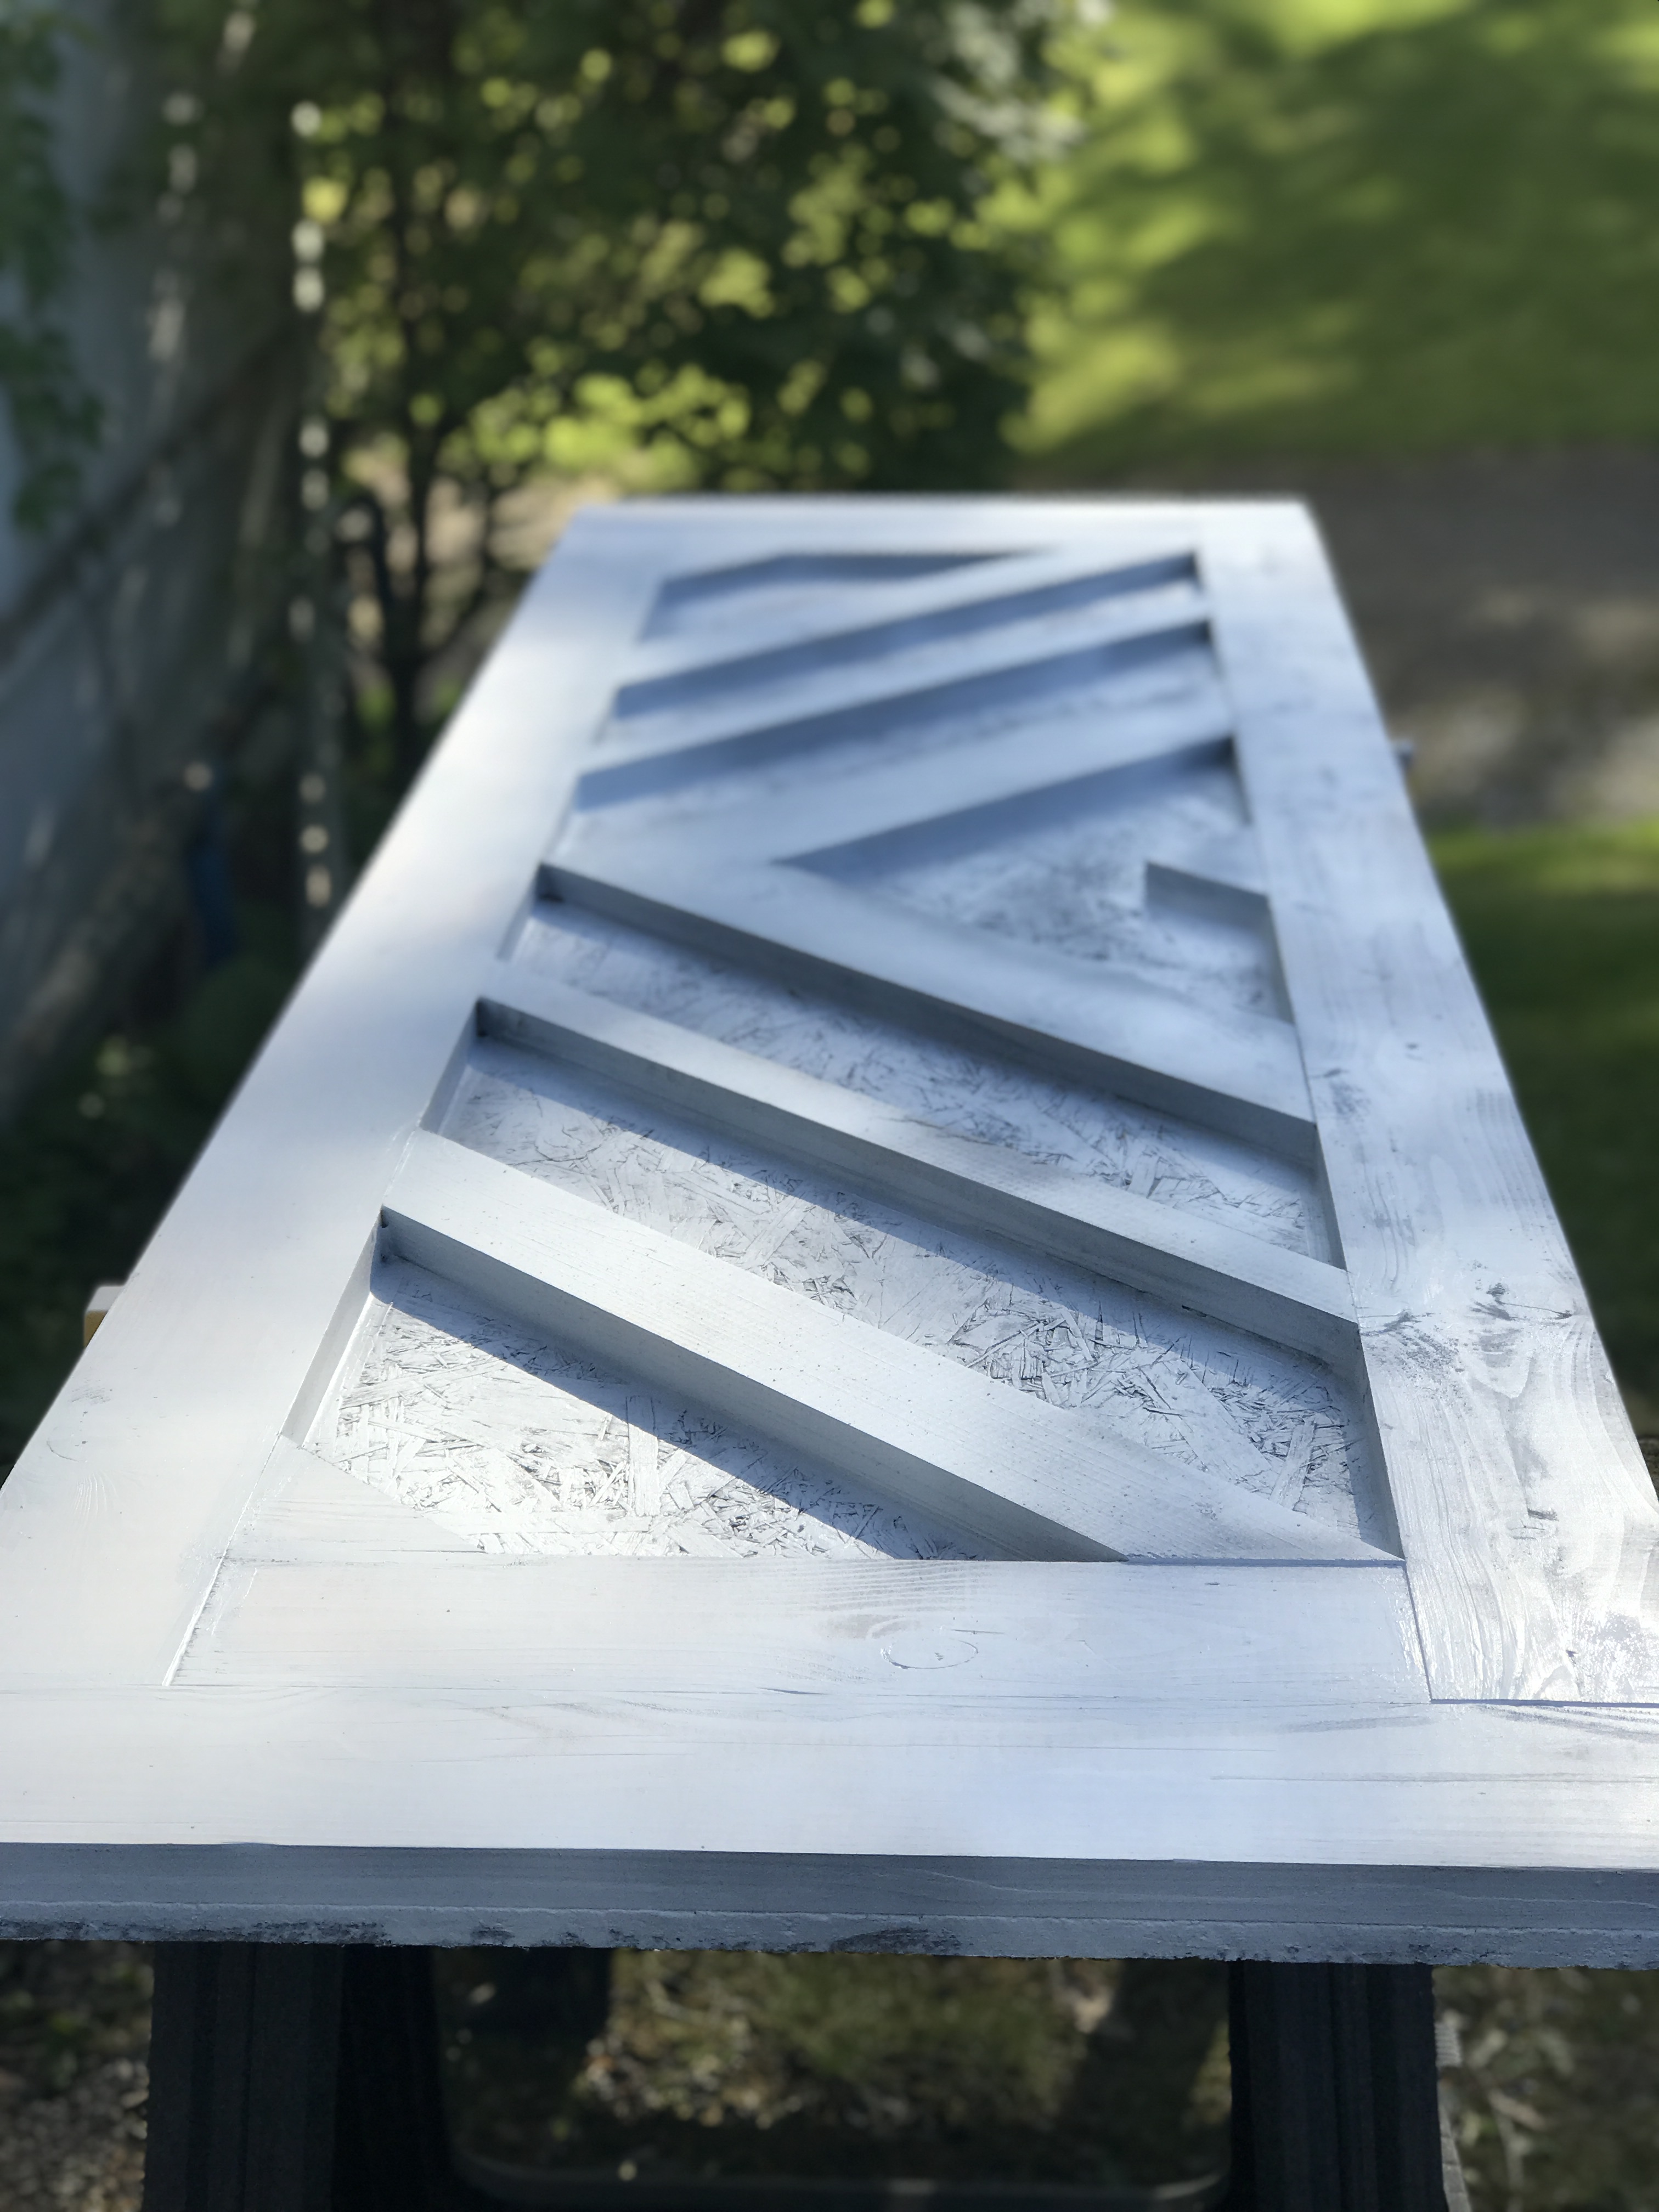
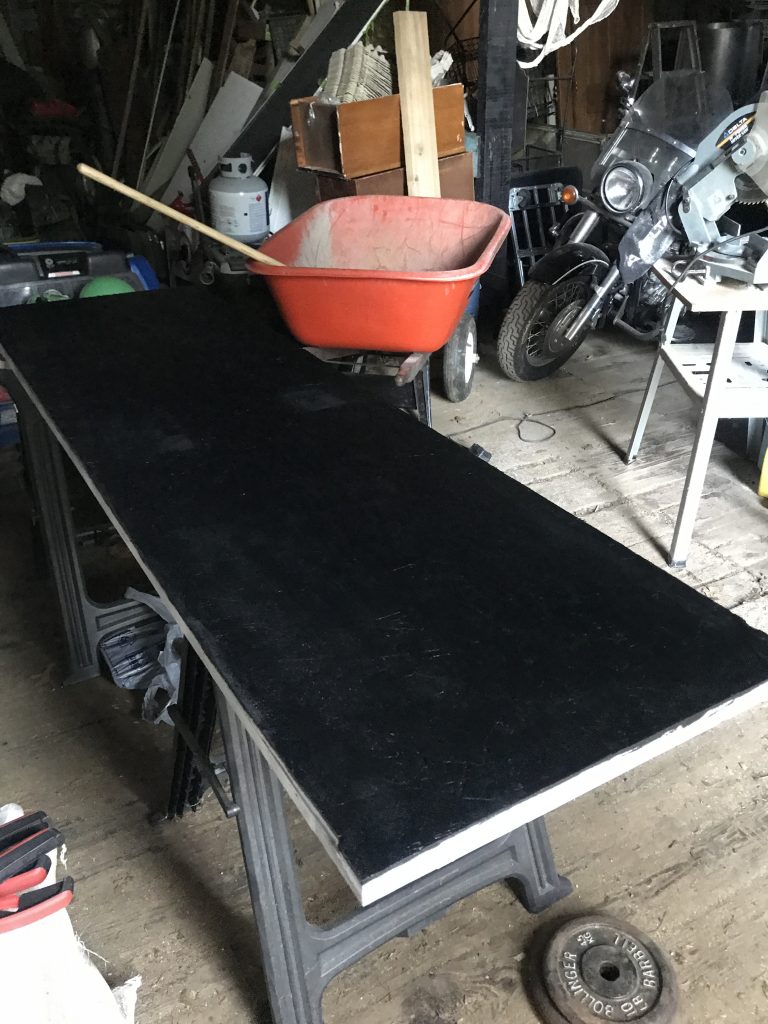
All sides got two coats of paint. 
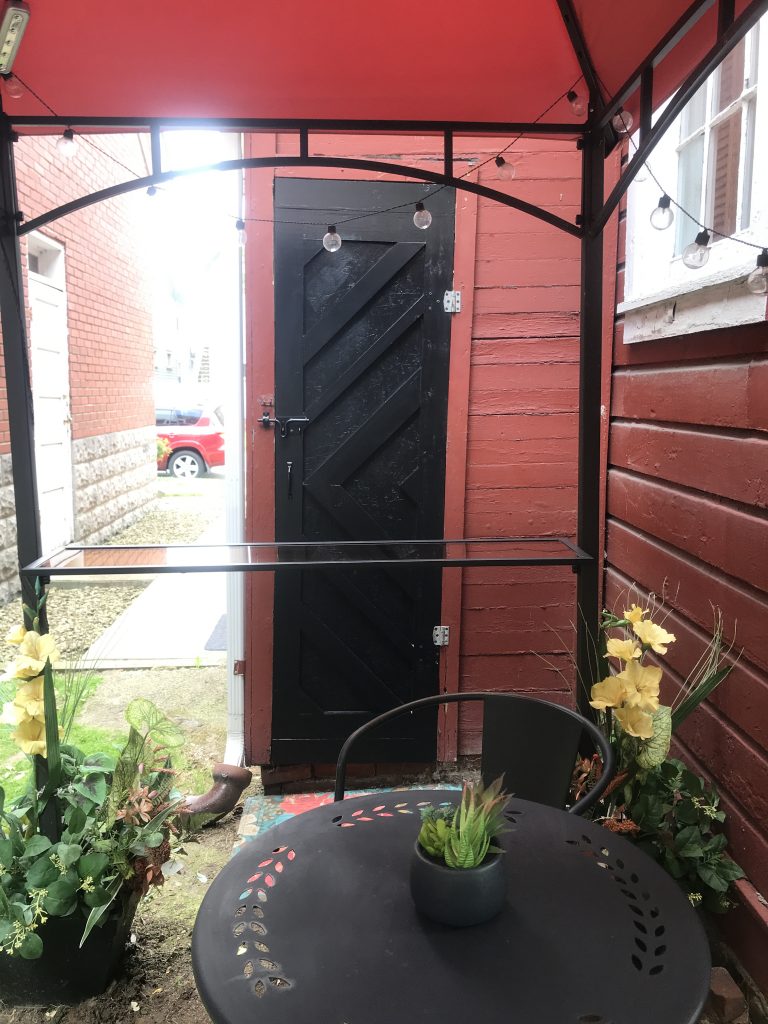
And … tada!

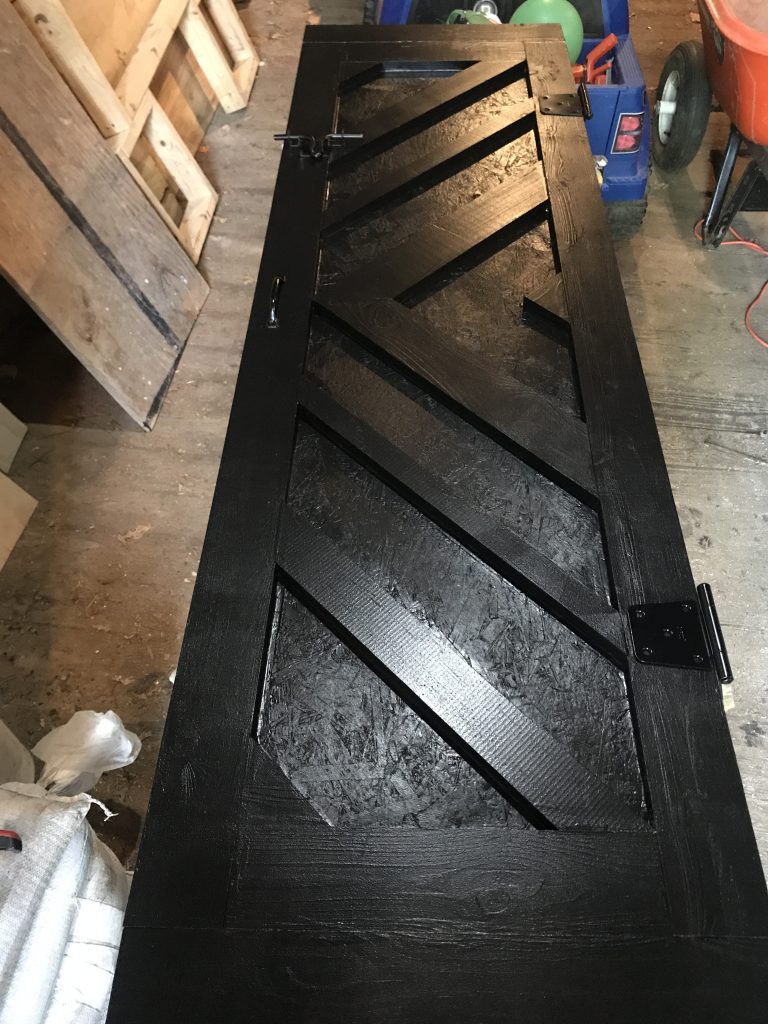
Time to hang. The sizing was pretty much spot on but we did have to make a few adjustments and the new hinges gave us such a hard time that after about an hour, we decided to utilize the old original hinges which took about 10 minutes! Live and learn. lol 

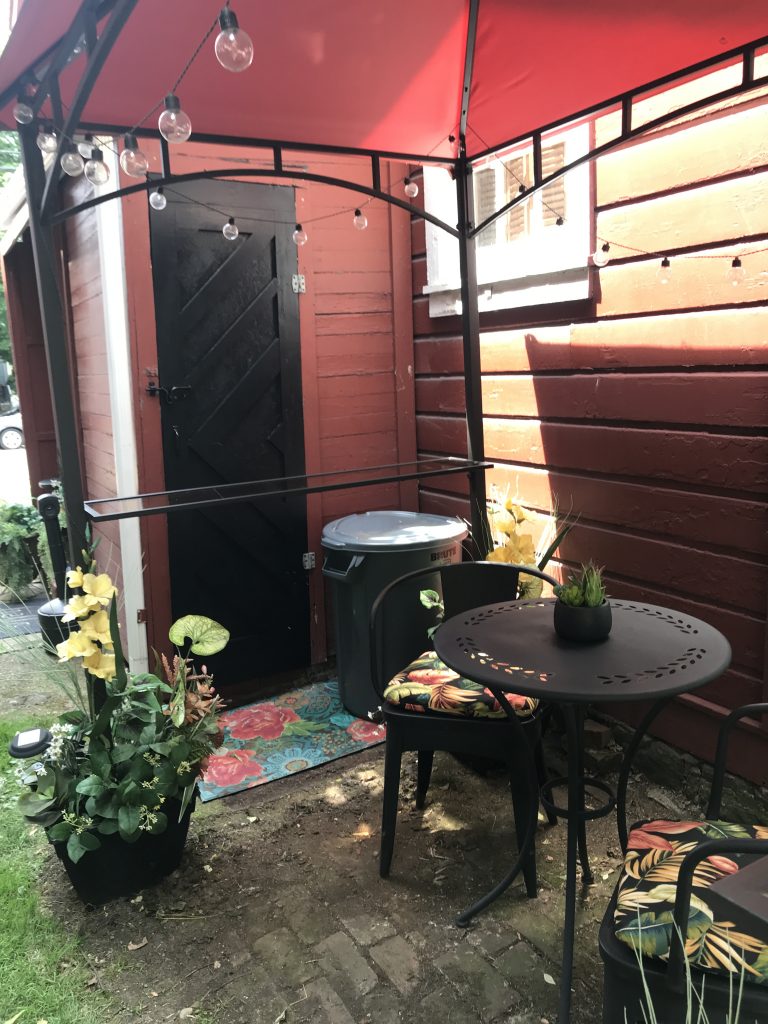
Now there’s no longer a gaping hole! Guests enjoying the outdoor seating probably won’t think much of it but I do think they’ll notice. And I’m happy to have a place for outdoor yard tools, pots and salt for winter. 

DIY Color Block Painted Door Makeover

Remember when I finished the combined nursery / guest room  makeover a few months ago…

combined nursery/guest room @diyshowoff 

I had a few finishing touches left to share. One of them was taking this plain door that leads to the guest bathroom…

chevron color block door tutorial @diyshowoff

and giving it a fun look. Paint is such an easy way to make a fun and bold statement, add a pop of color and definitely a touch of “wow” to the room…

chevron color block door tutorial @diyshowoff

What I used:

  • plain white door
  • sample of Valspar paint (color: rushing stream, finish: satin)
  • paintbrush
  • FrogTape
  • yard stick and pencil

What I did:

1. I gave the door a good scrub. Amazing how unnoticeable the dust is on those recessed panels. Who knew?

2. Using my yard stick, I found the center point of the door horizontally. Then made marks for where I’d like each “chevron” point to be. I didn’t really space them out exact. From the top, the first section is 14 inches down. 

3. Using FrogTape, I created a “v” shape. I eye-balled the angle. 

4. I repeated the “v” shape. A lot of my spacing and angle had to do with the panels, not exact measurements. 

chevron color block door tutorial @diyshowoff

5. I used my thumbnail (a credit/gift card would also work) to burnish the edges of the tape. 

chevron color block door tutorial @diyshowoff

6. I painted one coat and let it dry. Then brushed on a second coat. 

chevron color block door tutorial @diyshowoffchevron color block door tutorial @diyshowoff

7. While the paint was still wet, I removed the FrogTape. Try pulling away from the paint, as shown:

chevron color block door tutorial @diyshowoff


Before:

chevron color block door tutorial @diyshowoff

After: I am in love with the large scale bold design. It’s so unexpected and fun. 

chevron color block door tutorial @diyshowoff


and just that small project makes a big statement, doesn’t it? 


chevron color block door tutorial @diyshowoff


I love how it kicks the guest room/nursery room decor up a notch. 

{before}Guest Room/Nursery reveal @diyshowoff

{after}chevron color block door tutorial @diyshowoff

See the entire nursery/guest room reveal here. See this project and more in the Lowe’s Creative Ideas digital magazine. 

LCI Spring

I received a Lowe’s gift card to put towards this challenge. Opinion and above idea is 100% my own. More DIY ideas at Lowe’s Creative Ideas or follow Lowe’s on InstagramPinterest and sign up for the Creative Ideas magazine and app.

A Chartreuse Door

Mini-makeover…

When we first installed the sliding door, I embraced it’s original old paint.

interior sliding door

But over the past year, it did feel more “dirty” even after a good scrubbing than “charming”. It just reminded me of the cold weather and dirty snow…blah. You can’t tell from the pictures. But it did have that dirty old worn finish.

Remember how my brain sometimes works with DIY? It’s usually a spur of the moment decision that wasn’t in my plan for the day or ever. That happened with painting the sliding door in our dining room.

And remember when I painted the door in the apartment renovation

apartment door

I fell in looooove with that color. A beautiful happy shade of green.

The beginning of the new year consisted of cleaning and organizing the basement somewhat. I stumbled across packed boxes of supplies and tools from the apartment renovation…still not unpacked since November. While putting things away, looky what I found:

Valspar Gilded Pesto

chartreuse green

And just like that, in that five minute time span, I decided to paint the sliding door in the dining room, to add some “spring” color to the dingy, dirty, neutral white. No wonder it takes me FOREVER to clean. Distractions get me every time.

FrogTape

I started by taping off the glass around the mullions with my favorite stash of FrogTape, making sure the edge of the tape was flush against the corner where wood met glass. It doesn’t leave a sticky residue when removed…and I’m all for making a last minute DIY easier.

{you can see the dirty original paint job better in this picture}

FrogTape on glass

{curtain is for privacy in the guest room or maybe hiding junk in what’s become a storage room…ummm, I’m not telling}

I used my thumb to burnish the edges of the Frogtape to prevent paint from seeping underneath.

burnishing the tape

Then applied two coats of my sample container of paint.

painting door


{oops…One coat looked great while wet so I removed tape. I did a second coat on the flat parts after coat 1 was dry}

I removed the tape immediately after the second coat, pulling away from the wood.

removing tape

Ta-da…the after:

painted door after


again…here’s the before:

shabby chic dining room

What do you think? Do the seasons aid in changing your decor? How finding inspiration and materials that you forgot you had when cleaning and organizing? Either way…I’m loving the new pop of color!

chartreuse paint

  • paint the built ins and add hardware to the bottom doors
  • swap out the light fixture (wait ’til you see the new one!!!)

*This is a sponsored post brought to you by FrogTape. The opinions are completely my own based on my experience. Results may vary. 

FrogTape Blog Squad

Sharing at:

Beneath My Heart’s Best DIY Projects of January

FJI’s Saturday Night Special

Thrifty Decor Chick Before and After party

DIY Door Clock and DIY Project Parade

I featured a clock on a stand alone vintage door being used as decor a while ago (see below). That inspiration stayed with me and it seemed like the perfect idea for an old door on our pots and pans pantry in the kitchen.  
 
farmhouse kitchen makeover
 
Look what we have now!


I love it and it was a really easy DIY project. Here is how we did it:
 
Materials:
large serpentine design
Large Serpentine Clock Hands
Mini Quartz Movements
  • Extra washers if needed (depends on the thickness of door)
  • Vinyl numbers (I made mine using my Silhouette but you can purchase them on etsy or paint or stamp numbers also.)
 
Tools:   Yard stick, pencil drill, dinner plate to trace (glass microwave plate works well).
 
1.  Mark the center of the door panel using a pencil. I lightly marked from one top corner diagonally to the bottom to create a big “x”.  The center of the “x” is the center of the door panel.
 
2.  I then used our microwave plate (since it’s glass and transparent and about the right size). I traced it, with the center of the “x” in the center of the plate. I just eyeballed it. 
 
3.  Drill a hole in the center of the circle, “X” marks the spot.
 
4.  I added my vinyl numbers using the inside of the penciled area (circle from tracing the plate) as a guide, starting with 12, 3, 6 and 9 in a larger font size.  Use a pencil to divide the circle in to pie-pieces. It will make placement more precise!
 
5.  Pencil marks erase easily with a damp Magic Eraser.
 
6.  Insert the mini quartz movement.  We added a few extra washers to make the fit perfect since the thickness of our door panel was on the thin side.
Back
 
Front
 
7.  Add the hands as shown on the packaging.
 
8.  Screw on the lfinishing nut and add the second hand.
 
9.  Pop in a battery.
 
10.  Set the time using the dial on the back.
 
Here’s what the back side looks like, unobtrusive, not in the way, right behind our lids which we store on the door.
 

It works so well and I love it – especially with the round Rockler lazy Susan spice wheels/spice loft to the right.


Thanks to Bargain Hoot and Pinterest for the inspiration:
  

Updated picture:

farmhouse-kitchen

What have you been up to lately?  Got something DIY or a thrifty deal to share?  Link up! Let’s see it!
 
The DIY Show Off


1. You must use the button above (ADD BUTTON HTML CODE FROM SIDE BAR TO YOUR POST) and link to this post to share the linky love.
 
2.Include your name or blog name and project title. Add your permalink (not your blog url, but your DIY project post url). Feel free to link a Past Post, just invite your readers in a current post with a quick note.
 
3.Or email your link to thediyshowoff@gmail.com and I will add it for you.
 
4.If you notice your link has disappeared -please add the link back to The DIY Show Off to your post today, a button or a quick note to your readers about the party and try again! I love when everyone participates and readers check out everyone’s links, but I think the return favor of linking back is the nice thing to do so everyone plays fair and enjoys all of the projects and links. Also – this blog party is for DIY projects only. Links not related to DIY will be deleted.
 
 
5.  NOW you can “like” the links!  What a fun idea!  Most liked links may be included in a post of DIY Project Parade highlights later in the week!  🙂
 
 
While you’re here, I wanted ask a BIG favor. As you know, I’m participating in the HGTV Home Design Challenge at Shaw Floors. There is a Shaw Area Rug giveaway going on!  (any style/ANY size – even 9×12)  Click here to enter for the details.  Cassity and I really need your help in the 30 Days of  HGTV Home design challenge.  Thanks so much for voting for our room – one floor being given away every day in September.  Yes, 30 floors total! Please pop over to enter to win and vote ever
y day.  We’d love to see our readers win and for our room to win too!