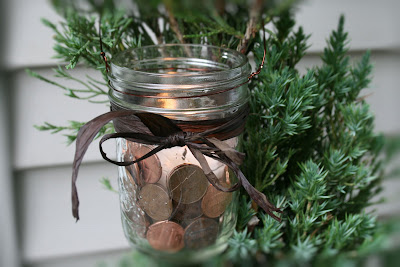
Copper Penny Jar Candles

Today = rainy. Perfect. Here are my pennies I was saving for a rainy day!
I constructed some decorative candles for our patio.
Our back patio will have copper/dark brown light fixtures (still a work in progress) and accessories. The grape arbor is also mostly an aged bronze color. I wanted to coordinate some romantic lighting and accessories. I love candles in canning and jelly jars and these are perfect. I love them!Look! A money tree! 🙂
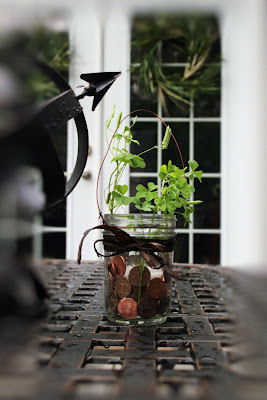
Tucked in amongst the herbs:
Use as a vase too!
Pretty and inexpensive. Total cost for 12 candles = $20. I bought new jelly jars, but if you found recycled ones…it’d be even cheaper.

Tutorial

Materials &  Tools:
Pennies
12 Small Canning or Jelly Jars (approx. $7 for 12 pack)
12 pack of votive candles in jars ($7.99
Raffia Ribbon (or any decorative ribbon) (mine was $2.49)
Wire ($2.99)
Wire Cutters
Scissors
Tape Measure

1.) Cut wire into about 21 inch pieces (x 12 for 12 candles)
2.) Wrap wire around lip of jar and one end twist to secure.
3.) Loop wire to the other side, slide under wire on lip and twist to secure.
Now you have a handle!
4.) Cut raffia ribbon about 30 inches.
5.) Tie around the jar. I doubled up for a fuller look and placed it lower on the jar. Snip ends to even up.
6.) Place votive inside and slide pennies between the glass votive and glass jar.
Ta-da: Pretty hanging copper penny lantern.
I also saved the box from the jars for easy storage. And you can skip the wire if you don’t need to hang them.

Oh…also, do you remember this 5th grade chemical reaction science project for cleaning pennies? It still works!

Add vinegar to a plastic or glass bowl with 2 tsp. of salt. Add dirty pennies. Stir. Rinse. Shiny new pennies!


Easy As ABC!

RWhen I saw a cute chair in a Better Homes & Gardens magazine (100 Decorating Ideas under $100, Spring 2009), I couldn’t resist making my own little whimsical chair for the mudroom using this chair:

Materials:
Old wooden chair (sanded)
Primer
Canvas alphabet stickers (& may need some adhesive spray glue) or the article mentioned using chipboard letters (flowers would be cute for a little girl!)
Spray paint
Throw pillow/coordinating ribbon (optional)

I removed the seat and sanded the chair (okay, so I had Russ sand the chair – even better!). I then attached the stickers. I had to use a spray adhesive on the back of some of them to get them to really stick. I attribute this to the chair not being fully sanded.

The I used primer over the entire chair and stickers using a brush but using a spray primer would have worked quicker.

After that dried, I used this great spray paint for the final coat. I love this spray paint with a trigger (Home Depot)!


After paint dries, reattach the seat and add a cute throw pillow (yes…it’s a “baby” pillow but so what? I sewed ribbon to the corners so it would stay put) and all done!


Isn’t it cute? Probably very appropriate for a baby boy’s room but since we don’t have one of those…it’s a perfect addition to our mudroom, a spot to sit and put on your shoes or a time out chair for the grown baby boy that I married! lol

WDYT?

Lord of the (key) Rings

Ever here the saying “you’d forget your head if it wasn’t attached?” That is my dear, darling husband. He forgets where he puts things. He loses tools, kitchen utensils, books, his cell phone, his super hero ring and his keys. (See HERE and HERE.) So with the mudroom being completed, I wanted a place specifically designated for his keys when he walks in the door.

I found this cute snack tray at World Market and decided to give it a new impressive job title…Sargent Key Keeper.
Update – It seems World Market has sold out of the snack trays. I did see something similar at TJMaxx. I also found these similar ones:

  • This one at Target is square and has 4 dishes (His/Hers/Yours and the training M&Ms!)
  • This one at Target comes with two 3-serving trays (one for you, one for a gift)
  • Here’s one with an iron stand
  • Another option
  • Try googling 3-way divided snack tray, try adding “white” or “ceramic”


I think it’s very happy, preventing rushing-out-the-door meltdowns by guarding the keys and of course I couldn’t help labeling each “dish” because it would be pretty rude of me if guests were to arrive and see what they might consider is an empty snack tray. How heartbreaking. Now…even guests have a special designated spot for their very own keys.
Michaels:
Stickers (not the paper-thin cheap ones, try something a little sturdier/vinyl)
Mod Podge
Spray lacquer

  1. Apply stickers.
  2. Apply Mod Podge with a brush. I did a swirling motion since the brush marks were visible. Let dry. If you finish with this step – do not get the dishes wet, wipe with a dry cloth or you’ll moisten and peel the Mod Podge.
  3. (Optional) Spray with a matte laquer for better protection against getting wet.

Ta-da!

Now to train Mr. Forgetful to remember to use it…