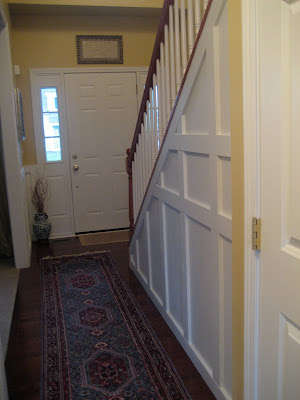
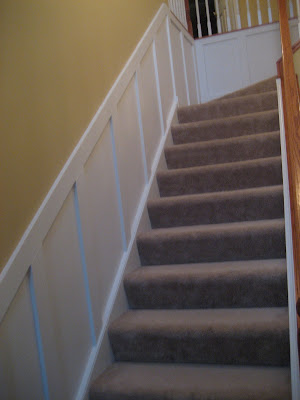
Wainscoting and Picture Frame Molding

I love this DIY project at Impatiently Praying for Patience! Here is Katie’s post:

Foyer…check!

One more project is complete…Hallelujah! So lets go back and remember how boring the foyer looked before.
Then we started to put up wainscotting.
Then we got the wainscoting up.
Then we got it painted.
Then last but certainly not least Mr. Genius finished the wainscoting for the rest of the foyer!!!!
Sorry about the bad photos…it started raining when I finally had a minute to take the pictures. Not that I am a photographer or anything but I do know that natural light makes it look so much better.
We…meaning Mr. Genius…put some more boards up the staircase. I like it even better.
I am really happy with how it looks!

I Love it Katie! Once I learn how to use the miter saw – I’m considering it!
Thanks for sharing your amazing work!

Do you think it’d look good here in my living room? Here is a picture of mine:


—-

This post is brought to you by:


Purely Products, a eco-friendly supplier of 100% quartz UV lamps, is proud to be part of the DIY Home Center team.

Decorating Obsessed

I can’t thank Ashley from Decorating Obsessed enough for sharing so many of her before and after DIY projects. I can’t decide which I love more. They’re all awesome. Here, see what I mean then click her button above to visit her blog – and see the rest of her beautiful home!

My Buffet

I have a couple of touch-ups to do, but other than that – my buffet is done! Now I just need to buy some white candles. 🙂 Before: After: Painting furniture is actually really easy. I have been painting furniture since I was a kid (Yes, seriously. I could never decide what color or pattern my dresser should be – so paint became my friend at an early age). The Process My best tip is to find furniture that is structurally in good condition, and the rest can be altered easily. I do a light sanding on whatever I’m painting (just rough it up), and then a thorough sanding to the top of the piece (that’s the area that usually receives the most wear). Once all the sand dust is off your furniture – paint away. I’m a no primer and no oil-based paint kind of girl myself. Oil-based paint definitely has it place, especially when painting tile, but other than that I would prefer something less smelly. Plus, latex is just so much easier to work with. Primer also does have it’s place. I would recommend using primer if you are going from black to white (or any other extreme changes), because it will save you time in the end. Paint anywhere you have to use a small brush first, then do whatever rolling is needed. Doing it the other way, can start altering your rolling pattern and look sloppy. Paint For the buffet, I used Glidden’s Black Onyx. This is the first time I’ve used Glidden, and I thought it covered wonderfully. My best tip for picking paint is to keep it all the same. No matter how many coats you do, at some point paint will chip – and you want to know exactly what you used, so you can just do touch ups, and not an entire new coat. This also makes it easier, when you find additional things to paint. That way there’s no confusion later on. Everything that is black is just one color. Finish There really isn’t a wrong answer for what type of finish to use. I personally prefer satin, because that’s the shine most store-bought furniture has. Her Entryway: The painting is done! Now I just need to clean the floors in there. Before: After:Bathroom Makeover: Well, it’s not 100% done, but it’s done for now. Here it is: Before:

After:


The wall color is Behr’s Grass Cloth.

Close Ups: The “before” hinges crack me up – it looks like they have little wings on them. I have the same hinges in the half bath – I can’t wait to get rid of them.

I finally have art for the bathroom. This was a Christmas present from my parents, and I absolutely love it.
Stairs Transformation: I had a simple plan for today – tear out the carpet on the hallway stairs. Then voila – hardwood floors to enjoy. Here’s what I didn’t know, when I started this project: – This carpet runner, is nothing but scraps. Each stair is its own piece of carpet, which equals 3 tac strips per step and at least 50 staples per stair. – While I pulled on some carpet to make sure the wood was okay, apparently the spot I looked at was a fluke – the wood is unfinished. – The unfinished wood is blessed with random paint spots all over it. So you can witness the joy: Because of the extreme amount of staples, each stair is taking about an hour to do. My hands are swollen and hurt to move – I am so done for the night. This is how far Brent and I got. So, the new plan (which hopefully includes having this mofo done by our housewarming party on the 21st): – Tear off the rest of the carpet and de-staple the stairs (Monday and Tuesday) – Sand the stairs – this will help the paint situation I have going on and it will also rough up the finished paint of the stairs (Wednesday) – Stain the stairs (Friday night) – Paint the back of the stairs white (Sunday) I have never stained anything before, and I have to admit that I’m slightly terrified. But I guess if it’s terrible, it can always be sanded done again. Overall, I think it turned out really well. Before: After:
My tips… – Spend the extra $10 and buy the conditioner. This helps limit the blotchiness that can happen while staining. – When staining and using the polyurethane – move quickly. Both these products change consistency quickly when they start to dry, making them more difficult to work with. Because of this, I felt more comfortable using a smaller brush, because I had more control of it – so I could be fast and not so sloppy. – Second coats doesn’t necessarily make things darker – time is the biggest factor. It’s better to do 1 15-minute coat instead of 2 10-minute coats. Projects for later… – Paint the handrail – Tear out the carpet in the hallway and stain away.

Great job on EVERYthing Ashley and thanks so much for sharing! First, how cute are those dogs?! I love the way the painted doors brighten up the entryway. The stairs look amazing! The bathroom is GORGEOUS. The color and accessories are so fun. The buffet is stunning!

This post is brought to you by Simply Radiators, horizontal and vertical radiators at great prices.

The World Spins Madly On – Mudroom and More

In case you didn’t get to check out this mudroom makeover from the last DIY Show & Tell party, I thought I’d bring it to your attention. Karli from The World Spins Madly On did an amazing job. I LOVE the new mudroom. I know you will too. Here is her post:

Mudroom Before and After

I’ve been taking a ton of pictures while we do this whole house renovation thing and since things are really starting to feel ‘finished’ in a few places I thought I’d share a few photos.
First up, the front door and entryway/mudroom.
We started with a nice white door and royal blue window panes.

Not terrible, but certainly not what I had in mind.
Ahhhh, much better.

~Keep in mind, many of these pictures were taken a while ago, which is my excuse for pumpkins being on the front porch!~

When we open the door you’ll find many, many changes.

First I’ll show you a bit of the floor as it used to be.

You’ll notice the carpet. Ewwwwww. Imagine the water and mud and dirt and everything else that was in that carpet. Yuck.

This is the only photo I have of the floor ‘before’ because it was one of the very first things I tore out.

We decided to go with a dark but neutral tile that we found at Home Depot.

I love it. We (and by we I mean my super talented cousin Elana) laid the tile in an offset pattern and I really love that it’s a little different than what most people do.

The wall of the mudroom were covered in a plastic-ish something that did NOT want to come off.

And there were hooks everywhere. Functional? Yes. Functional and beautiful? Not quite.

So I pulled off the hooks and shelves….

…. and patched the walls for paint.

And my favorite part of the ‘before’?

The yellow/brown/orange window leading from the mudroom to the main part of the house.

Gorgeous isn’t she?

So the steps went as followed:
– Replace carpet with tile flooring
– Remove hooks and shelves and patch walls
– Paint
– Add beadboard (on top of blue-ish stuff cause it won’t come off)
– Remove brownish/yellow/orange window
– Enlisted Kaelen (awesome brother) to make a built in ‘locker’ system
– Decorate!!!

Here are some of the ‘afters’!!!


And…look how she makes some simple changes with BIG results using fabric. Take a look:

Before:

The wall was bare and needed a punch, plus the molding near the ceiling stops right in the middle of the room? Don’t ask me why.

With a few tips from The Nester and some of this…

We get this…

AFTER:

Ahhhhh! So much better, no?
I liked it so much I decided to do the same thing in my bedroom.

Remember this post when I talked about how I thought the long wall behind my bed needed something more?

BEFORE:

Not bad, but in need of somthing more…

AFTER:

Ahhh, just what it needed!

Thanks for sharing Karli! Everything is JUST AWESOME! 🙂

~*~*~*~

I‘m going to host a weekly DIY party on Mondays!
Stay tuned for more details. You’re invited!