There’s progress in the closet! The coat hooks are hung in the closet with care in hopes that our guests have more options than flinging coats on the chair.
Mr. DIY loves to make sure something is done right and not earthquakes or tough guys or gorillas could destroy his hard work. So, thanks to our friends at True Value, each coat rack can support 500 lbs. and one coat rack boasts a 1000 lb. weight limit. Cool, right? There’s no way these babies are coming loose. Here’s a little step by step on how to use toggle bolts to support your coat rack on a drywall wall without the use of studs. For lighter objects where a nail isn’t enough but a toggle bolt is overkill, we follow this same process using plastic wall anchors.
Characters:
Handyman….Mr. DIY
Photographer & Narrator…Me
1. Using a level and a pen, mark the screw holes on the wall.
2. Using a spade drill bit, drill the holes where marked. We drilled two for each coat hook rack.
3. Insert screw into coat hook front to back, and twist on toggle. We used two on each.
This direction:
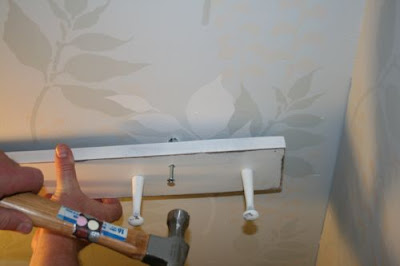
4. Insert toggle bolt into holes in the drywall. The toggle “wings” will fold forward in order to insert, then open once placed through the drywall hole. This spreads out the weight that the coat hook racks will hold.
5. Tap with hammer. This helps to make sure the entire toggle part is all the way in and opens back up on the other side.
6. Screw into the wall.
Easy and sturdy!
A little sneak peek of the closet in progress. Don’t you love that mechanic’s light we found at an estate sale? It sure comes in handy!
A little sneak peek of the closet in progress. Don’t you love that mechanic’s light we found at an estate sale? It sure comes in handy!
What’s left?
Light source
Baseboard Trim
Organizing
Completed:
Painting and distressing coat hook racks
Installing coat hooks
It almost makes one want to test the weight limit – rock wall climbing style, doesn’t it? Okay, maybe that’s just me. I can’t wait to have a place for guests to hang coats. I have big plans but I also have a bit of shoe and coat addiction so maybe not. 😉
In a quieter voice: I’m narrating because if you put up a coat rack and it’s fancy on one side and your wife wants that side fac
ing up but you screw it in upside down, your language could be a bit interpreted a bit innapropriate for a lady. You take it all down (the toggle parts fall into the wall space) and repeat the above steps with the coat rack fancy side down AGAIN. Now the language is really inapproprite for ladies and small dogs and the neighbors. The fancy decorative side being upside down reminds me of a little bum in the design but I’ll just have to live with the litte bum for now.
ing up but you screw it in upside down, your language could be a bit interpreted a bit innapropriate for a lady. You take it all down (the toggle parts fall into the wall space) and repeat the above steps with the coat rack fancy side down AGAIN. Now the language is really inapproprite for ladies and small dogs and the neighbors. The fancy decorative side being upside down reminds me of a little bum in the design but I’ll just have to live with the litte bum for now.
*~*~*~*~*~*~*~*~*~*~*~*~*~*~*~*~*~*~*~
I was one of the bloggers selected by True Value to work on the DIY Squad. I have been compensated for my time commitment to the program as well as my writing about my experience. I have also been compensated for the materials needed for my DIY project. However, my opinions are entirely my own and I have not been paid to publish positive comments.


