Lighted PVC Candy Canes DIY Christmas Home Decor

These PVC lighted candy canes are a fun Christmas home decor idea and pretty way to greet guests at the front door. Welcome, friends! 

Lighted PVC Candy Canes Tutorial DIYShowOff

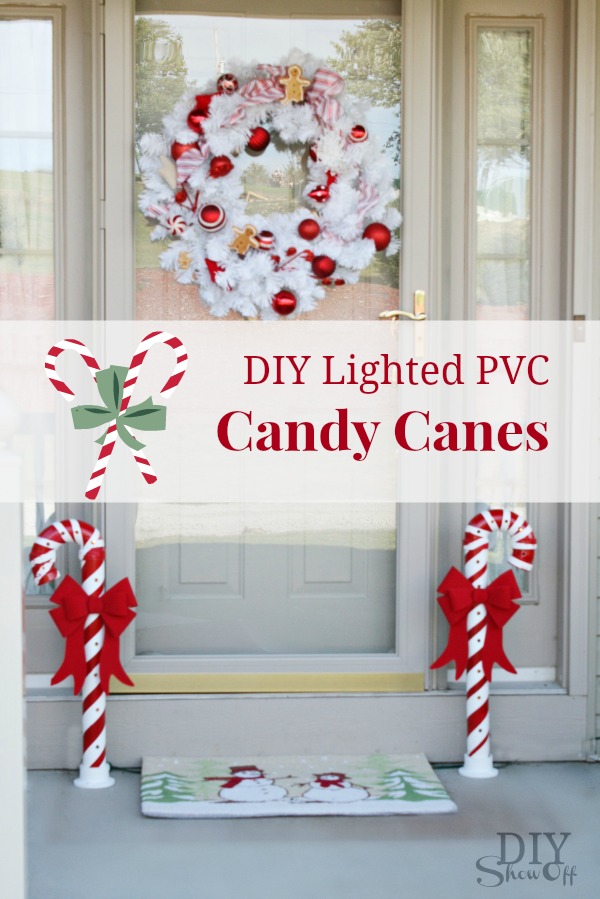
{a big thanks to mom for letting me decorate her front door}

{Christmas wreath and snowman welcome mat also found at Lowe’s}

Materials for a set of two:

  • Two 2″or 3″ (that’s how they’re specifically labeled) PVC drain with 5 SS strain
  • Two 2″ PVC P-trap with union 
  • Two 2″ x 2″ PVC solid pipe in 2 ft section (stock)
  • Two 2″ x 22.5D street elbow
  • sanding block/sand paper
  • FrogTape®
  • Valspar Primer for Plastic
  • Valspar Outdoor White spray paint
  • Valspar Red spray paint
  • Two strings of 35 white Christmas lights
  • Rocks/gravel for weighting the bottom
  • Two bows 

Tutorial: Attach pieces to create a candy cane shape in this order: drain on bottom, 2 ft. PVC pipe, P-trap, elbow.  sanding PVC pipe - lighted candy cane tutorial

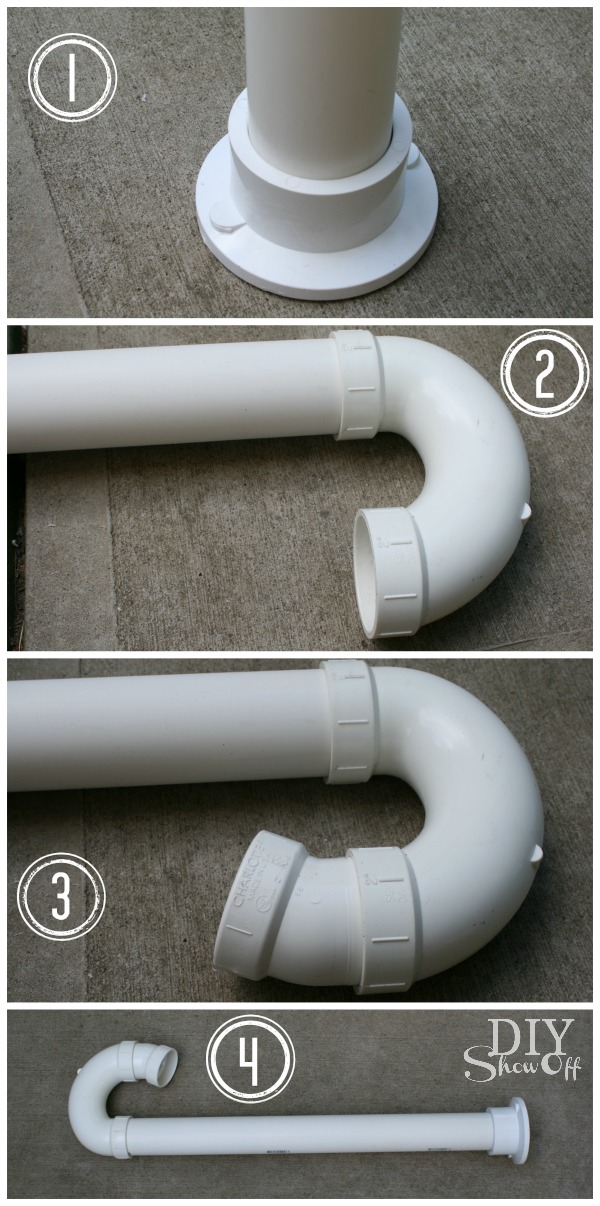
Lightly sand and wipe clean each piece of PVC. sanding PVC pipe - lighted candy cane tutorial 
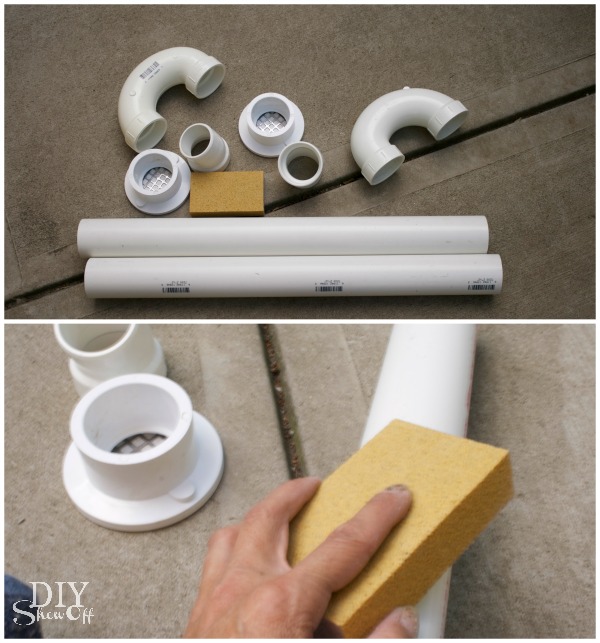
Spray each assembled PVC candy cane with primer and let dry.  candy cane tutorial - priming PVC 
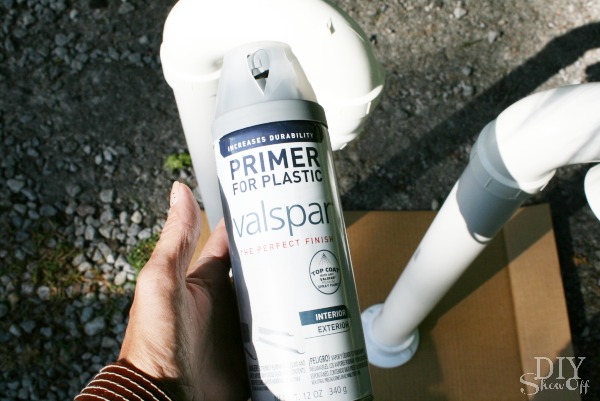
Give each candy cane two coats of white spray paint. Allow to dry between each coat.  candy cane tutorial - spraying painting PVC 
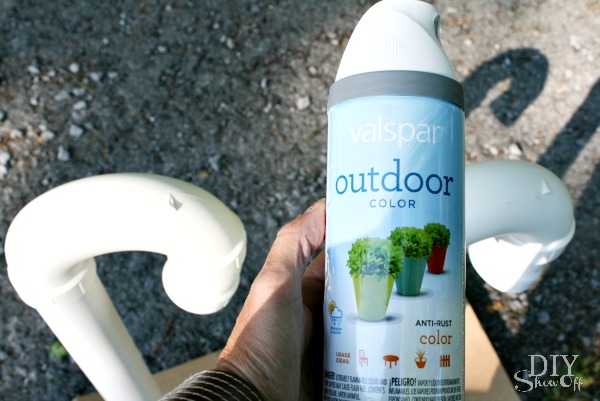
Remove the bottom pieces (the drain/stand). Wrap FrogTape around each candy cane to create a twisted/striped pattern. It gets tricky around the bends but just do your best. Mine are imperfect but it doesn’t take away from the final result. Imperfection adds character, right?  Using your thumbnail or a credit/gift card, burnish the edge of the tape. Rub the edges to ensure paint doesn’t seep under.  Give the candy canes two coats of red spray paint. PVC candy cane tutorial - spray painting Carefully remove the FrogTape before the second coat of spray paint dries.  FrogTape lighted PVC candy canes 
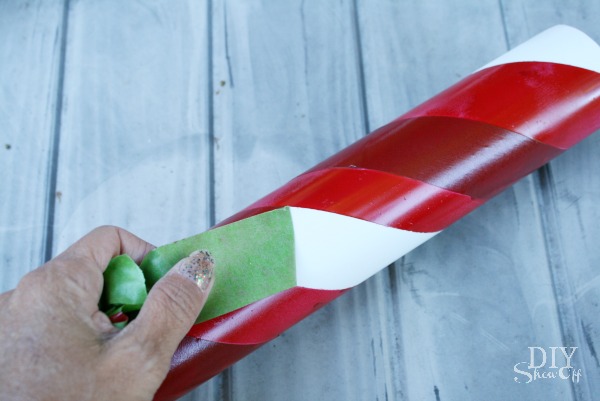
Allow spray paint to fully dry.  Drill holes where desired along the candy cane. I drilled mine randomly in the white sections. Remove the plastic/PVC shavings. (Note: Great gift idea for a DIY lover! The Rockwell Jawhorse is awesome for DIY projects…it held my PVC in place perfectly while I drilled!) lighted PVC candy cane tutorial - drilling PVC 
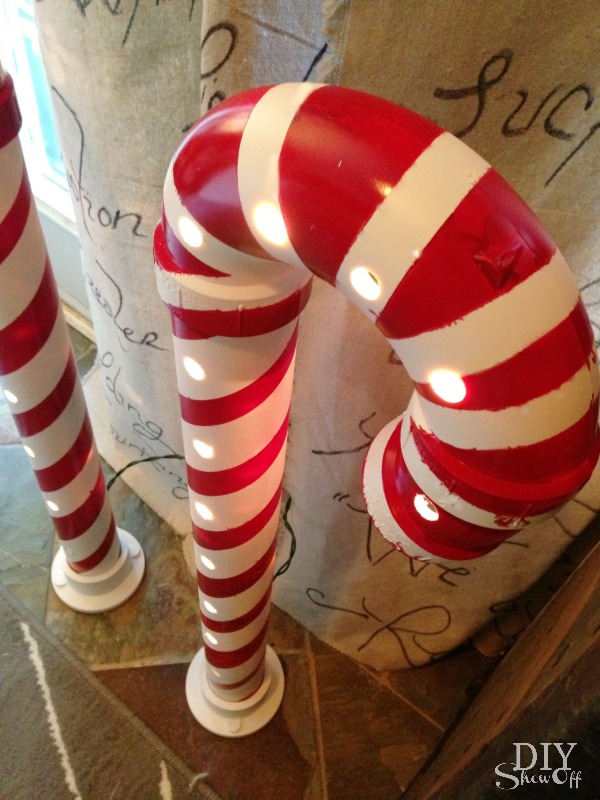
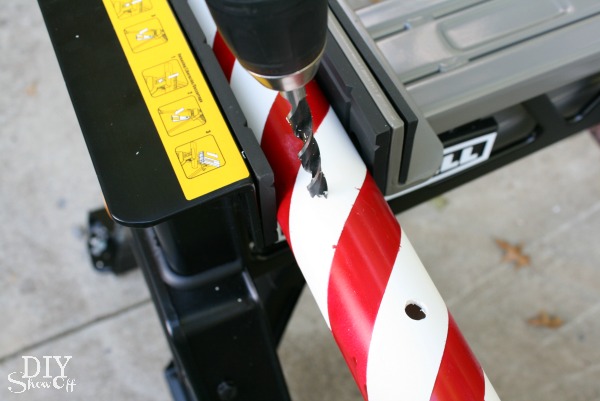
Remove the bottom drain/stand.  Keep the plug on the outside and push the entire string of lights through a hole that’s been drilled near the bottom of the candy canes right above the drain area. Work the lights up through the candy cane. I used a thin yardstick to help. Lighted PVC Candy Cane Tutorial at diyshowoff.com Fill the bottom drain/stand with a handful of rocks for weight and reattach to the candy cane. PVC candy cane tutorial 
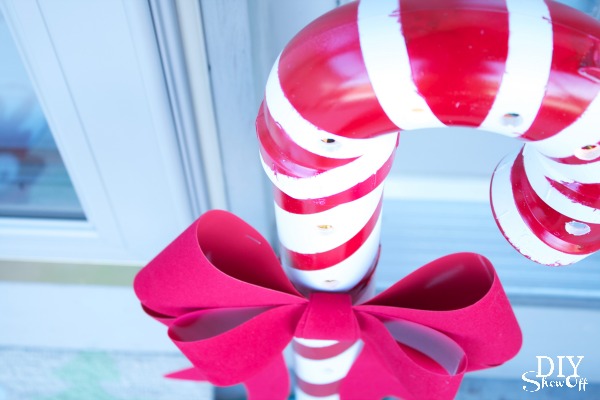
Attach bows, plug in and admire your work!  DIYShowOff PVC candy canes Lighted PVC Candy Canes tutorial 
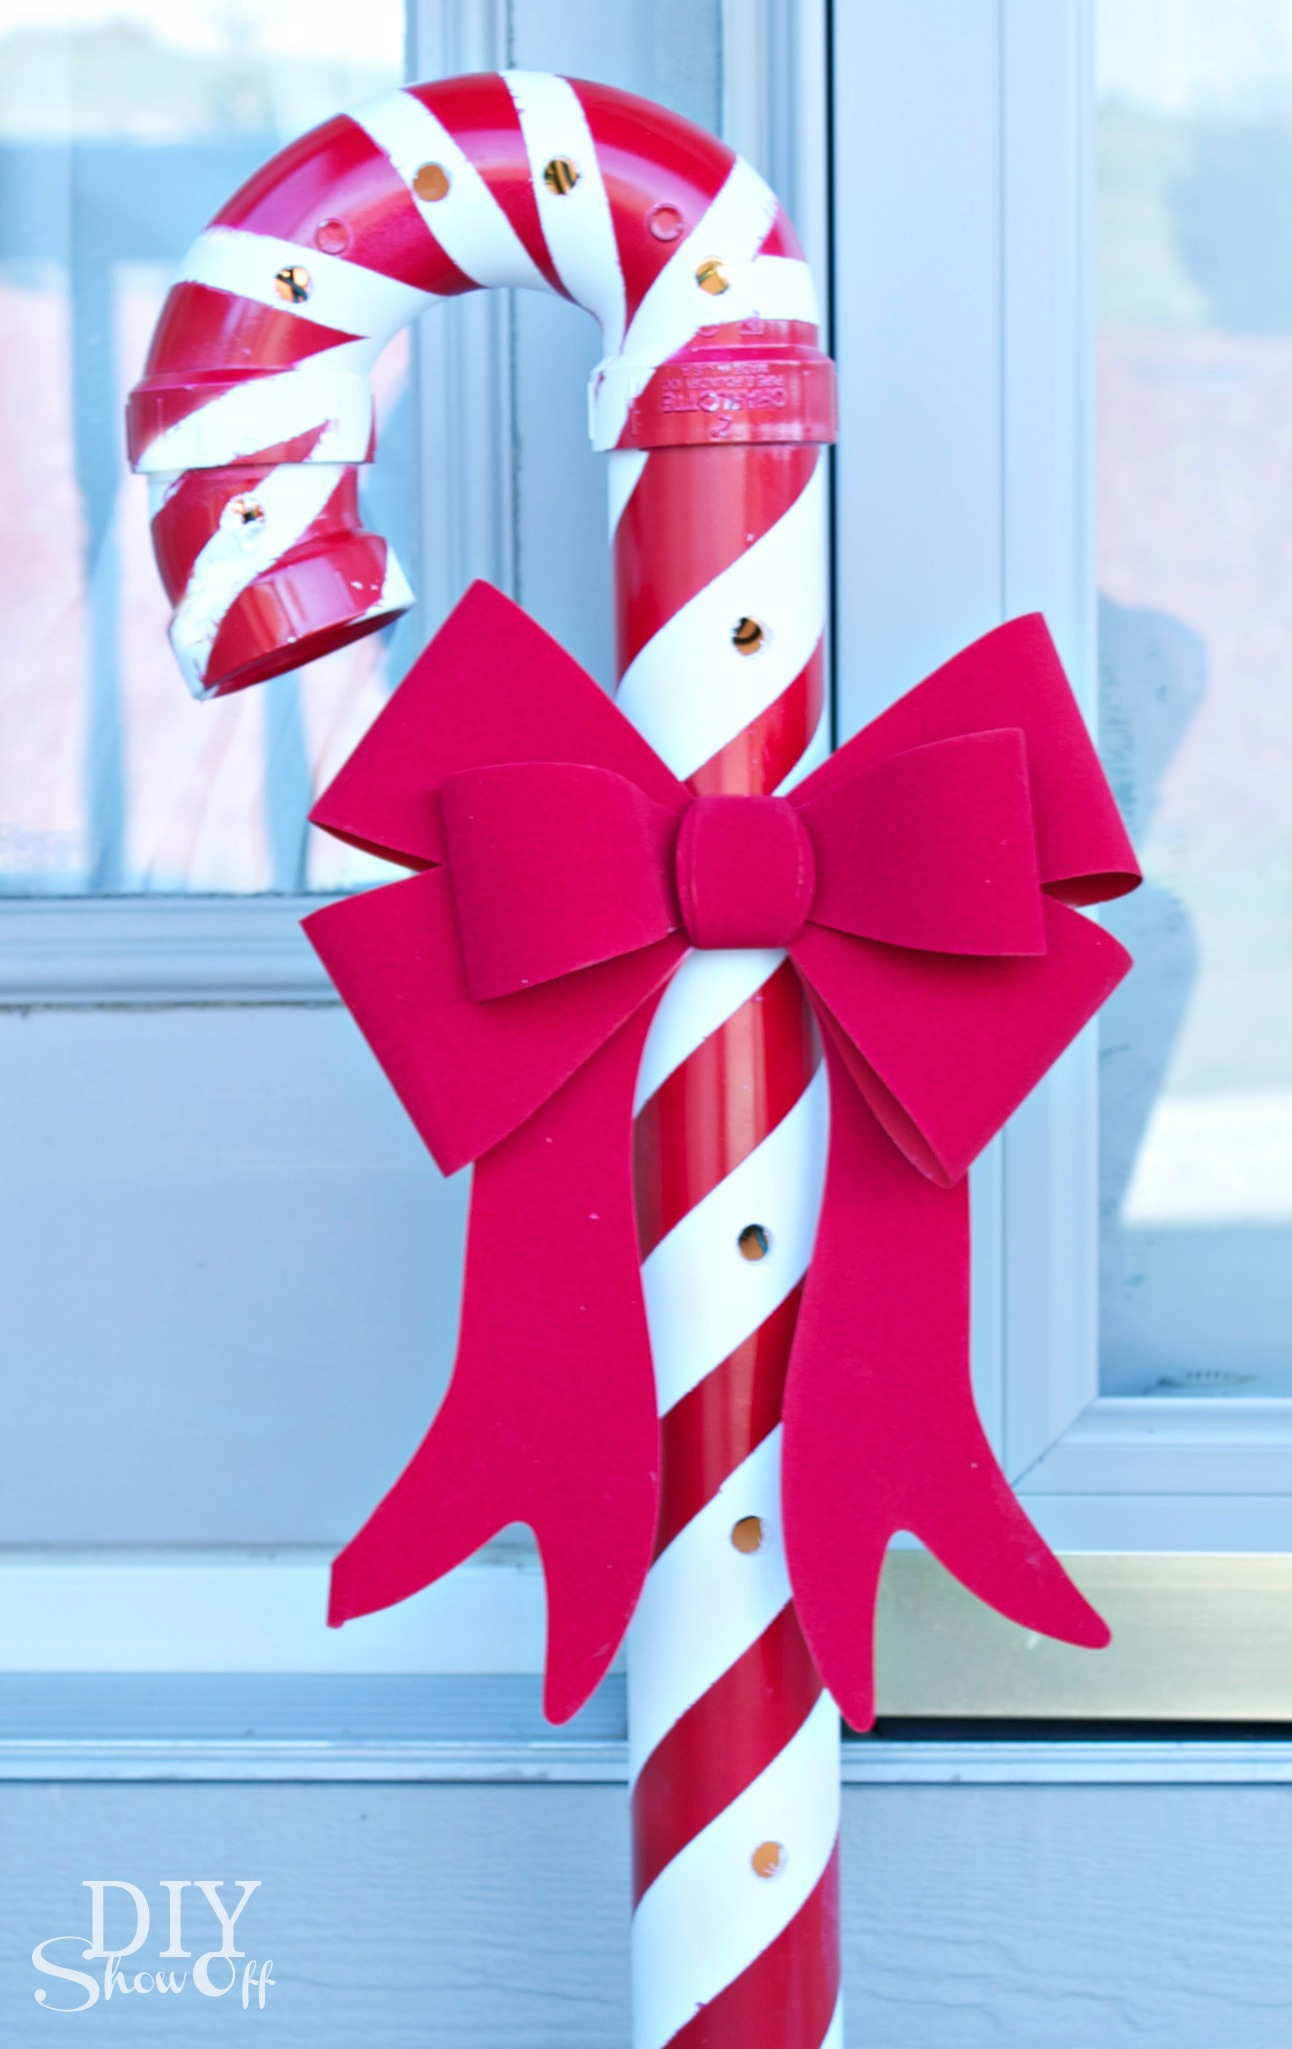
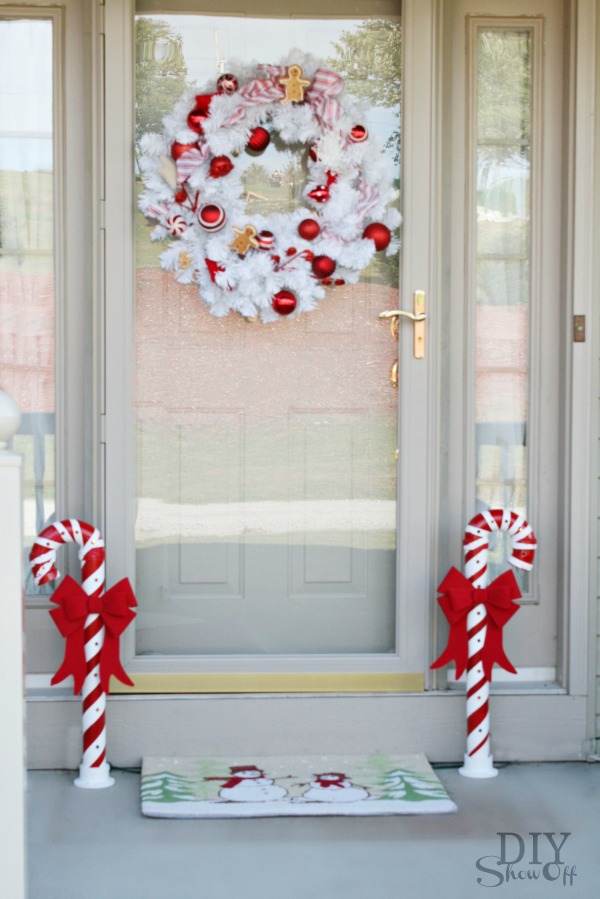
So festive and welcoming! They’d look pretty indoors with a red and white theme too… christmas How to Make Lighted PVC Candy Canes

Looking for more inspiration? Visit the DIYShowOff tutorial page for links to more holiday DIY.

birds and berries Christmas tree #michaelsmakers @diyshowoff Dream Tree Challenge

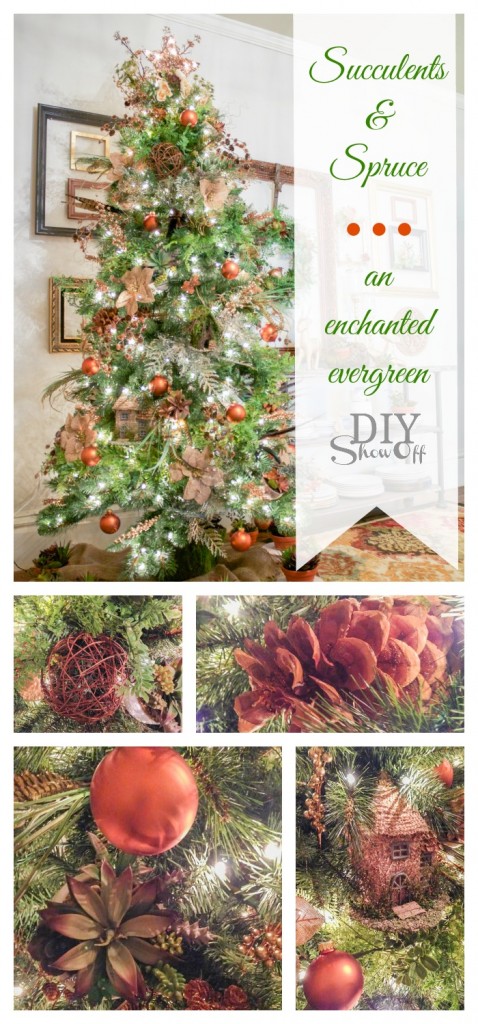
Pop over to see my Succulents & Spruce themed Christmas tree!

Succulents & Spruce Christmas Tree @diyshowoff - #michaelsmaker dream tree challenge

See more fun DIY ideas at Lowe’s Creative Ideas, follow Lowe’s on InstagramPinterest and sign up for the Creative Ideas magazine and app LCI winter *Disclaimer: I’m a member of the Lowe’s Creative Ideas Creators and Influencers network. I received a Lowe’s gift card to complete this challenge. As always, all ideas and opinions are in my own words. Results may vary. Remember to work in a well-ventilated area and to take the proper safety precautions. 

Complete the ‘mood’ by swapping out chemical filled candles for essential oils with amazing health benefits. Diffuse Christmas Spirit, pine, Thieves, cinnamon bark…so many options to fill your home with healthy holiday scents. Young Living essential oils are so loved and so amazing that they’re sponsoring my blog! Thank you, friends! What a blessing! Interested in joining me? Once you experience essential oils, you’ll not only be embracing wellness (we feel better than ever with this lifestyle change!), you’ll make new friends, be a part of an awesome team and have tons of support/resources so you aren’t left clueless. You’ll also learn of the generous business opportunity that has the potential to create financial freedom! I’d love for you to join my team! You can enroll by clicking here or contact me to learn more. So excited to hear from you!

Young Living at diyshowoff.com


Getting Holiday Ready & Giveaway

How the heck do you get ready for the holidays when your home is under DIY construction and chaos? Well, I’m not sure but I can tell you how it’s going for me. When I have a lot going on, I’m a list maker. Seeing what needs done and checking things off helps keep me on track.  Otherwise, you know something’s going to get forgotten. This year, with being a part of the Lowe’s Creative Ideas team, Lowe’s has played a large part in halting my holiday home procrastination.

mercury glass centerpiece

Here is how my list goes:

  1. First priority is to finish up existing projects like bigger tasks so that I can breathe, relax and enjoy the rest of the year. So, I’m pushing to get some projects like our window installation, open pantry makeover and laundry room makeover complete. You may not see those makeovers until January, but my deadline for finishing them is a real life holiday home tour on 12/7.
  2. Cleaning and de-cluttering. In order to prep for digging out all of those bins filled with holiday decorating goodness, I need to start with a clean slate. That means piling up existing decorative accents (to be stored in the empty Christmas bins) and dusting, vacuuming, sweeping, scrubbing. 
  3. Re-arranging the furniture. I decorate three trees for Christmas so moving furniture around to make room is one of my favorite parts of decorating. I love a fresh new perspective from the usual arranged room, don’t you? 
  4. This one I usually start the weekend after Thanksgiving: Hauling out the Christmas decor bins and decorating! Pump up the volume on those Christmas tunes and deck the halls! 
  5. Sending out Christmas cards to family and friends. DIY Christmas Card Tree Display
  6. Holiday shopping. I’ve started a little shopping the past month or two but this is the time I take to get it done. I love giving gifts! Do you wrap as you go or pile it all up or wrap all gifts at once?  I love to be organized about it and wrap it all at once. Blasting the Christmas music in the background, singing along, ribbons and bows and paper and scissors and tape all within reach. It’s a huge wrap-fest! A party for one. 
  7. Holiday baking. I don’t do much baking but hoping to change that a little this year. I’d love to have a variety of cookies to go with my hot cocoa. chevron wooden table runner{chevron wooden table runner tutorial}

Call me crazy but I’m {unrealistically?} optimistic! Check back with me next weekend and I may be in a panic. Because #1 on my list is a doozy. But if I don’t have everything crossed off my list this week, I do have next week before Thanksgiving and the weekend after to fall back on. Having a deadline puts the pressure on to get things wrapped up…and I’m not even talking about the presents yet!rustic vintage glam christmas centerpiece

A few weeks’ back when I first started thinking about getting my home ready for the holidays by following the Lowe’s Holiday Showcase, I had the opportunity to play around with some decorating. Just enough to get me excited to get the projects done in order to get to the reward:rustic Christmas mantel

…really decorating for Christmas.rustic metallic vignette

Christmas vignette

That was a couple of weeks ago. Remember when I said I’m working on completing some bigger projects and a house under DIY construction? This is my dining room table now…{keeping it real!}dining room mess

Yikes! Not for long. According to my list, I’ll be clearing that table off today! Hurray!rustic glitter Christmas decor

I hosted a small get together with family and friends and we discussed holiday decorating and plans

holidayreadyhome

Putting together a list this time of year really helps keep me on track as well as ensures I don’t forget something with so much going on.

THIS GIVEAWAY IS NOW CLOSED. Winner is JD who commented: Paint! I’ve had paint chips up in the bedroom and bathroom for months now, and we have a nursery to do now too! Congratulations, JD! You’ll be notified by email!

$50 Lowe’s GIVEAWAY

How do you get your home holiday ready? How about a $50 Lowe’s giveaway to finish up some home improvement or to start shopping for the holidays? 

To be entered to win, simply leave a comment below telling me how you’d spend $50 at Lowe’s right now. I appreciate your shares! Leave a comment telling me how you shared as well for another chance to win. 

*Giveaway runs now through Wed., 11/27/13 at midnight EST. Winner will be chosen randomly from the comments and announced shortly after. Giveaway is open to US residents 18+ only. 

See more fun DIY ideas at Lowe’s Creative Ideas, follow Lowe’s on InstagramPinterest and sign up for the Creative Ideas magazine and app! You’ll see my DIY foldable luggage rack for getting guest room ready in the November digital issue! So exciting!

LCI winter

*Disclaimer: I’m a member of the Lowe’s Creative Ideas Creators and Influencers network. I was compensated for hosting a Holiday Ready Home party and supplied with a gift card for some Lowe’s holiday decor (shown above). All opinions are my own. 

DIY luggage rack and sprucing up the Guest Room

Lowe’s Creative Ideas challenge for November is sprucing up the guest room. So, it’s all ready for your visit! Pack a suitcase because I whipped up a pretty DIY luggage rack:

diy luggage rack 

Materials I used:

  • Three poplar 1in x 2in x 6 ft (they really measure 3/4 x 1-1/2 inch)
  • One 3/4 x 36 inch square dowel
  • 24″ by 16″ fabric
  • Twelve 1-1/4 inch pocket hole screws
  • Two 3-1/2 inch machine screws with washers/nuts
  • Valspar Spray Paint + Primer 

Tools I used:

  • Kreg Pocket Hole Jig
  • Saw
  • Sanding block
  • Iron
  • Sewing machine
  • Stapler

I cut the poplar and dowel as follows:

  • Two 25″ long pieces of poplar (tops)
  • Four 20″ long pieces of poplar (legs)
  • One 19″ dowel  (cross beam)
  • One 16″ dowel (cross beam)

Next, I painted my wood pieces. (You may want to wait until you have frames assembled. I had to do paint touch ups after assembly because of pocket holes.)

Using my Kreg Jig I  drilled pocket holes into each of the four legs on the 2″ end (2 holes each) and each end of both dowel rods. 

DIY luggage rack tutorial

Drill a hole into the each leg piece in the center on the short side (10″ down).

DIY luggage rack tutorial

Outside frame: Attach one 20″ leg to the 25″ top using two screws as shown measuring in 1 1/2 inch. Repeat with the other side.

DIY luggage rack tutorial

Then the dowel as shown.

DIY luggage rack tutorial

* My pocket holes are facing out. They’re more noticeable if they’re on the inside when the luggage rack is unfolded. 

Repeat the above steps for the inside frame piece EXCEPT attach legs 3 inches in on the 25″ top piece (or lay out on top of inside frame and make sure one set of frame legs fits inside the other for folding).

*This is where I’d paint the frames instead of beforehand like I did. 

Now, cross (sort of tuck) the smaller frame into the larger frame above the dowel. You may need to loosen the larger frame’s dowel a little to get it to fit properly. 

Insert the 3 1/2 inch machine screw into the pre-drilled hole through both frame legs on each side. Secure with a nut on the inside. 

DIY luggage rack

Cut fabric rectangle measuring 24 x 16 inches. Fold, iron and hem all borders. (My seam allowance is 1 inch on the short ends, 1/2 inch on the long ends.)

DIY luggage rack

Staple short ends to under side of top frame pieces (between legs). 

how to make a luggage rack

All done!

Open and guest ready:

diy luggage rack


foldable luggage rack tutorial

Folded and easily stored:

diy foldable luggage rack

More ideas to be guest room ready:

Add…

  • a variety of magazines to the night stand
  • freshly laundered sheets and towels
  • a comfy throw blanket
  • tissues
  • fresh flowers
  • alarm clock
  • easy access to outlet for chargers
  • extra toiletries

See more fun DIY ideas at Lowe’s Creative Ideas, follow Lowe’s on InstagramPinterest and sign up for the Creative Ideas magazine and app! I’m SUPER EXCITED that THIS PROJECT will be featured in the Lowe’s Creative Ideas digital magazine! Be sure to get the app and check it out! 

Lowes-Creative-Ideas-Fall

*Disclaimer: As a member of the Lowe’s Creative Ideas Creators and Influencers network, I received a Lowe’s gift card to complete this project challenge, however the tutorial images, instructions and opinions are my own.