DIY Project Parade

What a week!  I have a number of different projects going at once! I am loving it!  But dreaming of days off and sleeping in, being served breakfast in bed inspired this DIY project.

Materials:
Old cabinet door
Wood filler
Sandpaper
Paint and Primer (Dutch Boy  – Color:  Lake Champlain)
Milk Paint (Antique White)
Deco Art (Pearl White)
Cutting Edge Stencil (that I used on my daughter’s walls)
(2) Cabinet pulls
Deft Clear Gloss Wood Finish
Adhesive Felt

Tools: Foam brushes, Sanding Bug, Drill, Scissors

Here is the cabinet door (before) from any ugly vanity we removed from our powder room.  I removed the brass pull and hinges then gave it a bath.
I grabbed the first screwdriver I could find.  We have more screwdrivers than pens.  Seriously, we can never find a pen but screwdrivers sure are handy.  I need a screwdriver with ink.  Looks like this one is used to open paint cans.

I sanded both sides and wiped it down. Isn’t this sanding bug so cute?  Works great on a small project like this too! Since it’s not real wood, sanding took some of the faux wood paper off, but I just kept sanding until it was as smooth as I could get it.  One of the things I love most about DIY is the amazing transformation and the little imperfections that make it one of a kind. 

Then I remembered that I needed to fill the holes.  So, I did and sanded again once the wood filler was dry.

These Painter’s Pyramids sold at Rockler were really helpful and allowed me to paint on newspaper in the dining room.  They kept the door up off of the newspaper and table.  It’s been so hot and muggy outside so this allowed me to pain in the comfort of a cushioned seat and a/c.  So handy!


And I wiped it down again before painting. I used foam brush and Dutch Boy Paint/Primer all in one.  It took 2 coats. I’m a paint snob and I was very impressed with this paint! Zero VOC and eliminates household odors (isn’t that cool?).  LOVE the color too (Lake Champlain) so you’ll be seeing this in future projects! 
I like the easy to open plastic lid (although it takes some muscle to get it open the first time – insert Mr. DIY’s help at this point).  The easy pour spout was cool too!
Once the 2nd coat was dry, it needed something in the center.  I taped down my Damask Cutting Edge Stencil.  The entire stencil was too large, but I only used the portion of the stencil that fit my area.
Using a small amount of Milk Paint on my foam brush (I kept wiping it off on a piece of cardboard), I dabbed the areas of the stencil. This was the first time I have used Milk Paint.  I love t
hick paint and was like pudding.  It looks good enough to eat or maybe that’s because of milk in the name and pudding’s main ingredient? Milk!  I DO NOT advise eating your milk paint though.
Once that dried, I wanted to give it a little glam so using another foam brush, I added Deco Art Dazzling Metallics Pearl White to the stenciled area.
Then it was a few days before I got back to it but when I did, I sanded the edges a bit to distress it.
Spray both sides and edges with the Clear Semi-Gloss Finish to help protect the wood/paint.What a beautiful finish!
Next mark the areas that need drilled for the handles.  Drill the holes for the handle in the middle of the left and right edges. Attach the handles. Or have a handyman do it for you because you’re cleaning up all of the DIY materials and supplies before guests arrive for a party you’re having in a few hours.  Of course, that’s my experience.  My day was chores/DIY and hosting a party but I’m crazy like that and love when I can squeeze DIY into my schedule.
After the handles were attached, I traced circles onto a piece of adhesive felt, cut them out and attached to the bottom side (1 in each corner) to prevent scratching surfaces.
Ta da!  All done.  A junk door becomes a pretty tray!


I‘m donating my Trash to Treasure Tray to the 7th Annual Trash to Treasure Charity Auction in St. Cha
rles, MN, The auction, hosted each year by the Pfarkel Sisters of Junk {Re}defined (in photo above), donates all net proceeds from the auction to Susan G. Komen for the Cure.  If you have a project that you’d like to donate – there’s still time (although very little!)  Click the button below for more details!
~*~*~*~
It’s also time to vote on your favorite DIY project over at the DIY Club! 
My tray above used at least one of the DIY Club sponsors and it would qualify for September’s DIY Club Contest. How about yours? If so, it’s so easy to enter and the prizes are awesome!  
Click HERE to vote and get the details!

~*~*~
Now, my favorite time of the week!  
SHOW IT OFF!  What did you DIY lately?
The DIY Show Off

If you’d like to link YOUR DIY project post to The DIY Show Off Project Parade:
  1. You must use the button above and link to this post to share the linky love.
  2. Include your name or blog name and project title. Add your permalink (not your blog url, but your DIY project post url). Feel free to link a Past Post, just invite your readers in a current post with a quick note.
  3. Or email your link to thediyshowoff@gmail.com and I will add it for you.
  4. If you notice your link has disappeared pleaseadd the link back to The DIY Show Off to your post today with a quick note to your readers about the party and try again! I love when everyone participates and readers check out everyone’s links, but I think the return favor of linking back is the nice thing to do so everyone plays fair and enjoys all of the projects and links. Also – this blog party is for DIY projects only. Links not related to DIY will be deleted.

DIY Project Parade


Question.  Have you ever nearly finished a DIY project only to realize at the last minute that you did something wrong in the process?  Do you start completely over or just live with it? 
On occasion, despite my prep and research and the ‘vision’ in my head, this happens to me.  And it just happened.  I’ll tell you about it but first, I finally finished painting my daughter’s room.  
Not a mistake:  We’re Benjamin Moore fans, but for her room I used Mythic paint .  I was so impressed and not disappointed!  The quality was just as awesome!  The consistency was just the way I like it and I do a lot of painting!
Here is her room before.  When we bought our house, I gave the girls permission to pick out their own paint color (after all – it’s only paint) and they painted the rooms themselves (mistake!  What a messy job!).  She chose a pretty bold turquoise color and we paired it with hot pink and black accessories.  It didn’t take long for her to outgrow it and my eye would twitch (DIY OCD) when I went in there because of the teen-paint-job which you can’t see in pictures…but there are accidental turquoise brush strokes on the white trim and door and drips on the floor and…you get the idea. I managed to snap a quick picture before painting.
She has pretty French Provincial furniture.

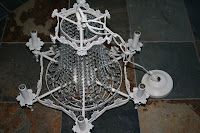
This chandelier (free):

got a makeover:
In the guest room, we have this Pinecone Hill Genevieve bedding (celery):

I want to give the guest bedroom more of a farmhouse look or maybe even move it downstairs and use the existing guest room as a dressing room (future DIY!), anyway – this pretty bedding goes to her.
I chose wall color to match the bedding. It’s called ‘Lamorna’. The Mythic paint covered the turquoise in two coats! It was pretty bright and when painting over the turquoise, I kept thinking it was the same color as that “glow in the dark” color.  I was scared! After all of the walls were painted, it still seemed a little bold, but with drying and the bedding and creamy white accessories, she loves it.  Feminine but still a little crazy for her teenage taste.  (Seriously – if you saw the picture I took with my cell phone – the name of the color would be ghost/plasma!) I used the color ‘Sweet Silence’ to freshen up the trim. It’s a nice creamy white. I’m considering painting her furniture with it too…but we’ll see if that works out.  So many projects, so little time!
So, now my error.  I have a damask stencil from Cutting Edge Stencils.  It is amazing!  It was so easy to use and my plan was to give the wall with the two windows a damask wallpaper-look.  I used the same ‘Sweet Silence’ colored Mythic paint that I used on the trim.The damask stencil is almost identical to the damask pattern in the bedding and curtains. Here is a close up of the bedding:

Frog tape kept the stencil in place.  
I just dipped my foam roller into the paint then used an empty paint tray lined with foil to get the paint on the roller evenly and applied it to the stencil.  Easy!

A lot of measuring/centering and leveling and I got the base of 3 vertical lines on the wall. THEN I discovered that the stencil has a “built in” guide for overlapping a finished stenciled area in order to create a wallpaper-look easily.  Oops! WHY didn’t it click before I was to this point?! I swear I read the tutorial!  Perhaps just too much on my mind. So, I painted over and started again for the center part of the wall and did it properly.  I painted the ‘guides’ on the stencil for the vertical lines towards the corners of the wall to give it more detail.

See here how the top of the stencil overlaps a finished stencil area?  It keeps things lined up!  How cool!

If you’re looking for a stencil – I highly recommend Cutting Edge Stencils.  It’s a really nice size and so easy to use (learn from my mistake!).  I will be using it again. I love it and it made the entire project less overwhelming. I’m going to use it in another upcoming project too!

So here is the back wall of her room.  My little DIY helper is going to Germany for a few weeks (foreign exchange program) and I’ll be working to get the rest of the room done before her return so more to come!

Love the free chandelier in here…

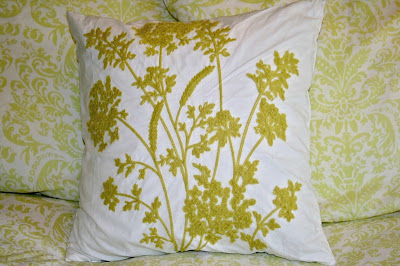
Pillow on clearance at TJMaxx..

Frame from estate sale – future project.  🙂


What do you think?  We still have to get lamps, wall art, frame a mirror, pick up a thrift store chair she likes, work on the estate sale frame project and turn the bifold closet doors  into French doors for the side of the room you don’t see in pictures. 


~*~*~

~*~*~*~
So...that’s what I’ve been up to.  What about you?  Feel free to link up!

The DIY Show Off

If you’d like to link YOUR DIY project post to The DIY Show Off Project Parade:
  1. You must use the button above and link to this post to share the linky love.
  2. Include your name or blog name and project title. Add your permalink (not your blog url, but your DIY project post url). Feel free to link a Past Post, just invite your readers in a current post with a quick note.
  3. Or email your link to thediyshowoff@gmail.com and I will add it for you.
  4. If you notice your link has disappeared please add the link back to The DIY Show Off to your post today with a quick note to your readers about the party and try again! I love when everyone participates and readers check out everyone’s links, but I think the return favor of linking back is the nice thing to do so everyone plays fair and enjoys all of the projects and links. Also – this blog party is for DIY projects only. Links not related to DIY will be deleted.

— 
This post is brought to you by… 
 

Looking for that nail free premium deck finich, hidden deck fasteners by Tiger Claw are your solution.

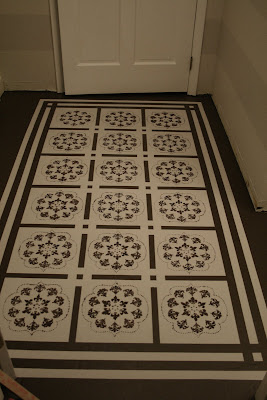
Painting a Bathroom Floor (a DIY painted rug)

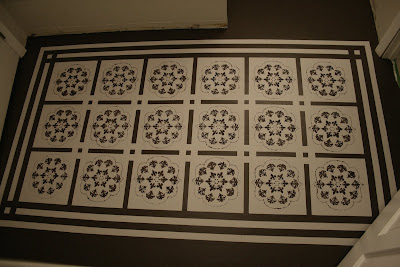
A temporary bathroom floor makeover (temp likely meaning a few years) until bigger renovation with tile is in the budget can make a HUGE difference. Look at the transformation, using paint. I love it! I may never want to tile this floor!
When we bought our old farmhouse, there was carpet in the bathroom (gross!). So we immediately tore it out before moving in. But that’s as far as we got (so many projects, only so much $ and time). We have big plans for this bathroom. It sits between my office/guest room and the family room so even though there is a powder room on the first floor too, this bathroom gets used just as often by guests and family. It needed SOMETHING!
Before

I filled in the cracks/seams with wood filler.

Sanded. (It’s not completely smooth and perfect, but we were okay with imperfections. It is an old farmhouse, after all.) You could also lay down a fresh new base but we were cutting corners.
2 coats of Zinsser Primer

2 coats of Valspar Porch and Floor paint. I chose a color called Journey. It’s a nice dark chocolate brown.

Then, a lot of measuring to create a painted rug base. I used Frog Tape. It is amazing and really cuts down on touch ups. Actually when I used it on the walls, NO touch ups were needed. I did need to do a bit with the floors though. Anyway, I also used the Frog Tape to create a border by covering up some of the base.
I painted my ‘rug’ color twice using Benjamin Moore (eggshell finish) in Smoke Embers.

Then immediately pulled off the tape, pulling away from the paint (some of the tape was completely covered though so fingers do get paint-y). I had newspaper laid out near by so I could throw the wet-painted tape on it (pushing into a garbage bag = bigger sticky mess).

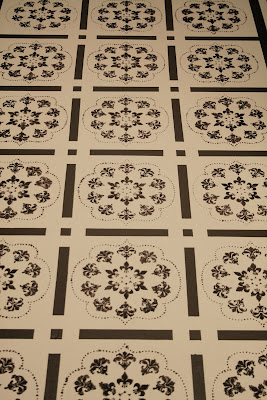
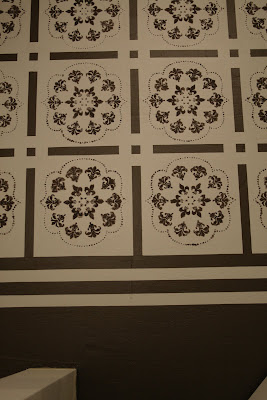
Once that was dry, I continued with measuring, taping and using a stencil to complete my design.

My big center area is 3 x6, so using a pencil, I drew a grid with 12″ squares in order to keep everything symmetrical. I learned that a Magic Eraser is quick and easy for erasing pencil! But, when all was said and done, most of the penciled area was covered by paint and what wasn
‘t, I painted over when doing my final touch ups. I considered using a chalk line, but intimidation got the better of me. I’ve never used one and with me being down on the floor…I was worried I’d smear it all.

I even painted over the gray area one time because despite drawing some ideas on paper, I didn’t like the first design. It’s just paint and it really doesn’t take too long. Right under this room is a wood stove, so the floor is warm and helps to speed up drying time.

I did use acrylic craft paint for the stencil (that happens to match the dark brown perfectly) because it is thicker consistency than the brown floor paint I used. Also – my stenciled areas “bled” a little – anyone know how to get a perfect stencil? Anyway – it actually gave it more character and I like the effect of “fuzzy” edges with the stencil rather than “clean edges”. It really does give it more of a “rug-look”. And honestly – can you really tell? Not unless your nose is 6 inches from it. 🙂

(It’s not a pretty job – painter’s butt! And since I can’t stop once I get started, dark circles.)


Ta-da!

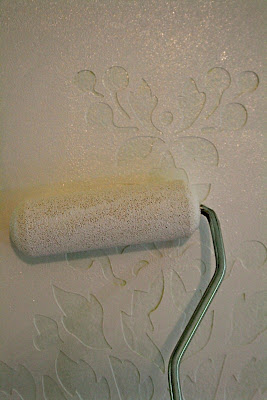
Next, a couple of coats of water-based polyurethane to seal and protect. I used Minwax Water Based Polyurethane. I’m applying 3 coats by using a brush along the border and against the wall and a foam roller for the rest of it. Now it’s waterproof and protected.


Last part coming up! Replacing the baseboard trim, re-installing the pedestal sink and then the fun part – decorating! I know everyone wouldn’t pair the striped walls with a doily-designed painted floor but the best part about decorating for yourself is doing what you love, right? I promise I won’t hang a polka-dotted shower curtain and crazy wall art. 😉
See DIY and bathroom progress in our
DIY farmhouse

Materials: {affiliate links}

Large Wall Damask Stencil Faux Mural Design #1015 5″ x 7 3/8″
Large Wall Damask Stencil Faux Mural Design #1012 9″ x 7 7/8″
FrogTape 1358463 Multi-Surface Painting Tape, Green, 0.94-Inch Wide by 60 Yards Long
Flower Stencil Zinnia Grande size Med – Reusable wall stencils better than wall decals
Shur-Line 4-Inch Foam Mini Roller Refills, 2-Pack #04940C
Minwax 63333 Satin Polycrylic Protective Finishes, 1 Quart