Easiest {no sew} Small Dog Snood {infinity scarf} Tutorial!

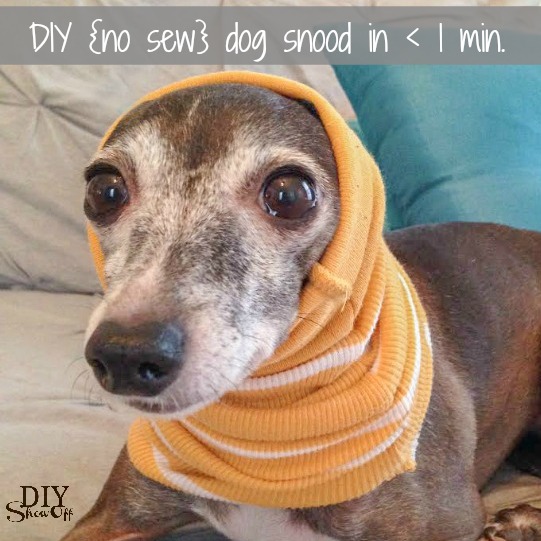
Have a small dog? This is the easiest {no sew} small dog snood {or infinity scarf} tutorial! 

DIY (no sew) small dog snood infinity scarf in less than 1 minute! @diyshowoff

Our Italian Greyhound, Rosie, has very little body fat and very short fur. Needless to say, she’s not a happy to be walking in a winter wonderland type girl (she’s so much like me). Even if it’s summer time, she’s burrowed under her blankets on the couch in the a/c. So you can imagine winter time = sweaters, pajamas, coats.

DIY small dog snood/infinity scarf tutorial (no sew) @diyshowoff

While I was doing some online shopping, I came across something called a “snood”.

Snood: (/snuːd/, rhymes with ‘food‘, not ‘wood‘) is historically a type of European female headgear, or in modern times a tubular neck scarf. In the most common form, the headgear resembles a close-fitting hood worn over the back of the head.

I’ve seen dog snoods for sale but my DIY-eye saw the opportunity for a super easy tutorial where I could choose the patterns and colors for a lot less than $12+ each and not have to wait for (or pay for) delivery.

Ready to make one? 

Small Dog Snood Tutorial

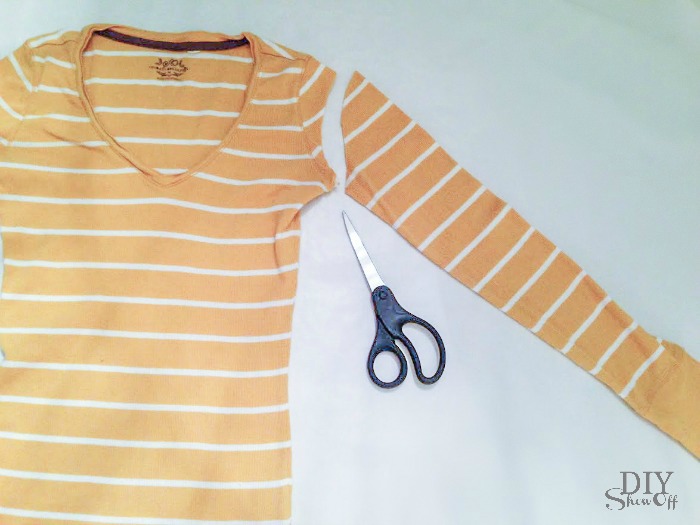
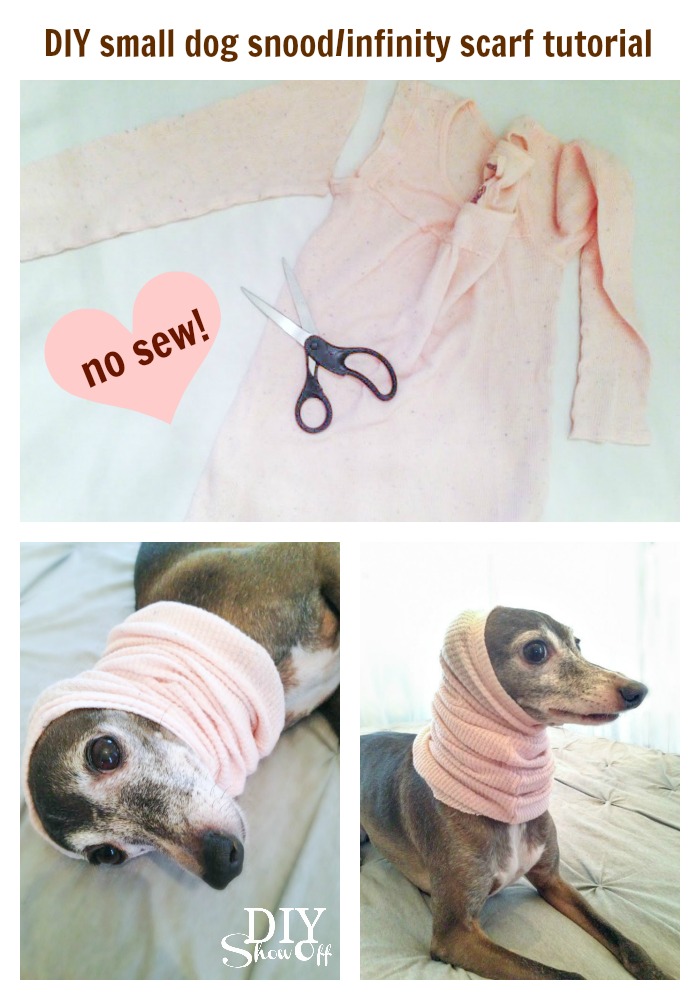
1. Shop your closet or thrift shop for a stretchy long-sleeved knit shirt or thermal shirt (this type works best as it won’t unravel or need hemmed).

2. Make sure the cuff area stretches enough to go over your dog’s head comfortably. It should be loose fitting but not so loose it’s hanging. Loose but snug. Got that? Italian Greyhounds have VERY small heads so this is perfect for Rosie. 

3. Then simply cut the sleeve off near the armpit area/where the shirt meets the shoulder. Cut your snood shorter if desired. 3/4 length sleeves work too! 

DIY small dog snood/infinity scarf tutorial (no sew) @diyshowoff

Ta-da! The easiest DIY no-sew dog snood ever! 

DIY small dog snood/infinity scarf tutorial (no sew) @diyshowoff

If using a sweater, you may have to hem the larger cut side of the sleeve to prevent un-raveling. 

I paid 1.50 for size large shirts from the thrift shop. That’s $3.00 for 4 snoods! Or FREE if you end up cutting up shirts from your own closet. Well, maybe minus the money you’ll need to replace your wardrobe if you go crazy. 

DIY small dog snood/infinity scarf tutorial (no sew) @diyshowoff

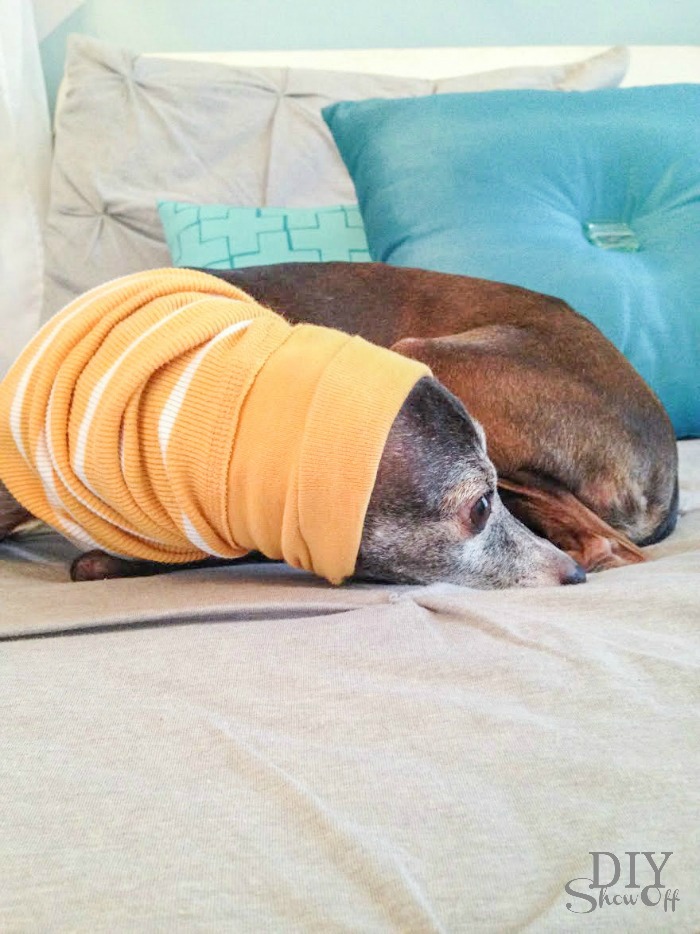
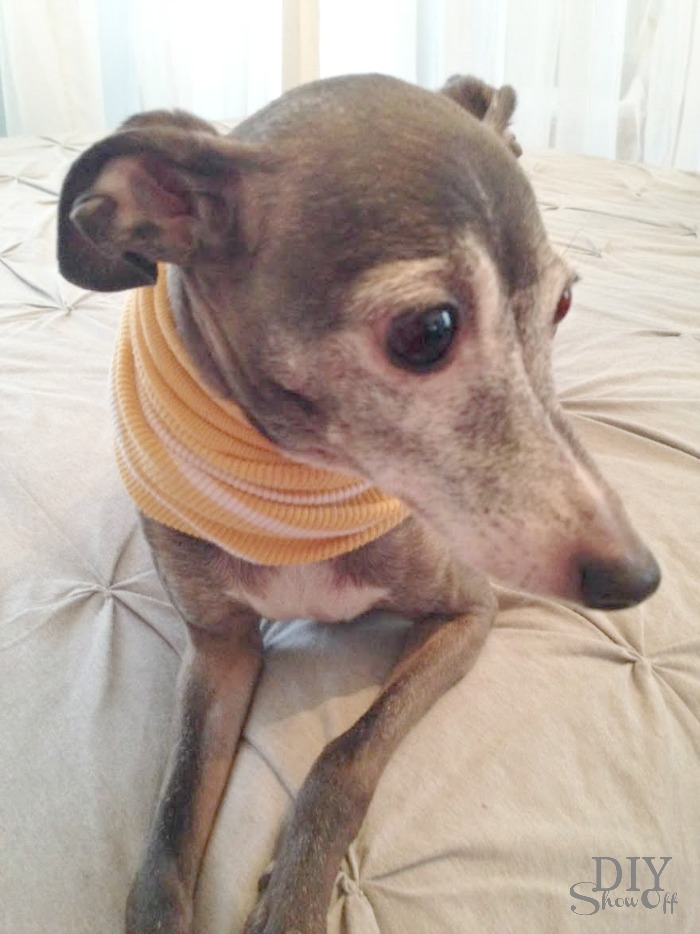
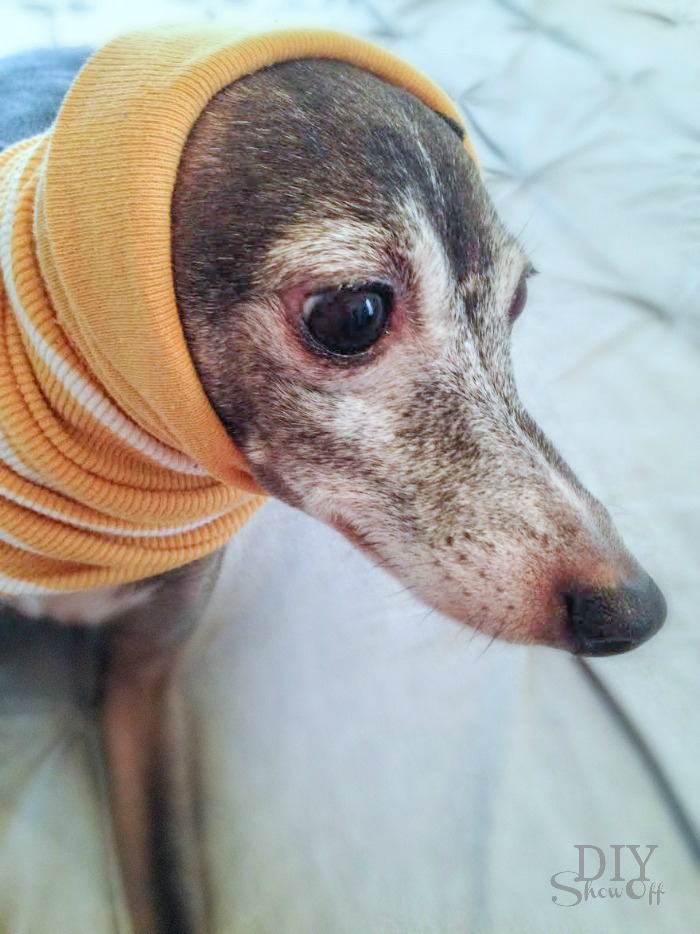
I snoodle her by putting her head through the larger part of the snood first (the side I cut), letting it naturally bunch around her neck/collar area. If it’s too bulky, remove and cut the sleeve shorter. The smaller cuff area rests closest to her ears and top of her head, the larger part of the sleeve sits at her shoulders. 

DIY small dog snood/infinity scarf tutorial (no sew) @diyshowoff

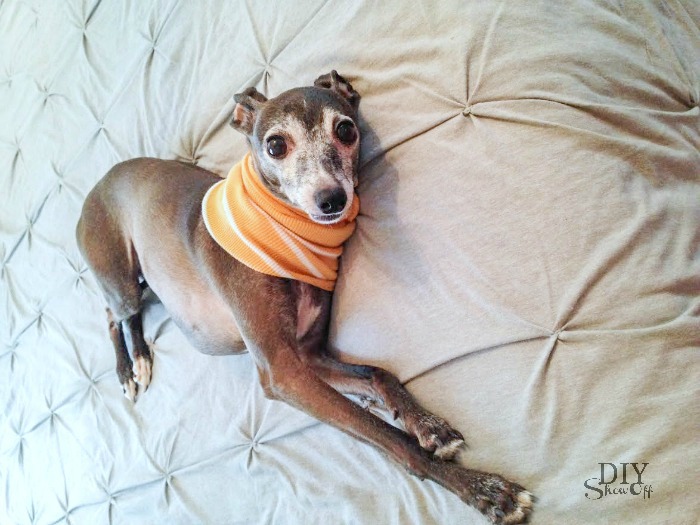
Rosie mostly wears them as infinity scarves over her collar but when it’s cold, I pull it up over her ears for her outdoor potty breaks. Awe, baby! Or is that granny? Too cute either way! 

DIY small dog snood/infinity scarf tutorial (no sew) @diyshowoff

And for those concerned about safety, Rosie only wears her snood under adult supervision.

DIY small dog snood/infinity scarf tutorial (no sew) @diyshowoff

Please supervise your snood-wearing pooch.

DIY small dog snood/infinity scarf tutorial (no sew) @diyshowoff

Note: Rosie is a 10 lb. senior dog with a tiny skull. If your dog is larger, try sewing a larger version using a stretchy fabric and by looking at the shape of a shirtsleeve and the size of your dog. You don’t have to be a professional seamstress, just a few simple stitches. Results may vary. 🙂 

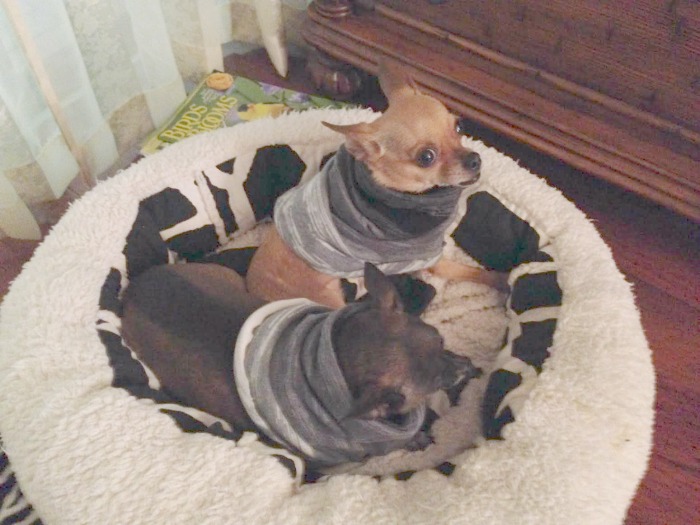
Update: And just like that, that quick, one DIYShowOff reader has already raided her closet and a few minutes later, her sweet chihauhaus are cozy and warm! This is Phoebe & Sable. They love to snuggle. Aren’t they cute?! Thanks for sharing, Mary-Louise! xo 

DIY small dog snood/infinity scarf tutorial (no sew) @diyshowoff

Share your photos and show off your snoodled pups by emailing them to thediyshowoff at gmail dot com. 

More DIY:

DIY wood plank wall art - DIYShowOffeasy DIY cat window perchDIY Dog Bed

How to Make a NO SEW Ombre Ruffled Tree Skirt

{no sew} Ruffled Ombre Tree Skirt Tutorial

With an eclectic family room makeover in progress, we’re decorating the Christmas tree with fun non-traditional colors for Christmas. I know – my house is a mish mash of themes but I do what I love and I’m loving walking from room to room with a different scene. However, finding a colorful non-traditional tree skirt is nearly impossible. Then I remembered that few years ago, I stumbled across a no-sew ruffled tree skirt and although I don’t remember where I saw it, I remember it was a lot easier than I imagined.

No Sew Ruffled Ombre Tree Skirt tutorial

It’s much harder to explain how to do it in words than actually working on this. It’s so easy! This could even be done using a sewing machine (which was my plan but I had to go to Plan B when my sewing machine stopped working). It is time consuming but can be done in one day if you work on it a lot. I made mine in two days. Crank up the Christmas tunes!

Here’s how I did it: 

Materials:

  • round vinyl/flannel back table cloth
  • 5 colors of lightweight fabric (dark to light in color). I purchased 2 yards of the darkest, 2 yards of the second darkest, 1.5 years of the next color, 1 yard of the lightest colors. Yes, a lot. I bought 7.5 yards of fabric. {Use coupons! Look for sales/clearance fabric.}
  • Hot glue (approx. 100 glue sticks) OR swap out hot glue for sewing
  • Duct tape

Tools: scissors, iron

Tutorial:

1. My round table cloth was was too large. I started by folding it in half and placing it under the tree. This gave me an idea of where I’d want to cut. I didn’t measure. Just decided I needed to cut off about 10-12 inches. no sew tree skirt2. I folded the half circle table cloth in half again to create a pie-slice shape. Then just cut {rounding it} approx. 10″ from the outer edge. how to make a no sew tree skirt 3. Snip the pointed edge of the folded table cloth. no sew ruffled tree skirt 4. Cut along one fold from outer circle to inner. no sew tree skirt tutorial5. Place under the tree and decide if more needs to be trimmed. And if I liked the “Twister” vibe of my vinyl table cloth, I’d be done! But, um. No. Something better in mind.

no sew tree skirt

Tip: cover edges of smaller hole {where tree trunk will be}  with duct tape. I used FrogTape. This little area is susceptible to tearing…tape will help prevent tears.

6. Spread out fabric {keep folded}. Any size strips will do. Larger widths will create bigger ruffles. Smaller widths, smaller/more ruffles. I decided on small 4 1/2 inch wide strips. I marked the fabric and cut my strips (no need to be a perfectionist about perfectly straight strips but keep as straight as possible). Length doesn’t matter. Most of my fabric was 54″ wide, but one of my fabrics had a smaller width.

no sew ruffled tree skirt

A lot of strips! 7. Time to iron. And iron. And iron some more.

no sew tree skirt tutorial

Take a break.

8. Start at the outer edge, along the vertical cut (the back of the tree skirt). Folded edge towards you, raw edge will be glued. Place the strip of fabric so it hangs off the vinyl table cloth.  I applied hot glue to the end of a strip of fabric, attach to back side on flannel and wrap around to the front of the vinyl (only about an inch or so on the back). no sew ruffle tree skirt9. I worked in about 4-6inch sections (just eye-balling it, making sure to hide the outer edge of the vinyl table cloth. I applied a line of hot glue, then pressed the raw edge of the folded fabric strip onto the hot glue line. AS I WENT, I’d create “pinch” pleats (glue a straight 2-3 inches, fold the fabric up towards you, then press down another 2-3 inches of fabric strait onto the hot glue line.

no sew ruffled ombre tree skirt tutorial

10. Insert a small amount of hot glue into the folded fabric. Press down flat.

no sew ruffled ombre tree skirt tutorial

11. Attach the little flaps with a dab of hot glue if needed.

no sew ruffled ombre tree skirt tutorial

12. Repeat and continue. no sew ruffled ombre tree skirt tutorial13. When another strip of fabric is needed, open end of fabric, place the end of the last fabric strip, add some glue and fold. (Just create an extended strip of fabric).

no sew ruffled ombre tree skirt tutorial

14. When completing the row around the edge of the circle, cut strip of fabric about an inch and fold onto the flannel back and secure in place with hot glue {as shown in step 8}.

15. Continue onto the next row. Since my ruffles were smaller, I used up all of my darkest color then continued onto the next color. Sometimes it was in the middle of a ruffle, most of the time, I ended a color at the end of a row. My fabric mostly ran four rows. Working towards the center, will require less fabric.

no sew ruffled ombre tree skirt tutorial

16. I noticed that as I worked, my circle wasn’t so perfect anymore. I kept going. Around the trunk area, inner tree skirt, I did have to fill in with fabric strips…again, it’s not perfect…just play with creating more ruffles under what you’ve done, if you see vinyl showing through or have vinyl that’s not circle shaped towards the end. No one will be able to tell…just create pleats/ruffles with the same color to fill in.

17. Near the “trunk” part of the tree skirt, I finished off with a sheer white double ruffle from my scrap supply. You can use wide ribbon…create a double ruffle by hand with a running stitch with thread (no knot) in the center length wise and pulling ends to “gather”. Or use ribbon or bias tape, or follow the same steps but do the last row upside down, gluing raw edge to raw edge, creating pleats/ruffles. Cover hot glued raw edges with thin piece of pretty ribbon using hot glue. no sew ruffled ombre tree skirt tutorial 18. I ran a length of duct tape up the ends of the ruffles on the back side just to keep things neatly tucked down.

ruffled tree skirt

Looks like an expensive professionally sewn beautiful tree skirt, right? So pretty in any color, even drop cloth or burlap or how about using white flat sheets? You’ll have to let me know if you give this a try {or if you already have!}. I’d love to see it!

ombre ruffled tree skirt

Oh – and you will experience some hot glue burns. No sew doesn’t mean no pain. Ouch! But they only hurt for a few seconds.

teal ombre ruffled tree skirt

{Leftover fabric strips were torn into thinner strips and used as garland.} Stop back later this week for Christmas tree pictures!

Don’t miss a post and see sneak peeks first by following along:

DIY Show Off DIY Holiday Highlights

Partying here:

Home Stories A2Z

Holiday Craft Party at Centsational Girl

Quick, Easy Curtain Panel Update with No Sewing ~ Maxwell House Interiors

Meet:  Jeannie from
Jeannie loves seeing the Ballard Designs catalog in the mail box. Don’t we all? But like most of us, she finds the prices a little on the high side.   The Deux Ribbon Linen Drapes were featured in the Ballard Designs catalog last Spring with an $89 per panel price tag. Ouch!