A Little Bit of This, A Little Bit of That and a Living Room Before and After

Hi, DIY friends!  I’d like to introduce you to Halley from a Little Bit of This, A Little Bit of That and Everything in Between.  
Halley recently transformed her living room.  She claims it wasn’t an expensive remodel.  Just basically a lot of paint, new hardwood floors and some rearranging of art work from other areas of the house to create this amazing transformation.  
You won’t believe what this pretty living room looked like before!
Living room before was dark and no doubt about it, the first word that comes to your mind is “brown”…
More brown…
Now, take a look at the WOW! I love the new floor, lighter walls and exposed beams which were lost in the sea of brown before.
See the little bit of the breakfast bar area before…
Now:
What a beautiful makeover and HUGE difference!  I just love it!
See more details and before and after pictures at Living Room Remodel Reveal.
Halley, this is such an inspiration.  Proof that it doesn’t take a lot of $$$ to transform a room.  You did an amazing job!  I love the new fresher look!
Pin It

How To Get This Beach/Eclectic Cottage Look

Good morning!  There have been some questions regarding the details of the room Cassity and I designed. Then we’ll move on to the regularly scheduled DIY posts.
These are the final professional shots of the beach themed room:

With the exception of the handscraped Rockbridge Dusk hardwood floor and the beautiful Ikat panel area rug, the room, the furniture and accessories are photo props at Tribuzio Hilliard in High Point, NC.  So, nothing from this room was purchased via shopping from a store when we decorated.  Everything was selected from a warehouse.  It was the candy shop for DIYers!  Packed full of decorating goodies.
Here is a breakdown of the room details with links to similar furniture and accents as well as some DIY tips.
Hardwood & Area Rug

Handscraped Maple Hardwood (Style: Rockbridge/Color:  Dusk)and Ikat panel (Multi) by Shaw Floors HGTV Home collection. The rug is listed as contemporary and even has a traditional feel to the design.  We loved the pattern for our cottage room.  As Lisa LaPorta agreed, an area rug is a great starting point for inspiration in your home.

Ikat Panel (Multi)
Selected sample (large)
Wall Color

COPEN BLUE by Sherwin Williams for HGTV Home.

SW0068 Copen Blue
Interior/Exterior

Color Collections
Rustic Refined, The Streamlined Years
Color Family
Blues
RGB Value
R-192 | G-204 | B-198
Hexadecimal Value
#C0CCC6
Sherwin Williams Copen Blue paint
Chandelier

We loved the detail of this chandelier when we found it and felt it added a touch of whimsy to the other red coral accents in the room. This chandelier was originally white.  Painting it antique red was a fun way to add color to the room.

Sherwin Williams antique red paint

SW7587 Antique Red

  • DIY:  Our chandelier was originally white. Paint a thrift store find/old brass chandelier.  Color shown is ANTIQUE RED by Sherwin Williams for HGTV Home.
  • Shop:  (better off with the DIY option with something like this because affordable red chandeliers are hard to find) Home Depot has a glass version.
Sofa

We were limited by what was in the warehouse but chose a neutral color and clean lines.  We both agree that furniture is a big purchase and should be neutral enough for when redesigning or changing accents in the future. Keeping big pieces neutral ensures many years of use and your money’s worth!
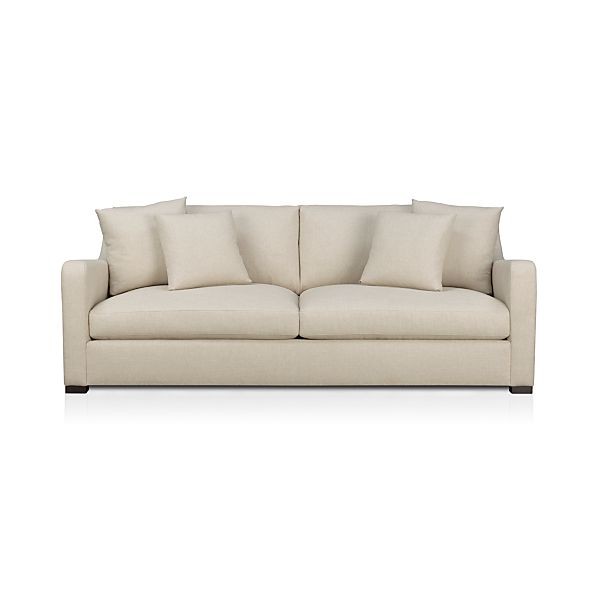
  • DIY:  Add a neutral colored slip cover to your existing sofa or re-upholster in a neutral fabric. DIY drop cloth slip covers are a little challenging but affordable!
  • Shop:  Crate and Barrel, custom sofa covers http://www.comfort-works.com/
VeranoSofaCanvasF11
v style=”text-align: center;”>Wall Gallery

Place art on the floor to create the layout you’d like to show off on the wall.  Find tips on how to hang art for a photo gallery HERE. Look for art with a theme.  Add a plate, wooden letters or mirrors for interest.

  • DIY:  Frame prints from books, calendars or printed from a site such as Vintage Printables. Do something unexpected. Mix in a canvas with framed prints. We used double sided tape to display a starfish on the square plate. Non-matchy letters were all painted a pretty oil rubbed bronze and sanded for a distressed look.  Round mirrors simulate port hole windows keeping within the nautical theme. {Tips for Hanging a Wall Gallery}.  Placing a mirror (from Michael’s) or convex mirror into a painted pie pan or plate could give you a similar look to the port hole mirrors.
  • Shop:
    • Small Sepia Nautical Art:  Amazon
2 Nautical Sailing Art Prints Bow Hull Ship Posters Sail Decor Sepia

DIY version using convex mirrors and pie tins:

    • Letters: Craft Cuts, Michaels, Joann Fabrics, Hobby Lobby, etc.
nted wood letters come in many heights and thicknesses.

Accent Table
  • DIY:  Stack crates and top with glass for a vintage look. Often a yard sale or flea market find or build your own crates using reclaimed wood or pallets. Stamp or stencil wording and sand/distress for a vintage finish.

I have this accent table in my barn patio area:
Crate with an old vintage window top…


or use an old barrel as a side table like we did in our sitting room:

 Lanterns
  • DIY:  Accessorize varying sizes of lanterns with small plants for terrariums or add candles with sea shells, star fish or palm leaves.  Wrap candles with jute to add texture.  (Paint lanterns if desired.)
  • Shop:  Target, Crate & Barrel, Pottery Barn, etc.
Knox LanternMini Lantern Tealight Holder
Horse
Horse Figurines

Mantel
  • DIY:  Use large wrought iron salvaged pieces or a small piece of iron fencing to make a statement and a large clock for balance. Accessorize with old books tied with twine and pottery. Shop thrift stores or yard sales. Find a shape of ceramic pottery and spray paint a pretty turquoise if needed.
  • Shop:
Timepiece - Large Distressed Wall Clock with Pendulum
    • Vintage Books – Etsy
Morph Vase
    • Red coral – 15.97 at Amazon
Worldwide Imports Painted Coral Red 5-7"
    • Cloche. Everything looks special under glass. Try Pottery Barn or search for glass sconces and globes (turn upside down)/etc. at thrift stores.
Lamps 
Southwest Turquoise Décor - 20" Azure Glazed Ceramic Jar Desk / Table Lamp - JCO-X4014
Accessorize
  • DIY:  Use a small old drawer as a tray for books.  Add vintage hardware to the sides for handles. Fill a bowl with glass orbs or DIY your own orbs using twine or seashells to add texture. Spray paint accent bowl if you can’t find the right color in thrift stores. Spray paint small urns and fill with grass.  Small thrifted ceramic fish or other themed accent can be painted to coordinate. Give an accent the spotlight by displaying it under a glass cloche.
Telescope
10x Magnification Tabletop Telescope
Side Chairs
  • DIY:  Search Craig’s List or estate sales for wicker chairs. Great texture!  Spray paint brown to freshen up or a fun color if you love the unexpected.  Add neutral cushions.
  • Shop:  Pottery Barn
Seagrass Wingback Armchair
Typography Ottoman
  • DIY:  Built it yourself (info on this coming soon) or give an old ottoman a new look using fabric similar to this:
Throw Pillows
  • DIY:  Sew or No-Sew using typography printed fabric or grain sacks.
  • Shop:  Pottery Barn and Etsy
PB Found Vintage Grainsack, Blue
Speaking of typography, love these trays from Pottery Barn:
Decoupage Typography Trays
Ceramic Garden Stool
  • So many wooden step stools can be found at thrift stores and yard sales.  Paint and distress if needed!
  • Shop:  TJ Maxx and HomeGoods seem to have the best prices for ceramic garden stools (under $50)
Console Table
Sailboat Art 

We hung two large vertical prints on the left side of the window to balance the art on the right.

Sailboat Sea Nautical Sepia Framed Print Picture
Coffee Table Book
  • Shop: Cabinet of Natural Curiosities, Amazon
Cabinet of Natural Curiosities (The Colored Plates 1734-1765)
Albertus Seba: Cabinet of Natural Curiosities (25)
Large Round Mirror
(shown far left)
  • Shop: Great price on sale at JCPenney!
Drapery

Hang drapery as high as possible to add height to a room. Expand rods past the window and “frame” window with drapery to allow the maximum amount of light into the room.

  • DIY:  Sew your own simple curtains using drop cloths or white linen fabric.  Rod pocket or using curtain rings with clips to hang.  Using white/off white twin sheets is also an inexpensive option.
  • Shop:  Overstock
Coffee Table

Rustic.

Holbrook Coffee Table
Subway Art and Easel
Reserved listing for dstiles84
Hopefully this helps with the details.  What’s your favorite part of the room?
class=”Apple-style-span” style=”font-size: large;”>

Preview

Sharing this post at the great party going on at

Powder Room Decorative Details

We remodeled our powder room a few years ago but there were some unfinished details that finally got some attention. 
Our powder room was originally the end of an entry area to our home with a window and a small coat closet.  Somewhere down the line, a previous owner put up a wall and door, installed some plumbing and created a small powder room.

Before
As you can see, this half of the small powder room used to be the closet originally.  We installed a shelf above the toilet and for years, I’ve been looking at those exposed screws and I finally reached a point where I can’t take it any more.

I saw this cool Flexible Dentil Molding at Rocker:
Flexible Dentil Molding
Inspiration for an easy DIY project! 
I measured and cut it with scissors to fit.
Next:  Glue in place. I used Gorilla Super Glue.  I did have to hold it in place and apply pressure for a couple of minutes. I’m sure there’s a better method, but this is what I had on hand and it was easy to use.  Use a level to be sure it’s ‘level’. 
Then all I had to do was paint it.  I used a craft brush to easily get into all of the grooves. I used the same color as our walls.  Painting it white like the rest of the trim would have been pretty too (paint it before gluing it in that case.)
Doesn’t it look better? Love this product! (It’d be awesome for curved/rounded areas!) No more ugly screw heads showing and a little extra pretty detail. 
I‘ve had these plaques for years as well but because hanging them is an ordeal, they’ve sat on a shelf. 
ugh…
Dischangers make hanging so much easier.

Wet the back of the disk using a fingertip and
water.

Wait about a minute and apply to the center of the back. Smooth into place.

Let dry over night (important step!) and hang! 

What do you think?  Sometimes the smallest details make a big difference. I love how it turned out. 
Want to see how nasty this bathroom was when we bought the house?  Visit Powder Room Makeover to see the before and progress. It was one of my first blog posts here at the DIY Show Off.  🙂

*I received linked products mentioned as part of my participation in the 


Link up your DIY project in the Monthly DIY Contest for a chance to win a great prize package!