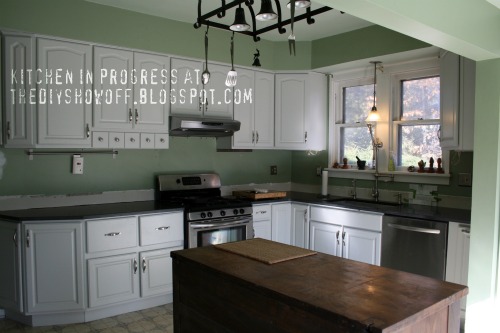
We’re finally shopping for tile for behind our stove area so I wanted to revisit how our kitchen has evolved and the tile we chose for our back splash as well as review the steps we took to install the tile. Our kitchen when we bought the house was outdated…
When we moved we only paint the walls green, inserted new SS appliances and range hood. We lived with it for 3 years then painted the cabinets and finally replaced the countertop with granite (Virginia Jet Mist). Working as time and budget allow sometimes mean waiting for the things we want.
We had a savings to get started on our dream kitchen (the dream where we have savings but the dream without winning the lottery.
The back splash:
Materials:
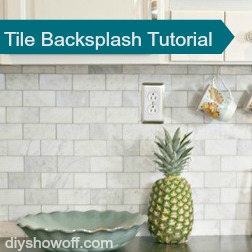
Venatino Polished Marble Tiles 12×12 mosaic, 5 Venatino Pencil Borders
OmniGrip Maximum Strength Adhesive
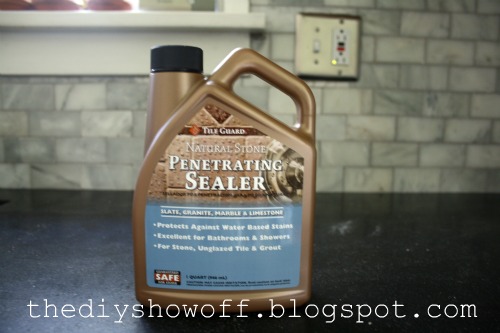
Tile Guard Natural Stone Penetrating Sealer
QuartzLock Grout – silver
FrogTape
Caulk
Tools:
Tile saw
Trowel
Float
Putty knife
Bucket
Sponge
Bucket
Paper towels
Rags
Caulk gun
DAP Pro Caulk Tool Kit
Back Splash Tutorial:
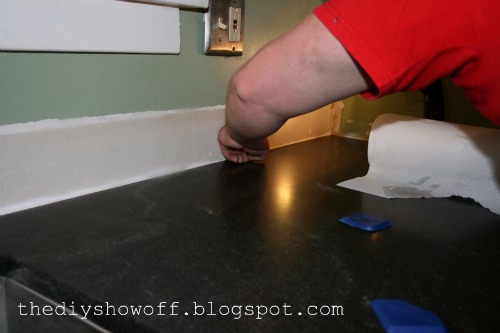
1. Apply caulk to gap where countertop meets the wall.
2. We used a DAP Pro Caulk Tools to make an even/straight line, but a using your finger (and water) works just as well.
3. Prep area. Cover countertop or clean as you go to protect the counter top.
4. Upper cabinets sit back further than the edge of the countertop. We wanted out backsplash to cover the entire area. We started at the edge of the counter for our backsplash. Decide how your tile edge will be finished. We used a matching border from the countertop’s edge vertically and ended at the bottom of the end of the wall cabinet. We mitered the joint where vertical meets horizontal.
5. Apply border and tile with OmniGrip Adhesive using a trowel. Coat the wall (can be done directly on drywall). OmniGrip is pre-mixed so there’s no guessing on consistency and this product works really well for a back splash.
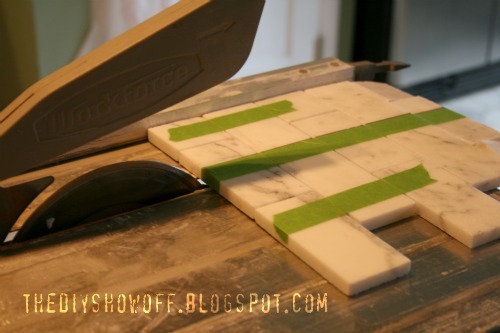
6. To lessen breakage and crumbling when cutting (the vibration nearly pulverizes edges of the marble), we used FrogTape on cuts.
7. Apply pressure to ‘set’ tiles in place.
Another shot of how we ended the tile on the countertop/cabinet edge.
8. Let dry at least 2 days.
9. Seal tiles using Tile Guard. Wipe on with a rag. It dries within seconds.
10. After drying, prep area by covering countertops or clean as you go – dried grout {We chose Quartz Lock in a darker gray} will be hard to remove.
Have a bucket of water handy.
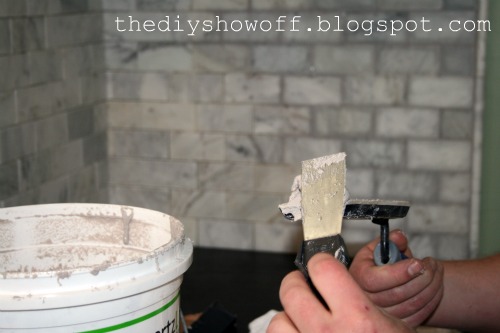
11. Apply generous amount of Quartz Lock to the float using a putty knife.
Quartz Lock is pre-mixed. We cover with a plastic grocery bag, then the lid with a tight seal and save leftover for a future project.
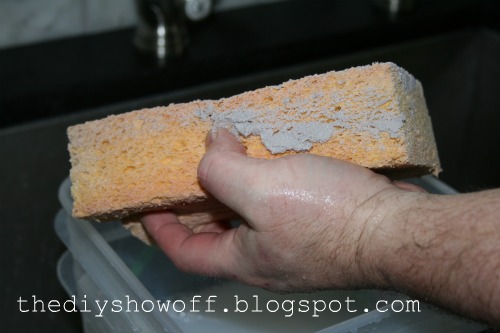
12. Add grout to spaces between the tiles, filling every gap, working in small areas going to next step and starting again with the next area. Smoosh it in the gaps.
13. Using a well-wrung wet sponge, wipe in a diagonal motion (except when necessary against countertop and cabinets), wiping away grout from tile. Grout should stay in the cracks and gaps, but be cleaned away from tiles.
14. Rinse sponge.
15. Repeat.
16. Let dry. Grout will hide imperfections/crumbled edges of marble tile. Don’t stress with tiny chips. Grout will disguise them. We have an old farmhouse, so our motto is “imperfection adds character”.
Before Grout:
After Grout:
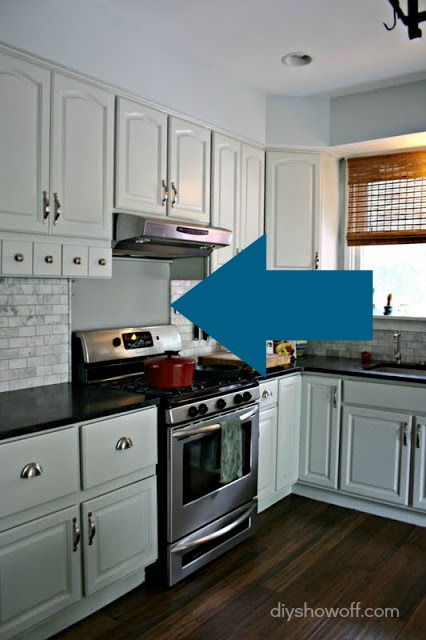
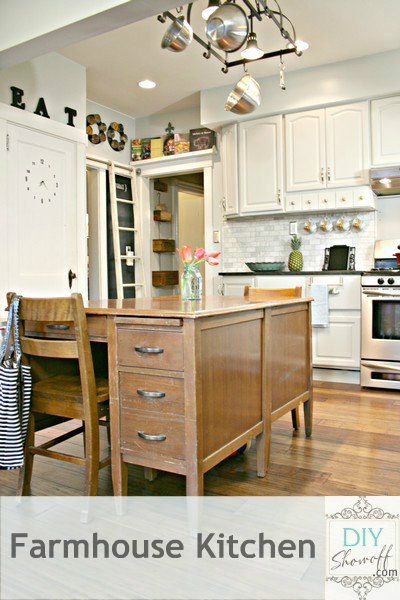
Kitchen before:
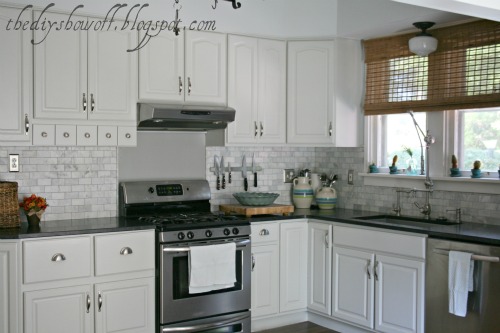
Kitchen after:
We’re thinking of stainless steel tiles for behind the stove but I haven’t decided on the pattern or shape of tiles yet.
We just calculated that we’ll be in our house 7 years this summer. And we’re ready to put the finishing touches on the kitchen. About time, right? We’ll be removing the cabinets above the stove to install a proper vent. It means losing those two cupboards but more on a pantry coming soon too. What do you think?
I think the chef’s dream stove/range is on that ‘winning the lottery’ dream kitchen and he’ll have to make do with what we have but it’s functional. Sorry, Mr. DIY.
See more about our kitchen makeover at our
Home Tour…


I’m going to pin this! It looks like a project for my kitchen.
And I love your tile choice. Might have to copy,
Deb@LakeGirlPaints
Love the tile! Where did you get it? We’re redoing our kitchen and I love this tile!
http://laterbetty.blogspot.com/2013/02/castle-of-cabinets.html
Kelly, we purchased the tile from Lowe’s. Here’s the link: http://www.lowes.com/pd_291377-93840-LW599_4294855623+5003695+5003718_41_?catalogId=10051&productId=3191117&Ne=41&identifier=Natural+Stone&N=4294855623+5003695+5003718&langId=-1&Ns=p_product_prd_lis_ord_nbr|0||p_product_quantity_sold|1&storeId=10151&searchQueryType=1
Marble will crumble when being cut but using the FrogTape on cut lines really did help. Also- the grout hides a LOT of imperfections so if there is a little crumbling on the edges here and there, it’s not noticeable. Good luck!
Did you get the endcaps at Lowes as well? I’ve often wondered how I was going to tastefully finish off the ends of the backsplash.
This really is perfect. What a great job! I noticed the shade that you put over the window too… I have been looking for something just like that only a little bit smaller. Where do you find something like that? Home Depot?
Brittany, I ordered color samples first then went with the custom sizing. The prices were actually very reasonable. Here’s the link:
http://www.paylessdecor.com/
Good luck!
Wow…that’s really pretty and you did a fantastic job. Thanks for the Tutorial!
oh how perfectly timed your post is… i am changing up my kitchen, yet again, and seriously considering doing a tile backsplash – only issue is that I will want it to snowball into new counters, and then who knows what….
I like the tile you used already for behind the stove….. but I am not that knowledgeable and it is your kitchen and I bet you have a brilliant design in mind already.
Oh it is gorgeous!!!!
Positively stunning! Great job! 🙂
Ah! This post sent me to dreamland! I’ve been living in my house for more than two years and I still don’t have a kitchen… But one day, I will have a backsplash… Meanwhile, I’m dreaming of yours!
You kitchen transformation is AMAZING! Drooling over your new back splash. Marble is my weakness. 😉 I was thinking about using stainless steel tiles behind our stove as well. I am constantly wiping the wall and slowly taking off paint. 🙁
Roeshel, you have a beautiful and lovely kitchen! 🙂
Roeshel – I always love seeing your kitchen. Can’t wait to see the new stove hood in place.
Sooo gorgeous! Thanks for the tutorial! 🙂
One more question…how did you install the magnetic knife bar on the back splash?
Hi Kelly! Yes, we purchased the matching marble pieces at Lowe’s as well. And here’s the link for how we attached the magnetic knife holder: https://diyshowoff.com/2011/05/29/diy-project-parade-and-lots-of-tweaks-in-the-kitchen/.
🙂 Good luck!
That is so entirely beautiful! Some things are worth the wait! Life to the full, Melissa
I love marble! Great job!
Great tiles choice, they look amazing, definitely an idea I’m gonna take from you! Thankyou!
Love your kitchen! Do you by any chance know what color green your kitchen walls were? I love them!
Thanks! Yes…it’s Benjamin Moore palisades park. http://www.benjaminmoore.com/en-us/paint-color/palisadespark