


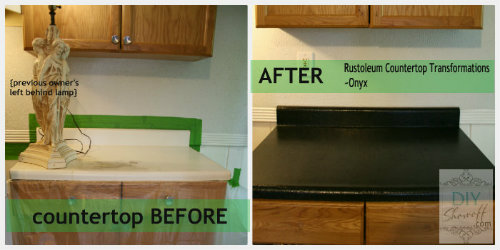
When I first saw the scratched, lightly burned and stained creamy colored laminate countertop in the rental, I knew I needed to either board up the door and run for the hills or an affordable and easy DIY solution. Rustoleum’s Countertop Transformations kit was a great way to rescue this kitchen.
kitchen before…

Rustoleum’s Countertop Transformations kit comes in 5 colors: Onyx, Charcoal, Java Stone, Desert Sand and Pebbled Ivory. Since the previous light color was stained, I decided to go with a darker color to avoid the same issue in the future. “Sleek and contemporary, Onyx is one of today’s most-sought after colors. Onyx’s black gleaming finish will modernize your kitchen and accent any decor. It perfectly complements kitchens with stark colors, white cabinets and stainless steel appliances.” The description sold me…an easy DIY way to modernize a kitchen?
A DIY option that doesn’t include removing the old and measuring for new, cutting new/etc.? Count me in! There’s a lot of DIY going on in this apartment and budget friendly, easy choices are a huge help!
I’m often asked about this DIY kit, so it was great to have the opportunity to give it a try for myself. Summary? Definitely worth the money and work to achieve the look of a brand new countertop!
My Rustoleum Countertop Transformations Experience
I read through the instructions. I also wrote down highlights when I watched the instructional DVD. The kit includes nearly everything but I did have to purchase 2 angled 2″ brushes, gloves, a 6″ microfiber roller and a 6″ foam roller (shown on the outside of the box). A shop vac is handy too.
I set up a work station close by with all of the materials on hand and ready to go.

and prepped the area using plastic drop cloths and FrogTape. I did not remove the sink, however removing the sink will make the process much easier.

Tip: I taped around the sink. However, if you have a steady hand and an angled brush, I think it’s easier to wipe away basecoat when you get it on the sink. Tape will peel away some of the finish and require touch ups but those are super easy to do too! More on that below. Tape off wall near backsplash, cover cabinets, appliances (if near by) and floor with plastic drop cloths.
The first step is to sand the counters using the diamond embedded sanding block (provided in kit) to remove the shine from the laminate, sanding in a circular motion. It actually not only removed the glossy finish but the some of the stains as well. This is by far the hardest step – not too difficult, just time consuming and requires some muscle.

{as you can see above, I removed the loose laminate side strips because they were not secure and applied each step to the non-laminated sides}
Once the sanding was done, I cleaned the countertops with a damp cloth, removing all of the dust (several times) then let them dry.
Step 2 is applying the adhesive base coat. Have the materials ready to go including: adhesive base coat, wetting spray, paint tray and microfiber roller, 2″ angled brush and decorative color chips (in the spreader). Stir the adhesive base coat.

Starting with the backsplash area, apply a heavy coat (like icing on a cake) of the adhesive base coat to the top and front of the backsplash and two inches of the countertop against the backsplash. Use the brush to apply the adhesive base coat to the sides and front of the countertop. Pour the adhesive base coat into the paint tray and roll onto the large flat area of the countertop. Make sure that none of the countertop shows through. Work quickly!


Once every spot is covered, quickly move to the next steps. Spray the wetting agent and spread decorative color chips using the spreader according to instructions. Take handfuls and apply decorative color chips in hard to reach places, covering every area of adhesive base coat. There are plenty of decorative chips. Spare no expense!

It does make quite a mess but don’t worry, they’re very easy to sweep up. I let this sit overnight then swept up the excess decorative color chips with a shop vac.

It’s starting to look awesome!

Using the scraper provided, start removing build up of dried decorative chips along the coated surfaces (being careful not to dig or remove too much).

Next, using the sanding block in the kit, sand down the decorative color chips. And sand some more. And sand again.

Vacuum up the dust

and compare the sanded countertop with the sample piece.

Sand and vacuum again if needed.

Clean with a damp cloth, making sure to get all of the dust removed and let dry. Score the FrogTape with a utility knife (we only had a razor on hand) and remove tape.

Touch ups: When I removed my FrogTape from around the sink, it did peel away some of the finish. Not to worry. Simply touch up with the adhesive base coat using a foam brush, (wipe away base coat if it gets onto the sink/etc.), apply decorative chips and wait four hours.

Sweep up the chips. Sand. Clean.
Tip: Note that this process is messy and remember to over protect areas you don’t want involved. I have a little paint touch ups to do.

Again, make sure countertops are completely dust/dirt free and dry. {looking better already, isn’t it?}

On to the last step! Once the countertop has been sanded and cleaned, gather supplies and pour Part A of the protective coat with Part B and stir.

Apply the protective clear coat starting with the top and front of the backsplash and onto about 2 inches of the level countertop. Pour some of the protective coat into a paint tray and apply to the flat areas of the countertop using the foam roller. Don’t forget to apply protective coat to the sides also.

Keep kids and pets out of the room until the protective coat dries to avoid fingerprints, pet hair, etc. in the finish.
The transformation is amazing. What a gorgeous finish and huge improvement!

Let dry 48 hours for light use and 7 days to fully cure for normal use.
Thoughts: This do-it-yourself Rustoleum Countertop Transformations kit is messy but easy to use, an affordable option and the result is gorgeous. Dried nice to a nice hard finish. The countertop feels durable and looks 100% better! We’re thrilled with the results! Thanks to Bri for her help with this project! Two people are definitely better than one!

What do you think? Have you tried the Rustoleum Countertop Transformations?

Thinking about it? I hope sharing our experience helps! This YouTube video shares DIY tips.
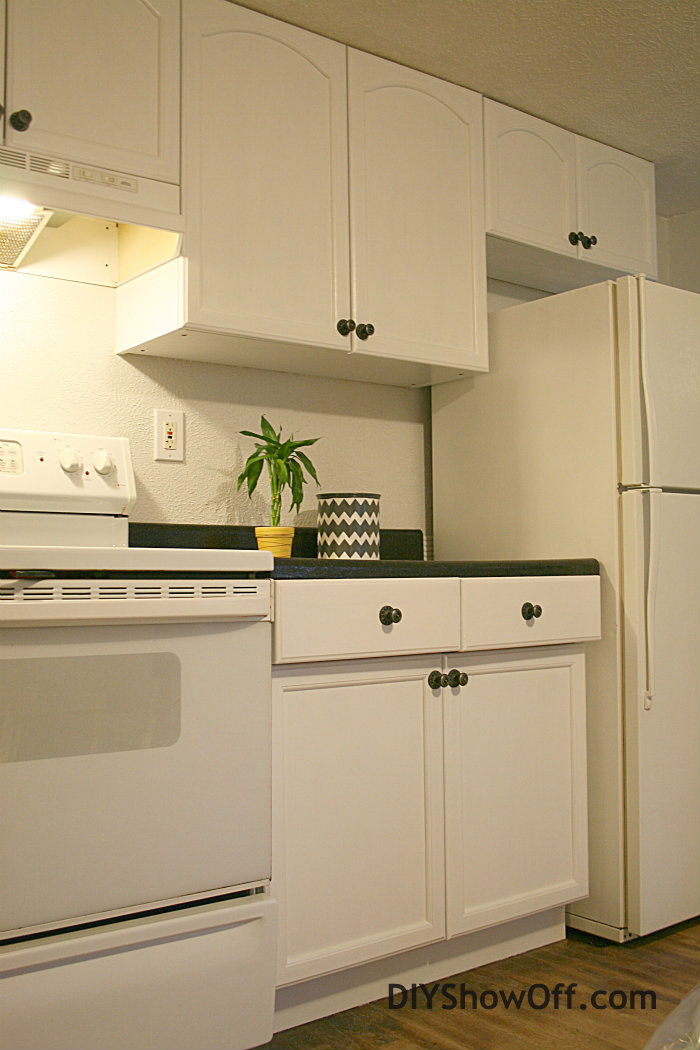
Up next…oh yes I did! I painted those cabinets! I’ll share the process next week. But here’s a sneak peek…

You might also be interested in Rustoleum Cabinet Transformations…making painting cabinets easy (no sanding!):
I did receive product (Rustoleum Countertop Transformations kit) in exchange for a review however experience, pictures and opinion are my own. For more information about Rustoleum Countertop Transformations including a how-to-guide, colors, virtual tool, photo gallery with before and after pictures and where to buy, visit Rustoleum Countertop Transformations.
![]()
This is a sponsored post brought to you by FrogTape. The opinions are completely my own based on my own experience.
![]()
I think it really turned out looking great. There’s really only so much you can do to improve the look of laminate covered particle board countertops, and with choices limited, this is a great option that should last for a while.
One thing I’ve heard is about the top coat being too shiny for some people. If you’d prefer a less shiny surface, but still want a two part epoxy durability, there’s an easy change. Apply the epoxy topcoat just the same, then sand it lightly with a 200 grit paper after it’s dried and cured fully. That will take away the gloss. Then, using a satin or low luster water based polyurethane, apply a final top coat with a foam brush or roller. That will give you the final and slightly lower gloss look you’re looking for without sacrificing on the durability.
We did something similar right when we bought our house, using some textured spray paint on our gross green counters. It’s now lasted for over 9 years and we’re just finally to the point where the chips are looking bad enough to do something about it.
http://www.oldtownhome.com/2011/11/3/Quick-Kitchen-Counter-Update—With-Textured-Spray-Paint/
Thanks for sharing your tip, Alex!
I would have used a sander to make it smoother it’s a little too lumpy for me. I’ve been painting my car with Rust-oleum and so far it’s coming out real nice. I’m surprised. I tried sanding by hand, but it was too hard. I’ve still got a few more coats to go, but I’m anticipating a great finish. Compared to how my car used to look … WHEW!
Great transformation and wonderful tutorial! I’ve been wanting to try this product for a while but just wasn’t sure until seeing your success. Thanks for the inspiration.
I suppose we can consider the horrible green marble formica kitchen house we looked at last weekend a little more now…. Thanks for sharing your experience!
Definitely, Kirstin! Anything cosmetic can be changed. It’s the location, size, style and having no major issues that matter! Good luck!
Those look really nice! I was wondering how well that product worked and how easy it was. While my counters at the farm aren’t horrible, they are 25 years old and aged. I like this solution. And you even used the color I thought about using. hmm, now just to convince the hubs. :o)
Cecilia – it really was easy to do (seriously – sanding is the hardest part and that’s not hard…I just complain about doing that part in every project! haha!). I do love the look and while I can’t testify about the extended life of the countertops or durability just yet, I’ve been using the countertop (putting tools and paint cans/etc. there) without any issues. I haven’t scratched or chipped it. It’s a nice hard finish. We will instruct our daughter to use a trivet and cutting board but it’s a really great product for getting more life out of it without having to replace anything.
The countertops are beautiful now! I was going to ask if you planned on paining the cabinets but looks like I don’t have to haha Can’t wait to see the final reveal 🙂
painting* haha whoops!
Absolutely wonderful job and an amazing product, Roeshel- xo Diana
Such a beautiful difference. I love the new look.
I actually won this product @Haven, but as you know I’ve already done my countertops. Waiting for just the right family member to share this with. 🙂
great job Roeshel!!!
gail
I’m so excited to use that stuff someday! It looks great!!!
–Katie
@ Creatively Living
WOW! Your Counter looks great! I have the same white counters in my kitchen and would Love Granite- but let’s be real. Not on the top of my needs! lol This looks like a great way to transform the counters! Thank you for the great step by step!
Jen
This looks awesome! Love the transformation. I’ve been wanting to try this out in my kitchen!
Pingback: DIY Project Parade and Highlights - DIY Show Off ™ - DIY Decorating and Home Improvement BlogDIY Show Off ™ – DIY Decorating and Home Improvement Blog
Pingback: DIY Apartment Kitchen Makeover - Before and After DIY Show Off ™ – DIY Decorating and Home Improvement Blog
Pingback: Rustoleum Cabinet Transformations {apartment progress} - DIY Show Off ™DIY Show Off ™ – DIY Decorating and Home Improvement Blog
Pingback: How to Paint and Stencil a Herringbone Accent WallDIY Show Off ™ – DIY Decorating and Home Improvement Blog
Pingback: my application for dirtiest jobs {rustoleum countertop transformations} - the space between
Your counter top is beautiful. Is it a real smooth finish or kinda rough?
Thanks, Gayle! It isn’t rough. It has a slightly textured feel to it but the finish is smooth. Hope that helps!
They look BEAUTIFUL! How have they held up so far? I’m SOOO interested in doing this, my kitchen is ridiculously dated, but the hubster is worried about it chipping and looking worse than it did. I say, hey, if it does, I’ll just buy a new, non-ugly laminate counter instead of the fake butcher-block that we have, but some feedback would be nice!
Thanks, Kelly. They’re in a rental, so I haven’t seen them for about six months. However I just asked and they seem to be pretty durable. I’ll keep you posted when I do see them about how they’re holding up. For us…nothing could look worse than the stained/scorched white counters before!
I tried to watch your video but it won’t play….it says it is “private”.
Thanks for the notice, Cathe. It’s Rustoleum’s video. There’s one on You Tube: http://www.youtube.com/watch?v=mnONl72We0g
Hope that helps!
How did it turn out on the unfinished edge? Our counters are really uneven and I was going to sand them down pretty far in some spots (the seams are lifting, so to even it out, I’ll probably be sanding some of the lino off of the edge), but I’m worried they will look weird or not stick properly.
It really does a nice job on the unfinished edge. Of course in this kitchen, it’s not visible, but the peeling laminate edges were just so gross and I had the same concerns. The Rustoleum Countertop Transformation really blends well.
Did this one kit cover your entire kitchen? Also, did you have some left over so that if it were a larger kitchen one kit could cover it?
Hi Leah,
There was definitely enough in the kit for a larger countertop. I think one kit would cover an average sized kitchen counter. It lists on the box how much it covers and since our counter was super small, there was a LOT left over.
I am wanting to use this on my rental home that I own in the kitchen. Now that it has been a few years how has it worn? I like the idea about being proactive with supplying a cutting board and trivet for my tenants. Is this kit the way to go or is there another process that will work?
Hi Carla!
Yes…this is still in great condition and definitely worth the effort. I do recommend removing the sink prior to starting. That’s the only area that has a little chipping because I didn’t remove the sink (completely my error). It doesn’t bother the tenant in the meantime. I would head over to do touchups if it did bother her. Overall, I am very satisfied with the product. It’s a bit of work/mess but compared to measurements, removal, re-installation and cost of something new, I’m happy with this choice. The stained/burned before was such an eye sore. Now it’s pretty…still! Supplying trivet/cutting board is a great idea/housewarming gift too! Good luck!
DO YOU HAVE ANY SAMPLES OF WHAT IT LOOKS LIKE FINISHED?
Samples? No. Just the photos. Sorry I can’t be more helpful. It is still holding up though!