DIY luggage rack and sprucing up the Guest Room

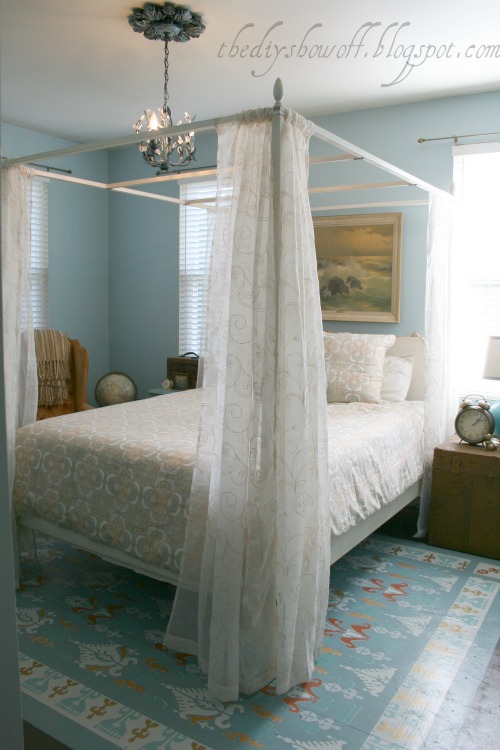
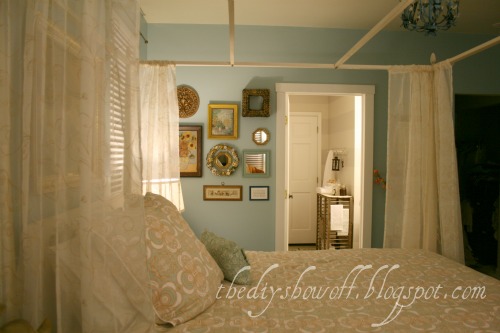
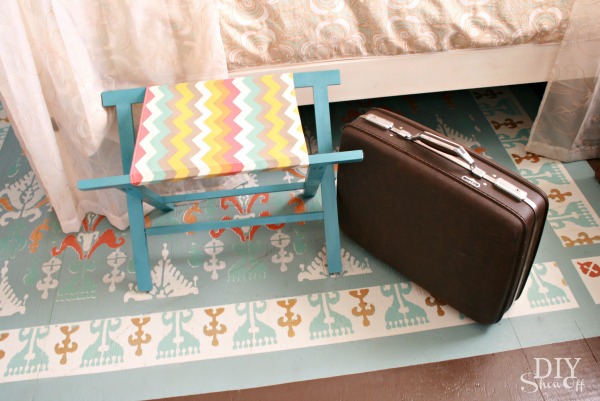
Lowe’s Creative Ideas challenge for November is sprucing up the guest room. So, it’s all ready for your visit! Pack a suitcase because I whipped up a pretty DIY luggage rack:

diy luggage rack 

Materials I used:

  • Three poplar 1in x 2in x 6 ft (they really measure 3/4 x 1-1/2 inch)
  • One 3/4 x 36 inch square dowel
  • 24″ by 16″ fabric
  • Twelve 1-1/4 inch pocket hole screws
  • Two 3-1/2 inch machine screws with washers/nuts
  • Valspar Spray Paint + Primer 

Tools I used:

  • Kreg Pocket Hole Jig
  • Saw
  • Sanding block
  • Iron
  • Sewing machine
  • Stapler

I cut the poplar and dowel as follows:

  • Two 25″ long pieces of poplar (tops)
  • Four 20″ long pieces of poplar (legs)
  • One 19″ dowel  (cross beam)
  • One 16″ dowel (cross beam)

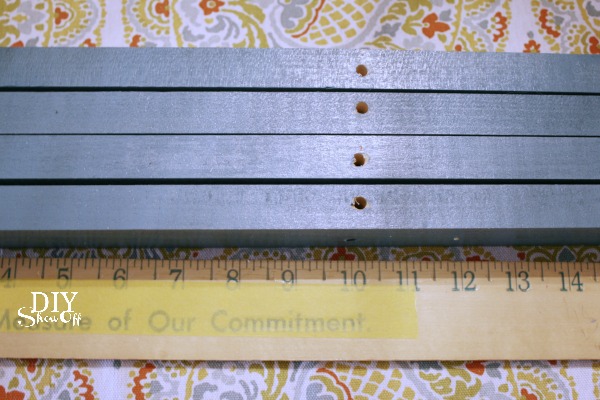
Next, I painted my wood pieces. (You may want to wait until you have frames assembled. I had to do paint touch ups after assembly because of pocket holes.)

Using my Kreg Jig I  drilled pocket holes into each of the four legs on the 2″ end (2 holes each) and each end of both dowel rods. 

DIY luggage rack tutorial

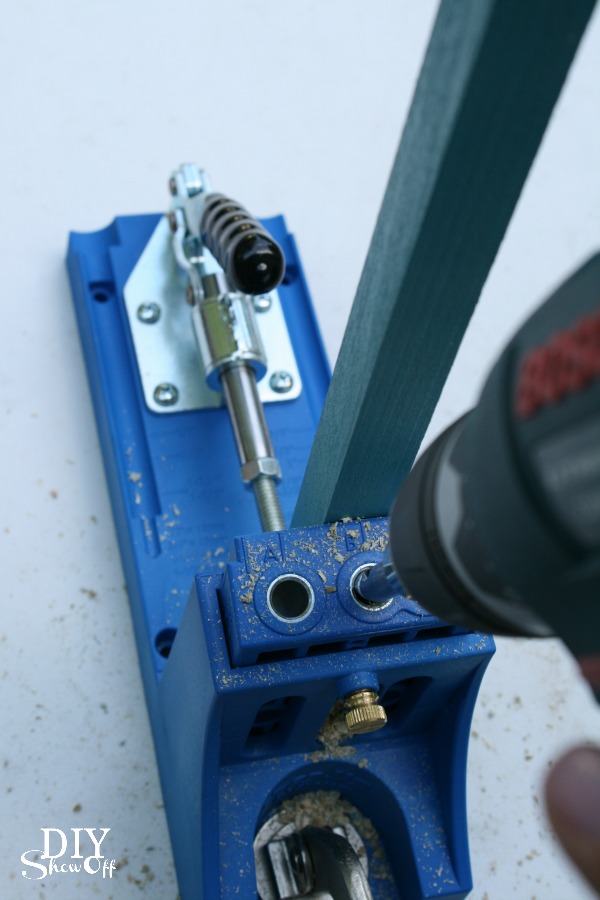
Drill a hole into the each leg piece in the center on the short side (10″ down).

DIY luggage rack tutorial

Outside frame: Attach one 20″ leg to the 25″ top using two screws as shown measuring in 1 1/2 inch. Repeat with the other side.

DIY luggage rack tutorial

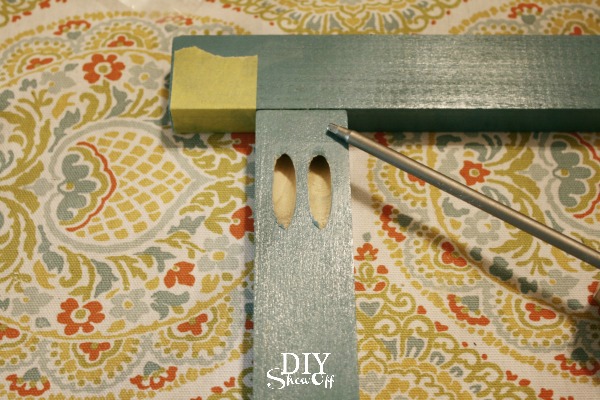
Then the dowel as shown.

DIY luggage rack tutorial

* My pocket holes are facing out. They’re more noticeable if they’re on the inside when the luggage rack is unfolded. 

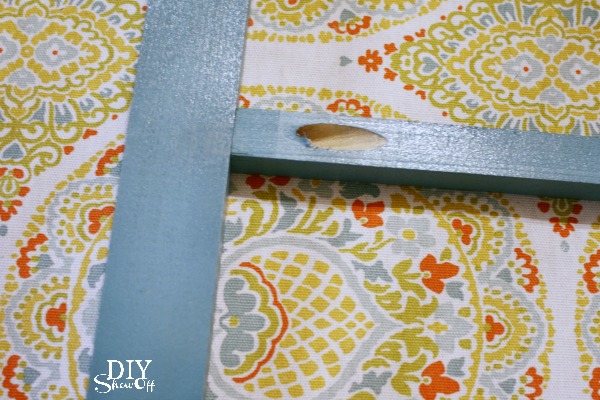
Repeat the above steps for the inside frame piece EXCEPT attach legs 3 inches in on the 25″ top piece (or lay out on top of inside frame and make sure one set of frame legs fits inside the other for folding).

*This is where I’d paint the frames instead of beforehand like I did. 

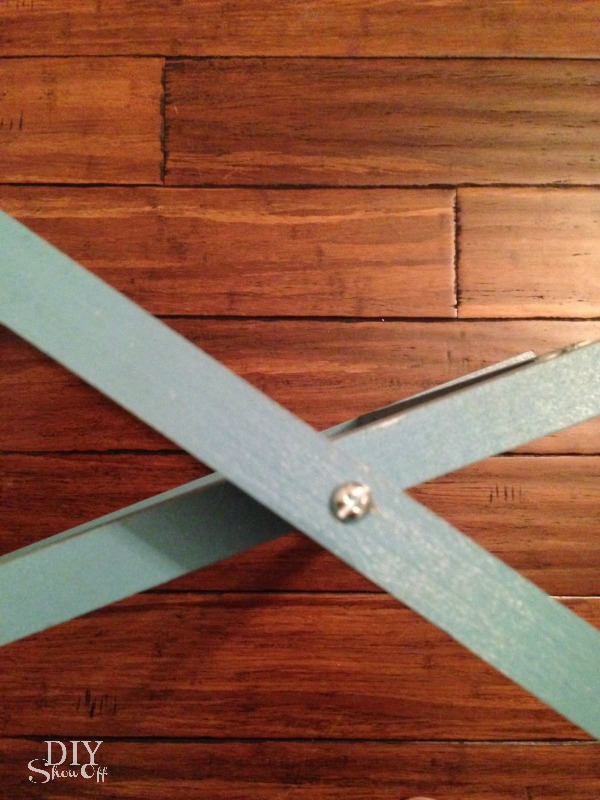
Now, cross (sort of tuck) the smaller frame into the larger frame above the dowel. You may need to loosen the larger frame’s dowel a little to get it to fit properly. 

Insert the 3 1/2 inch machine screw into the pre-drilled hole through both frame legs on each side. Secure with a nut on the inside. 

DIY luggage rack

Cut fabric rectangle measuring 24 x 16 inches. Fold, iron and hem all borders. (My seam allowance is 1 inch on the short ends, 1/2 inch on the long ends.)

DIY luggage rack

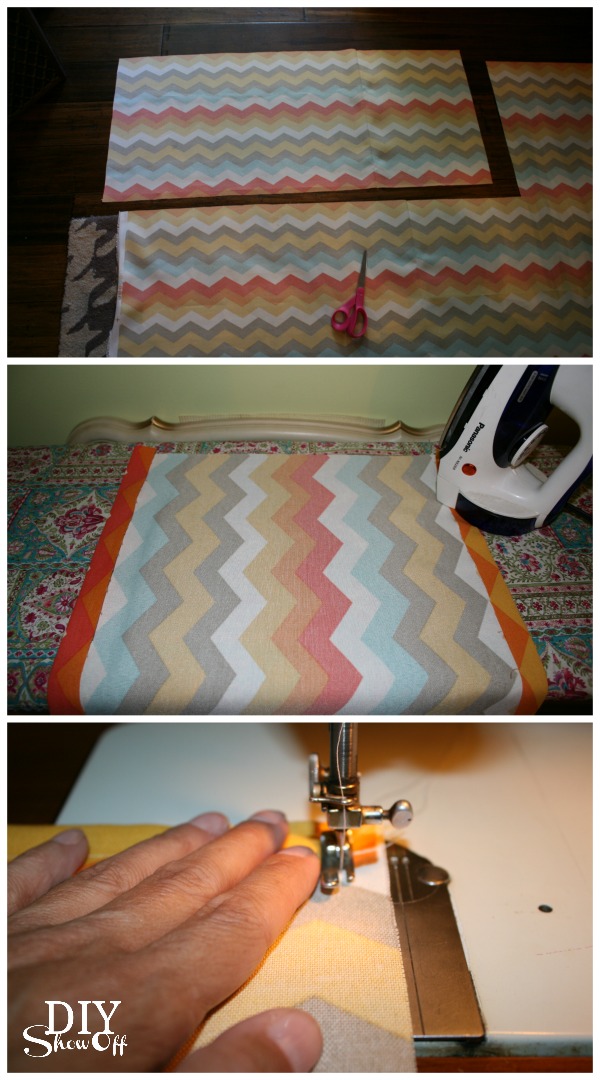
Staple short ends to under side of top frame pieces (between legs). 
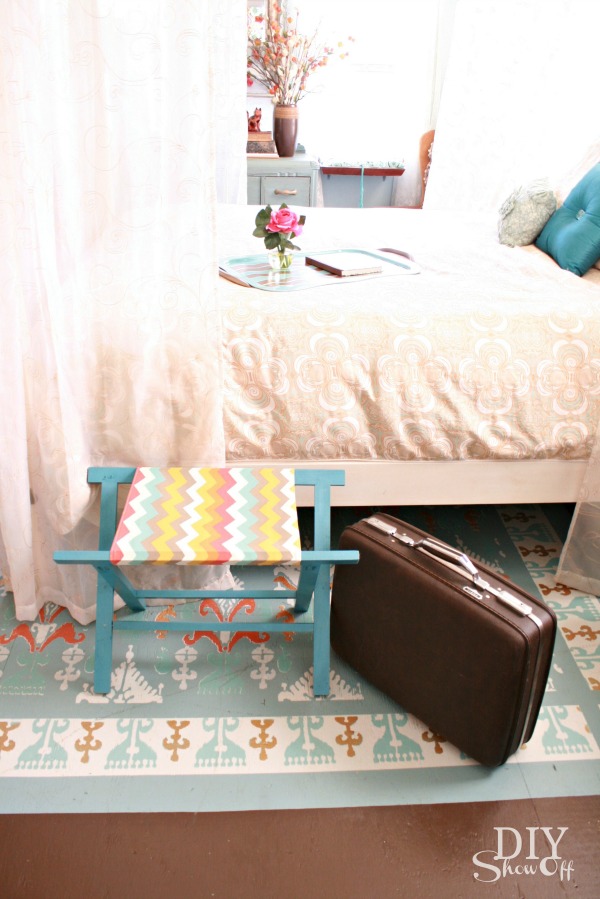
how to make a luggage rack

All done!

Open and guest ready:

diy luggage rack


foldable luggage rack tutorial

Folded and easily stored:

diy foldable luggage rack

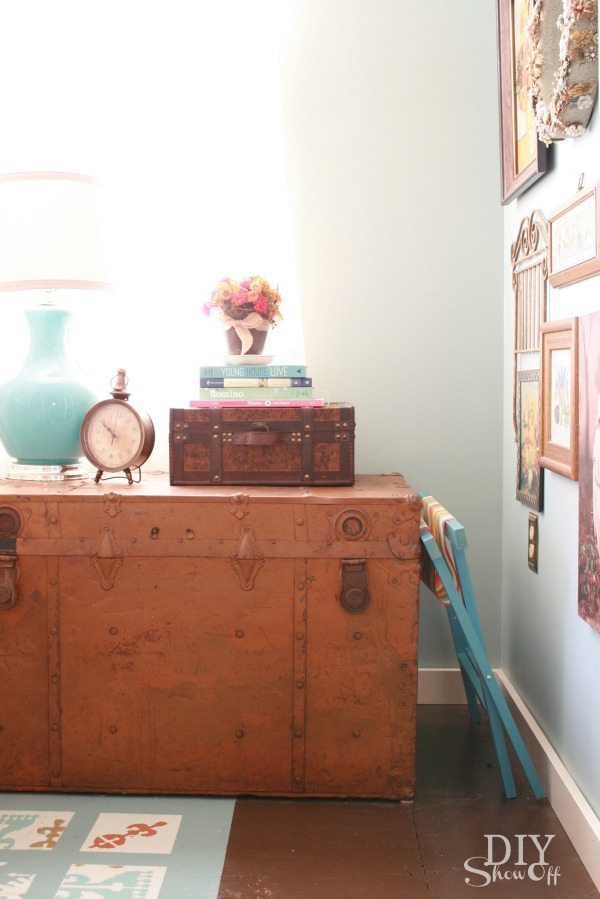
More ideas to be guest room ready:

Add…

  • a variety of magazines to the night stand
  • freshly laundered sheets and towels
  • a comfy throw blanket
  • tissues
  • fresh flowers
  • alarm clock
  • easy access to outlet for chargers
  • extra toiletries

See more fun DIY ideas at Lowe’s Creative Ideas, follow Lowe’s on InstagramPinterest and sign up for the Creative Ideas magazine and app! I’m SUPER EXCITED that THIS PROJECT will be featured in the Lowe’s Creative Ideas digital magazine! Be sure to get the app and check it out! 

Lowes-Creative-Ideas-Fall

*Disclaimer: As a member of the Lowe’s Creative Ideas Creators and Influencers network, I received a Lowe’s gift card to complete this project challenge, however the tutorial images, instructions and opinions are my own. 

DIY 2011 Recap Party

Happy New Year, DIY friends! 
Do you have the habit of looking at all that needs done with little regard to all that has been accomplished? Me too! Always looking ahead to what’s up next on transforming this old house. Who does that?  DIY crazed much? So, this time of year (here’s last year’s post), I love looking back to the year’s DIY and all that we finished up and tackled. Mr. DIY says we get tons done in odd years and that on even years, we’re allowed to sit around and be lazy. Um, he’d be wrong. This DIY girl isn’t going to let that happen! There’s so much to be done, I don’t know where to begin!  Let’s start with reflecting on 2011 for some DIY motivation.
Here is a recap of what went on (DIY and otherwise) at the DIY Show Off home in 2011 according to my picture files:
We adopted Lalka…
Kitchen cabinets were painted, marble backsplash installed, walls painted, new granite countertops and bamboo flooring.

Before/In progress

After:
How to Install a Tile Backsplash
Helloooo beautiful bamboo!
Pantry removed.

Before:

After, the fridge is closer to the work area instead of trying to run out the door…
Love this new-to-me piece of furniture:
Before…
Guest Bedroom Now…
Sitting Room Makeover
Before
After
Before
After
Dining Room Sliding Door 
Before
After…
{opened}
{closed}

Dressing Room Closet Before…

Bi-fold turned French Door tutorial…
 

Craft Room Before

Craft Room After (still tweaking)

Some favorite projects:
Shaw/HGTV Home Design Challenge…How to get this Beach Cottage Look
Whew – what a great year!
Let’s see a recap of your DIY productivity in 2011!  Link up, then visit the links for some motivation to get moving this year!

(Sorry I don’t have the code – the previous didn’t work…making/pasting code into wordpress is a little different so I’m working on it. Please copy/paste picture above and linkt to this post or just link to this post in your 2011 DIY Recap. Thanks!)

  1. Write a post about your top 2011 DIY Projects.
  2. Add the Looking Back button by copying/pasting the code shown above into your blog post.
  3. Leave a comment and visit some of the other links.
  4. If you noticed your link has disappeared, please edit your post to include the link back to this post and try linking again (double checking that you’re linking up a 2011 recap. Here’s the link:  https://diyshowoff.com/2012/01/diy-2011-recap-party.html
  5. Be sure to follow along on G+ or subscribe via email (right side bar) so you catch the latest at the DIY Show Off in 2012.
  6. Thanks so much for sharing your 2011 recap!

If you haven’t already, after linking here, visit and link up at these awesome parties too:  


Special thanks to YOU for making 2011 so much fun! Your support, encouragement and comments mean so much to me…for real. I look forward to us all having a productive 2012 and can’t wait to see what you have planned!  I also want to thank these companies for their support and amazing and super fun opportunities this past year and look forward to an opportunity to work with them again this year…


 Click below to see our participation with...  


Pin It