Meet: Amy from
greetings, DIY showoff readers! i’m so excited to be here since i’ve been an oogler of roeshel’s blog for quite a while now. i love the way, along with her own DIY journey, she promotes so many creative bloggers through her hugely popular site.
anywhoopla, i’m here today to toss out some ideas about the creative process. you know, the thingy you do in your head between having an idea and finishing a project.
oh, you don’t think you follow a process? hmmm. let’s talk about that a bit.
i have an interior design degree and, though i loved my major, i never was exposed to the creative process as i know it today. perhaps it was because i did not attend a “design school” and my major was housed with the other “girly” majors (i can say this b/c i’ve held two of those girly professions so zip it.). regardless, i recall being assigned a project and…uh…going to quarter beers on thursday night, watching jack and jennifer get back together on “days of our lives” and then pulling an all-nighter hanging in the studio with my design buddies, working to meet the deadline. i went straight at it with nary a crumpled paper on the floor to prove my planning. and, yes, i graduated.
in fact, i’m not sure i ever heard the word “brainstorm” until i returned to graduate school–after a few “eh” years in corporate interior design–to become a teacher .
 |
| brainstorm
|
in recent years, much of my training and research about teaching was based on processes to help each student tap into her creative side when approaching an assignment.
“just toss out a bunch of ideas even if they’re crazy or strange or silly or ridiculous. there is no such thing as a bad idea.”
“close your journal and walk away from the first draft. put some space and time between you and the words, then go back and reread it when you are fresh.”
“you can and should always edit, always make changes because nothing is perfect the first time.”
that’s a bit of what i’d say to my sixth grade students as i walked them through the writing process, hoping they’d understand that it’s messy yet malleable, flexible yet under their control.
sounding familiar to you? uh-huh. i sniff me a diy-er who dippin’ some toes in the creative process river.
am i wrong or is this process—the process of creating—not overtly exposed in this blogiverse of delectable “before and after” shots? of course, we love to hear the origin of the idea but, dude….really? c’mon. how’d miss diy design diva get there with THAT from waaaay the $#@! over there? …and why won’t she toss me a rope so i can climb to the creative summit on which she rests and hang with the cool diy cats?
oh? wait a sec, she’s going to share it? alrighty, then. get to it. i’m all ears.
 |
| (but is it a cat or a dog… or something else?) |
miss diy design diva:
“well, let me see if i remember this correctly. i believe i was sitting in my eclectic vintage ’60’s kitchen on my original eames chair–found on a brooklyn curb–eating my organic avocado/free-range turkey sandwich on gluten-free low-carb fat free bread with my husband, the head designer–and self-taught professional photographer–at schnockeral and sven. our cats, ernie and bert, were playfully tossing around one of the 128 catnip-stuffed felt mouse toys that i had crafted earlier that morning. suddenly, our yellow lab, scout, darted into the room and clamped down on bert’s neck like a shark scoring the leg of a surfer. ernie went limp, bert sprouted wings, flying to safety atop the fridge and i…. i…. i saw scout’s soft yellow fur gently intermingled with ernie’s calico patches… BAM!
yes. oh, yes. that’s when my new 12 pattern hand-printed silk-screened 100% organic cotton fabric line flashed before my very eyes.”
(i made that up. really, i swear. i’m weird creative that way. nooooo, it’s not from my interview with a famed diy blog queen.)
moving on.
does a design plan usually come to one in a “flash”of genius like the diva’s or is it more of a gathering little twigs in an effort to build a fire of an idea? it could be a bit of both but the consensus of the people who study this stuff agree that it’s more like the fire analogy. “they” have organized the creative process into the following steps:
simply stated, it’s not much different than the process i taught to 6th graders in expanding their writing. now that i’m painting furniture full-time, i also realized that i’m NOT using this process fully when i dive into each piece as is evident in my recent
flubs. let’s face it, when juggling 4+ projects that need to be squeezed into an hour here and twenty minutes there, the “process” can become lost in the… uh… process.
my recent process-less process….
STEP 1 “preparation”: choose a project and start the basic repairs to prep for the finish while you explore the details of the piece.
 |
| scary, right? |
STEP 2 “incubation”: this is where we are
supposed to be open-minded, explore the crazy ideas (hello,
donna at funky junk), ask the opinions of others, visualize the end result, ponder, poke, prod, peek around (hello, pinterest!), pour over colors….and document all of it so we see the ideas, make connections and don’t forget any of it along the way.
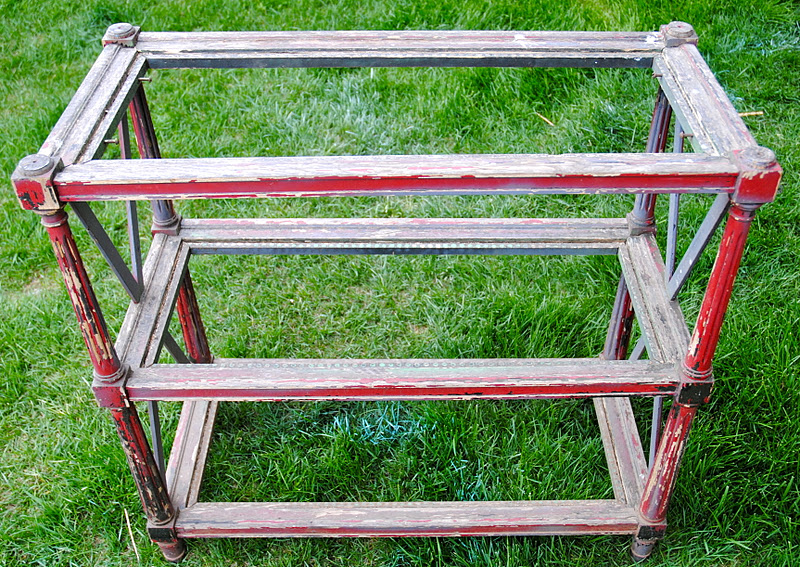
STEP 2 for me with the scary shelves was…. a whole lotta phooey. yep, this is where i swerved to the left in the process due to my lack of patience. i was like violet, the greedy blueberry girl in willy wonka’s chocolate factory…
i barely tasted the chocolate bar of “step 2: incubation” as i shoved it down my throat and popped open the paint cans. i didn’t explore and i didn’t document; i just raced to the finish with my golden ticket… paint cans and turned into a plump blueberry along the way.
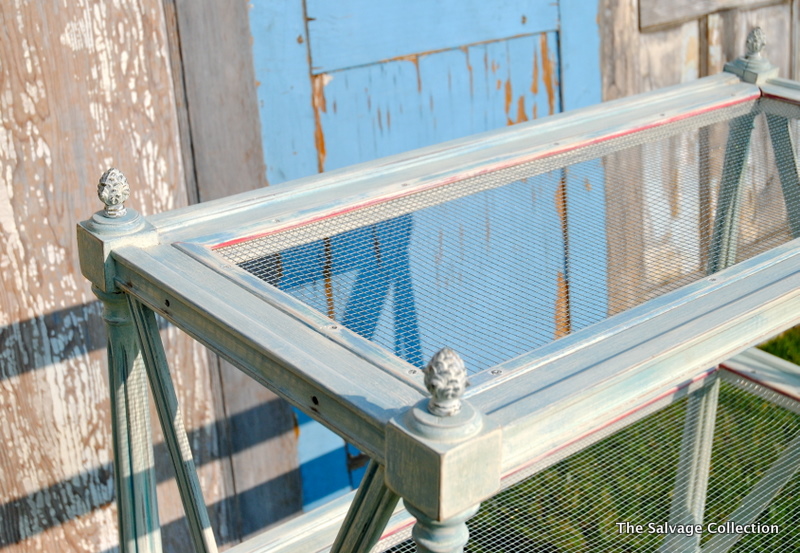
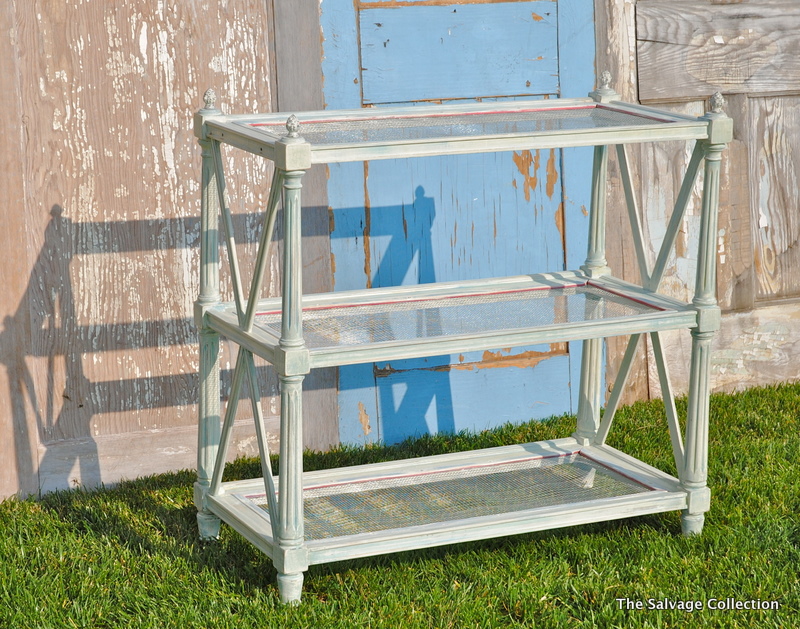
so, here is the result of speeding through the design process…
yes, it’s nice but…
just eh. whatev. after 263 hours, it’s not the “wow” that i wanted it to be because i went all “violet” and didn’t pause to explore ideas. currently, i’m using it as a punishing daily reminder of PATIENCE and PROCESS.
and what will i do in the future? in typical teacher fashion, i’ll be using one of my black and white composition books to write and sketch my ideas for each of the 4+ painting projects i am currently steering…
starting with two traditional school chairs that i plucked up for $10 each. yippeedoo!
care to join me as i document my way through the rest of the creative process to wow up these drib-drab chairs? i promise it won’t be boring…and the posts won’t be this long, either. hopefully…for your sake.
in the meantime, if you want to see more about the way successful people work together in the creative process, then check out this 2+ minute video of creative wizards at anthropologie staging window displays for earth day. note the sketchbook, peeps–part of THE PROCESS!
thanks, roeshel! hope i haven’t sent too many of your readers running for the hills….


 (600x450)")
 (2)")
")
")
 (2)")
") 3. I cut the drop cloth fabric into 22” x 22” squares, allowing for a 1” seam allowance around the border …
3. I cut the drop cloth fabric into 22” x 22” squares, allowing for a 1” seam allowance around the border … (2)") Here’s a tip that guarantees a straight line: cut a small slit in the drop cloth and then tear …
Here’s a tip that guarantees a straight line: cut a small slit in the drop cloth and then tear … (2)")
 (2)")
 (2)")
 (2)")
 (2)")
 (2)")
 (2)")
 (2)")
 (2)")
 (2)")
 (2)")
 (2)")
 (2)")
 (2)") … and the finished product …
… and the finished product … (2)")
 (2)")
 (2)")
 (2)")
 (2)")
 (2)") … is ready for dinner …
… is ready for dinner …


 .
. 


 Beautiful job, Lee!
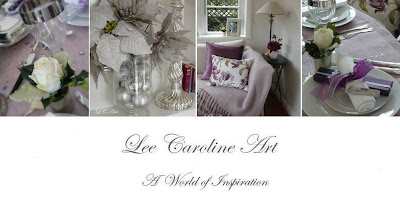


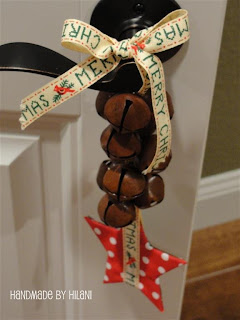 . So sweet! Thanks for sharing, Hilani!