How to Hang Heavy – using toggle bolts

There’s progress in the closet!  The coat hooks are hung in the closet with care in hopes that our guests have more options than flinging coats on the chair. 
Mr. DIY loves to make sure something is done right and not earthquakes or tough guys or gorillas could destroy his hard work.  So, thanks to our friends at True Value, each coat rack can support 500 lbs. and one coat rack boasts a 1000 lb. weight limit.  Cool, right?  There’s no way these babies are coming loose.  Here’s a little step by step on how to use toggle bolts to support your coat rack on a drywall wall without the use of studs.  For lighter objects where a nail isn’t enough but a toggle bolt is overkill, we follow this same process using plastic wall anchors.

Characters: 
Handyman….Mr. DIY
Photographer & Narrator…Me

1.  Using a level and a pen, mark the screw holes on the wall.

2.  Using a spade drill bit, drill the holes where marked.  We drilled two for each coat hook rack.

3.  Insert screw into coat hook front to back, and twist on toggle.  We used two on each.
This direction:
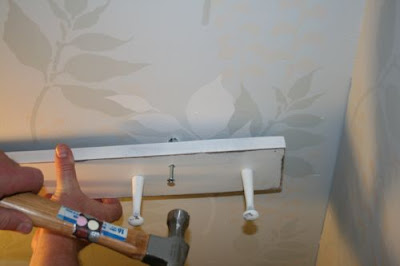
4.  Insert toggle bolt into holes in the drywall.  The toggle “wings” will fold forward in order to insert, then open once placed through the drywall hole. This spreads out the weight that the coat hook racks will hold.
5.  Tap with hammer. This helps to make sure the entire toggle part is all the way in and opens back up on the other side.
6.  Screw into the wall.
Easy and sturdy!
A little sneak peek of the closet in progress.  Don’t you love that mechanic’s light we found at an estate sale?  It sure comes in handy!
What’s left?
Light source
Baseboard Trim
Organizing
Completed:
Painting and distressing coat hook racks
Installing coat hooks
It almost makes one want to test the weight limit – rock wall climbing style, doesn’t it?  Okay, maybe that’s just me.  I can’t wait to have a place for guests to hang coats.  I have big plans but I also  have a bit of shoe and coat addiction so maybe not. 😉
In a quieter voice:  I’m narrating because if you put up a coat rack and it’s fancy on one side and your wife wants that side fac
ing up but you screw it in upside down, your language could be a bit interpreted a bit innapropriate for a lady. You take it all down (the toggle parts fall into the wall space) and repeat the above steps with the coat rack fancy side down AGAIN. Now the language is really inapproprite for ladies and small dogs and the neighbors. The fancy decorative side being upside down reminds me of a little bum in the design but I’ll just have to live with the litte bum for now.
*~*~*~*~*~*~*~*~*~*~*~*~*~*~*~*~*~*~*~
I was one of the bloggers selected by True Value to work on the DIY Squad. I have been compensated for my time commitment to the program as well as my writing about my experience. I have also been compensated for the materials needed for my DIY project. However, my opinions are entirely my own and I have not been paid to publish positive comments.

Jewelry Tree

Edit!  I’m showing off and linking up to:

I love when decor has a function, don’t you?  This DIY jewelry tree is pretty AND functional.  

Materials:
Rust XO spray paint in Antique Gold (sold at True Value)
.29 embroidery hoop from thrift store
free branches from the yard
How to:
1.  Snip off a few branches to a desired height.  I used 4. 
2.  Open embroidery hoop and squeeze branches in between wooden hoops.  Tighten to secure.  This is tricky but push them through with the ends sticking out the other side.  I didn’t cut them off the bottom at this point because having it up off the surface made painting a little easier. 

3.  I love this antique gold color by Rust XO Spray Paint and Primer in One!  Give everything a good coat of spray paint.  Just 1 good coat on from every angle is all you need!

4.  Snip off branches at bottom of hoop.  

5.  Secure branches into the hoop with hot glue.

6.  Hang necklaces!

Easy decor, pretty storage.  Now my daughter’s jewelry won’t be a tangled mess!  What do you think?


~*~*~*~*~*~*~*~*~*~*~*~*~*~*~*~*~*~*~
I was one of the bloggers selected by True Value to work on the DIY Squad. I have been compensated for my time commitment to the program as well as my writing about my experience. I have also been compensated for the materials needed for my DIY project. However, my opinions are entirely my own and I have not been paid to publish positive comments.
~*~*~*~*~
XO Rust

X-O Rust Paint & Primer In One
  • The only spray paint and primer in one.
  • Direct to metal application.  Works well with wood too!
  • New 360º spray technology for coverage at any angle.
  • New comfort tip offers wider coverage area.
  • Superior indoor/outdoor rust prevention.
  • Available in 31 colors!
  • Available in Flat, Satin and Gloss.

Little Stool Steps Up

We have this little step stool that we use to reach higher cupboards in the kitchen or quickly sit to put shoes on.  It’s sort of boring…
Always looking for a way to spruce things up and a fun DIY project, I decided to give it a little makeover.  I love the MiniCards at Moo.com.  You can personalize a template or upload a complete design for both sides – so many cool uses.  I think creating personalized gift tags would be cool too but I couldn’t resist this cute ready made design:


Aspa Gika

First, using my Dremel Multi-Max, I sanded the entire stool.  This tool is awesome.  If your projects involve a lot of sanding – this thing reaches where a palm sander can’t.  See how it gets in the cut out on the top and in the corners? Love it!


Next, using X-O Rust spray paint in flat black (available at True Value), I gave the entire stool 2 coats.  This is a Paint + Primer and the coverage was awesome!  I’m sold.  No clog.  Even spray. I sprayed the bottom and sides first and once that was dried, flipped and sprayed the topside and where needed on the sides.
Now the fun Moo part!  I first laid my Moo MiniCards in a pattern on the top.  I had to trim some of them, shorten others to make it work. Then I moved the template (exactly as laid out on the stool top) onto the table.
Working in sections on the top, I applied a decoupage medium using a Rockler foam brush:
Beginning in a corner, I began applying the Moo MiniCards, pressing down with my finger/nail until secure in the decoupage glue.  Continue.  The MiniCards easily slide around into place, allowing for adjusting as you go.
Once all of the cards were in place and the top was covered, I let it dry for about an hour. 
Then I covered the entire top and all of the MiniCards with a coat of decoupage glue, let dry for 1-2 hours and repeated with another coat and let that one dry over night. 
I wanted it to be a little distressed, so using my Norton Sanding Bug, I sanded the edges of the legs and around the top:
Wipe down.  Using Deft Clear Wood Finish in High Gloss, I gave it thorough spray on the bottom first, let dry, then the top and sides to help protect and seal everything:
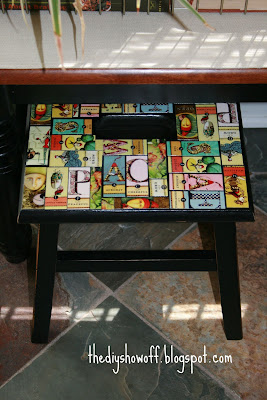
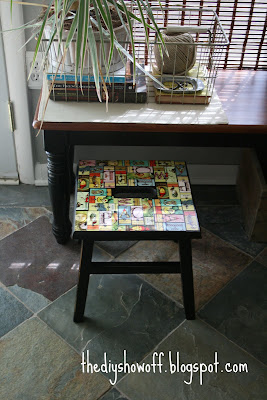
All done and we love it – Boring No More!  A little character now.  See the Deft High Gloss sheen?  It’s really not so glossy, but just perfect.

Here it is. This would be a fun project for ‘saving’ ruined tabletops/etc. too.  Or for decorating furniture for a nursery or playroom.  What do you think?  Moo + stool = milking cows?  We have a farmhouse but the barn is empty!  

Have an idea for a project (you’d qualify to enter the DIY Club Inc. contest too!) Use your own images/designs (just upload) or choose from the huge selection of ready made.
Need more incentive?  Moo is offering a 10% discount!
*~*~*~*~*~*~*~*~*~*~*~*~*~*~*~*~*~*~*~
I was one of the bloggers selected by True Value to work on the DIY Squad. I have been compensated for my time commitment to the program as well as my writing about my experience. I have also been compensated for the materials needed for my DIY project. However, my opinions are entirely my own and I have not been paid to publish positive comments.