DIY Holiday Highlights #5 through Christmas Day!

DIY Holiday Highlights #5 runs until Christmas Day. Looking for last minute ideas and inspiration? Check out the links. Have a holiday DIY related project or decor? Link up! 🙂

Hi! As you know, I’ve been busy painting floors and faucets in the bathroom, so I’m a little (okay ALOT) behind when it comes to Christmas DIY projects.

I know most of you have seen these next pictures but since my new table and living room have since been covered with junk while finishing up DIY projects, I want to see it again without the clutter. Motivation to get it some things done this week. And if that’s not motivation enough, I’m thrilled to participate in The Nester’s Christmas Tour of Homes & Hooked on Holiday Home Tours! I don’t have my home completely ready yet but I’m inspired to get busy!
Hooked on Holiday House Tours
and ‘=
All of the motivation and inspiration I need to make the time to put Christmas a the top of my priority list!


Our Tree


Ornaments Exchange (thanks Silvia!)


Can you spy the letter “B”?


a sneak peek at the stairs:
(Vinyl lettering I won from Holly at Live for Each Moment – I love it!)
Thanks Holly!!!

Entryway

Sneak peek of the stairs:

More DIY holiday projects that I love:

~*~*~
Christmas Swag Tutorial
at


Pretty Christmas Cloche at Percolating Projects


And a fun site:

Shareholidays.com focuses on economic but beautiful and unique holiday stationery choices. With Christmas right around the corner, our focus at the moment is on our online Santa letters (both to and from Santa), which can be created online in real time and shared with friends and family members. (Read mor
e about it
here.)

and I’m participating in

I'll be hosting FMM for a bit while Kasey takes a break! Spread the word & come back Monday!at AE Filkins. 🙂
~*~*~*~*~

Now…link up your inspiration. I love seeing your ideas and DIY holiday projects!

If you’d like to link YOUR DIY holiday project or even holiday decor for inspiration post to the party:
  1. You must use the button above (or html code on left side bar) and link to this post to share the linky love.
  2. Add your permalink (not your blog url, but your holiday project post url which is the web address that goes directly to your holiday project blog post, not your blog address). Feel free to link a Past Post, just invite your readers in a current post with a quick note.
  3. Or email your link to thediyshowoff@gmail.com and I will add it for you.
  4. If you notice your link has disappeared please check the content of your post. Is it holiday related? Add the link back to The DIY Show Off to your post today with a quick note to your readers about the party and try again! I love when everyone participates and readers check out everyone’s links, but I think the return favor of linking back is the nice thing to do so everyone plays fair and enjoys all of the projects and links. Links not related to DIY holiday projects or holiday decor for inspiration will be deleted.
  5. Please know that I haven’t had time to visit you and see your links but I plan to catch up with everyone this week since I’m off! I can’t wait to see what you’ve been up to and get some inspiration!!!

DIY Paper Ornaments

Cassity from Remodelalohic is hosting a 12-Days of Christmas paper crafts. Pop over to check it out the beautiful paper ornaments with tutorials!

Here is just a sample of one of her great projects:

Aren’t they fun?
They are so simple to make.
Flower Ornament
Cut 8 strips of card stock paper. 3/4 inch thick and about 4″ to 6″ long. It can be patterned or solid.
Take a quarter and trace 2 circles on card stock paper. This can be either the same or contrasting paper. Cut circles out. Set aside. ** You could make this more snazzy by embellishing the circles, with pretty things you have in your craft room, i.e. glitter, rhinestones, artificial flowers etc
Now grab a stapler, and loop paper strips like above and staple two ends together to create a teardrop loop. Repeat with all pieces.

Now take a small piece of ribbon and glue it to the side of a loop of paper.
Then loop the ribbon and glue that end down too.
Take a second loop and glue to first, so it resembles a heart.

Continue adding loops to circle with a little glue. Hold together with paper clips while glue sets.
    When flower is assembled, and glue is set, remove paper clips and add some glue to center, and place cut, embellished(optional) circle over the center of flower.

**I also tried a glued together option, which I don’t recommend, but they would be cute as little heart ornaments. I thought I would show you the image.

Modern Ornament
Our second ornament is just as easy.

Step 1: First you need 8 strips of paper. 2 at about 3-4 inches to begin and then 2 each of 5, 6, and 7 inches long. (this can be longer or shorter depending on desired size)

Step 2: you need a loop of ribbon.

Step 3: Glue ribbon in a loop to inside of shortest set of pieces and sandwich together.

Step 4: Stack the pieces in this order 7″,6″ 5″ sandwiched piece, 5″, 6″ 7″. Now take the end of your stacked pieces and staple together.
Step 5: Repeat on other end, after you hold all the ends together which will push out the longer pieces to form the shape. And you are done!

The longer the pieces the more the shape changes, you can also crease the center if you want.
My sources for these ideas are Flickr and Design Sponge.
Click on the links if you want to check them out.

Thanks for sharing Cassidy!

DIY Show & Tell – HOLIDAY FOOD Edition

I‘ve never had a food related post, but it’s about time, right? Especially with all of the holiday goodies I’ve seen floating around. Do you have a recipe for something special to eat this time of year? Do tell! I’m hosting Christmas for my family this year and I need some inspiration!


Brittany from Superwoman made these cute and yummy deserts:

Ice Cream Ornaments
—————————–
This one’s perfect if you have kiddos.
Supplies
————-
-Ice cream (I used vanilla)
-Sprinkles
-Twizzlers Pull N Peel
-Mini Resses peanut butter cups
-Wax paper
-Cookie sheet
Directions
————–
1. Lay out a sheet of wax paper on your cookie sheet.
2. Scoop some ice cream into a ball and place on your cookie sheet (try to make it as round as possible!)
3. Stick it in the freezer while you are getting the other parts ready.
4. Start making the tops. Unwrap a peanut butter cup and turn it upside down.
5. Make two holes on the top with a skewer.
6. Break off a piece of Twizzler and shove each end into the holes.
7. Pop those into the freezer also, to harden.
8. Once you have waited about 30 minutes, get the sprinkles set for your kids (or yourself!). Bring out the cookie sheet.
9. Let them go nuts!

10. Refreeze if you are using them for a party, or let everyone dig in right away! This is what ours looked like in the end:
Festive, right?

And check out these adorable little guys from Tiffany at La*T*Da!

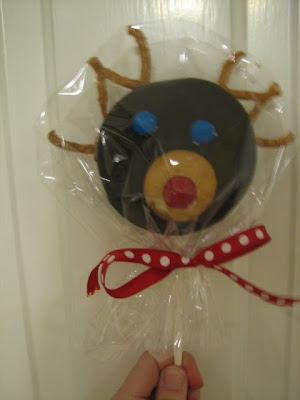
I buy my Moon Pies from the Cracker Barrel. If you don’t have a Cracker Barrel in your town, just drive a little further. You’re bound to come across one in just a few miles. 🙂

You’ll also need some Nilla Wafers that you will “glue” to the MoonPie with regular white icing (Betty Crocker, in the tub container).

I used these Atomic Fire Bombs from Cracker Barrel for Rudolph’s nose. But you could also use a red gumball or even an M & M (although I think that the b
igger nose it what makes it so cute).

Once you’ve assembled the face with the Nilla wafers, red nose, and M & Ms for eyes, you can serve it “as is”, or you can put it on a lollipop stick. I think they’re a little cuter on a stick.

For the “antlers”, I used Kroger brand pretzel twist. I simply broke off the top portion so that they were no longer connected. They don’t have to be perfect and the pair of antlers don’t even have to match. It’s kind of hard to break them off with your fingers, so if you are doing these for your own family, just bite them off! It’s much easier!

I then wrapped them in cellophane and added a bow.

Helpful hint: Let the icing dry completely before attempting to wrap the MoonPie in cellophane. The nose tends to come off if the icing isn’t completely dry.

Enjoy!

~*~*~*~*~*~
Now…it’s your turn. Link an old post or create a quick recap showcasing your hard work again…perhaps new readers haven’t seen it! Show it off!
In either case – please post the button/link back to The DIY Show Off. Share the link in a quick note on your post today so everyone can enjoy the DIY Show & Tell!

What is it? It’s always a surprise with a different theme and no specific date planned…just pops up out of the blue. I just knew you were looking for something to blog about today.
Show it off!

If you’d like to link YOUR DIY Holiday Recipe post to the party:
  1. You must use the button above and link to this post to share the linky love.
  2. Add your permalink (not your blog url, but your Show & Tell post url). Feel free to link a Past Post, just invite your readers in a current post with a quick note.
  3. Or email your link to thediyshowoff@gmail.com and I will add it for you.
  4. The party will run for a few days…so showing up fashionably late is acceptable. I will probably take tomorrow off from blogging so keep checking back for more links!
  5. If you notice your link has disappeared please add the link back to The DIY Show Off to your post today with a quick note to your readers about the party and try again! I love when everyone participates and readers check out everyone’s links, but I think the return favor of linking back is the nice thing to do so everyone plays fair and enjoys all of the projects and links. Also – this Show & Tell is for HOLIDAY RECIPES ONLY. Links not related to DIY recipes will be deleted.