Fabulous Furniture Makeovers

I love seeing great furniture rescued from Craig’s List or at local thrift shops and the amazing transformation from broken or trash to beautiful one of a kind display pieces, don’t you? Here are some great examples. You’ll want to click the links for helpful tricks and tutorials.

From Made Right Guide – inspiration for the creative and busy crafter:

before
during


happily ever after


By Rose Colored Glasses –

in progress

after – so fun!

and this one is so clever…beautiful and functional!

before
after

From Creating a Peaceful Home – what a transformation!

Before


After

and who doesn’t love how paint can perform magic?

before


after


From Dots Azule

before

after
Look at those details. Love the metallic finish. It’s so glamorous!

Thanks for sharing ladies!
If you have before/after furniture makeover you’d like me to add to this post – send me an email! I’d love to update it all day with MORE transformations!

And here are some I’ve received today – GORGEOUS!

From Wilma:
before
I love this beautiful after, don’t you?

Isn’t this one amazing from Welcome to Heardmont? A desk and a chair. LOVE them both!

before

Desk_Before

after

Desk_After_Magic

and the awesome chair

before

after – sitting pretty!

And check out this awesome transformation (desk to buffet table!) from A Lovely Place to Land

before

after ::insert ‘wow’ whistle sound effect::

And from The Little Green Bean which has so many cool DIY projects,

coffee table before


fabulous bench after

Decorating Obsessed

I can’t thank Ashley from Decorating Obsessed enough for sharing so many of her before and after DIY projects. I can’t decide which I love more. They’re all awesome. Here, see what I mean then click her button above to visit her blog – and see the rest of her beautiful home!

My Buffet

I have a couple of touch-ups to do, but other than that – my buffet is done! Now I just need to buy some white candles. 🙂 Before: After: Painting furniture is actually really easy. I have been painting furniture since I was a kid (Yes, seriously. I could never decide what color or pattern my dresser should be – so paint became my friend at an early age). The Process My best tip is to find furniture that is structurally in good condition, and the rest can be altered easily. I do a light sanding on whatever I’m painting (just rough it up), and then a thorough sanding to the top of the piece (that’s the area that usually receives the most wear). Once all the sand dust is off your furniture – paint away. I’m a no primer and no oil-based paint kind of girl myself. Oil-based paint definitely has it place, especially when painting tile, but other than that I would prefer something less smelly. Plus, latex is just so much easier to work with. Primer also does have it’s place. I would recommend using primer if you are going from black to white (or any other extreme changes), because it will save you time in the end. Paint anywhere you have to use a small brush first, then do whatever rolling is needed. Doing it the other way, can start altering your rolling pattern and look sloppy. Paint For the buffet, I used Glidden’s Black Onyx. This is the first time I’ve used Glidden, and I thought it covered wonderfully. My best tip for picking paint is to keep it all the same. No matter how many coats you do, at some point paint will chip – and you want to know exactly what you used, so you can just do touch ups, and not an entire new coat. This also makes it easier, when you find additional things to paint. That way there’s no confusion later on. Everything that is black is just one color. Finish There really isn’t a wrong answer for what type of finish to use. I personally prefer satin, because that’s the shine most store-bought furniture has. Her Entryway: The painting is done! Now I just need to clean the floors in there. Before: After:Bathroom Makeover: Well, it’s not 100% done, but it’s done for now. Here it is: Before:

After:


The wall color is Behr’s Grass Cloth.

Close Ups: The “before” hinges crack me up – it looks like they have little wings on them. I have the same hinges in the half bath – I can’t wait to get rid of them.

I finally have art for the bathroom. This was a Christmas present from my parents, and I absolutely love it.
Stairs Transformation: I had a simple plan for today – tear out the carpet on the hallway stairs. Then voila – hardwood floors to enjoy. Here’s what I didn’t know, when I started this project: – This carpet runner, is nothing but scraps. Each stair is its own piece of carpet, which equals 3 tac strips per step and at least 50 staples per stair. – While I pulled on some carpet to make sure the wood was okay, apparently the spot I looked at was a fluke – the wood is unfinished. – The unfinished wood is blessed with random paint spots all over it. So you can witness the joy: Because of the extreme amount of staples, each stair is taking about an hour to do. My hands are swollen and hurt to move – I am so done for the night. This is how far Brent and I got. So, the new plan (which hopefully includes having this mofo done by our housewarming party on the 21st): – Tear off the rest of the carpet and de-staple the stairs (Monday and Tuesday) – Sand the stairs – this will help the paint situation I have going on and it will also rough up the finished paint of the stairs (Wednesday) – Stain the stairs (Friday night) – Paint the back of the stairs white (Sunday) I have never stained anything before, and I have to admit that I’m slightly terrified. But I guess if it’s terrible, it can always be sanded done again. Overall, I think it turned out really well. Before: After:
My tips… – Spend the extra $10 and buy the conditioner. This helps limit the blotchiness that can happen while staining. – When staining and using the polyurethane – move quickly. Both these products change consistency quickly when they start to dry, making them more difficult to work with. Because of this, I felt more comfortable using a smaller brush, because I had more control of it – so I could be fast and not so sloppy. – Second coats doesn’t necessarily make things darker – time is the biggest factor. It’s better to do 1 15-minute coat instead of 2 10-minute coats. Projects for later… – Paint the handrail – Tear out the carpet in the hallway and stain away.

Great job on EVERYthing Ashley and thanks so much for sharing! First, how cute are those dogs?! I love the way the painted doors brighten up the entryway. The stairs look amazing! The bathroom is GORGEOUS. The color and accessories are so fun. The buffet is stunning!

This post is brought to you by Simply Radiators, horizontal and vertical radiators at great prices.

Creative Ideas from Dwellings by Devore

I am so inspired when someone shares amazing DIY creativity. Check out these transformations by Bethany at

Glass Lamps

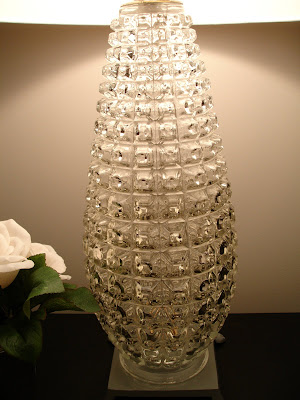
I just realized I have been doing a lot of posts on lighting recently, but I think lighting makes all the difference in a room. It’s crazy how these lamps came together. I found these two glass vase-like things at the Goodwill for $2.99. They definitely caught my eye and the fact that they were a pair was even better! I’m really not sure what they are, but would love to find out. Any ideas? They have a fairly large whole in the bottom and a smaller opening at the top. I started thinking about all the wonderful things I could do with them and decided they would make nice lamps for our master bedroom.

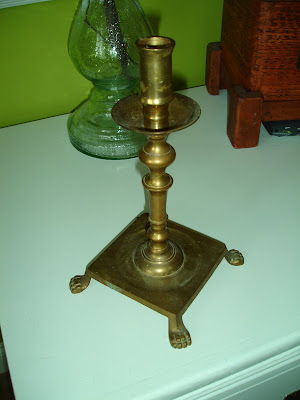
I had to come up with a way to elevate the base so that the cord wouldn’t cause them to sit unevenly. So, I found these two candlesticks at the Goodwill for $1.99 (they were actually at two different Goodwills, believe it or not) I unscrewed the candlestick, leaving only the base. The base had nice feet on the corners leaving an open space on the bottom of it, just what I needed! Then, I primed it (to make sure the paint would adhere) and sprayed it with Valspar Gloss Gray Spray paint.
Unfortunately I don’t have a picture of the next thing I bought because I totally forgot to take one. Instead of purchasing a light kit from Lowe’s for about $10 I chose to take the cheaper route and buy a couple of lamps from the Goodwill for a couple dollars. I plugged them in and asked for a lightbulb to test them out with to make sure everything was in good working order before I bought them. This step saved me over $15! If you want your cords to match you can actually buy just the cord at Lowe’s for about $5. However, I decided to be cheap resourceful and buy two $0.99 extension cords and just cut the “plug in” part (not sure what that’s called) off the end of it. Then all you do is strip the outer plastic layer off so you are left with just the bare wires. Putting the lamp back together is pretty easy, you basically just put it together the same way you took it apart. The lamp shades were another great bargain at $2.99/each! (got those from Ross) So, here is the finished product!

I just love the detail on the glass. I think it’s so unique.
Cabinet Makeover

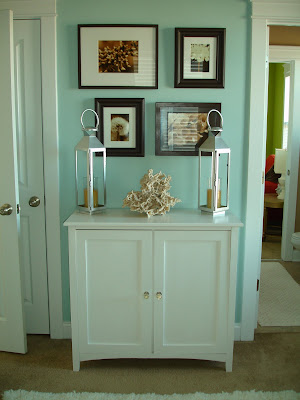
I found this cabinet at the Goodwill for $29. It still had the sticker on it from Homegoods and it was in like new condition. The finish on it actually wasn’t too bad just not my style. So I gave it a coat of white paint that I had leftover in the garage and found a new home for it in our guest bedroom. These lanterns also needed a little update. They had been on our front porch for a while and the weather had taken a toll on them. So they got a coat of silver metallic spray paint and joined the cabinet in the guest bedroom.

I got these knobs from Hobby Lobby. They have, by far, the best selection of knobs and drawer pulls that I have seen and they are great prices! If you wait it out, they usually go on sale for 50%. I have seen very similar ones at Anthropology for three times as much.

Coffee Table Bench

I made this bench for my mom for a C
hristmas present. I wish I had taken a before picture but unfortunately I forgot so you’ll just have to use your imagination, picture dark brown and kind of beat up. This was actually an old coffee table before. I found it for only $5 at the thrift store! At the time I wasn’t sure what I was going to do with it (like most of the things I buy), but it was only $5 and that was too good of a deal to pass up! You could do this to any coffee table to add some extra seating in your living room. All I did was attach some two inch foam, batting, and material to a piece of 5/16 inch OSB board using a staple gun. Then I drilled some holes through the top of the table and screwed the upholstered piece into place. Here it is in my mom’s bedroom.
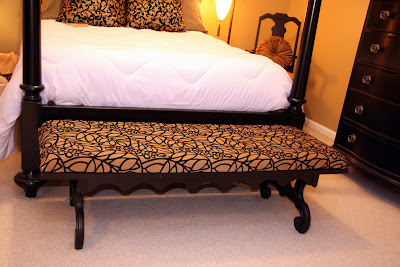
It’s hard to tell from the picture but the legs had really cool detailing on them…

Desk Makeover

Ok, I have finally finished the desk I have been working on. I found this desk for a great deal at the Goodwill. I thought someone had already bought it when I first saw it, but when I asked about it up front she said the lady couldn’t fit it in her car so she didn’t buy it. I was so excited! It was meant to be! I think I am going to sell this as well, seeing as how I have absolutley nowhere to put it.

These knobs are from Hobby Lobby. As I have said before they have the best, most unique knobs at the best prices. The only problem is they have so many great ones, which makes it very hard to decide. I finally settled on these white ceramic roses.