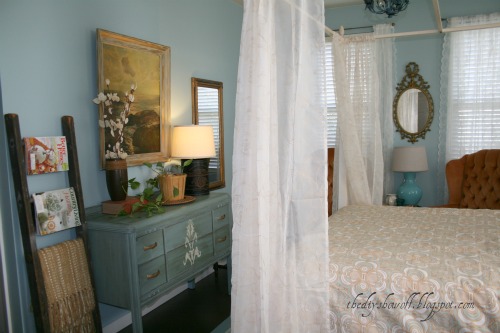
Well, that’s a long post title but I wanted to get it all up there! I’d hate for you to miss anything! I’ve finally finished up the guest room completely (I’m writing this ahead of time but at the time of this post, guests will be calling this their room for a few days). This week, I’m seriously thinking of making it my winter master bedroom. It’s so pretty now and it sits directly above the wood burner. Cozy! Spy something new in the photo below?
buffet turned dresser

(before)

(before)
As you’ll maybe recall, the old furniture fairy gave me a visit. I recently scored a bunch of old furniture from my brother when he cleaned out his basement and I offered to “store” everything. Did you know that our barn accepts donations? Yep. I rescued the buffet and turned it into a guest room dresser. (We do have a dresser that serves as a buffet in our dining room, so why not?!) I needed something for the long stretch of wall, the buffet was the perfect size.
Ever wonder how easy it is to paint things using a paint sprayer? Well, Wagner asked me to review the Power Painter Max. I was so excited, I couldn’t say yes fast enough especially when they generously offered up 2 for DIY Show Off readers! You know what? It does make painting super fast. The EZ Tilt unique flex tube draws paint from any angle. What does that mean? It means that when you tilt the paint sprayer, if the paint is running low, it won’t sputter because it follows the paint in reserve. There’s a bit of a learning curve and I think with practice, I’ll definitely get better but honestly, the results were gorgeous for a first time furniture rescue. I used the left over True Value Easy Care paint (color is “ticker tape”) I had from painting the floor. I love that color, a pretty bird’s egg blue. Take a look at the process to see the Wagner Power Paint Max in action (me in action too), stenciling, how to glaze and updating hardware in this short video I put together (warning – I had YouTube add music since the sprayer is noisy!):
Tips for the Power Paint Max:
- Have a brush on hand. With first time use, I did experience some sputtering/spitting because I didn’t know the paint reserve was empty. Just brush out imperfections and resume smooth spraying finish.
- Stand back! Standing too close will mean a very thick coat of paint that might drip – coverage is amazing!
Clean up was super easy – just involves taking apart the sprayer and cleaning it with water.
I‘m looking forward to my next furniture painting project. I have a lot to choose from in the barn but my spray paint booth (just plastic drop clothes is set up in the barn and it’s weather permitting – it’s cold out there right now!). The power of paint is just so “magical”! The before and after transformation amazes me. The Power Painter Max makes it an easy and quick DIY project.
THE GIVEAWAY IS NOW CLOSED.
Now onto the giveaways x 2! You can see more about the Wagner Power Painter Max (MSRP $159.99) at
How to Enter Both Giveaways:
(open to U.S. residents only)
Wagner Power Painter Max Giveaway #1
- Leave a comment on this post telling me about your paint projects and why a Wagner Power Painter Max is on your wish list. 1 ENTRY.
- Share the giveaway via Facebook, twitter or blog post and comment here that you’ve done so. Remind friends to tell me you sent them! 1 ENTRY.
- Subscribe to the DIY Show Off. Let me know in a comment. 1 ENTRY.
- Giveaway ends Sunday, November 6th at midnight EST. Winner will be chosen via random.org and announced shortly after.
Wagner Power Painter Max Giveaway #2
- Like the DIY Show Off at http://www.facebook.com/pages/The-DIY-Show-Off/195248467209043. Comment that you “like” the DIY Show Off on Facebook here. 1 ENTRY
- Go snap a picture of that pile of furniture in the garage or damaged scratched up furniture you’d love to transform – Upload a picture to the DIY Show Off Facebook wall showing your next DIY project in desperate need of a Wagner Power Painter Max. 1 ENTRY
- Giveaway ends Sunday, November 6th at midnight EST. Winner will be chosen from the wall photos submitted by me according to most creative picture, request and most sad project in need of desperate DIY lovin’. Show off your ugly project!
Let’s see what y
ou’ve been up to this past week!
ou’ve been up to this past week!
1. You must use the button above (ADD BUTTON HTML CODE FROM SIDE BAR TO YOUR POST) and link to this post to share the linky love.
2.Include your name or blog name and project title. Add your permalink (not your blog url, but your DIY project post url). Feel free to link a Past Post, just invite your readers in a current post with a quick note.
3.Or email your link to thediyshowoff@gmail.com and I will add it for you.
4.If you notice your link has disappeared -please add the link back to The DIY Show Off to your post today, a button or a quick note to your readers about the party and try again! I love when everyone participates and readers check out everyone’s links, but I think the return favor of linking back is the nice thing to do so everyone plays fair and enjoys all of the projects and links. Also – this blog party is for DIY projects only. Links not related to DIY will be deleted.
5. If reading this in an email, pop over to http://thediyshowoff.blogspot.com to see the inspiring DIY projects linked up!
5. If reading this in an email, pop over to http://thediyshowoff.blogspot.com to see the inspiring DIY projects linked up!
6. NOW you can “like” the links! What a fun idea! Most liked links may be included in a post of DIY Project Parade highlights later in the week!
I was one of the bloggers selected by True Value to work on the DIY Squad. I have been compensated for my time commitment to the program as well as my writing about my experience. I have also been compensated for the materials needed for my DIY project. However, my opinions are entirely my own and I have not been paid to publish positive comments.
~*~*~*~*~


