Earthy Essentials Party Time!

It’s time for the 
Here at The DIY Show Off, I am hosting the Earthy Essentials linky party as a part of the DIY Club Anniversary Celebration! That means all things canvas, burlap, linen, twine, rope and jute related!  I’ve seen some amazing projects out there using these materials! 
I‘ll be sharing and featuring some Earthy Essential DIY tutorials linked below as well as a few of my own DIY projects using earthy elements over the next two weeks.  Taking a look back, here are a few I’ve shared…
One lucky Earthy Essentials party participant at The DIY Show Off will win a fabulous prize pack from the generous folks at Canvas Corp. – so many fun products to spark creativity and a blog full of TONS of crafty inspiration. 
Psst. Guess what! There’s a Canvas Corp. Burlap Party going on as well!
Here are the items in the Canvas Corp. Earthy Essentials Prize Package valued at $95! Imagine adding this awesome selection to your craft stash:

Stretched Canvas 2″x2″ {2}
Stretched Canvas 4″x4″ {2}
Stretched Canvas 12″x12″ {1}
Stretched Burlap 2″x2″ {2}
Stretched Burlap 6″x6″ {1}
Mini Canvas Triangles {3}
Mini Canvas Tags {3}
Mini Canvas Heart {3}
Mini Canvas Round {3}
Mini Canvas Diamond {3}
Mini Canvas Star {3}
Canvas Round {5}
Canvas Rectangle {3}
Burlap Triangle {3}
Burlap Tag {2}
Mini Burlap Square {3}
Mini Burlap Round {3}
Mini Burlap Heart {3}
Mini Burlap Star {3}
Mini Burlap tag {3}
Mini Burlap Triangle {3}
Mini Clothespins black {1pk}
Mini Clothespins red {1pk}
Clothespins white {1pk}
Jute Rope
Jute Rope Light Natural

The DIY Show Off

Party Details:
DATES: Party is open April 16-30, 2011.

TO ENTER: Link up as many of your own new or old BURLAP, CANVAS, LINEN, JUTE AND TWINE DIY related posts using the linky below.

ELIGIBILITY TO WIN OR BE FEATURED:  Be a follower and include the Earthy Essentials party button in each linked post. 

PRIZE: 1 randomly drawn winner will be selected from the eligible posts to receive the Canvas Corp. prize package (shown above).

***This linky is for projects using ONLY the following materials:  CANVAS, BURLAP, LINEN, TWINE, JUTE.  See you Sunday for the DIY Project Parade – open to all DIY projects. If you notice your link has been deleted – check to be sure you’re linking to the correct party. This linky is for Earthy Essentials ONLY.  🙂 Link DIY projects not related to Earthy Essentials to the DIY Project Parade.  

~*~*~*~

This party is only 1 of 4 celebrating the 1 year anniversary of The DIY Club. Check out the daily giveaways at The DIY Club site and link up to the other 3 parties hosted by my fellow DIY Club friends…

DIY Burlap & Starfish Wreath

Easy DIY Burlap & Starfish Wreath

Materials:
1 – 8 inch straw wreath (plastic wrap intact)
Approx. 1/2 yard of burlap
1 Starfish
1 Piece of Ribbon (approx. 36″)
Gorilla Glue
Gorilla Super Glue

Tools:
Scissors
Phillips Head Screwdriver

Step 1:  Cut burlap into 4″ squares.  Perfection not required!

Step 2:  Using the screwdriver, make a pilot hole into the plastic-wrap covered straw wreath.

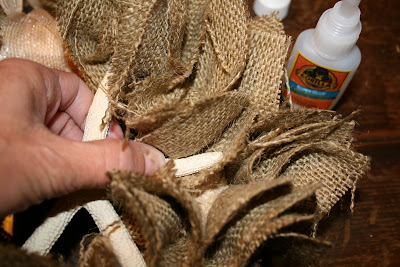
Step 3:  Add a dab of Gorilla Glue into the hole.  This will expand and keep the burlap in place.

Step 4:  Fold a burlap square into 4s (in half and in half again)

Step 5:  Place burlap corner (without an open end) on top of the pilot hole and using the screwdriver, push into the hole and twist. Repeat until the wreath is covered on the front and outer edge, leaving an open area for ribbon/to hang the wreath.

Step 6:  Determine where starfish will go and apply Gorilla Super Glue to the backside of the starfish that will touch the wreath.  Apply pressure and hold for a minute until secure.

Step 7:  Tie the ribbon around the non-burlap part of the wreath.

Step 8:   All done.  Fluff.  Tie into a bow and hang.

Other Options:  Personalize a wreath for any occasion the same technique with different fabrics and embellishments.

See more awesome burlap projects at

Update – More Jute & Burlap DIY Collection

If you have a project – email me and I’ll include your photo/link in this post full of inspiration!
Something about jute, hemp and burlap appeals to me.
You love it too, don’t you?

I
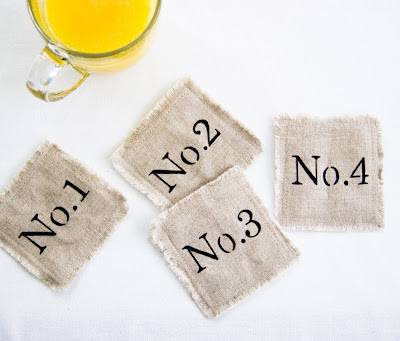
love these burlap numbered placemats made by Courtney from
Project Pretty
AND she did an easy to follow tutorial! She’d love for you to stop by and say “hi”. Tell her congratulations too! She just moved back home to Maine and is sharing beautiful countryside autumn photos. Here is her post:

All you need is burlap, a sharpie marker, some printed numbers, and an X-acto knife. I just so happened to have all those materials laying around my house from previous projects, so it didn’t cost me a cent!

Step 1: Print out desired numbers in a stencil font (if your ink is low, it’ll look like mine):

Step 2: Cut out the numbers with an X-acto knife. I placed a piece of cardboard behind the paper so I wouldn’t scratch up anything else.. that happens enough around here! 🙂

Step 3: Use a placemat you already have as a guide to cut out pieces of burlap for your new mats. Tip: cut along the threads of the burlap for an even, straight, & less-fraying placemat.

Step 4: Lay the paper stencil on top of the burlap and trace the outline with a Sharpie. Then, remove the stencil and fill in the middle with the marker. {You can also just leave the outlines.. I was tempted, but decided to go with the full-coverage option 😉 }

When you’re finished, it should look like this:


To secure the edges, sew a small line about 1/4″ from the edge with a similar, tan-colored thread. Then, lay them on your table and do your happy dance!


Such a cheap & chic fix for a boring tabletop. I couldn’t help thinking that this would be a genius idea for a big family like the Dugars- each kid would have a number! We have friends with 13 kids, and when they need to make sure everyone’s there, they count off by birth order. Numbered placemats just seem perfect, eh? 🙂

Or, of course.. it could just be the two of you (like us) & you’ll love it just as much!


Thanks Courtney!

Did you notice the new button?

I‘ve been out on a DIY Hunt and want to give a shout out to these awesome DIY-ers too! Click the link for more on details on each project and to visit the creative genius behind the photo.

La*T*DaEvery Day Chaos

0000tut0

Craft Monkey

Pretty Project
Burlap Love at The Lettered Cottage
(Click the link to see Layla’s burlap projects. Don’t you just love her style? ::sigh::)

Room to Inspire
Lotsa burlap eye candy at A Beach Cottage
(You’ll have to stay a while and hunt for her beautiful burlap touches,
but I promise you – you’re not going to mind!)

IMG_0924

Cawfee Stained

Southern Hospitality Blog

Pickles and Cheese

Burlap Art 020

Savor the Small Things

A close-up:

Shanty 2 Chic

Shanty 2 Chic

Brenda came up with this creative idea:
https://mail.google.com/mail/?ui=2&ik=a5e03674e0&view=att&th=12446d7a884e213e&attid=0.1&disp=inline&realattid=f_g0oog53p0&zw

~~~~~~~~~~~~~~~~
A Burlap Stamping Stenciling Tutorial from
Sanctuary Art


~~~~~~~~~~~~~~~~~~

I know I’ve seen more fantastic projects using burlap and jute …but I apologize for running on a tight schedule today. I need your help! If you have a DIY burlap, jute or hemp project or you’ve seen one, email me the link and I’ll add your photos to this post! I’m inspired. I’m getting burlap today. I‘d love to see your ideas! I WILL UPDATE THIS POST ALL WEEKEND. 🙂

*If you are featured here today – be sure to grab this button for your side bar and link to your feature. Go ahead…brag a little! 😉

I’m linking up to the Hooked on Fridays party.
Head over and check out all of the links!