HAPPY NEW YEAR, DIY SHOW OFF FRIENDS! 2011 was awesome and wishing you an even better 2012. Welcome to the First DIY Project Parade of 2012!
12 foot curtain rods are expensive! I love the look of our new affordable DIY curtain rod made from pipe and fittings:
I knew True Value would stock the materials I needed:
2 – 6′ galvanized steel pipes (True Value will cut/thread the ends to any size)
3 galvanized 1/2″ flanges
3 galvanized 1/2″ tee fittings
3 1/2″ connectors {nipples}
Drywall screws
2 finials and 1 wine cork
Tools:
Stud finder
Drill
Screw driver
Level
I gave all of my pieces a coat of Krylon‘s hammered metal:
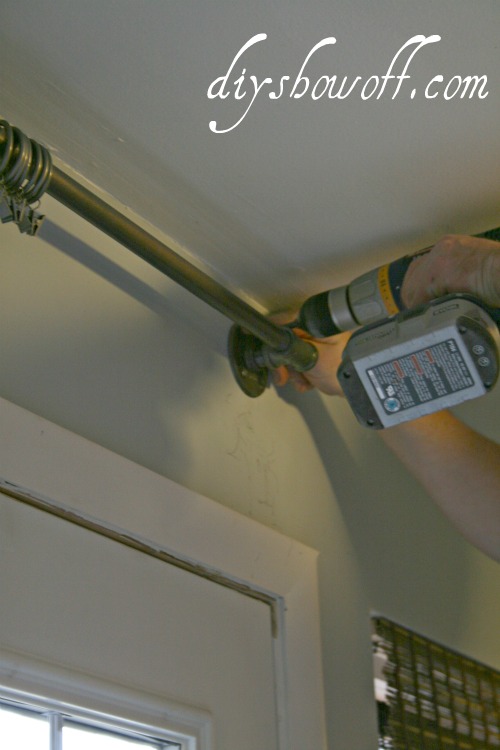
1. Find and mark studs. Measure/mark the height you’d like the curtain rod to hang (not my hairy arm!).
2. Attach “tee” to flange using nipple. Do this for all three pieces.
3. and 4. Slide on curtain rings onto pipe at this stage. Tip: Keep curtain rings clipped to plastic casing they came with or clipped to index card or piece of cardboard to help keep them in place during installation (not shown). Attach two flange sets to the ends of a pipe.
5. Hold pipe with flanges on each end up to the wall, mark holes for screws (use a level to make sure rod hangs straight) by starting a hole with a spade bit or nail (hammer lightly).
6. Four screws to each flange.
7. Attach last flange set to remaining pipe.
8. Slide on more curtain rings (I use 7 for each curtain panel).
9. Screw one end of pipe into the tee that’s secured to the wall.
10. Twist flange so it’s flush to the wall.
Note: The installation process will scuff your walls…you’ll need to touch up.
11. Repeat steps 5 and 6 for the other end.
12. Choose 2 finials that fit in your space and match your style. I spray painted mine to match the pipes.
13. Cut a piece of a wine cork in half.
14. Shave down the sides. (Make 2 pieces, one for each end of the pipe.)
15. Push a piece of the cork into the end of the pipe.
16. Screw the finial into place into the cork.
Done and ready for curtains!
I love the industrial look. {No Sew Drop Cloth Script Curtain Tutorial here}
More photos of the sitting room “Christmas un-decorated” coming up! 🙂


What a great idea! I like the industrial look 🙂
Wishing you the happiest of Happy New Year’s Roeshel!
Thank you so very much for all your support and encouragement in 2011. I’m looking forward to expanding on our blog friendship in 2012.
Oh, and I’m going to pin your tutorial because it’s exactly what I need to do when I make over my family room later this year!
Linda
Happy New Year! Thanks for hosting. Wishing you all the best in 2012.
Wow, wow, wow!!! This s so great!! I’ve got a HUGE window that I need to cover and this will totally do it!!! Thanks!!!
Oops! Sorry Roeshel! I linked before I looked. I thought this was the look back. You can delete my links. I’ll come back Sunday.
Great curtain rod Roeshel! It works perfectly with your curtains!
thanks for hosting!
gail
I love this idea, I have the exact same items sitting in a bag waiting to go up for a curtain rod too. So simple but adds a completely different look.
I did this in my sons room but didnt spray paint it. I also love the industrial feel it brings to the room 🙂 I like your version, it adds a little class to the industrial style 😉 Thanks for hosting! Happy New Year!
Love it, Roeshel! Looks fantastic! Happy New Year and thanks for hosting!
I was just looking at something very similar in the west elm catalog! I love the look too. You’re so resourceful 😉
You are so creative! Love it!! Happy New Year! Have a grand evening. Toodles, Kathryn @TheDedicatedHouse
Hey Roeshel,
I was wondering what the cost breakdown for the pipes and fittings was? You don’t need to add in the cost of the spray paint- I think I have a life time supply over here! Thanks for your help. Oh- and you bought 2 6′ pipes- does that mean your “curtain rod” ended up at 12 feet? Thanks again,
Becca
Becca, yes my rod is 12 ft. long (covers French doors and a window and extends past our console table for a balanced look). I remember looking in the stores and that size was ridiculously pricey (over $100-200) . I don’t remember the exact amount I spent but I’m guessing $50-70. I’ve seen it done with PVC pipe which would be less expensive still. Hope that helps. (Sorry – it’s been a while and I have no idea where my receipts are.)
Pingback: DIY Show Off ~ Creating a Special Dining Nook
Pingback: DIY Tomato Cage Christmas Tree tutorialDIY Show Off ™ – DIY Decorating and Home Improvement Blog
Pingback: Christmas in the Sitting RoomDIY Show Off ™ – DIY Decorating and Home Improvement Blog
Hi Roeshel,
These look great! I was wondering where you got the finials you used. Thanks.
Thanks, Jenny! I’m afraid I’m not going to be much help. I got my finials at a yard sale. A search for end cap finials might bring up some results though. Good luck!