DIY Holiday Highlights – Easy Ornament Wreath Tutorial

Happy Thanksgiving to my awesome U.S. blog friends and readers!  Whether you’re celebrating Thanksgiving today or not ~ I’m so thankful and so blessed by so many things, including your friendship, support and encouragement.  Thank you.  Wishing you a day filled with happiness, blessings, family, good memories, fun traditions and lots of food!

{image courtesy of Country Living}

It’s time for … 


Meet new blogger:  Amanda from 

mommy is coo coo
 

I recently met Amanda when she linked up to the DIY Project Parade which lead to talking more which lead to her sharing a tutorial and giveaway with you today. She’s creative AND funny. How can you not love a blog called “mommy is coo coo“?    

“I am Amanda, the Crazy Momma, wife and mother of three young children.  My happy life revolves around my family but I love a good project.  If you were to visit my home, you would frequently find things in the driveway I am painting, what appears to be a thrift store in my garage, and my living room furniture rearranged from when you visited  last week.


I retired from my professional job at the age of thirty and then enthusiastically went into the baby making business.  Before motherhood, I worked in the health care field.  I have a Bachelors degree in Sociology and a Master’s Degree in Business Administration.


I hope following my blog will make you laugh about the realities of marriage and motherhood and inspire you make your every day surroundings lovely, regardless of your budget.”


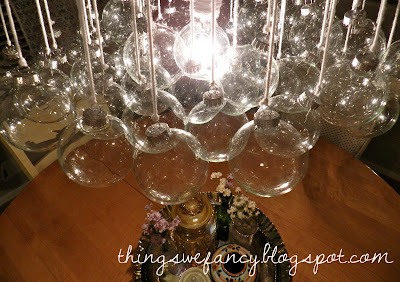
Today, Amanda is sharing her take on the ornament wreath (much easier than the coat hanger method)…


Here’s Amanda:
 
Supply list:

1. a foam wreath (not floral foam)
2. glue sticks and a glue gun
3. spray paint (for the foam wreath) 
4. about a million ornaments (different colors and sizes work best). 
5. spray on glitter
6. a small piece of ribbon to hang your wreath


Spray paint your foam wreath. You can use whatever color you want but keep in mind some paint will show  between your bulbs. I choose Carmel Latte, which I bought with my 40% off coupon at Hobby Lobby.


Place your bulbs on the inside of the foam wreath. Don’t use your favorite bulbs on this part because a lot of these bulbs will be covered up.  After you have placed your bulbs, use your glue gun to secure them in place. You will glue each bulb to the wreath AND to the next bulb in place.


Repeat this process for the outside of the wreath. I like to alternate the size of the bulbs and use sturdier (not vintage-they break really easily) bulbs on the outside. (Again, don’t use your favorite bulbs here).
 
 
Now you are ready to start placing your favorite bulbs. When you finish placing all your bulbs, decide what part is the top and weave your ribbon through.  Finally, spray your wreath glitter.  This will really make it shine!


Important Note:  Store your wreath at room temperature!  Otherwise your glue will expand/contract and the bulbs will fall off and possible break (causing your husband to wonder why you are crying in the attic in July holding your ornament wreath).
 
TA DA: Christmas Ornament Wreath


Merry Christmas!!!


What do you think? I think it’s beautiful!  You too, you say?  Well, guess what!  Amanda, in an attempt to grow her blog, make new friends and wish you a Merry Christmas is GIVING AWAY A BEAUTIFUL ORNAMENT WREATH!  She’d love for you to introduce yourself.  How? Where? When? Hurry to enter at 


Good luck! 


  1. You must use the button above in your blog post or side bar to share the linky love.
  2. Add your permalink (not your blog url, but your holiday project post url which is the web address that goes directly to your holiday project blog post, not your blog address). Feel free to link a Past Post, just be sure add the DIY Holiday Highlights button to your side bar. Or email your link to thediyshowoff@gmail.com and I will add it for you.
  3. Holiday DIY includes Thanksgiving, Fall, Christmas, Winter…whatever you are celebrating this season. (The DIY Fall Festival has ended.)
  4. If you notice your link has disappeared please check the content of your post. Is it holiday related? Add the link back to The DIY Show Off to your post today with a quick note to your readers about the party and try again! 


All linked up?  Did you remember to enter the Christmas Ornament Wreath Giveaway?


I’m so happy to help spread the word that Kristin at A Simply Klassic Home is hosting an awesome 12 Days of Christmas Printables party and you’re invited…don’t worry, I had permission to bring guests.  No blog crashing going on.  There will be free printables, giveaways and a linky (oh my!….that was her line and I cracked up! Kristin is so cute!). Anyway, I can’t wait!  All of those free printable goodies for the holidays linked up in one amazing party?  I think it’s an awesome blogger Christmas gift!  

Photobucket


I’m sharing my styrofoam wood chip tree tutorial at the DIY Club today!


Organizing Your Pantry ~ My Happy House

Molly from

My Happy House
always has some great cleaning, organizational tips and DIY.  With holiday cooking and baking on the agenda, I thought you’d enjoy some helpful tips:


Up until just a few days ago, on a good day, my pantry used to look like this:

Before: 

Maximizing the pantry is key. Oh and I want it to look pretty, am I asking too much? Perhaps, but that didn’t stop me from trying. See the tips at the bottom of this post. 

 
After: 

How to achieve the pantry of my your dreams:

  1. Really only stock the items you need. I ditched a few things I really didn’t need and have a pile of stuff to donate.
  2. Visually break up the shelves. A nice balance of baskets, containers, cookbooks, and serving platters helps big time!
  3. Uniformity is somewhat key. I wasn’t about to drop $$$$ on new baskets when I had quite a few I could repurpose. I actually like the variety there, but I wanted to have all the same containers for the most part. So I spent some money on those.
  4. The wire rack on the side wall was one way to house can goods, but I needed a better solution for items I keep in bulk (diced tomatoes, chicken broth, etc.). Fridge bins work great for this! They are clear, so they go with whatever theme you have and are the perfect size since they are for soda cans.
  5. Don’t overfill the shelves. This one was hard for me to do because I really do need all the space in there, but I’ll show you something I did later that really helped with this!
  6. Make sure to use all the vertical space! The way the pantry was originally set up, there was a good couple feet above the shelf that wasn’t used because I just didn’t have that many tall items. We added the wire shelf up top, instant space. And notice on the left, where I have some serving pieces, those little “S” hooks. Again, vertical space. It still looks aesthetically pleasing by not looking crowded, but without those hooks, I’d lose an entire space for a basket.
  7. When using that top vertical space, be smart about it. I kept all the canvas baskets at the very top light in weight. Linens, chips, cereal, etc. are easy to get down without fear I’ll knock myself unconscious when I need to get them down.
  8. Keep the color scheme light. The paint we chose was some paint we had bought and weren’t able to use the perfect paint for the little closet space with no natural light. (Platinum by Ace) However, I’m pretty sure any paint would have been an upgrade from builder grade beige, and especially so seeing as the ceiling white came about 2 feet down the wall with a jagged line to finish it. Seriously builders?
Thanks so much for sharing your great tips, Molly! Perfect timing! I know that not only with the holidays do we do more cooking and baking, but with cold winter weather and shorter days, there are more home cooked meals, more comfort foods and having everything organized feels so good! 
 
You can see more from Molly at 
 

Things We Fancy – Using Fabric as Wallpaper Tutorial

Meet:  Hillary & Breann from 
Things We Fancy
Why would you want to meet these talented ladies?  Because they’re new to blogging and DIY divas!  I’m loving these DIY tutorials…
AMAZING, huh? There’s more where that came from!  But, first…
Today they’re sharing their tutorial on how to use fabric as wallpaper – a beautiful solution for those of us with anti-wallpaper phobia (when you’ve scraped an entire house with layers upon layers of wallpaper, some even painted, some on ceilings…you understand the hate and fear of wallpaper).  This is gorgeous and the fact that it’s easily removable is a huge bonus! Not to mention fabric comes in so many beautiful designs, patterns and colors.  Welcome Hillary & Breann: 
{BEFORE}
{AFTER}

Directions:
  • take starch and poor into your paint tray
  • take your paint roller & roll starch on just part of the wall about a 24″x 24″ square
  • line up your fabric and stick it to the wall

Tips: They found it easier to thumb tack the corner and top to make sure it stayed and didn’t slide–{make sure to always start at the top corner}[also make sure to leave about an inch extra on the top, bottom, and sides. the fabric shrinks about 1/2″].
  • after putting your fabric on, take your roller and roll starch over the top.
Tip: {fabric should be soaking with starch}-also when using the roller brush only roll upwards. if you you roll the roller down, all the starch comes gushing out of the roller-

  • continue doing the same thing with the rest of the panel & each one after that.

Tip: {it would be a good idea to place thumb tacks through out the whole process. especially where the panels overlap.}
  • once your wall is completely dry, go over it again with starch to get all the air bubbles out
  • after that dries, take your rotary cutter and cut the excess fabric off the sides.

Tip: [using a rotary cutter [or razor blade] was the best way to get a smooth straight cut. scissors… no bueno.]

For more information or questions, visit Hillary and Breann and their awesome DIY at
Things We Fancy

Pin It