How to Hang Heavy – using toggle bolts

There’s progress in the closet!  The coat hooks are hung in the closet with care in hopes that our guests have more options than flinging coats on the chair. 
Mr. DIY loves to make sure something is done right and not earthquakes or tough guys or gorillas could destroy his hard work.  So, thanks to our friends at True Value, each coat rack can support 500 lbs. and one coat rack boasts a 1000 lb. weight limit.  Cool, right?  There’s no way these babies are coming loose.  Here’s a little step by step on how to use toggle bolts to support your coat rack on a drywall wall without the use of studs.  For lighter objects where a nail isn’t enough but a toggle bolt is overkill, we follow this same process using plastic wall anchors.

Characters: 
Handyman….Mr. DIY
Photographer & Narrator…Me

1.  Using a level and a pen, mark the screw holes on the wall.

2.  Using a spade drill bit, drill the holes where marked.  We drilled two for each coat hook rack.

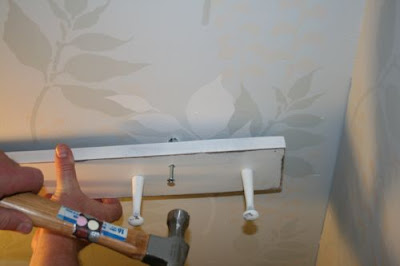
3.  Insert screw into coat hook front to back, and twist on toggle.  We used two on each.
This direction:
4.  Insert toggle bolt into holes in the drywall.  The toggle “wings” will fold forward in order to insert, then open once placed through the drywall hole. This spreads out the weight that the coat hook racks will hold.
5.  Tap with hammer. This helps to make sure the entire toggle part is all the way in and opens back up on the other side.
6.  Screw into the wall.
Easy and sturdy!
A little sneak peek of the closet in progress.  Don’t you love that mechanic’s light we found at an estate sale?  It sure comes in handy!
What’s left?
Light source
Baseboard Trim
Organizing
Completed:
Painting and distressing coat hook racks
Installing coat hooks
It almost makes one want to test the weight limit – rock wall climbing style, doesn’t it?  Okay, maybe that’s just me.  I can’t wait to have a place for guests to hang coats.  I have big plans but I also  have a bit of shoe and coat addiction so maybe not. 😉
In a quieter voice:  I’m narrating because if you put up a coat rack and it’s fancy on one side and your wife wants that side fac
ing up but you screw it in upside down, your language could be a bit interpreted a bit innapropriate for a lady. You take it all down (the toggle parts fall into the wall space) and repeat the above steps with the coat rack fancy side down AGAIN. Now the language is really inapproprite for ladies and small dogs and the neighbors. The fancy decorative side being upside down reminds me of a little bum in the design but I’ll just have to live with the litte bum for now.
*~*~*~*~*~*~*~*~*~*~*~*~*~*~*~*~*~*~*~
I was one of the bloggers selected by True Value to work on the DIY Squad. I have been compensated for my time commitment to the program as well as my writing about my experience. I have also been compensated for the materials needed for my DIY project. However, my opinions are entirely my own and I have not been paid to publish positive comments.

At Home Alterations

DIY Show Off reader, meet Mike and Katrina from At Home Alterations.  Isn’t that a great name for a DIY blog?  You know what’s better?  Their actual DIY and at home alterations.  You can see more (lots of DIY and before and after!) at their blog but here are a few of the projects they’ve mastered.

Costing just $634 and a lot of elbow grease, their kitchen went from this:

to this:

What they did:

  • tore up the linoleum and refinished the hardwood floors
  • painted the cabinets and replaced cabinet hardware
  • installed a space saving pot rack
  • painted the walls
  • DIY art

Full (and more) details and pictures here.  

Then, as if that wasn’t exhausting enough (they’ve only been in their home since the beginning of the year!), they did a guest bedroom makeover.  Here it is before:

Don’t rub your eyes.  You’re seeing the same room – here it is now:

What they did:

  • Sanded and re-stained and sealed the floor
  • Sanded the stars on the walls and repainted
  • Furnished/Decorated – using furniture they mostly already had and great bargain shopping
  • DIY art

Cost breakdown and more details here.

Mike and Katrina also entered their “Easter Bunny bathroom” into True Value’s Design SOS contest.  You can vote and view all entries at http://www.startrightstarthere.com/.  Mike and Katrina’s entry is #10!


Mike and Katrina – you’re doing an awesome job on your home.  I love your drive to DIY and get it done!  Thank you so much for sharing your beautiful transformations!  I think I can speak for all of us when I say – “Keep up the good work! We can’t wait to see more!”

~*~*~*~
A quick note to fill you in on an exciting, new True Value mobile sweepstakes! It’s a simple program that enters anyone who signs up for the True Value text message program the chance to win one of four grand-prize $500 shopping sprees at their local True Value or one of eight weekly drawings for a $50 shopping spree at their local True Value.
All entrants need to do is text SWEEPS to 30364 by October 31st for a chance to win! Once signed up, you’ll receive a couple texts a month with specials/deals and sales information from True Value. 
*~*~*~*~*~*~*~*~*~*~*~*~*~*~*~*~*~*~*~
I was one of the bloggers selected by True Value to work on the DIY Squad. I have been compensated for my time commitment to the program as well as my writing about my experience. I have also been compensated for the materials needed for my DIY project. However, my opinions are entirely my own and I have not been paid to publish positive comments.

Shabby Chic Style Little Girl's Bedroom

You may have seen this but in an effort to spread the love (the love of beautiful DIY before and after) and for those who may not have seen it yet, I must share this beautiful transformation.  It’s from Becky at Tea Party.   Prepare to go “ooohhhhh” an “awwwwwe”. 

Here is her daughter’s bedroom before:

Here it is after.  It’s all in the details, right?  Teagan’s new big girl room is full of pretty details…

My favorite parts?  Did you see the gorgeous grain sack inset on the headboard?  All of the DIY art work?  How about the soft, peaceful color scheme?  What do you think? 
Check out all of the details at Tea Party.  Beautiful reveal, beautiful job, Becky!  Thanks so much for sharing!