I Spy A Winter Wonderland Lamp

 Winter Wonderland Lamp Makeover Story…

White Christmas decor

Sleigh bells ring, are you listening, 
In the lane, snow is glistening
A beautiful sight,
We’re happy tonight.
Walking in a winter wonderland.

I know. It’s August. Why in the world am I thinking winter? Well, I love a good DIY challenge! And thinking about December in August is a challenge, isn’t it? Besides, when August temps are high, it’s the only time I’m wishing for snow.

and…

HomeTalk and Lamps Plus are hosting a Holiday Design Contest and I’m excited to be participating!  What is HomeTalk? A fun community based around all things “home” and Lamps Plus is an awesome source for lighting – what a great team!

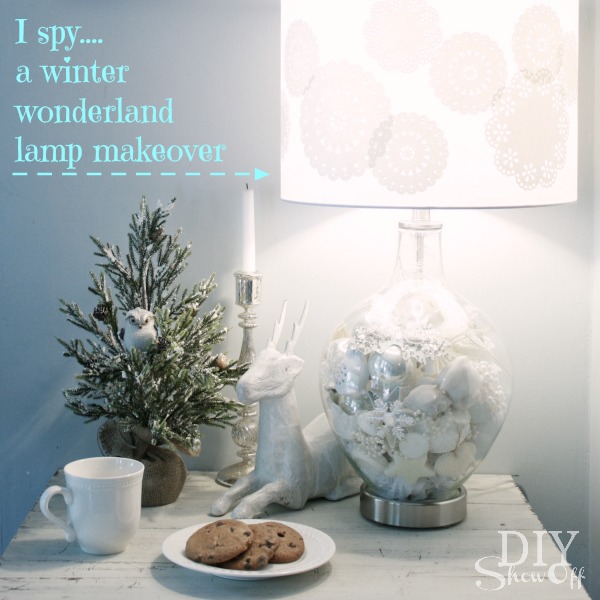
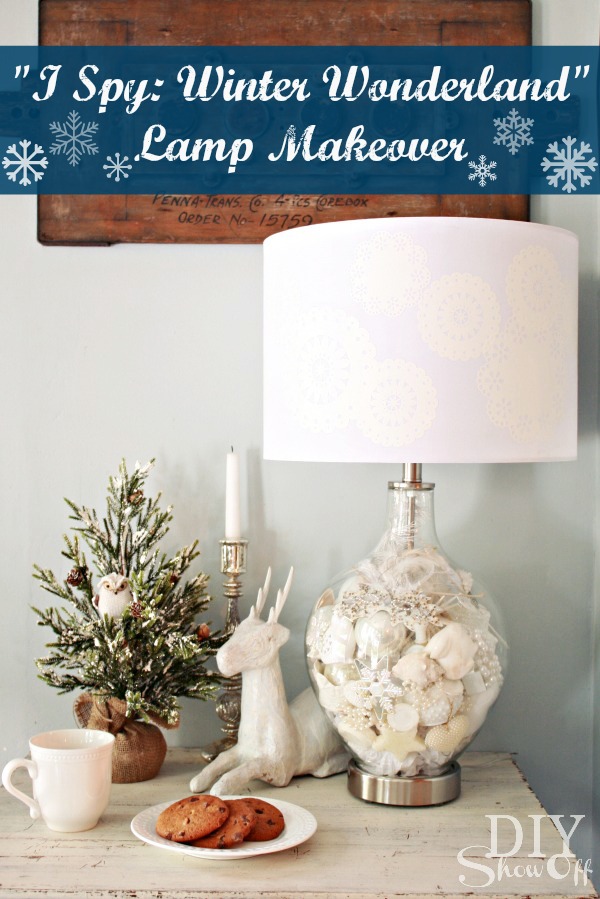
I Spy Winter Wonderland Lamp Tutorial:
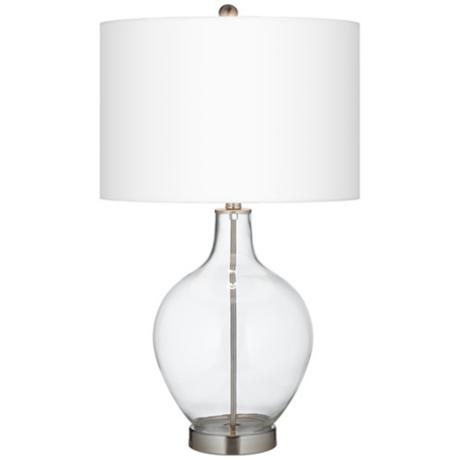
I Spy Winter Wonderland Lamp Makeover

Materials:

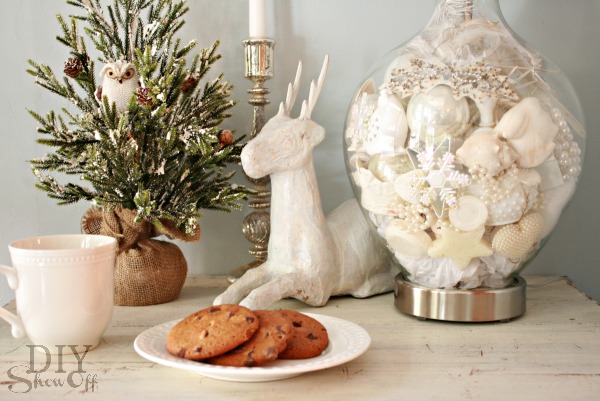
  • Fillable Clear Glass Ovo Table Lamp

Winter Wonderland Lamp Tutorial

  • assorted small white accessories from around the house. Mine include Christmas bulbs, snowflake ornaments, a white owl, ceramic angel, seashells, small white feathers, stars, mask, organza butterfly, nesting dolls, poker chips, chess pieces, faux dahlia, pearls, etc. 
  • paper doilies
  • Martha Stewart Decoupage Multiple Surface Durable Matte Finish
  • craft chip brush

Lampshade Tutorial:

Working quickly and in small sections, apply decoupage to lamps shade with a soft bristle chip brush.

decoupaged lampshade tutorial

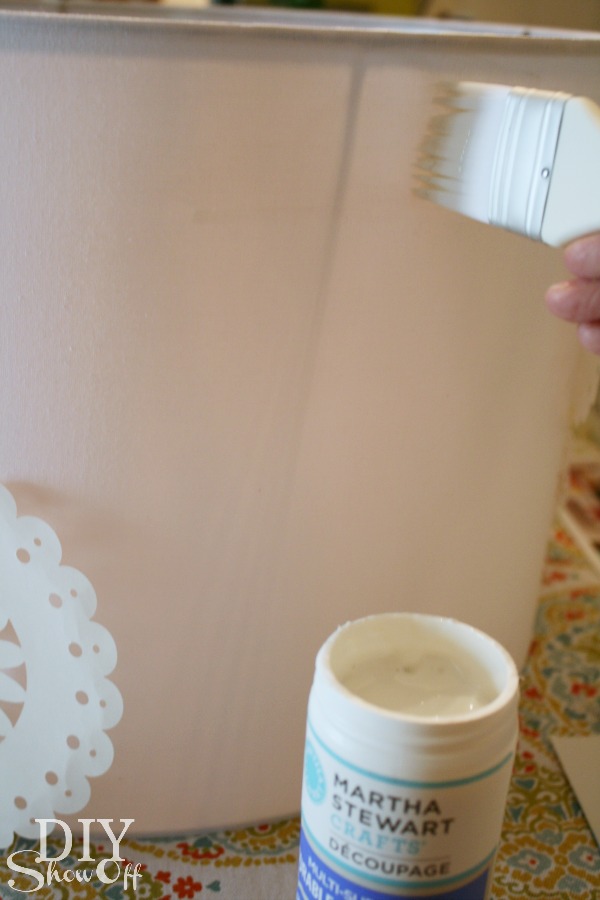
Apply decoupage to the back side of the paper doily. 

Martha Stewart Decoupage

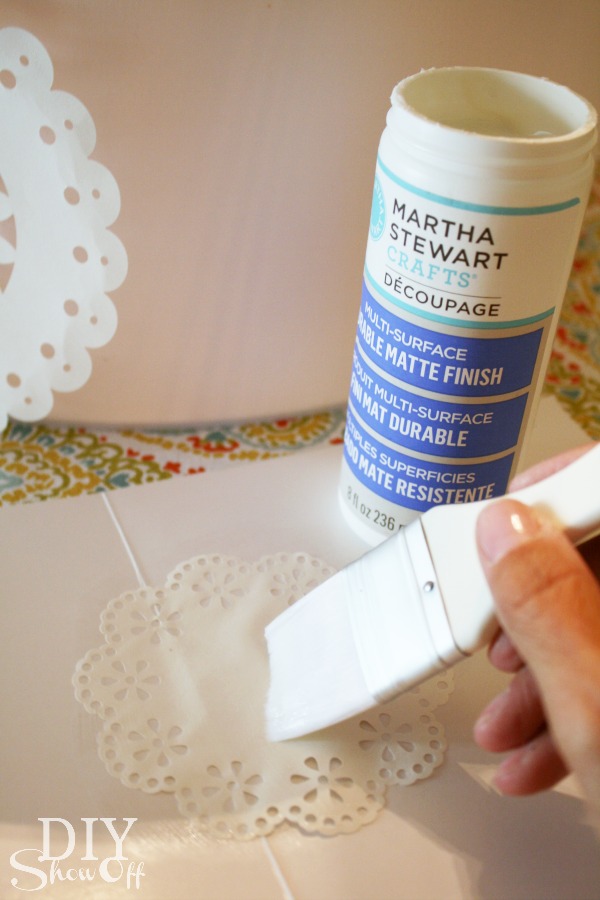
Place paper doily onto the freshly brushed decoupage on the lampshade. 

decoupage doily lampshade

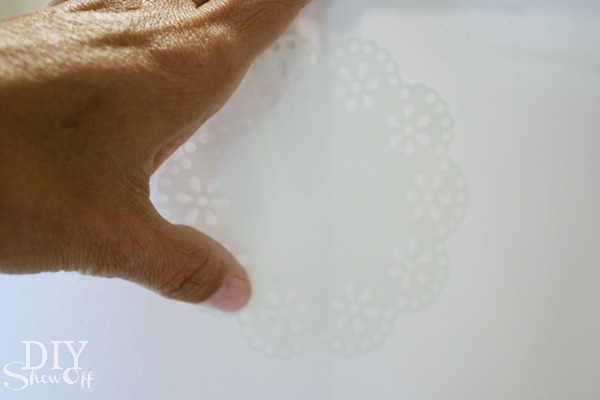
Apply a coat of decoupage to the paper doily and surrounding area. 

Martha Stewart Crafts Decoupage Doily Lampshade

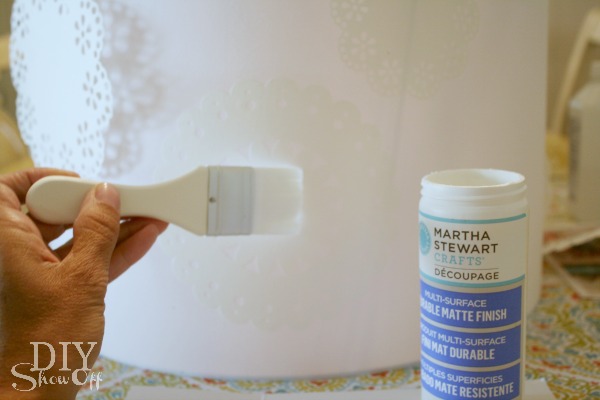
Repeat steps above for all paper doilies, staggering the designs. 

Attach lampshade to lamp and give entire lampshade one to two top coats of decoupage, allowing 1-2 hours of dry time between each coat. Let dry. 
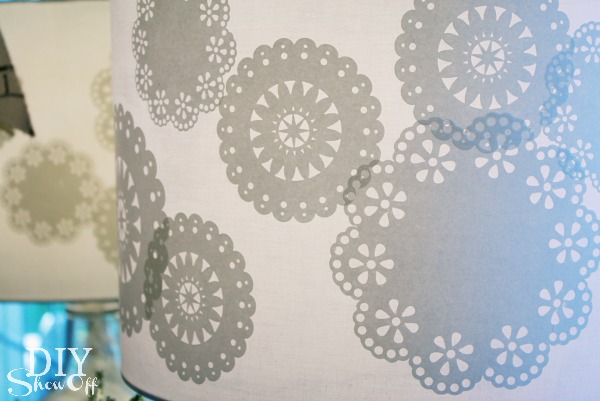
Ta-da:

paper doily decoupaged lamp shade

Filling the Lamp:

winter wonderland ornaments

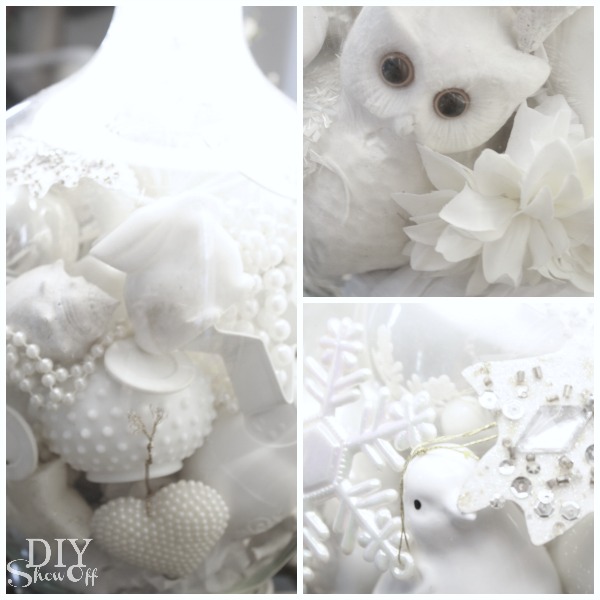
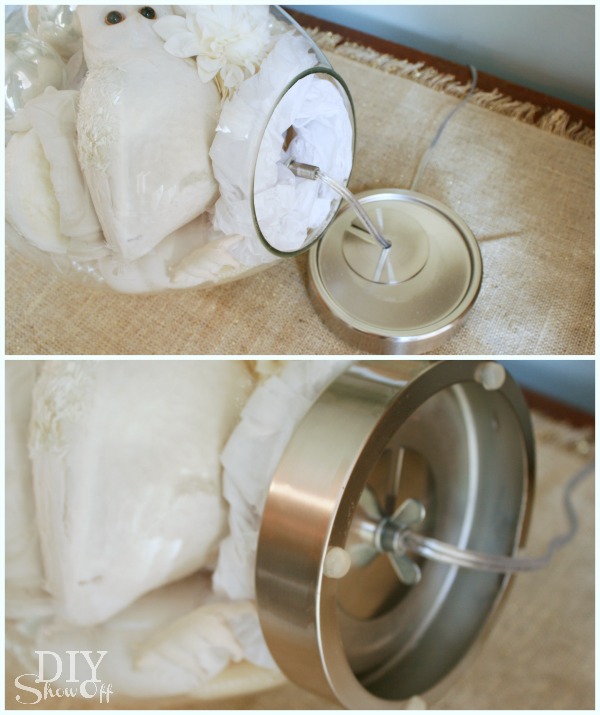
Filling the lamp is super easy: Unscrew the wing nut on the bottom of the fillable lamp to separate the bottom piece. Carefully fill the lamp with baubles. In my case, it was my white “I spy” collection from around the house. At the bottom of my lamp, I added a little bit of old tissue paper to act as a cushion. When full, replace the the base and secure with the wing nut.

fillable lamp

Attach lamp shade.

I Spy Winter Wonderland Lamp

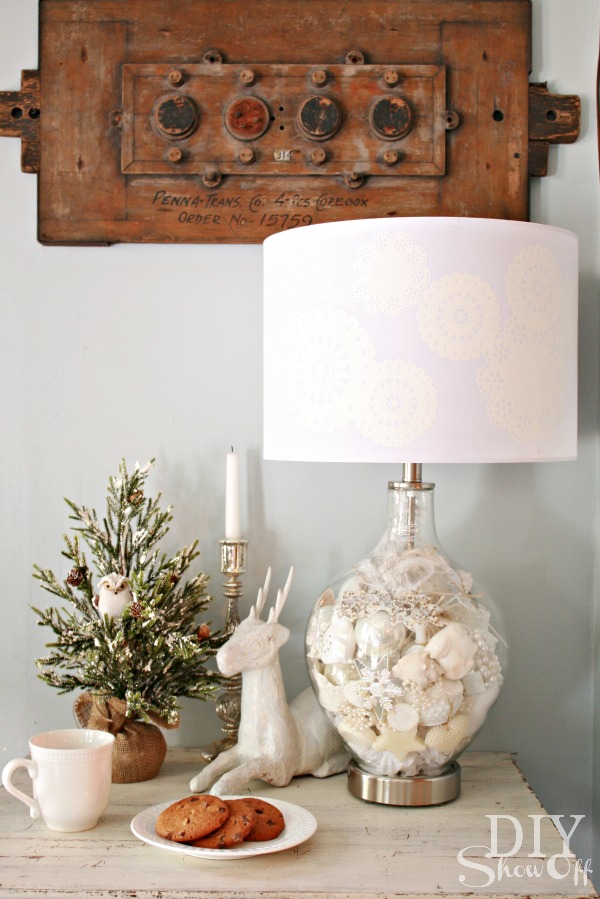
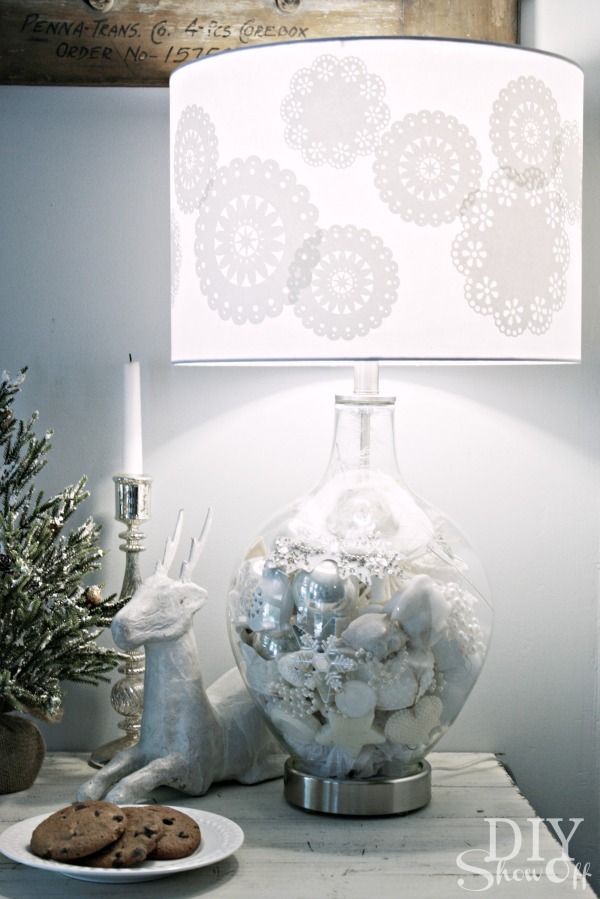
Hot cocoa, a warm throw, cozy fire, holiday music and dreaming of a white Christmas…

DIY Christmas Lamp

What I love about my “I spy winter wonderland lamp”:

  • I love that while my lamp definitely has a winter wonderland vibe, it’s a subtle enough style to display all year long since it doesn’t scream “HO-HO-HO! Merry Christmas!”
  • Great for a winter decorated side table or vignette to coordinate with any holiday theme or color scheme. White goes with everything!
  • Perfect for a guest room night stand…who needs to count sheep when you can hunt for treasures?
  • And a fun quick “I spy” game and conversation starter for guests in the living room.  
  • Easily refillable for a new look. 

Winter Wonderland Vignette

Thanks to HomeTalk and Lamps Plus for inviting me to participate in this fun Holiday Design Challenge! 

*LampsPlus supplied the lamp for this project. All thoughts, opinions and project tutorial are 100% in my own words. 

Holiday Highlights #4


I
don’t have a lot to share this week. My decorations are still sitting half in/half out of containers around the house! Hopefully by next week, I’ll have some pretty holiday DIY projects completed, another tree up and decorated and our entire home will be all set for Christmas.

I wanted a rustic/natural looking winter centerpiece for my new barn wood trestle table (new table = another minor DIY project/reno in the works).

Materials
are mostly things I already had:
Wreath
Candle
Glass vase
Faux snow (the only thing I purchased)

I put together a centerpiece that turned out to be exactly what I was looking for.


I plan on adding some DIY mercury glass bulbs to give it a Christmas touch but this is what I’ll use through the winter, even after Christmas is over.

Edit! I gave my centerpiece a little more Christmas spirit. I added some ornaments and different pine tree clippings to fill the room with a Christmas-pine scent. 🙂 Lots of pictures. I just love it.


(This is Not holiday related, except that it feels like a gift when I get time to work on something “fun” and DIY-related! If you haven’t seen them, I have sneak peeks of the progress of my painted bathroom floor! HERE!)

~*~*~*~*~*~


My Happy House is having a Holiday Challenge. Check it out! She also shared a tutorial (here) for making real pine wreaths! Beautiful and now I’m thinking of redoing my centerpiece. Or at least throwing in some real pine clippings for the scent. (DONE!) Isn’t it pretty? And I bet it smells just like Christmas too! ::insert scratch screen and sniff widget::

~*~*~***~*~*~

Now…link up your inspiration. I love seeing your ideas and DIY holiday projects.

If you’d like to link YOUR DIY holiday project or even holiday decor for inspiration post to the party:
  1. You must use the button above (or html code on left side bar) and link to this post to share the linky love.
  2. Add your permalink (not your blog url, but your holiday project post url which is the web address that goes directly to your holiday project blog post, not your blog address). Feel free to link a Past Post, just invite your readers in a current post with a quick note.
  3. Or email your link to thediyshowoff@gmail.com and I will add it for you.
  4. If you notice your link has disappeared please check the content of your post. Is it holiday related? Add the link back to The DIY Show Off to your post today with a quick note to your readers about the party and try again! I love when everyone participates and readers check out everyone’s links, but I think the return favor of linking back is the nice thing to do so everyone plays fair and enjoys all of the projects and links. Links not related to DIY holiday projects or holiday decor for inspiration will be deleted.

I’m joining

Head over and check out all of the links for great transformations and inspiration!