


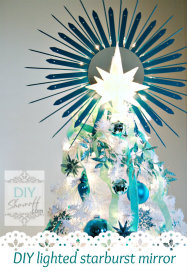
DIY Lighted Starburst Mirror Christmas Tree Topper
One thing I’ve never created but have always loved is a DIY starburst mirror. There are so many great tutorials, so many beautiful creations. The new white Christmas tree in the family room needed a topper. I have a white star (which you’ll see that I also used…there’s no such thing as too much bling at Christmas!). Here’s how I made the lighted starburst tree topper:


Materials:
- about 30 BBQ skewers
- about 30 plastic garden stakes
- 7″ flat round mirror
- 7″ cardboard circle (I traced my mirror onto a piece of white cardboard and cut it out)
- FrogTape Delicate Surface
- string of lights (mine is a string of 20)
- spray paint (I used Rustoleum‘s Satin Lagoon)
- 1 pipe cleaner
- hot glue
Tutorial:
1. Using the FrogTape Delicate Surface, tape off the front of the mirror.

2. Trace the mirror onto a piece of cardboard and cut out circle. Set aside.

3. Flip mirror over. I used a Sharpie and traced the bottom of my FrogTape container, making a circle centered on the back of the mirror. I traced the lid of my spray paint can for a smaller inner circle.

4. Lay out garden stakes round the outer circle to see if you’ll need to leave a small gap between each garden stake. Mine fit snug, just touching each other. I glued them into place on the outer circle.

5. Next I glued a BBQ skewer, starting on the inner circle, spacing them between each garden stake.

6. Mark the center of the cardboard circle. About 1/2″ from the center to the left and to the right, I poked a small hole using a pair of scissors.

7. Thread through the pipe cleaner. Glue pipe cleaner into place on the back side but do not glue to the back of the mirror yet. The front side will be what attaches the starburst mirror to the top of the tree. I folded my pipe cleaner and covered each with a piece of FrogTape. {I realized after the fact, do not thread the pipe cleaner until after spray painting the cardboard.}

8. Spray the back of the mirror. Let dry. Flip and spray the front of the starburst mirror. I also gave my cardboard a light coat of spray paint. Let dry.

9. Glue base of lights (and some of the coated wiring if needed) into place. I tried to place the lights between skewers and garden stakes. The actual bulb sits above the mirror when looking from the front. My string of lights was enough to wrap around at few times. Be sure to leave the cord hanging for plugging in.

10. Once the lights are all glued into place, glue the cardboard backing into place over the lights/back of the mirror, back of the garden stakes and skewers. {I did not do this…as shown, my cardboard was glued to the back of the mirror before the lights.} Be sure the pipe clear is facing the correct direction to wrap around the top branch of the tree.
11. Remove FrogTape from front of mirror. All done!

It’s a pretty topper by itself, but I really like the reflection of the white star we already had on hand…

Reminder: starting Monday, 12/10…

Keep up-to-date and get sneak peeks by following along:


![]()

![]()
Sharing here:
This is a sponsored post brought to you by FrogTape. The opinions are completely my own based on my experience. Results may vary.
![]()
Oh my gosh Roeshel this is amazing! I love the sparkle and drama of it!
Wow, it is gorgeous… not quite sure I follow the instructions, but maybe if I reread them in the morning… grin… tired. Oh yes, how much did this cost you? I live in Jacksonville, FLA……. so hopefully places here for me on the westside of Jax? Of course you would not know that part….. grin…. thanks for the beautiful ideas and all you give us.
Wow, really a beautiful idea! Thanks…I think I’ll do one!
Pingback: DIY Project Parade Linky PartyDIY Show Off ™ – DIY Decorating and Home Improvement Blog
But one thing Roeshel, how did you make it standing on the tree? I am sorry if I missed or misunderstood anything.
Hi Eva – I used a pipe cleaner in the design which wraps around/ties to the top of the tree. 🙂
Wow! That is such a great idea and a great tutorial!! How creative! I love the lights you added to it. Awesome statement for a tree topper!
Pingback: DIY Tomato Cage Christmas Tree tutorialDIY Show Off ™ – DIY Decorating and Home Improvement Blog
Pingback: Looking back: 2012 DIY recap | | DIY Show Off ™ - DIY Decorating and Home Improvement BlogDIY Show Off ™ – DIY Decorating and Home Improvement Blog