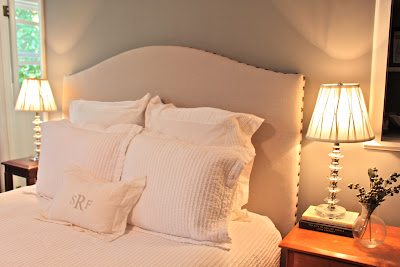
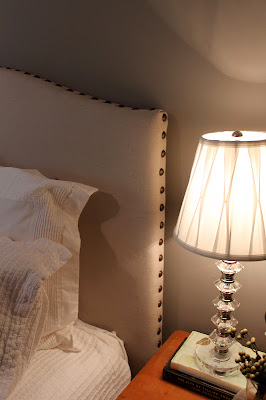
Don’t you just love a good Pottery Barn inspired DIY project? I’m so inspired when I see something not in my budget recreated for a fraction of the price and it’s rewarding. Stretching a budget further with more to spend in other areas or just the ability to have the same look when it’s not otherwise possible. Meet: Susanne from
Can you believe that her headboard is a do-it-yourself version, upholstered using a drop cloth?
I’d swear it’s the exact same thing as this:
Susan’s father-in-law started the project by creating a design and template. This looks like the most difficult part.
They used two pieces of plywood.
Then Susanne and her mother-in-law took over.
They traced the headboard on foam, then cut it, and applied it with spray adhesive.
She laid out the drop cloth and two layers of batting. Then placed the headboard on top face down and stapled using the staple gun!
They wrapped the corners like a package
Ready for nailheads!
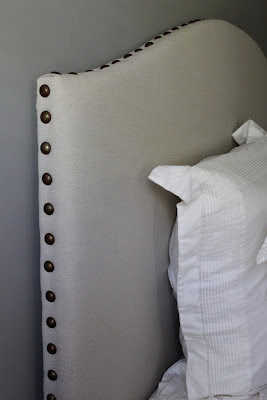
Susanne recommends placing the nailheads 1.5 to 2 inches apart.
Nail with a rubber head mallet.
Stand back and admire:
Beautiful! A nearly identical budget friendly alternative.
Lovely close-up:
The drop cloth worked perfectly and was SO inexpensive! So many options to customize with different fabrics too (maybe a large table cloth or XL shower curtain even.)
Sort of makes you want to repurpose your old headboard and get upholstering, doesn’t it? Thanks for sharing your tutorial, Susanne. It’s awesome!
See more amazing DIY and home before/after inspiration at Tenth Avenue South.


OMG, I’m so doing this, my husband could definitely cut out the headboard and I’d love to use the dropcloth. Thanks for posting this…made my day because I’m in need of a new headboard!
This headboard is absolutely incredible! It DOES look like the PB version. Such a fabulous DIY!
Excellent step by step, a handy gal could duplicate. No one would ever know that didn’t come from the store.
~Bliss~
We have the PB version in our master bedroom. It’s so beautiful. How wonderful that they were able to make their own to look identical!!! ;o) Love them both!
What a great project! We’re currently bed-less and are on the lookout for a good idea.
I really like this look and it is certainly doable!
Beautiful project and that I’d love to do, too! Thanks for the “how-to”!
I know – she makes it look so easy, doesn’t she? Since I don’t need a headboard, I’m tempted to start a headboard wall trend. haha! I love it! She did an amazing job.
Beautiful and a great tutorial as well!
I’m enjoying your tutorials. Love the headboard. Seems so simple… my favorite.
Hi, Roeshal
I just love your headboard. It turned out great! I need to do this. Thanks for sharing.
Vanessa
I’m certain Susanne will pop over to check your comments today – so thanks so much for taking a minute to give her a round of well deserved applause! 🙂
Yes, I am so flattered! Thanks for the love!!
It looks great! Gotta love a drop cloth!
xo Becca
Oh, it looks fantastic!!! I keep threatening to upholster our bed, but I’ll probably never do it. Slipcovers, maybe. I’m sure enjoying seeing yours, though! 🙂
~Angela~
Beautiful headboard! I love anything and everything drop cloth! 🙂
I really do adore this project. My little girl has two twin beds that I haven’t been able to find headboards for that will fit in her small room. I have thought about a DIY fabric headboard. I’m definitely going to try it.
So well done and beautiful.
Absolutely gorgeous! I wouldn’t have known it wasn’t the real thing!!! Fantastic job! <3
OMG this is wonderful! The headboard is so elegant. I am looking to redesign my master bedroom and I would like to update my bed. This is an option I will keep in mind. Gonna bookmark this post!
I am making this!!!!! Hugs and happy weekend!
I love it of course. I am considering a drop cloth for my flat valance for above my windows (to make the most use of window space) and just to cover the tops of my roman shades I am planning right now. Toying with the idea of some bright grosgrain ribbon for a pop of color. Only thing is no money and grosgrain get’s expensive for me with buying a lot of it.
Sounds gorgeous, Sheryll! I’m still looking around for window treatment ideas for the family room makeover too. 4 windows in there – must be something budget-friendly!
Yes budget bone friendly for me is a must. I am so poverty stricken, that they don’t make a word for it. So I have already nixed the idea of the grosgrain ribbon. Maybe I will buy a couple of yards of cheap sailcloth or even broadcloth and make my own strips for a border. Heck I don’t even have the money for that now (lol and crying at the same time).
I have noticed that the gathers are not popular now, like gathered dust ruffles, which I have from one I made many years ago for my parents which I liked so much that I kept for myself after mom passed.
I will give you a tip that I have never seen used ever, except by me. I took a full bolt (forget how many yards now) and made this dust ruffle by just sewing row after row after row of decorative stitching on plain white broadcloth. First of all do NOT hem it, fold the fabric in half lengthwise and it give you more body and less work. This also means that there is NO need to iron the dust ruffle, which always killed me to do. I am considering doing this on my Roman Shades as well.. I hate to iron and I wash everything. Let me know what you think, it really does work. I used a bunch of different stitches and just sewed and sewed. Buy the thread for the sergers. You will need a ton of thread and you do not want to run short till you get to the end of the length of fabric. So plan accordingly.
Oh yeah, you can use colors of broadcloth and the same color thread or vice versa. I like the one on one color thing, but everyone is different.
USE good quality thread though, cause you do not want to spend all that time sewing and not have it hold up well.
Just curious…
1. What kind of wood was used?
2. Where was the drop cloth purchased? I like the color and am not familiar with purchasing them. Are they all the same?
3. How was the headboard attached? To the bed?
Great tutorial! I’m looking forward to doing this one!
Hi Erin! I featured a summary tutorial but you can see more at http://tenthavenuesouth.blogspot.com/2012/03/new-drop-cloth-headboard.html. Susanne would be happy to have you stop by and will be able to answer your specific questions. 🙂
Does the drop cloth have an odor? I find the ones I buy do. Maybe if I washed it the smell would go away.
Hi Annelie! I wrote up a summary feature of the drop cloth headboard tutorial from Susanne at Tenth Avenue South. Here’s her original post and I know she’d be able to answer that question best for you. http://tenthavenuesouth.blogspot.com/2012/03/new-drop-cloth-headboard.html I used a drop cloth to make curtains and I didn’t notice a smell beforehand but I did wash them ahead of time. 🙂
Ps. Of course, unlike a headboard – my head isn’t right on top of my curtains either. 😉
This is beautiful! Why didn’t I know about all these cool design ideas prior to blogging!? Geez, I could have saved so much money ! 🙂
Pingback: Before and After Master Bathroom MakeoverDIY Show Off
I have searched EVERYWHERE for the nail heads! Michaels, JoAnn Fabrics, Home Depot… where did you find them? Its my last step to finishing the headboard!
Kara, Susanne says on her original tutorial that she got hers here: http://mascofabrics.com/contactus.html
I get mine at Joann’s: http://www.joann.com/search/_upholstery_nail_heads/
Hope this helps!
So awesome!!!!!
Pingback: Home Improvement Weekend « Project 365
Where do you get the large nail head trim kits? All I’m able to find are the smaller versions.
Hi Steve. Looks like she had a difficult time finding large nail head trim as well. Following the link back to her original post, she lists this company as her resource: http://mascofabrics.com/. I don’t see it listed as a product, but she may be local to the store. Through a Google search, I was able to find this company: http://www.tackband.com/products.htm. Hope that helps!
I was able to locate a place on-line with a huge selection of nail head trim. http://www.dadsnails.com/
They have all types, shapes, sizes, etc.
Awesome! Thanks for sharing, Steve!
I someday want to do this myself. I have done other fabric headboards, so I am not new to this…. but, here it comes, but….. I must wait till I do something to my awful floors. I am in the process and procrastinating more than I want to admit…. about taking up the rest of my nasty carpeting… I so dislike mine or even new….. gag me, I just can not stand it. But…… yep here it is…. I had to take up the nasty, broken, 9 in tiles and below that is this… just as nasty, BLACK glue stuff…… gag me again. My kitty kats climb on EVERYTHING and track the black stuff… I know… gag again. I am so dreaming of Julia’s kitty kat enclosure sometime before I die…. yep.
Long story….. the drop cloths shrink a lot, so I found by planning my roman shades with it. What do you think is a good protection IF used for a head board? I know, I know….. I am a bit crazy right now…. and no money.
Sheryll & Critters.
Where’s the foam from?
Molly,I’m not sure where she purchased the foam (I get mine at Jo-Ann fabrics and have also used a foam mattress cover-sometimes cheaper). Here is a link to her original blog post (I featured her project): http://tenthavenuesouth.blogspot.com/2012/03/new-drop-cloth-headboard.html
She will be able to answer you better.
Good luck!
Pingback: DIY Upholstered Tufted Headboard MakeoverDIY Show Off ™ – DIY Decorating and Home Improvement Blog
Perfect How-to! I’m officially inspired to make this headboard happen this weekend! I’ve been putting it off bc of $ and time, but this eliminates my excuses! lol Thanks so much!
Where did you purchase the nail heads?
Our JoAnn Fabrics has nail heads, Kristin. Hope that helps! She states in her original post that she got them through a Fabric Store too.
What is he measurement of headboard? I am inspired to do this but for a twin size bed. Thnx!
Hi Robyn! You’ll want to check with Susanne at http://tenthavenuesouth.blogspot.com. I simply featured her but she’ll be able to get you the details! 🙂 Good luck!
Fabulous look! I have heard of using inexpensive drop cloth for so many projects! Including rugs, which might be next on the list. Thanks for the info!
Do you remember what weight dropcloth you used (6 or 10 oz, etc)?
Hi Tracy! The drop cloth headboard was a feature by Susanne from http://tenthavenuesouth.blogspot.com. She’d maybe be able to help you, although it’s been a few years. Good luck!
it beautiful and looks easy enough but…was wondering how you attach it to the bed rails..????
Where did you get the drop cloth from?
Where did you get the nailheads from (how many did you need?) and how thick/what type of wood did you chose to use? I really want to do this project for my first apartment after graduation. There are so many options and I tend to get overwhelmed in the lumber section
Hi Stacey! It’s a gorgeous DIY! It’s actually a feature on my site. Here’s a link to the original blogger who can hopefully help you with your questions: http://tenthavenuesouth.blogspot.com
Good luck!
Can you give measurements?
This looks great!
Just wondering what the dimensions for the the headboard was? How high and wide?
what size nail head did you use? Looks great by the way
Hi Debbie!
This was a feature so pop over to the original blogger’s post to see if she has more info/can answer your question. Good luck! http://tenthavenuesouth.blogspot.com/2012/03/new-drop-cloth-headboard.html
xo
Did you cover the back to keep from damaging the wall? Can’t tell in the pics. I like it very much especially the use of a drop cloth. Inspiring!
Hi Betty! I’m not sure since this project was a feature. You’d need to check with the original blog post listed in the article. Hope that helps (but I would imagine I’d wrap the drop cloth around the back side to secure so that’d help with protecting the wall. Good luck! xo
Where did you buy those nail heads? They are beautiful and bigger than what I have seen in my local stores.
Sorry for the delay, Jenifer. You’ll have to check with the original blogger linked in the feature. Best of luck!
How elegant.
So amazing! Can you please tell me what brand of drop cloth you used?
Hi Alicia. This feature is quite a few years old. You can check with the original blog listed in the article, she might remember. Sorry I can’t be more helpful. Best of luck!
Can anybody tell me what length upholstery nails we should use?
Thank you,
Renee
Hi Renee! This tutorial is a feature so I don’t have any advice (no experience). You can try visiting the original blog linked above. Best of luck! xo
Did you wash the cloth first?
Hi Elizabeth. This is a feature post (not mine) so I don’t know the answer. If she doesn’t mention that she does, then I’d assume no since that would be one of the steps in the DIY tutorial. Sorry I can’t be more helpful!
Hi! Love the idea of a drop cloth… not really familiar with them though. Where do you buy? Price? Color that you used?
Thanks!
This blog post is a feature of someone else’s work so I can’t answer the question of where, the price or what color. But check your local hardware stores! Hope that helps, Bonnie! Good luck!
Love this idea! Copying is said to be the most sincerest form of flattery
Thanks,shopping for the upholstery nails at the same time 🙂
Where do you buy the nailheads and about how much do they cost? Looks great, btw!
Hi Alice. This was a featured post a few years ago. Please see if the other comments may have a clue or visit the original blogger if still available. Sorry I can’t be more helpful!
Love the tutorial. I have quilted a whole cloth linen and plan to build the headboard, add a new frame. Thanks
Hello, I am creating a head board this afternoon and would love to know the size wood you used (particularly the height)? I haven’t liked any of the smaller ones and yours is beautiful… thank you
Hi Brittany, this blog post is several years old and was a submitted feature, not my own project so I apologize that I can’t be more helpful in answering specific questions.
Hi Roeshel! Love the drop cloth headboard! I’ve had my eye on the Pottery Barn one for quite some time but no way am I paying that much. So, I’m making it. This will be my 5th headboard, but this one is for me! I would love to know how you created the camelback design. My husband and I will ultimately figure it out, but it sure would be easier if we had a template of some kind! Any help you can provide would be awesome. Thanks!
Hi Cara! Sorry! It’s a post from a few years ago and a feature (not my project). Sorry I can’t be more helpful! I hope you’ll share the results! I’d love to see it! Good luck!
Beautifull and clean, what i was looking for. Thanks
Any instructions on how to cut out the plywood for a queen size, the dropsheet style
Hi Clare!
No, so sorry! This is a guest post (not my own tutorial) and from 2012. So only what is shown. It doesn’t look like the blogger is blogging anymore. Sorry I can’t be more helpful!
Hi! Can you post the dimensions used for the wood? Thank you!!
Hi Micayla!
Unfortunately, no. It was a guest post from a blog called Tenth Avenue South back in 2012. It doesn’t look like she’s blogging anymore, so I can’t forward your question. Sorry I can’t be more helpful!
So lovely to e-meet you! Thanks for stopping by!
Hi Rachel,
Where did you get your nail tacks from?
Kathy M
Hi Kathy! This was a guest post so not my content.
I have seen them at JoAnns though or Amazon! 😉
Sorry for the delayed response and that I couldn’t be more helpful. I hope you found what you were looking for!