Awesome DIY Kitchen Makeover

I received this note from Kinga and Joseph from BlueLoom about their awesome DIY kitchen makeover.  Sometimes budgets are small but results are HUGE!  Take a look!

When we bought our house, we knew we had to do something about the ugly kitchen from the 70s.

We didn’t want to spend thousands of dollars on a complete renovation, so we decided to do it ourselves.

Total kitchen reno took us more than 2 years but we saved a lot of money. The biggest project was to restore the existing kitchen cabinets which were solid maple, so we were able to send them and apply white paint. See our original blog post here:

http://blueloom.com/index.php?p=93&more=1&c=1&tb=1&pb=1

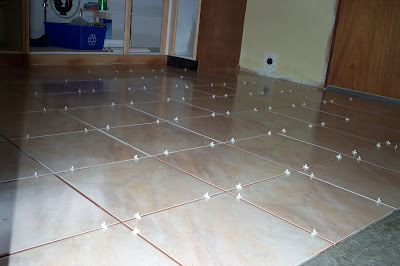
Money saved on cabinets allowed us to hire contractors to install spanish tile floor and new windows.

We did the rest:

  • restored kitchen cabinets and replaced hardware
  • installed the backsplash
  • installed new counter top
  • replaced all light fixtures and added two new ones above the sink
  • removed one kitchen cabinet and installed a dishwasher (originally there was no dishwasher in our kitchen). We also built the new cabinet for the dishwasher.
  • replaced the old trim
  • replaced electrical switches
  • removed wallpaper and painted the kitchen

The sink and faucet were pretty much the only things we kept. 

Here is the kitchen before:

First, we removed all cupboards and hardware.  We used electric sender to send cabinets to bare wood. It was a very time consuming process but eventually saved us a lot of money, and we were pleased with the result.

This is how the cabinets look like after sending. They were ready to be painted.

We applied one coat of primer and two coats of paint and installed new hardware. We also installed backsplash a replaced countertop ourselves (more on that in the near future).
 New tile

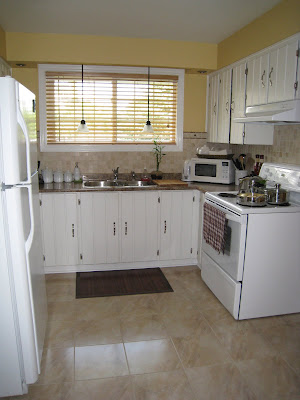
Here is our new kitchen:
Once our window was replaces, we installed two identical light fixtures above the sink. We paid lesss than $100 for both lamps at Home Depot.
New light fixtures
Old cabinets, new look
New table


If you purchased your first home and like us inherited an old kitchen, you don’t need to spend thousands of dollars by putting a brand you kitchen in. We saved a lot of money by painting old cabinets. The only expenses were primer, paint and new hardware.
WOW!  All of their hard work paid off because it’s a beautiful transformation, isn’t it?  Gives me hope for my own old kitchen.  Thanks for sharing Kinga & Joseph!  You guys rock!

——————

This post is brought to you by
 

Feeling a bit cold coming out of the shower? Get a new bathroom radiator from UK Bathrooms

Pretty Bedroom Makeover full of DIY details

Maria at 
sent over her pretty bedroom makeover.  Painting the furniture made a huge impact and I love her silhouette art and beautiful pillows.  Check it out:

DIY Bedroom Makeover

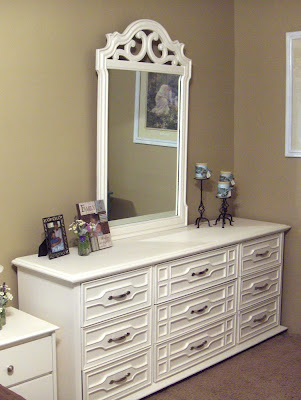
Welcome to our bedroom! Just about everything was a DIY project.My husband’s biggest request is we had to keep the brown comforter. I wanted to get a new bedroom set but we couldn’t afford to replace any of the furniture. So, after I got help choosing a color palette, this is what I came up with.BEFOREAFTER
The biggest project was painting all furniture and replacing the hardware. Here is a better picture of the night-stand. I took step-by-step photos of painting one of the drawers. Would that be helpful or is it pretty self-explanatory?BEFORE
AFTER
Here is how I did the candle wraps. I really love how it turned out. I wish my photos were better. It is such a nice, relaxing place now.BEFORE
AFTER
Follow these links for the large silhouette artwork, the smaller framed art, and the pillows. I used the same pillow covers for the large pillows but I adjusted the size.
 
Thanks for sharing your beautiful makeover, Maria!  I love how the furniture now pops against your mocha colored walls and the blue and brown accent everything perfectly!  Great job!

——————

This post is brought to you by
 

UK Bathrooms supply a wide range of bathroom furniture.

Kacey's LivingRoom and DiningRoom Makeover

Thanks to Kacey, I have another living room/dining room makeover to share with you.  It’s another beautiful transformation!  Here is her letter:
The Dining Room:

We just moved into an older home.  All the walls were WHITE!  So, we had a blank canvas to work with.  We started in the Dining Room.

 Then, we painted red and added wainscotting to the wall.  Budget tip: we used old bed slats for the vertical wood on the wall.  
Then we added crown moulding and a chandelier.  The table is a bit oversized, but we got it for $100 from a woman designs wall art.  It was her table for her Vegas showroom.  What a deal!  The tryptich wall art is also her design. Curtains… We’re still working on those.  All in all, this project was SUPER fun.


THE LIVING ROOM:
Also a blank canvas.

Here is the living room after the Tiffany’s inspired paint choice 🙂


I am a musician… If you can’t tell.

Wall with the Fireplace.

Living Room and Dining Room Shot.


No furniture in the Living room, yet.  But, hopefully soon.


Amazing, right?  The dining room – love the wainscoting (a dream of mine!) and how about those beautiful black and white accents with the red?  So pretty!  The living room?  LOVE the new colors and her wall art.  Kacey – thank you so much for sharing your gorgeous home!  Great job!


Personal updates:  I have to share with you! I have a new niece!  Addelyn Grace was born yesterday!  I LOVE baby girls.  She is so precious.  All 9 lbs. 1 oz. of her!  AND on another happy note, I will be driving to the airport tonight to pick up my daughter.  She had the best experience and so much fun in Germany with the foreign exchange program the past three weeks but I’ve missed her so much!  And finally, Niski is showing a LITTLE improvement.  I spied a little movement in her back legs.  Not much and not walking or 100% yet and still a few more weeks of crate rest but it’s so reassuring to see her lifting her back end the teeniest bit!