Frugal Home Design

Fawn from Frugal Home Design has an awesome blog with one of my favorite labels – “DIY”! If you haven’t stumbled across it yet, now is your chance. Here are two projects I absolutely love.

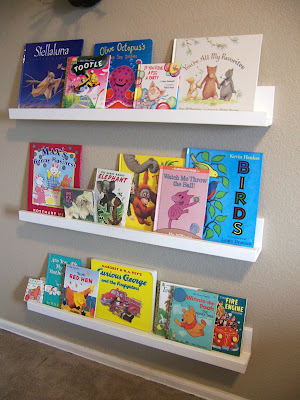
I love her book display! I want to make one for my home. I don’t have kids but we do have magazines all over the place. This would be such a great idea for organizing most recent magazine issues too.

$20 DIY Book Display-4 Shelves
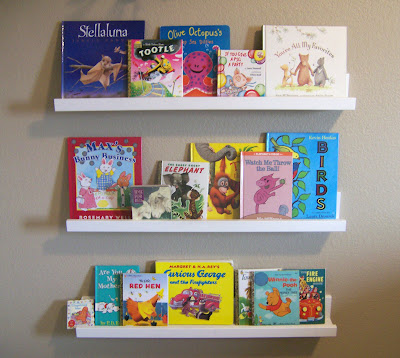

I have FINALLY found a solution to the great book storage problem.

I have a 2 year-old and 3 year-old (non-readers) so when they want to read a book they pull every book out to see the front! Not to mention, they didn’t know how to put them back standing up with all the backs facing out. It was making me crazy. I have tried several options (THIS, THIS, THIS). Nothing was working, until I saw this on Ohdeedoh
I was in love. They used something similar to the Ribbia Picture Ledge from Ikea. We don’t have an Ikea near us and I didn’t want to pay $ 20 dollars per shelf. I thought it looked like a pretty easy DIY so I went for it.

Off to Home Depot I went. I wanted 4-36 inch shelves. Here is my shopping list…for a total of $20.

4-6 foot 1×3
2-6 foot 1×2

I asked the nice guy at Home Depot to cut them to length for me then we were out the door. I already had the other materials I needed: wood glue, nail gun with nails, and caulk.

First step, attach 2 1×3’s together with wood glue and nails.

Step two, attach the 1×2 to the front, again using wood glue and my awesome nail gun.


Last steps:caulk, fill nail holes, and paint. Easy Peasy.

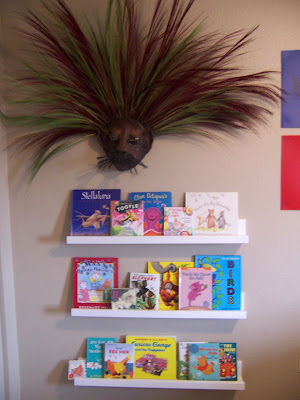
I attached the shelves to the wall with 3″ screws into studs. I love them and it has renewed the kids interest in their books, but best of all, the kids can pick out and pick up their books with ease.


The lion mask in the above picture was made by my mom.

This is another one of her projects and it is exactly my style and something I plan to do in my home too. Fawn – thanks so much for the inspiration and helpful tutorial. I LOVE your motivation:

Board and Batten Entryway/Coat Rack


So I live in a house built in the 90’s with no character to speak of. Slowly but surely I am trying to make it feel more comfortable and give a more character. This was my first attempt at board and batten. I absolutely love it and I definitely want to do more treatments like it in my house.

This is the entry we started with. It doesn’t really have room for much. Both the front door and closet door open to the wall, limiting space immensely. I have tried several things, but nothing really worked.

Inspired by these beautiful pictures and wonderful tutorial from Karla and Will at It’s The Little Things That Make a House a Home I finally figured out what I needed to do to my entry (and now I had my nail gun I got for my birthday) so it was time to get started.


So I came up with a plan that looked like this–very professional.

Then off to Home Depot I went to purchase my primed MDF, came home and got to work.
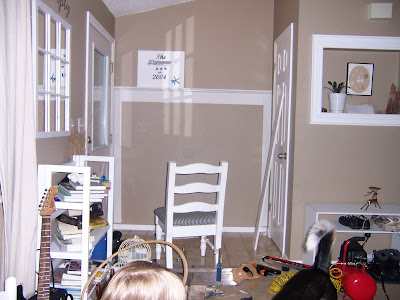
It is amazing I can get anything done with these two rugrats running around “helping” me. I love this picture because it truly depicts what happens when I (and probably most of you) get involved in a project. The house gets trashed. And yes, my son is wearing a skirt, but in his mind it is his superhero belt.

I did this project back in November so I don’t remember exactly how much it cost, but I think about $4o. I absolutely love it.


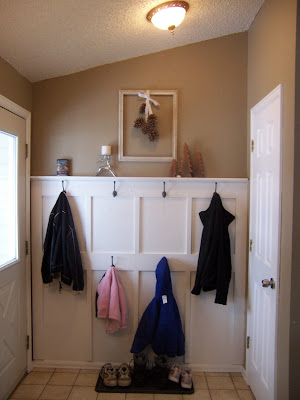

Now some new tile and a pendant light fixture and I will be completely happy.

Frugal Home Ideas


Stef
says she’s fairly new to blogging, but I say she’s a pro at before/after and DIY! From the moment I laid eyes on her before/afters, I couldn’t wait to share with you. Check out her blog post:

Entryway:

Before
After
You can see how I created my wall art here.
Front Living Room
Before
After
Before
After
You can see how I did this CRAZY EASY Wall art here
Before
After
Did you know you can spray paint blinds? Holy Moly!
Living / Dining Combo
Before
Don’t you just love the use of orangy wood and gallons and gallons of poly?
After
Before
After
Okay, I don’t know why my sectional looks purple in photos. I really have to upgrade my camera situation, because these pictures are really bad.
Dining
Before
After
See how I made these mirrors here ($40), and how to do this wall treatment here ($35)
Kitchen
Before
After
Before
After
It still needs some major work (and a new vent a hood), but at least you don’t have to shield your eyes from the blindingly (is that a word?) shiny orangy-oak cabinets.
On the list is to get a new backsplash. I will discuss my backsplash disaster and why there is a baseboard on my countertop in a future post.
Before
After
Nursery
Before
After
Stay tuned for future posts about how I made those floating shelves (and frames) for under $10
and how I made that collection of framed animal prints for under $20 (including frames)
Master Bedroom
Before
After
This is actually beadboard wallpaper on the walls
See… beadboard

Hope you enjoyed my home tour. You can look at the befores and afters of our first home flip (1916 craftsman bugalow) here.

AMAZING! So much DIY tutorials and before/afters in one post! Heaven!

Stef! I sure did enjoy the tour (and your first home flip) and I can’t wait to see future projects. You are a DIY superhero! Great job and the details and rooms look GORGEOUS! Thanks so much for allowing me to show it off.

What do you guys think? Love her, don’t you? What are you waiting for? Click her header picture at the beginning of this post and see more!

~~~~~~~~~~~~~
The giveaway is coming together! There are some really talented and awesome vendors joining in! I can’t wait to show off their shops and celebrate the milestones with you!

I’m still trying to catch up on visiting a few of you…thanks for your patience. As you can imagine, it’s been a crazy couple of weeks (if you were here early – you might have caught my blooper! Sorry Stef!). Have a great day!

I'm Telling! A Home Improvement Show & Tell Recap.

I thought it would be fun to spotlight some of the projects from the Show & Tell Surprise Party earlier this week. Here are the DIY home improvement projects that I thought were creative, beautiful and fun. If you’re featured, Make sure you grab an “I’m featured” button from the right side bar. Thank you to EVERYONE participating. I’m amazed and grateful for your participation without warning. 🙂 In real life…I’d need hours to “get ready”. Those of you with the amazing kitchen makeovers – you’re killing me! I’m so jealous! Click on the links to visit for more pictures of each project!

Red Writing
(Dining Room Hidden Storage)

I Love My 5 Kids
(Kitchen Re-do)
Before

After
Polka Dot Thought
(Kitchen Makeover)
Before: KitchenAfter: KitchenForever Daisies
(Scrapbook Room)
Before

After

Moore Minutes
(Dining Room Makeover)
Before
After

Thrifty Living
(Office Makeover)
Before

After

Proud Feet
(Built In Bookcase)
Before

After
The Proud Feet
(Kitchen Makeover)
Before
After
Mother of 3 Fellows
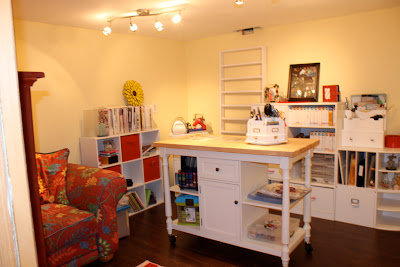
(Craft Room)

My Creative Attempts
(Entry Room Makeover)
BeforeAfter


Something To Do
(Kitchen Makeover)
Before
After
The Craft Monkey
(Laundry Room Makeover)
Before

After

(Playroom Makeover)
Before
After


Craig, Blair & Turbo
(Kitchen Makeover)
Before
After
Home to Three Duncan Boys
(Closet Office)
Before
After
The Meckleys
(Laundry Room Makeover)
Before

After


Modern Country
(Master Suite)

Fingerprints on the Fridge
(Kitchen Remodel)
Before
After


Making It Mine

(Kitchen Makeover)
Before

After

I bow down to these DIY queens! Each of your home improvement projects are awesome!
So many beautiful spaces. I wish I was a traveling blogger…
I’d pop by to see your projects in person.
Thank you SO much for sharing your makeover stories!
I’m inspired!
(See all of the amazing Show & Tell submissions! Check them out here if you missed them!)

What are you up to this weekend?

This post is brought to you by Hotpoint-Spares.co.uk, for all of your Hotpoint washing machine spares.