I love coming across new-to-me blogs that inspire me with beautiful makeovers and making new blog friends. In case you haven’t ‘met’ her yet, I’d like to introduce you to
And if you do ‘know’ her, why haven’t you introduced us? lol I’ve been catching up on her posts and I’ve seen your comments! 😉
I‘m going to share several of her makeover posts with tons of beautiful pictures but if you’re like me (and I know you are), you won’t mind! Then click the link above and see more inspiration and her boutique. We have a rainy weekend ahead of us here and if you do too – grab a throw blanket and curl up with your laptop.
Here goes (warning, you’ll need a napkin for the drool):
I’m eager to share our latest room makeover at 5th Place Cottage! I hope I don’t bore you to tears with the large amount of photos!…
Challenges were of plenty in this room, but this once dark and musty room is now as fresh as a daisy!
The antique Victorian cabinet in the corner was painted Cottage linen and not only looks great, it provides desperately needed storage for linens in this tiny cottage. Shhhhhh……there’s a tv hiding in there too.
I found this treasure at Hector and Susie’s place, Fundustrial in Warrenton / Round Top last Fall.
The huge mirror helps to enlarge the small room, I snagged it from Marcie and Mayron.
Check out the bed crown….its a zinc range hood in “as found” condition! We found this at the Fredericksburg Trade Days last year.
I hung our smocked white bed throws inside of it to create a canopy. Isn’t the mix wonderful?!
Hubby hung a small prism chandy from the shoppe inside…..it makes the perfect reading light.
Look at the amazing detail in the vintage vent-a-hood. And the perfect amount of rusty patina!
The greenery is compliments of a tree in the sideyard….don’t you love simple greenery!
The sheer white smocked top drapes let in beautiful filtered light.
I bought this heavy antique iron bed from Lillie of the
Junk Palace on our girl’s road trip last year…it’s perfect for 5th Place.
Crew member Bekah-doodle (Rebekah) made this beautiful white linen bedding for me.
Painting the floors white was an adventure that paid off big in this room! I fell in love with the white floors on the Swedish blogs and knew I had to try it. We may paint all the floors of 5th Place white…..over time.
Small architectural things always make it into the decorating details of my rooms….they feel like art to me.
It’s so nice to see these before I go to sleep.
A collection of random brushes are tucked under the cloche.
I’ve collected vintage baby dresses for a long time….they are so much prettier framed and hung on the wall. The backdrop….what else but bleached burlap.
A vintage flip top dining table paired with a burlap slipcovered chair makes the perfect desk for this space!
What are those big dome things you might ask….they are a pair of iron industrial harbor lights….just wonderful!
Vintage petite fish bowls on a tray make the perfect desk organizer!
I love the way the sunlight plays on the white floor….this room feels so fresh and I’m so pleased with the finished result.
And so you can really truly appreciate our efforts, check out the transformation in the before and after photos!
Are ya diggin it? Tell me what you think!!
Isn’t it beautiful? I want to paint all of my floors now! And one of these days, I will have a vintage romantic room to relax in too. Ready to see more?
Energetic and inspired….that’s the way I feel these days! Hubby and I indulged and took a week off. Actually, we had planned to take 2 weeks, but by the end of week 1, I was so refreshed that inspiration lay everywhere! So, we put the energy and inspiration to good use and went to work on 5th Place!
Hubby didn’t complain too much, although I did hear muttering yesterday that sounded like, “just how many projects can we cram into a day off?” No doubt he must love me because I know that I wear him out at times!
I’m very pleased with what we’ve accomplished over the past week….so many “after” shots to share that I don’t even know where to start! We built a sidewalk, an office / guest bedroom, finished the master bedroom, the living room, and the kitchen details! It’s been a very full week indeed!
These are all photos of the completed kitchen at 5th Place that are long overdue. See my previous
post for the first leg of this project.
Check out the transformation!
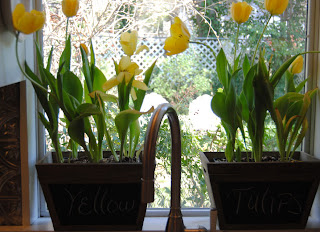
I’m tickled yellow with Spring bursting out everywhere!
These tulip bulbs just astounded me. We used them at the Shoppe during the past First Monday show and they couldn’t have been more than a couple of inches tall. I placed them in the kitchen window and they have gone crazy! Don’t you love their new home? These
chalkboard bins work perfectly ….aren’t they fun?
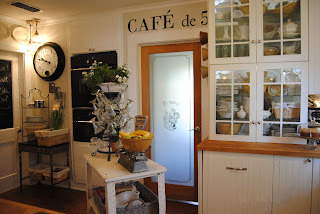
Cafe de 5. This handpainted project took an afternoon to complete and added a personal touch that is packed with personality. I love the way it revved up the tiny kitchen!
I wasn’t crazy about the view of the master bedroom door so I painted it with chalkboard paint. Now, it not only gives a bit of depth to the corner, it’s adds fun functionality too!
This corner definitely needed some extra light and hubby was sweet enough to hang a couple
mercury pendant lights …love love love it!
This fabulous
oversized clock is the perfect pop of energy for this corner and the antique metal table (a Roundtop find from our road trip last year) was exactly what the small area needed.
One of my favorite things at the Shoppe right now are these
silverware molds….they are fabulous and were a perfect compliment for this little nook.
I’ve been collecting vintage Sherbert / Sundae dishes for years but love them far more dancing on the
bottle drying rack instead of sleeping on a shelf.
So was this great ironstone platter.
I love these vintage inspired faux foil wrapped bunnies…they are one of my favorite Easter arrivals at the Shoppe.
Can’t get enough of Tulips and aged Ironstone!
The container for the beautiful Iberis is a wicker cake stand flipped upside down. I heard about these flowering plants on Martha Stewart’s show a long while back….they are supposed to be easy to grow. I love the freshness they bring to the counter.
I love the crown dishes from the Shoppe….I think they are my favorites we’ve ever carried!
A
burlap floor cloth was used for the window treatment. I can’t decide if I like them better on windows or floors….which do you like better?
I can’t possibly close without “formal” before and after photos. Take a look…
You can read more about this kitchen makeover here.
Wow, huh? If you saw my kitchen, you’d understand my envy. I do have Mr. DIY talked into redoing the honey-oak cabinets. I can’t wait to get started!
And then…there is her patio. She claims it isn’t finished but I love what I’m seeing and I’m so inspired to get my own barn patio into shape now that winter is over. Here is her post:
Spring is in full bloom everywhere! 5th Place Cottage may have more than its fair share of problems inside, but sometime in the past, someone with a very green thumb spent a lot of time in this yard.
Bulbs, ivy, ornamental trees, mature shrubs and wisteria….there is so much beauty blooming.
And, we want to enjoy every bit of it with strategic placement of sitting areas and outdoor living spaces.
But, as I showed you yesterday, and again pictured below….not everything outside is beautiful.
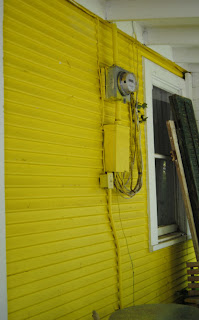
Isn’t this lovely? And, although we are big DIYers, moving this was a no no unless we want to hire an electrician. Hmmm…..just how bad do I hate it? Pretty stinkin bad! So, we considered the options and here’s what we came up with.
Since our power company reads the meter electronically, the visibility is not important like it used to be, but it has to be accessible. Okay, that helps…we will cover it up. But, what about that color? Don’t get me wrong, I like yellow. But, this is not exactly my kind of yellow….it lands somewhere between banana and schoolbus. You almost need sunglasses to look at it!

Since the entire house will be repainted sometime this year, we got a jump on it and painted this enclosed patio section a simple white. This area will remain white since it is a defined area that we are planning to screen in…this too will happen sometime this year. Notice how casually I commit us to layered projects….my hubby is not particularly fond of this trait…one might even say that he hates it. And one would be right!
Where were we…oh yes…the paint. An improvement? I would say so.
Next, we hung a pair of fab corbels that I scored last month at First Monday for $30, they made perfect shelf brackets. And, hubby cut a shelf to fit, notching out where necessary for that ugly awful conduit.
Okay, you’re probably saying “nice shelf” but it didn’t hide a thing”. But, you only say that because you don’t know what I know. Check out this bad boy!

Admit it….it’s fabulous! Yessiree Bob! And the cost for this lil gem? Ahem, that would be -ZERO-!! How ’bout that? I’ve had this beauty for almost 10 years. The sign is likely to be with me forever. It’s rescue story…many years ago a small antique store that had been in business for decades closed the doors. Months later when I noticed a new sign going up for the new tenants, my first thought was, “What did they do with that wonderful old sign”. I turned around in the middle of the street and headed back. When I asked the sign guy what happened to the old sign, I was so sad to hear that they had thrown it away. But happy as a clam when I went around back and discovered that I beat the trash man to the dumpster! How’s that for rescue? It needn’t ever worry about being thrown out again!

Now, it will spend its’ days lounging around being admired on this shelf. Hubster hinged it from the back so it can be easily lifted for meter accessibility. I’m pleased as punch with the clever concealment for that mess!
What next? Under the sign we placed an old pie counter from a drugstore cafe, another fleamarket find that needed some help.
Once upon a time there was glass in those inserts so you could see the pies.
But, one piece of glass was gone, and the other had been painted over. So, rather than replace the glass, I removed the remaining glass and inserted these great nesting crates for storage. We also sell these at the shoppe.
Isn’t i
t fabulous repurposed into a potting table? It will also be a great outdoor server. It can be whatever my my lil heart desires. I love multi-functional repurposed vintage pieces, don’t you? Try to say that 10 times fast!
That big ol sign required something big and chunky underneath to look proportionate and I think this was its soul mate. Symmetry is not at all important to me, but scale certainly is. Next, I added in some accents…
Plants, garden accents, and a pair of industrial lights (another find from Canton First Monday) are right at home in this section of the patio.
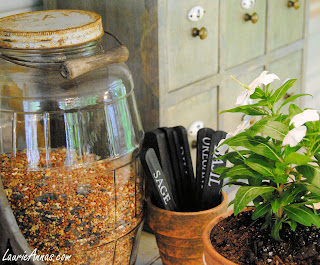
I used an antique pickle jar to store birdseed….aren’t vintage jars fabulous!!

LaurieAnna ~ thank you so much for sharing a small tour of your home. I’m a new follower and I really enjoying seeing all of your inspiration.
Beautiful work!
LaurieAnna is hosting a giveaway AND

Check it out!


