DIY Project Parade and Brooch Wreaths

I was recently inspired by Miranda Lambert’s brooch bouquet that I first saw mentioned by my friend Miranda at Just Drink a Coke. Miranda x 2!  This beautiful arrangement of vintage bling immediately had me wanting something similar.  With no need for a brooch bouquet, I was inspired to create a brooch wreath. I call my brooch wreath “my Miranda Wreath”.  It was a fun project for my daughter, Bri, and I to do together. We loved brooch hunting just as much as seeing our ideas become reality. We still have to find a few more pieces to fill in, but couldn’t wait to share our progress.
My wreath is done in golds, silvers with touches of blues/greens.
It looks like a giant brooch itself, doesn’t it?
So much pretty vintage bling!
Using costume jewelry, vintage brooches, buttons, earrings, pins, charms, etc. found at thrift stores and yard sales (LOTS of them…it takes time to collect over 100 for one wreath), Bri and I both created beautiful wreaths.  They’re so interesting to look at with so many unique pieces. We also used Styrofoam wreaths, Krylon spray paint, Deco Art MagiKote (seals the Styrofoam texture to accept paint), Deco Art craft paints, straight pins and hot glue.

Bri’s wreath is bursting with color.  I can’t wait to see this hanging on her wall with her assortment of framed colorful vintage postcards. Let’s hope she shares a picture with us!
So many vintage beauties…
Special Thanks to Cappy for her help with treasure hunting!
What do you think? We love reading your thoughts!
It makes me want to actually wear a brooch now that we have them on display!
What have you been doing this weekend?


The DIY Show Off


If you’d like to link YOUR DIY project post to The DIY Show Off Project Parade:


1.You must use the button above (ADD BUTTON HTML CODE FROM SIDE BAR TO YOUR POST) and link to this post to share the linky love.
 
2.Include your name or blog name and project title. Add your permalink (not your blog url, but your DIY project post url). Feel free to link a Past Post, just invite your readers in a current post with a quick note.
 
3.Or email your link to thediyshowoff@gmail.com and I will add it for you.
 
4.If you notice your link has disappeared -please add the link back to The DIY Show Off to your post today, a button or a quick note to your readers about the party and try again! I love when everyone participates and readers check out everyone’s links, but I think the return favor of linking back is the nice thing to do so everyone plays fair and enjoys all of the projects and links. Also – this blog party is for DIY projects only. Links not related to DIY will be deleted.


5.  NOW you can “like” the links!  Most liked link moves to the top of the list!  What a fun idea!  Most liked links may be included in a post of DIY Project Parade highlights later in the week!  🙂 >
See the full brooch tutorial at
Joining these parties:
Making the World Cuter
Remodelaholic
Tatertots and Jello


Now who else has a linky I can link to?  I’ve got a project to link up!

Freshen up existing decor with paint!

I shared this at the DIY Club a few weeks ago but wanted to show you here too! The DIY Club is a group of bloggers who share their creativity using sponsor’s products.  The products I used on this project include Dutch Boy paint, Dischanger and Rockler Bench Cookies.
With a kitchen remodel underway and most of the budget going for bigger ticket items including floor and countertops, etc., I love giving old existing decor a fresh look to feel “new”.  

I’ve had this letter “B” for a while now. It’s dark, scuffed up and sits on a shelf (because hanging it is a pain in the butt and it’s heavy). I purchased this a few years ago, probably from TJ Maxx.

Hanging is a nightmare because of placement of the holes on the back. One at the top right, one at the bottom left. Try getting nails to line up with those!

I love Dutch Boy paint because it’s zero VOC (no fumes!), scrubbable, durable with a mildew-resistant coating! I love the color “Lake Champlain” for decorative accents.  It’s an eggshell finish but using a gloss or semi-gloss top coat if needed makes for more options with this gallon. 
LAKE CHAMPLAIN – my favorite aqua-blue color
Centering a Dischanger on the back makes for much easier hanging than the two oddly placed original holes. Just wet, apply and let dry for 24 hours. (I cut the Dischanger to fit this project.)
Rockler Bench Cookies are so handy!  Once you have these, you’ll elevate every single DIY project you can for easier painting. 
I painted my letter “B” not worrying if the black underneath showed through.
Once dry, I gave it a little sanding for a distressed/worn appearance…
Distressed finish:
Now it has a new look to coordinate with the kitchen. 
Beautiful, right?

More on our kitchen remodel coming soon!

Oh! Speaking of the DIY Club – please head over to enter the TGIF giveaway for June. (HERE)

Enter to win the cutest one-of-a-kind art from sweet Renee at Where The Grass is Greener/Country Tag Sale!  3 to choose from! There’s a discount code for purchases too!  Check it out!

Outdoor DIY Signs for the Pool

Good morning!  I posted about these projects at The DIY Club a couple of weeks ago but I want to share the tutorial here too. 🙂
For Mother’s Day this year, I made two outdoor signs for my mom.  She loved them!  
Materials:
Wooden Plaques 
Fabric
Vinyl letters/stencils
Minwax Polycrilic
Dowel rod
2 screw eyes
Tools:
Paint brushes
Rockler Bench Cookies
Here is how I made them. I had the opportunity to use Deco Art’s Patio Paint.  It’s specifically designed to hold up outdoors in different weather conditions. 
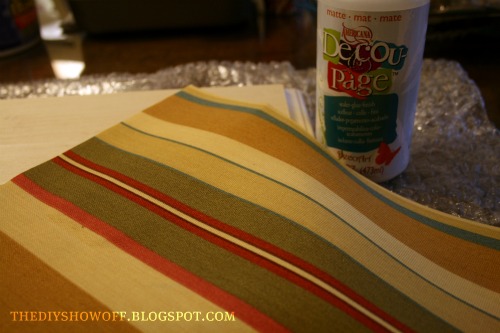
My mom purchased this Waverly fabric last year to recover her swing and outdoor cushions.
 I cut a piece of fabric to fit the top of the wooden plaque. 
 Apply a layer of Decoupage to the top of the plaque.
 Smooth the fabric into place (the Decoupage acts as a glue).
 Coat the fabric with a layer of Decoupage.
 It goes on white but dries clear…
 Rockler Bench Cookies elevate my projects and make painting so much easier!

 Deco Art Patio Paint is perfect for outdoor crafts!
 I painted the frame using the pretty “Larkspur Blue”.

 Let paint and decoupage dry.
 For this project, I used vinyl for my lettering.  You could also use stencils and paint or free hand if you’re good at that sort of thing.  
 I applied another coat of Decoupage over the vinyl lettering to seal. 

 Once the Decoupage was dry, I sealed everything with Minwax Polycrylic.
 All done.  I used two screw eyes and ribbon at the top for hanging.  
It’s hanging by two small chains from her top deck as a sign to the bottom pool patio underneath.

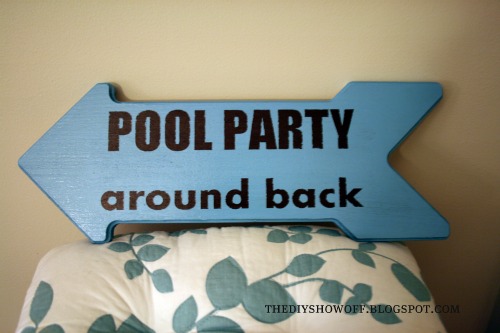
When there’s a pool party going on, my mom handwrites a note and tapes it to the front door to direct guests to the back yard. I thought a yard sign leading the way would be a fun idea.

I painted a wooden plaque in the shape of an arrow using Deco Art’s Patio Paint in Woodland Brown.
 Just the front/top side.
 This time I applied my vinyl letters…
 (bench cookies!)

 and painted the entire sign using Larkspur Blue Patio Paint. 
 I painted over the vinyl ‘sticker’ letters.
 Then pulled them off when I finished the coat of blue, revealing the brown underneath.
 Finish with a coat of Polycrilic.
 All done!

For the arrow sign, on the back I made a “welcome” so she could just turn the sign when there’s no party going on. 
I don’t have pictures of this step, but drill a hole in the bottom of the arrow sign. Insert a little Gorilla Glue into the hole and insert the dowel rod.  The arrow post sticks into the ground and is positioned in the front yard. 
I can’t wait for the long Memorial Day weekend to get here – POOL PARTY!  What are your holiday weekend plans?