DIY Show & Tell – Valentine's Day made with LOVE

Looking for some DIY Valentine’s Day projects? Check out previous posts here and here AND these sweet projects below then share your own. 🙂

I love this tutorial from Tidy Mom. Rosettes are on my DIY to-do list and she makes it look so easy! It’s a great Valentine idea for friends. I’d love to get one, wouldn’t you?

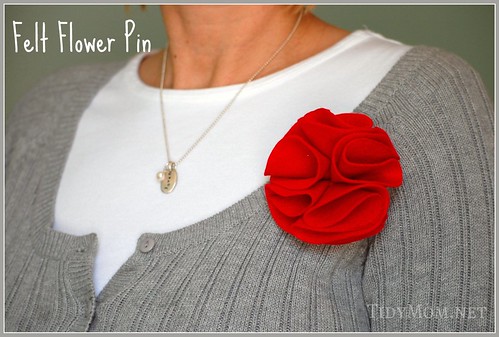
Felt Flower Pin>

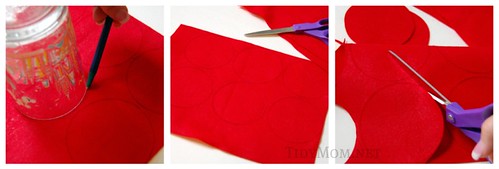
I started with a 9×12 piece of red felt that I bought at Michales. Grabbed a glass that was about 3″ in diameter, and traced 6 circles on my piece of felt, then cut them out.

Cut out Felt Circles

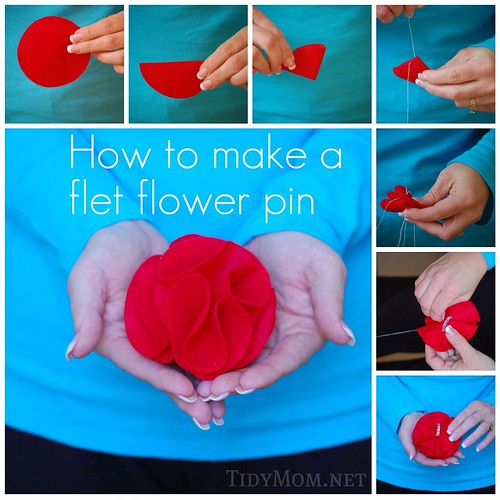
Next you can follow the steps in my picture.

(you also click the picture and choose to view in a larger size for detail)

  • Take one circle, fold it in half,
  • then in half again.
  • Hand stitch thru the bottom point enough to keep it folded.
  • Then do the same with each of the circles. I just went from one to the next pulling my thread tightly to keep them all together(I just placed them randomly around each other, not in a stack…it will make sense when you’re making it, you basically want the tips sewn together). When I had all 6 pieces attached I put a few more stitches in to keep them nice and tight together.
  • Next sew them onto a little pin backing (you can these at Michaels in the jewelry making section).

Felt Flower Pin {How to}

These were so easy and I love how they turned out! The red makes them perfect for Valentine’s Day!

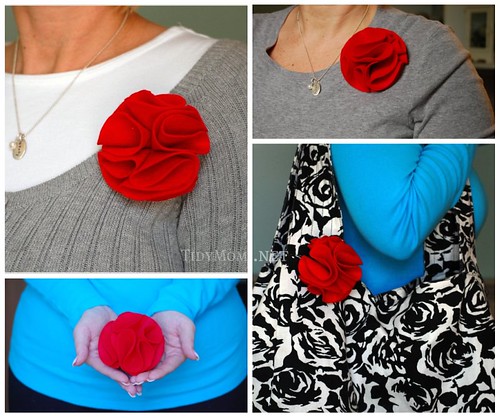
You can wear them on a sweater or jacket, t-shirt, on a bag……or give as a gift!

Felt Flower Pin

You could even use them as embellishments on scarves, hats, or pillows – oh, you get the picture!……just sew them right on instead of pining them on!

*~*~*

Yummy! Who doesn’t love easy Valentine goodies?

Check this out:

Owl be your Valentine

from La*T*Da

*~*~*

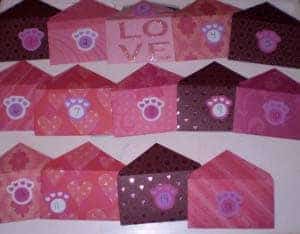
I love this post and sweet idea by Tara at Feels Like Home blog about love notes for kids. What a special way to make your little angels feel loved!
~*~*~*~

If you’d like to link YOUR DIY VALENTINE PROJECT post to the party:
  1. You must use the button above and link to this post to share the linky love.
  2. Add your permalink (not your blog url, but your Show & Tell post url). Feel free to link a Past Post, just invite your readers in a current post with a quick note.
  3. Or email your link to thediyshowoff@gmail.com and I will add it for you.
  4. The party will run for a few days…so showing up fashionably late is acceptable.
  5. If you notice your link has disappeared please add the link back to The DIY Show Off to your post today with a quick note to your readers about the party and try again! I love when everyone participates and readers check out everyone’s links, but I think the return favor of linking back is the nice thing to do so everyone plays fair and enjoys all of the projects and links. Also – this Show & Tell is for VALENTINE’S DAY PROJECTS ONLY. Links not related to DIY VALENTINE PROJECTS will be deleted.
PK from Room Remix blog is having a sweet giveaway!
Click here for more details.

DIY Valentine's Day Projects

Valentine’s Day is a sweet occasion for DIY projects. Something made with love by your own two hands. Here are some great ideas. Click the links for more details.

Valentine Topiary from Tanya at Save the Date for Cupcakes:

Valentine Topiary Tutorial


I’m no pro at Topiaries that’s for sure! This is just my little Valentine craft. I used toothpicks because they are easy and fast (my kinda project), but you can always hot glue the rose petals if you prefer. Another reason I like the toothpicks is because these are actual little soaps for your hands, bath, or whatever you choose! I love that I can pull them off and drop them into the tub for a nice peaceful bath! A perfect gift for mom or grandma;o) I hope you enjoy it! If you make it, or have any questions feel free to comment~ I wanna hear!

What you need:

~Styrofoam Heart ( I got mine at Michaels)
~3 boxes of Rose Soap Petals ($1 bin at Michaels)
~Toothpicks (trim the top off of the side that you will push into the styrofoam heart)
~1 Styrofoam ball or any foam that will fit into the bucket as a base.
~Bucket ($1 bin at Michaels)
~Wooden skewer or dowel
~Hot glue gun (glue the styrofoam ball to the bottom of the bucket~ I used two for height)

~Filler of your choice (I used more petals, but I think Conversation Hearts would be SUPER cute)

~*~*~*~

Tanya also has some super cute Valentine party ideas:

Early Valentine’s Party!


Mason jars filled with sugar coated marshmallows and large Conversation Hearts


Love these Heart Peeps dipped in chocolate and sprinkles!


Cute packaging for the Heart Peeps and Cupcakes


Take home bags

*Most everything was DIY and very inexpensive! I got lots of stuff from the dollar bin at Michaels.

~*~*~*~

Love this Valentine’s treat from Tiffany at La*T*Da:

I Scream, You Scream, We All Scream for Ice Cream

I’ve had this idea in my head for quite a while. I always thought this would be cute to use as a favor for an ice cream party. But, alas, none of my children want an ice cream party! So…I decided to turn this idea into a Valentine’s gift.

It’s a ball of cotton candy on a sugar cone.

I bought the cotton candy from the Dollar Tree. You could probably make 6 balls of cotton candy from one bag.


The sugar cones were from Kroger. You could also use larger waffle cones with a larger “scoop” of cotton candy. It would probably be even cuter than the ones in the regular sugar cones.

The cone-shaped bags were from Hobby Lobby. They were 1.99 for 26. Not bad!


I printed out a little saying on the computer and tied it to the ribbon around the cellophane bag.


I thought of another cheesy saying, “Valentine, My heart is like ICE CREAM. It MELTS for you.”

More Valentine’s Ideas to come. And most of them were inspired by findings from the Dollar Tree.

~*~*~*~

How about some sweet Valentine decor? One of my favorite sites for DIY project inspiration has the sweetest wooden LOVE banner. Check out this project from Child Made. So pretty!

Wooden Love Banner

For Christmas, I made a number of Wooden Joy Banners for gifts for friends. I had some wood left over and decided to make myself a Wooden Love Banner for Valentine’s Day.

The process was very similar, except I used a red/pink/white color theme, and used 4 blocks to form the word “love.”

I decided to base coat the blocks in a flat black paint and sand the corners.

I used a variety of block heights to accommodate the different letter sizes.

Next, I sized a variety of Valentine papers and secured them to the blocks using spray adhesive.

I ran a line of glue along the bottom edge, …

… then placed a ribbon onto the glue across all the blocks.

I flipped over the blocks and secured a wide piece of ribbon across the back.

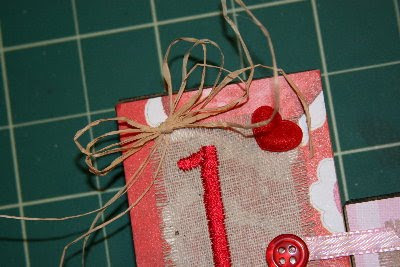
Then flipped them again and applied the letters and some embellishments. I love this font! Coincidentally, it’s called “Love Letters” — totally appropriate!

A little bow made out of raffia gets added to the corners.

I decided to slice the ribbons to make the hinges, …

… though it looks cute secured in a line as well. If you make hinges, you can still display the blocks in a line.

And this begins my Valentine’s Day decorating!

Now I just have to figure out where to put it…

I also made a single block with photo clips. Now I need to make one with “XOXO” to match.

You can also do this with stenciled letters or vinyl letters if you don’t have access to an embroidery machine. Give it a try! It’s very simple and you can adjust it to fit your own theme.

~*~*~*~
Thanks Tanya, Tiffany and Sheri for sharing your Valentine projects.
I love all of your ideas and enjoy your blogs full of creativity.

Do you have a DIY Valentine’s Day project?
Send me an email to show it off!

~*~*~*~

I also want to thank Melanie from Share Holidays. I am so honored to be featured (here). If you’re looking for some holiday inspiration, you definitely want to check it out!