DIY inspiration from the Project Parade

These links in the DIY Project Parade are inspiration to me personally this week. I’m so thankful to all of the talented blog friends who take the time to link up and show off…it’s just the motivation I need for a few things I have going on with helping my sister decorate her new home next month.

Carmel at Our Fifth House shared her DIY pegboard headboard and I’ve been looking for budget friendly DIY ideas to surprise my nephew. Isn’t this awesome? I love all of the DIY details in this room. And I need to make that bed frame too! Great job, Carmel!

DIY pegboard headboard

My teenage niece is going to want a glam bedroom and I see a pretty DIY chandelier makeover in my near future like this beautiful one shared by Ada’s Interior Design

DIY chandelier makeover

We’re going to need some fabric and Dear Emmeline has reminded me that repurposing vintage curtains {sheets too} is a beautiful, affordable option with yard sale season in full swing…

see the coffee table and end table tops:

coffee table makeover

My sister has an old dining room table and a thrift store eat-in kitchen table and we can’t wait to give them a ‘makeover’. The table makeover from Art is Beauty is bookmarked in our idea folder…

table and chairs makeover

As soon as my sister goes back to FL to pack up the last of her things, I’m sneaking over to redo her master bedroom. I’d love to surprise her with a beautiful romantic master bedroom. Have you seen the master bedroom reveal at Raising Up Rubies? Breathtaking!

master bedroom reveal

Have you seen the awesome links in the DIY Project Parade this week? Have you linked up your DIY? Time to ‘show off’! Let’s see what you’ve been up to:

DIY Project Parade

TGIF! Have a wonderful long holiday weekend!

DIY Show Off - FacebookDIY Show Off - TwitterDIY Show Off - PinterestDIY Show Off - Feed


Let’s Talk about Chandeliers!

I’ve been really lucky with finding thrifty {used} light fixtures. Want to see? Ever wonder how a creative idea strikes? Read on, my DIY friend…

This week, I may have squeeled with excitement when I saw this at St. Vincent de Paul for $9.99 {except that I’m the quiet type and even if I did squeel, you wouldn’t have heard me…but I was THAT excited. I still am!}

thrift store chandelier

and I’m thinking it’ll go in the family room {which, as you know is a work in progress…so what it looks like now isn’t a reveal and those pretty doors aren’t finished either!}…

turquoise doors

Then Lindsay had the idea of making it into an accent table – isn’t that brilliant?! ::light bulb over my head:: Re-wire it to plug in, add a glass top and ta-da!  It’d be gorgeous all rigged up – no need for a table lamp if the table is a chandelier!  Hmmm…now that she’s planted that seed…I just don’t know! {You know I’m indecisive!} But when it’s sitting on the floor, it DOES look like a table!

But I do love to play around. Here’s just an old window on top and an idea of how it’d look. Pretty awesome, I’d say!

DIY upcycled side table

repurposed coffee table

This one was purchased for $20 from Habitat ReStore…

 thrift store chandelier

and I’m pretty sure it’s replacing the light fixture in the dining room…

 thrift store chandelier

Now the dilemma. I love that they’re both huge and will make a beautiful statement in each room. But did I choose the right rooms for each chandelier? I think either light would work in either room so I’m certain I’m going in the right direction. I think. lol! What do you think?

And I love each of them and their aged gold color but I’m so tempted to give them a “WOW” with a coat of spray paint. Check out this inspiration…

yellow chandelier

{Pretty Handy Girl}

green chandelier

{Addicted to Decorating}

purple chandelier

{houzz}

magenta chandelier

{Vickie Howell}

blue chandelier

{design sponge}

I’m no stranger to spray painting chandeliers:

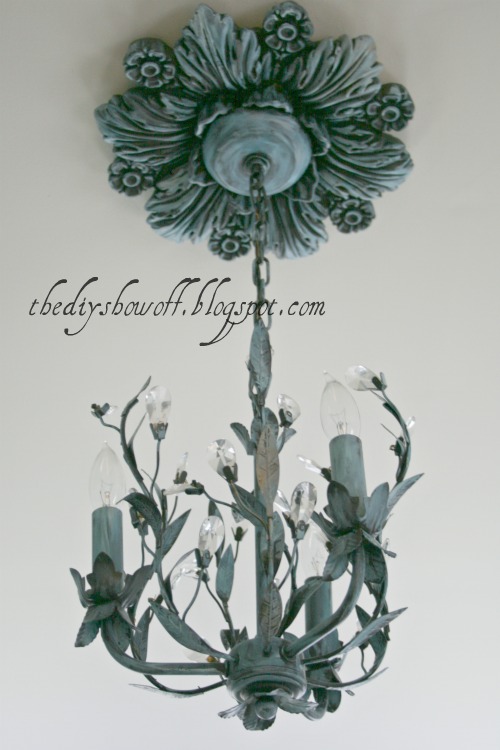
My dressing room chandelier used to be brassy gold…

The room that Cassity (Remodelaholic) and I designed for Shaw/HGTV Home last summer and the painted chandelier:

Guest Room Chandelier

  1. Keep my current placement plan?
  2. Spray paint one or both or none?
  3. Chandy side table?

Ps. Mr. DIY pictures a big palm leaf ceiling fan in the family room so the light fixture there will be temporary until we decide to choose and invest in the perfect one. And he’s sort of liking our current dining room light fixture, but maybe he won’t notice the swap? Or he’ll fall in love them when they magically appear in place? Didn’t happen with this one in the powder room:
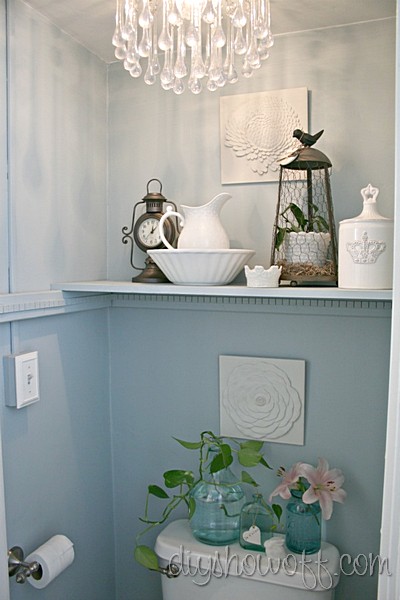
powder room before and after

{powder room}

He’s not a fan of the ‘snot monster’. But he tolerates it for me. Love him {and the tear drop light}. They’re both keepers! 😉 

After writing up this post and playing with the idea more, I’m thinking if I keep the current dining room light fixture {we’d love a pulley light there anyway}, use the lantern-chandelier in the family room and the caged chandelier as a coffee table/accent table … problem solved, right? What do you think? I am LOVING the chandelier coffee table idea! So, I’m going to work a little do-it-yourself magic, make it sturdy, add a top (I like the window) and change the electrical from hard-wire to plug-in. It’s just too perfectly my style not to go with that idea. Here are some more pictures of the repurposed chandelier table idea (I see a tutorial in my near future).DIY chandelier coffee table

repurposed chandelier coffee table

I’m so glad we had this chat. It’s been a huge help in curing my indecisiveness. 😉

old window, books and globes

But I might still change my mind.  {After all, I do have these for making a coffee table too.}

Funky Junk's Saturday Nite SpecialPhotobucketSouthernHospThriftyTreasures copy_thumb
Redoux Friday Feature Party

Harllee Design- Globe Coffee Table Tutorial

First things first, my name is Meagan from Harllee Design. I am new to blogland and I am honored to be guest posting on DIY Showoff! I recently started Harllee Design and also a blog where I share all my DIY adventures, tutorials and home improvement mistakes wisdom.


This is how I look in my mind’s eye, put together and welcoming.  
  

This is how I really look. Like a mad scientist that specializes in home decor. That frantic smile must mean it is 3:45pm and my husband will be home soon. I wonder where I will hide the shattered wine bottles.

I DON’T KNOW why it smells like nail polish remover in here. What is this, the inquisition?
Now that we have formalities out of the way I would love to share my latest tutorial with you. It was my most ambitious project yet and it came together pretty easily. 
I saw this table on Pinterest and knew it would look perfect in my family room.


Look closely at the base, it looks JUST like a globe. 
*wheels turning*
I then uttered the 6 words my husband dreads most:

“I think I can make that!”


1-13″ Globe – purchase one cardboard or another material you can cut. (I purchased my globe from Goodwill 1- 24″x 24″ x 1″ piece of wood

 1- 19″x 19″ x 1″ piece of wood
 1- 14″ x 14″ x 1″ piece of wood
 1- 10″ x 10″ x2″ piece of wood
 2- 24 x 2x 4 piece of wood
 2- 20″ x 2″ x 4″  piece of wood
 1- 4″ x 4″ x 14″ piece of wood
 1- 13″ in diameter circle of wood
 Wood for table top (I used a 42″ top of an old table)
 3″ wood screws
 Stain
 Varnish
 Saw
 Electric screw driver
 Hammer
 Drywall plaster
 Tape Measure
 Sand paper


1. Start with building the base. Predrill holes (I recently started predrilling, it makes things SO much easier)

2. Take the (2) 20” x 4″ x 1″ and (2) 24″ x 4″ x 1″ pieces and attach to form a box.  Congrats! You just made the foundation for the table.
3.  Center and attach the  19″ x 19″ square to the top off the foundation, place screws in the center so they are covered up by the next layer.

< div class="MsoNormal" style="margin: 0in 0in 10pt;">5. Attach the 14″ x 14″ to your base by screwing through the top of the piece as shown below. You can cover the screw up with filler later.


Optional Steps
  • Pour a glass of wine and think about what a badass you are.
  • Think about all those weaker people that BUY their furniture.
  • Remember the time you almost cut your finger off.
  • Wonder why no one told you that the miter saw SUCKS things into the saw.
  • Finish your glass of wine, humbled and get back to work.
                                                                                                                              
6. Cut a hole in the top and bottom of your globe, each hole should be 4 1/4″ x 4 1/4″ so you can slip it over the 4″ x 4″ post. Don’t feel guilty about the globe, it is for the greater good. Use one that still has the USSR on it, that might help sooth the guilt. The globe is decorative only, the weight on the table is supported by the 4″ x 4″
Slip the globe over the 4″ x 4″ post.
7. Spread drywall plaster over the entire globe, fill in all screw holes and also fill  any gaps that might exist between the layers of the pedestal.
8. Once the plaster has dried use sandpaper to smooth the globe and all other patches.
Clean off ALL dust and prepare to paint.
Spray paint, feel smug and satisfied. Ahhh. This might actually turn into a table.( I used Rustoleum Espresso in Satin.)
This is where our steps may differ. You might cut your own table top, I used one from an old table. Often it is cheaper to use pieces from a salvaged piece of furniture than it is to buy new wood. Check your local thrift stores for something that might work or simply cut your own.
Here is a great tutorial on making a solid wood table top.

9. Attach the  14″ x 4″ x 4″ piece of wood to the center of the 14″ x 14″ square of wood. Drill up through the bottom of the 14″ x 14″ into the 4″ x 4″. I actually used an old cupboard door for this piece, the molding added a visual interest.

10. After your table top is made and finish is applied attach the 13″ circle of wood to the top of your base. Screw down through the top of the circle into your 4″ x 4″ post.
11. Finally, attach your table top to the 13″ circle of wood.


Optional Steps
  • Tell your husband you are painting the work area of the garage PINK as you are now the master craftsman
  • Kick your feet up and ask for a beer
  • Realize the beer is never coming.
  • Get your own beer, sit down and enjoy that gorgeous table


I hope you try this tutorial, it was fairly easy and turned out great. Make sure you show me pictures of the finished product, I would love to see one in a bright, funky color. 

It was great to meet you and I hope you visit me at Harllee Design. I have wine and cheese over there for everyone, honestly………
Remember, if at first you succeed try something harder!
http://harlleedesign.blogspot.com/


Welcome to blogging, Meagan!  Thank you so much for sharing your gorgeous coffee table tutorial!  I can’t wait to see more of your great DIY projects!