


I recently shared a tutorial for Silhouette Fabric Interfacing which is great for creating fabric appliqués.
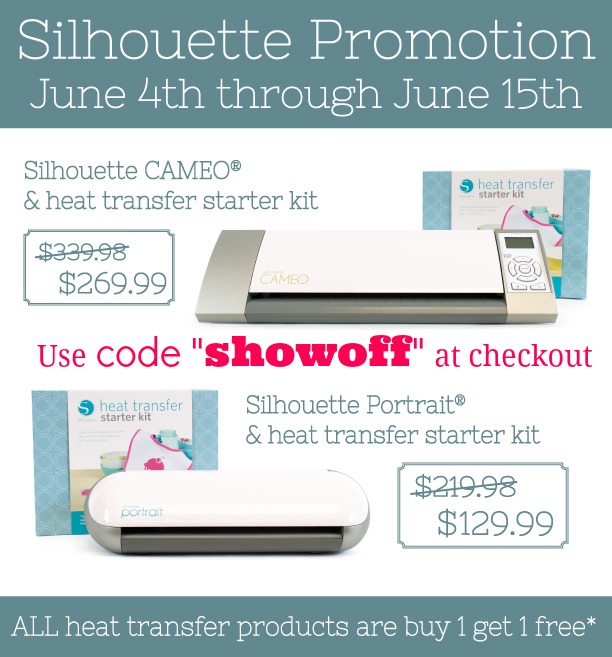
Silhouette’s heat transfer material is another great option, especially when you don’t want to sew around a larger design or a lot of lettering. As a member of the Silhouette affiliate program, I had the opportunity to try the Silhouette Heat Transfer Starter Kit. I was not paid to share this tutorial but did receive the starter kit and receive a small percentage of sales generated from this month’s Silhouette Sale when readers use code “SHOWOFF” at checkout at Silhouette America. Promotion ends June 15th. Here are this month’s awesome deals:
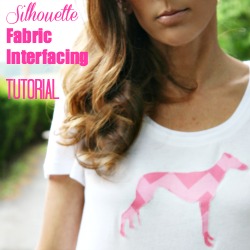
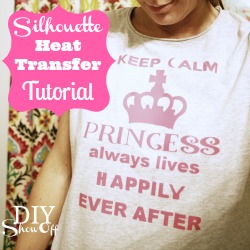
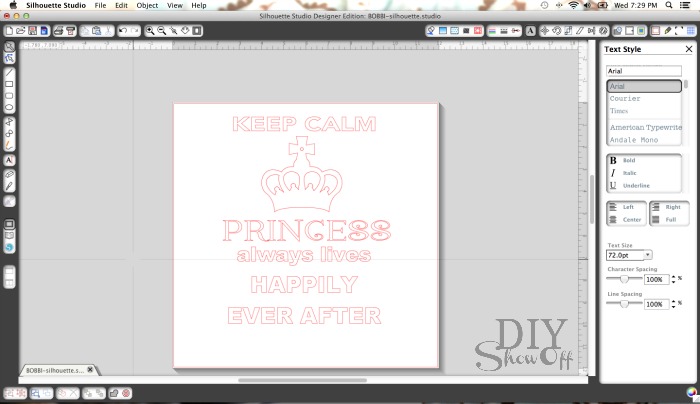
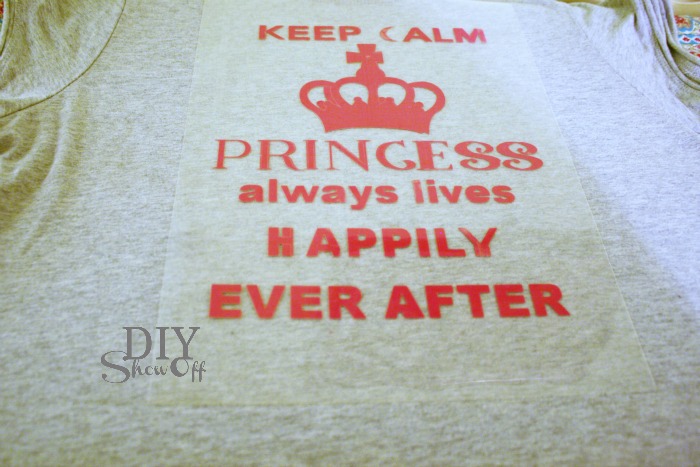
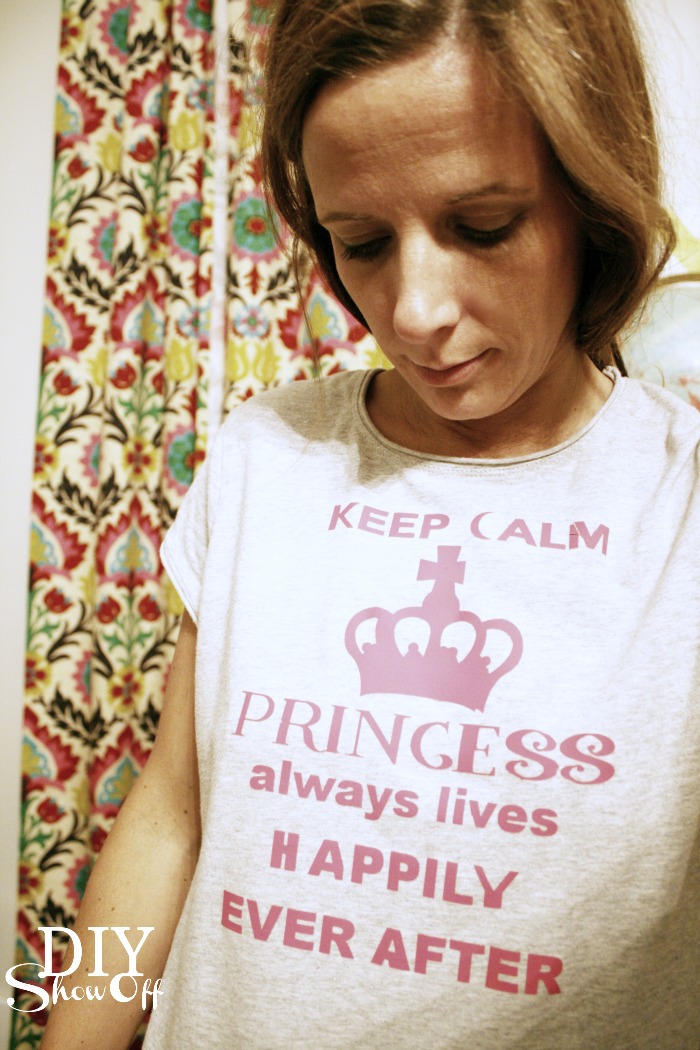
If you’re a DIY Show Off social media fan, you may know that last year my mom battled breast cancer (doing great!) and just recently my younger sister was diagnosed with breast cancer. She is so brave and keeping a positive spirit. I’ve purchased her several fun t-shirts with sayings like “I pay my oncologist big bucks for this hair style.”, “Does this shirt make me look bald?” and “Save the Hooters.” She has a great sense of humor and is very social. She has a close group of friends who’ve nicknamed her “princess”. She also has an amazing sweet heart and her big concern right now is how others are affected by her diagnosis. So, I decided a “Keep Calm. Princess always lives happily ever after.” t-shirt would send a reassuring message to her social group.
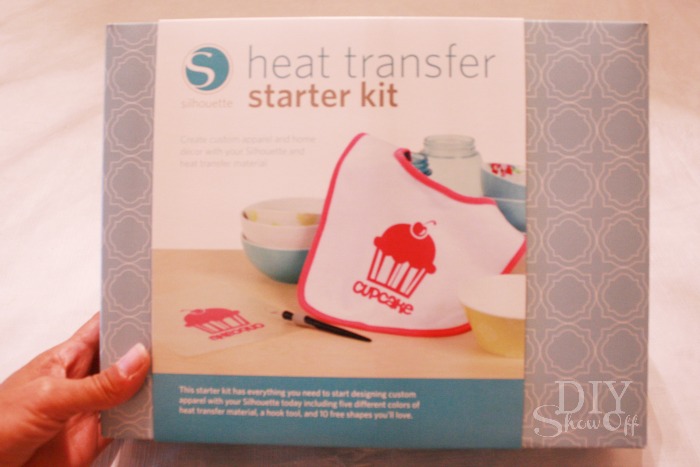
The Silhouette Heat Transfer Starter Kit comes with:
- 3 sheets of smooth heat transfer material (9 in x 12 in of black, teal, dark pink)
- 2 sheets of flocked heat transfer material (9 in x 12 in of white and yellow)
- Silhouette hook
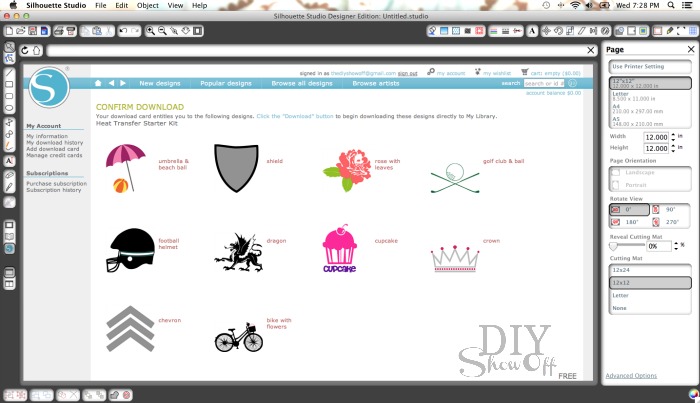
- exclusive download card good for 10 heat transfer designs
- idea booklet and instruction guide
- instructional DVD
Tutorial:
1. Download the heat transfer designs from the Silhouette online store. (I chose a design I already had on hand instead but love that bicycle!)
2. Create design in the Silhouette Studio.
3. Right click on each individual element of the design and click “FLIP HORIZONTALLY” to create a mirror image.

4. Send to cut. Choose Silhouette Heat Transfer (flocked or smooth…I used smooth).
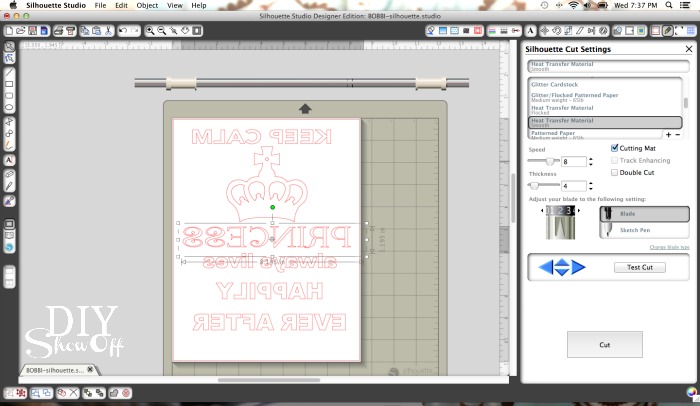
5. Load paper shiny side down and adjust blade setting as recommended (2).
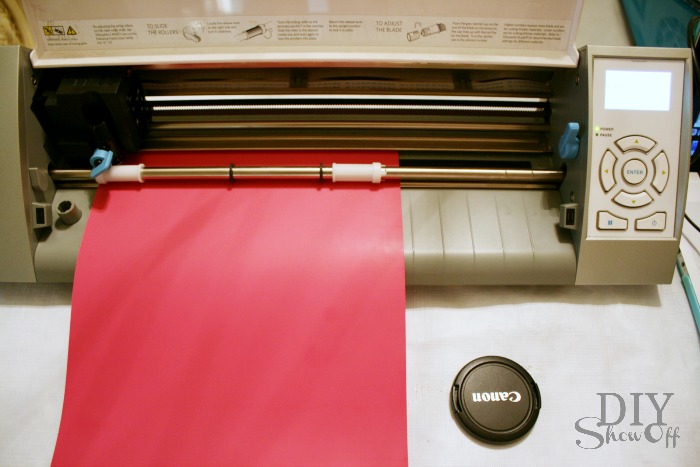
6. Cut and unload.
7. Remove negative heat transfer.
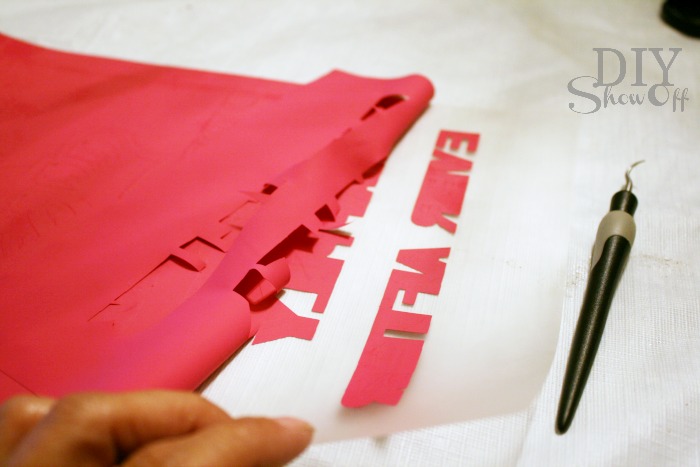
8. IMPORTANT: This is tricky with intricate designs and lettering. Be sure you’re in a well lit area so you can see the cut lines and utilize the Silhouette hook to remove small pieces of negative area when necessary. GO SLOW!
I did remove some of what I shouldn’t have and had to improvise…let’s not dwell on my imperfections. If you have the extra materials, you may want to do a “practice run” before your true project, especially if it’s your first time and if you’re creating a gift.
7. One side will be sticky with a backwards design. The other side is shiny and readable.
8. Place heat transfer/transparency sticky side down onto shirt or tote or dish towel.
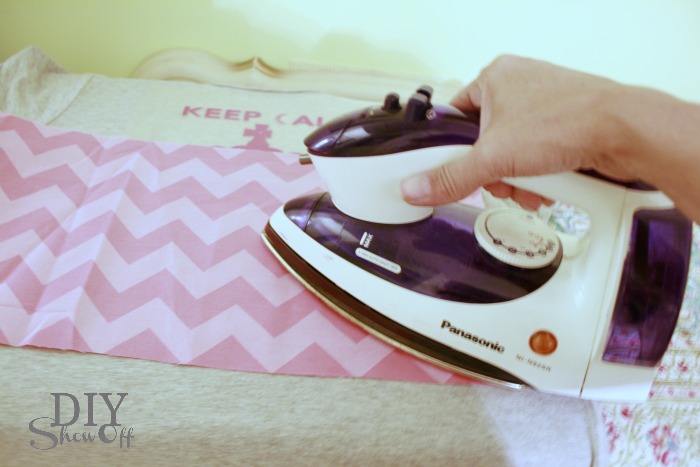
9. Iron using a towel or scrap fabric between the transparency and iron according to directions.
10. Slowly remove sticky/shiny transparency. (If some of the design is still stuck to the transparency, replace and iron again.)
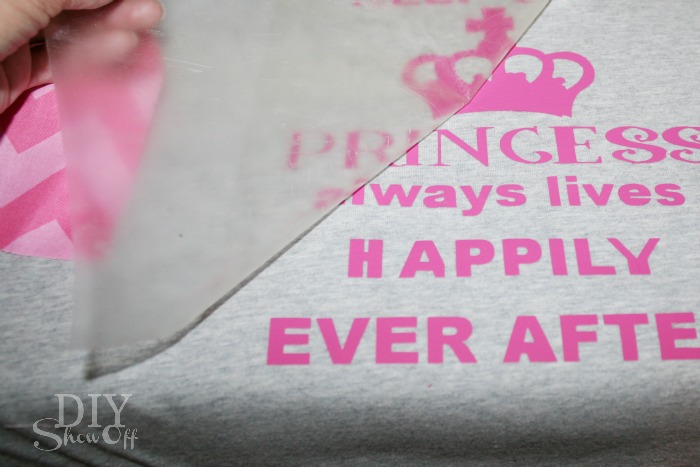
Ta-da!
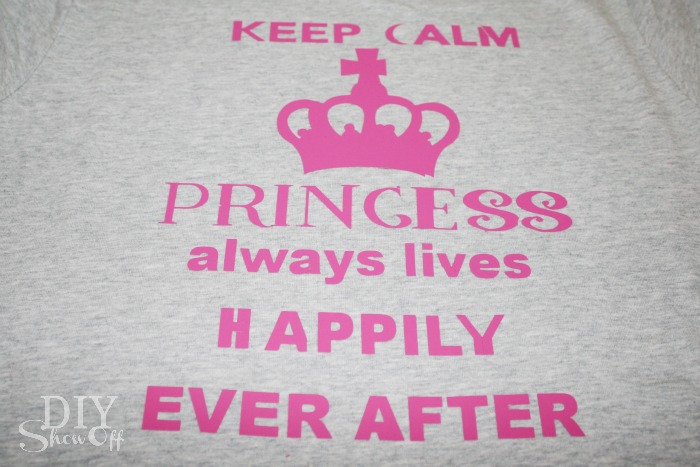
Imperfections and all, I think she’s going to like it!
THIS GIVEAWAY HAS ENDED. WINNER is Rachael from My Disorganized Life.
How about a chance to win a Silhouette Portrait?
I excited to offer an opportunity to give one lucky DIY Show Off reader a Silhouette Portrait machine. Enter using the Rafflecopter widget below. Giveaway starts now and ends Sunday, June 9th. Winner will be chosen randomly and announced shortly after. Open to US residents only. Lots of chances to win!
Need more info? Check out these helpful YouTube videos:
http://www.youtube.com/watch?
http://www.youtube.com/watch?
http://www.youtube.com/watch?
http://www.youtube.com/watch?
http://www.youtube.com/watch?
http://www.youtube.com/watch?
http://www.youtube.com/watch?
This project is sponsored by Silhouette America, who provided the heat transfer kit in exchange for a tutorial. Experience and opinions are my own. Sales generated from this post using code “showoff” earn me a small percentage of sales (thank you!) and Silhouette is providing a Silhouette Portrait to one lucky DIYShowOff reader (good luck!). Prize includes a Silhouette Portrait only and ships directly from Silhouette America. Other Silhouette materials are the responsibility of the winner.
T-shirts just like yours!
Susan
I am about to get a new grandson any day. This would be perfect to cute up onesies, bibs, tee shirts, super hero capes…..
Labels for my pantry
I’d love to make customized T-Shirts for my parents 40th wedding anniversary.
I would love to make some labels for around the house.
What WOULDN’T I make?! I have a million ideas floating through my head! 🙂
I’d love to make some pillows!
Love that! Such a cool tool! xo Kristin
I love your t shirt! I would love to try to make T shirts for our family vacation if I won! Thanks!
I’ve wanted to make a t-shirt for myself for the longest time–something about “Red Hen Home” that I can wear to a vintage market!
I totally want one of these!! And super cute shirts, Roeshel!!
tee shirts and subway art canvases!
What an awesome new feature! Can’t wait to try it!!!
Great tutorial and super cute shirt idea! 🙂
ALLTHETHINGS!! I want to MAKEALLTHETHINGS!!!!
What wouldn’t I create!!! I would make everything this machine creates!!
It’s amazing all the things you can do! I’ve never had the money to get a Silhouette, but love reading your blog and seeing what you do with it! Thanks for sharing your creativity! : )
Awesome tutorial and giveaway! Thanks so much for the chance to win!
I would make one with a dachshund & have it say “Low Rider!”
Would loove to win
I’ll make a pillow from a copy of a Paris Metro ticket – transferred to off-white fabric – as a present! It will be a great way to remember a wonderful trip.
I’d make a tote bag!
I would make t-shirts for my girls!
Tee shirts for everyone!
Awwwh that is so sweet of you to give such support to your sister. I wish I had a sister with a loving and kind heart like you. Praying for your sister.
Thank you so much, Sheryll. 🙂
I need to win this for my mom’s sake…
I would love to label my kitchen canisters for sure! This would be fun to have!
I have so many ideas that I want to use the Silhouette for, but your t-shirt tutorial reminded me of a t- I would like to make from a card a friend gave me when I was going through a tough time – it said “Joanie is so tuff, she has a bulldog on her poodle skirt” – I would love to make that tee.
Thanks so much for the opportunity!
I would make vinyl cut outs for glass etching
I’d make some wall decor and signs!
This is a very cool tool to have around the house — I’d love to do some custom onsies and shirts for my toddler niece.
VBS crafts!
I am in awe of these machines. I would make everything, including t-shirts for my best buds. Thanks for the opportunity.
T shirts.
I’d looove to make some vinyl wall art for our nursery!!
I would make the princess t-shirt as I hope to join the “survivors club of cancer” in the future. Still fighting…
I think the better question is, What WOULDN’T I make!? Thanks for an awesome giveaway!
I would use the heat transfer package to make a set of bibs for my friend who is having a baby.
I would make just about everything I could for my daughters 2nd birthday!
This is a great tutorial with an awesome finished product. I can see many uses for this around my house!
Best wishes to your sis. I trust Angelina’s recent op-end did’t make this subject trendy in a bad way, but I hope you take care of yourself as well given this strong familial link. I’m so glad I subscribed as i’m really enjoying your posts! CTD
Thanks, Teresa! xoxo Good luck!
Just now realized I need to say what I’d use this for. Ooops! Definitely bedding. I love applique, but it’s so time consuming doing the cut-outs. i could also see it being used for quilting.
This would be great for making customized aprons as gifts!
I have a pair of pillow shams that I would like to make and this would help so much with all the cutting. I love all these t-shirts I am seeing too.!
I would decorate a plain canvas tote!
The first thing I would make is some customized tote bags to fill up with goodies for our guests coming to our destination wedding!
The list is long, I have so many things I’d like to make. I’d start with nautical pillows for the porch. Then move on to signs made from pallets. I’d also like to make a stencil of a poem for the kick plate going up the entire flight of stairs. Oh and label the canisters. There that should keep me busy the first week! Would love to win.
Thanks for the chance.
Robin
I would make personalized onesies for my baby boy
I would love to own one, if I did I could make t-shirts for my family and one for each holiday for the kiddies. I would love to make some wall hangings for my Granddaughters new bedroom. I would love to make a lot of things, my lists seems endless. Thank you for the chance to enter your fabulous giveaway.
ncjeepster@aol.com
Love me a silhouette! Count me in!
YAY!
Karen U
I would love to make t-shirts for my nieces 🙂
I’d make everything!!
I’d make some fun shirts for my kiddos and their friends. Since I’m addicted to vinyl wall quotes, I’d be very busy making many of those too! Thank you for the chance to win a Silhouette!
I have been dying to have on of these.
I would use it to make home decor signs or cute t-shirts for my son :o) Thanks for the chance to win one!
i would make everything, but I’d start with the nursery mobile!
Holiday tees for the girls. Thanks.
twelve30(at)gmail(dot)com
I would make cute T’s for my 3 yo nephew Leom.
A shirt for my mom’s birthday. She loves this kind of thing.
Thank you for the great tutorial!
I think your site is awesome! So happy I found
I’d totally make some labels and signs for our brand new house!
There’s a plethora of projects I could think of for this machine! Love love love the possibilities!
I would make some cute totes for the beach! Thank you for hosting this giveaway!
Thank you so much for the chance…I love your videos. I’d love to make tshirts for the 4th of July.
Too many ideas running in my head now. I so need one of these!
Another giveaway?! You’re too much! Love it!
I would love to make my two new nephews onsies! Tote bags, shirts, onsies…I wouldn’t know which to start first 🙂
I would love a Silhouette machine!
I’d make labels for around the house, DIY artwork, vinyl letters, etc!
The first is a library bag for my little girl but I have a whole list of projects that would benefit from a Silhouette.
I have so many sign ideas that would be a snap with a Silhouette!
I would make some fun cafe curtains for my kitchen.
Would love to have a Silhouette! Not sure what I’d make first but have ideas for wall art.
I am so dying for one of these machines to enhance many craft projects but the one I really need it for is for personalizing a dog bowl for our new puppy who arrives home tomorrow! Would make my life so much easier than cutting and using an exacto knife to create the stickers!
I would love to have a silhouette heat transfer kit, I think I would make some pillows, probably some bags for the beach & definitely some shirts for the kids.
I would make some pillows, wall art and things for my girls!
I would make subway art with lyrics to our first dance song =)
I really want to do a cute Father’s Day shirt!
I wonder if this works on wood?
I don’t think the heat transfer would work on wood but I have cut out vinyl stencils and used them on wood (it’s still a little tricky getting the vinyl to stick sometimes too).
I’d make tshirts for my daughters to wear to band camp.
I would make pallet art and t-shirt art
I would love w silhouette!!! Would first make some labels and signs, altered art and book covers, and tee-shirts for the kids and…………….
I would love to win a silhouette!!! Would first make some labels and signs, altered art and book covers, and tee-shirts for the kids and…………….
T-shirts, jar labels, basket labels, everything and anything because I could…if I won this!!!!
I’m praying for your sister! I’m so glad she has a positive spirit! My husbands Aunt, Beth, is a Breast Cancer survivor. (11 years!) She has had different relapses and always tells me~attitude is everything! Beth says “she isn’t finished living yet and she’ll beat anything life throws at her!!” Gotta love that outlook!
xoxo
I love the shirt and the things you can do with a Silhouette. What a fabulous giveaway! Blessing to your sister.
Great giveaway!! The tshirt is adorable..would love to make that for my 5 year old 🙂
Love to win the Silhouette Portrait. Thanks for this awesome giveaway.
I would make anything and everything for my blog! I can’t believe I don’t have one of these yet so I will try my darndest to will one! XO
I would love to use a Silhouette machine to label everything in my house. But now with the heat transfers you better believe I’d be making adorable baby gifts, I’ve got a baby shower coming up soon!!! 🙂
There are so many things I want to make! T-shirts, subway art, and I can’t think of all the other stuff off hand, but I have a Pinterest board haha
Epic shrts
t shirts
I would make some artwork with this as well as pillows!! (I love your shirt and what it stands for, sending positive thoughts to your sister!)
I would make everything! I think a shirt first
I would love to make great T-shirts or Totebags! =)
id be giving this portrait to my mama! She keeps asking me to make vinyl decals, so i’d teach her how to make them!
Roeshel, thanks again for a great giveaway! I’m SO excited to receive my Silhouette!!! SO, sweet of you to link to my homepage, too!