Before & Beachy After – Living Room Makeover

When I saw what Brittany from SuperWoman did with her living room, it was like seeing my own vision for my family room come true – except in her house and not mine yet. I do have plans to do the same wainscoting, the same ceiling fan (Mr. DIY insists) and the exact same shelving around our French doors in there. I couldn’t believe my eyes. She did a beautiful job and I hope our own plans turn out just as pretty. Here is her post:

Beachy Cottage Bungalow (living room remodel)

I’m finally showing you the living room!
To date, this is my favorite remodel. Getting that stinky carpet out was a blessing!
I’m going to show you a series of “before” photos. These were taken before I even got my current entertainment center.
Don’t mind the huge general mess. I didn’t want to clean for some “before” pictures.
Yes, this is usually what it looks like.
I won’t lie.
😉
So
Much
Stuff….
Ugh.
So we purged boxes and boxes of stuff.
Once the floor was done, I started on the board and batten.
Only the boards needed to be primed.
I used 1×4 boards for the baseboard and chair-rail, then 1×3 for the verticle boards.
I spaced them 18″ on center.
The furniture was squished in the middle of the room for a while.
The screens had to be taken out of the windows because the windows were going to be painted.
(gasp)
I painted real wood!
😉
Sooooo….
Do you finally want to see how it turned out, my patient friends?
Much more airy!
Besides the formal furniture (which will be replaced next year!), it feels so much more open and clean!
I love that area rug!
We replaced our bookcase (that my father-in-law made!) with a toybench (that my father-in-law made!)
You’ll see why it’s gone in a second (don’t worry, we didn’t toss it, just moved it to a different room!)
And my vintage “Rubbers” box came in. It’s even better than I had hoped! It perfectly fits “his” and “hers” magazines, and the other slot is perfect for a throw blanket!
And what a nice conversation starter.
😉
The patio door got a white makeover as well.
I rearranged some decor for the entertainment center.
Don’t you like how it pops off the white wall?
Here’s a closer look at my new vases.
They were given to me by a good friend, Alicia, before she moved two states over.
=(
This is what they started out from.
She tried making them candles by just melting a ton of candles.
And it didn’t turn out.
So I had to fix it.
I put a sheet of wax paper on a cookie sheet, placed the vases upside-down, then turned the oven to it’s lowest setting (170 degrees).
Don’t worry, it won’t bust the glass!
After a while, the wax melts to the bottom.
Just keep changing out the wax paper, and before you know it, they will be clean!
Then it got a few coats of white spray paint.
Much better!
A big bag of building blocks for my daughter
<3
And the topiaries got a makeover.
We needed to replace the ceiling fan, so I went with this tropical-looking one.
It’s so fun!
(P.S. Beer-induced Wii Tennis near a ceiling fan is NOT a good idea!)
You can kind of see the old fan there.
Ugly.
Here’s a better view of the new bamboo roll-up shades.
These are the best (and cheap!) option if you want a beachy cottage bungalow look!
And of course, there’s always a catch!
I’m not actually done….
See this wall?
I didn’t even bother painting it because we (as in I) will be making built-in bookcases surrounding the door.
This is what it will look like.
Don’t laugh at my Photoshop skills….
lol.

Brittany – you did an amazing job and what a beautiful transformation. I’m betting that we even have the same future furniture purchase in mind as well! As usual, I love what you have done. Thank you so much for sharing your hard work!

The results are in and thank you so much for your votes! But…I did not win the Rejuvenation Create your own Home contest. 🙁 However, congratulations to the amazing people who did!

Now you can enter (and me too) for a chance to win a bathroom makeover in the CSN Green + Clean Bathroom Bailout. I received an email from CSN with the details and another head’s up from Heidi (thanks!). Click HERE to enter!

This post is brought to you by


Don’t have enough money to do a full remodel? Now you can turn the space underneath your deck into a living space with underdeck.

Happy House Family Room Before & After

When it comes to great before and after makeovers, Molly from My Happy House has great style! I love seeing her transformations.

Here is her post from her most recent makeover:

Family Room: The Official Before & After

When we moved in 2 years ago (seriously it’s already been that long???), the entire house just needed some updating. I’ve shown you here, here, here, here, here and here some of the things we’ve done. I loved the family room as soon as I saw it, vaulted ceilings, the fireplace, it just seemed like a nice homey kind of room. You know, once you looked past all the bleh stuff that was in it. Take note of the lovely eat in kitchen chandelier. Nice. You can’t see it, but there are hearts on the glass parts.


Here it is when we took ownership before any work had been done.


One of our biggest tasks was installing and refinishing the hardwood floors. The family room already had wood floors, but to make sure they looked uniform with the new ones, we refinished them. Ugh. I don’t ever really want to have to do that again for the record. Phase one complete. New paint color and the floors were sanded down.


Floors finished.


Then, we replaced the windows (as we did with the rest of the house). Unfortunately, I’ve married a man with allergies, and by his mother’s suggestion, I opted for the blinds between the glass. I’m not 100% thrilled with the outcome, but I do like the fact that we can darken the room and I never have to clean the blinds! Plus, Carl built window casings for every window in the house, and you can see the change in this photo. This is pretty much how the room has looked for about 18 months or so with a few slight changes here and there. It’s definitely the room that gets used the most, so I was very anxious to get it finished!


So now, finally, drum roll please! Here it is, about 95% finished, in all it’s glory, er maybe it’s my glory? I’m pretty excited about it either way.


Here is the breakdown:

  • Painted the walls: Wool Coat by Ace- Flat
  • Refinished the wood floors: Rented equipment from HD and did the labor ourselves
  • Installed new windows & custom window casings: All done ourselves, with my father-in-law
  • Installed surround sound speakers in the ceiling

Furniture & Finishes:

  • Couch, Chair, Rug & Lamps- Pottery Barn
  • Throws and Pillows: Crate & Barrel and PB
  • Side and Coffee Tables- Handmade by Carl (you can see those here)
  • Drapes & Floating Shelves: Ikea
  • Curtain Rod: Bed, Bath & Beyond (I’ll show you a secret in another post shortly!)
  • Mantel & Shelving Accessories- Target, Hobby Lobby, PB, Ikea, Crate & Barrel & Macys

Things left to do:

  • Possibly build a sofa table for behind the sectional
  • Repaint…a little down the road- same color, maybe a shade darker
  • Move the shelves over to make them more centered

Molly – YAY! It’s beautiful! I can’t wait to hear more about the window casings since it’s something on my DIY list. The color and new furniture are gorgeous. I love the floating shelves too. The entire room looks beautiful, bigger and more comfortable. You did a fantastic job! Thanks so much for sharing your hard work!

Want to see more of Molly’s home, click over to My Happy House to check it out. She chooses beautiful colors throughout her rooms and you’ll love her Tackle It Tuesday feature!

Our Living Room's Story and Reveal

First, do I have to apologize for tons of pictures? No? Good!

Oh – the fireplace built up surround isn’t completed or even started except that materials are propped up in the corner (I’ll leave those out of the after pictures) but if I wait until that is done to show you…summer could be over and I could decide to redecorate the entire room by the time we get around to it. So, I’ve decided to share what we’ve done since the rest is complete and I’ll save the fireplace surround and tutorial for another day.

Our living room has been through a few changes in the last three years!

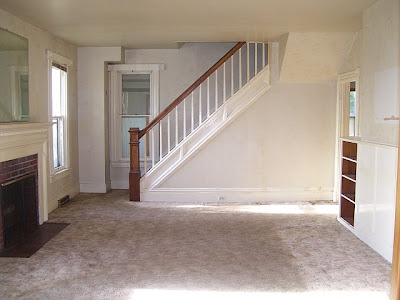
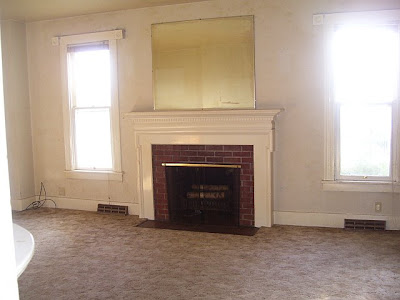
Here it is when we bought our home. Before, at time of closing:
Lots of strange angled corners to work with.

We repurposed this mirror by taking it down and framing it (more details here). It hangs in our back entry way.

The white walls were painted wallpaper. Fun!
We also tore out the nasty carpet and refinished the wood floors.

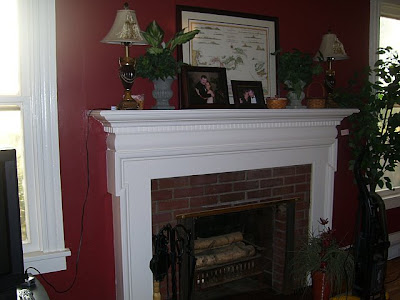
Then, I always wanted a red room. So – I painted the room red. It wasn’t quite what I pictured but I really loved it for a little bit. Excuse the mess. Some of these I snapped right before I began painting.


We installed French doors between the living room and family room.
We mounted the tv above the fireplace…I’m not sure if you can tell, but there aren’t a lot of options (wall 1=staircase, wall 2 = entry to hall and built-in shelving, wall 3 = French doors, wall 4 window/fireplace/window). It’s really not too high for viewing. We’ve adjusted to it being there. Our wood burning fireplace isn’t used at this time (another future project). Since behind the fireplace is a brick chimney and the walls are plaster, I currently hide the wires with garland (upcoming project to build up the fireplace surround will take care of that problem). Brick? Someday we’ll replace it with marble and I got a dirty look when I suggested we paint it. Mr. DIY does not like painted brick.

It didn’t take long before I didn’t grew tired of dark red. The room wasn’t getting any light. It just didn’t “feel” like the right color. THEN I won a Jason Martin DIY+design consultation from Jason Martin at Desire To Inspire (See the advice HERE! Thanks Jason and Kim for the inspiration!). It’s been almost a year and finally…

Finally! Here it is today:

Color is Benjamin Moore Smoky Taupe. It changes color in different lighting. I first saw this color in Sarah’s livingroom and it was love at first site! If you like it too – check out her beautiful livingroom to see it again.


Lamps – TJ Maxx


My thrift store find – wine corks.

Vintage French linen pillows – Restoration Hardware


French pediment – Ballard (I plan on adding more trim to the French door to fill in the gap)
It’s weathered and says “Flanders Sweet Shop”

Drapery is from Target and Ebay. I needed 8 + another to cut up and sew to lengthen them since I mounted my curtain rods near the ceiling. The curtains are ‘gray pebble’ by Thomas O’Brien. They aren’t a true gray, more of a griege color with a subtle pebble design. I got most of mine on clearance at Target so I don’t think they carry them anymore which is why I bought some panels on Ebay. I love the way they frame the French doors.

I scored a bunch of vintage boxes and crates at an estate sale (3 are the same found at Pottery Barn for $24. I paid $8 ea!). This little box holds the remote controls.


The Red Letter Words art I won a while back. It’s one of my favorite things and the quality is amazing.


Wall art from vintageprintables.com (Here is the post if you’d like more information).

My style? You’ll see that I have a bit of interior design ADD. French, vintage, traditional, farmhouse and so on but the thing I love about designing my own space is that I can decorate with things I love and I don’t have to follow any rules. And we’re obviously not minimalists. It’s for us, not for a decorating magazine, right? We love how much taller and bigger the room looks and our mix of decorating styles works for us. I’d love new furniture but it’s not in the budget and this set from the 90s is in excellent shape. It works for now.

Featured at Ballard Designs:

“Pruvost Plaque” by Roeshel

“Pruvost Plaque” by Roeshel

Roeshel has our Pruvost Plaque framing her French doors. An unexpected hanging place makes the Pruvost Plaque come alive, so naturally, we love her ingenuity!

Id love to know what you think!

————————


This post is brought to you by Tiger Claw hidden deck fasteners – found at DIY Home Center your source for premium & unique products for your home, deck and patio area.