Before & Beautiful After Kitchen Makeover

I love this kitchen makeover from Dayka at Life + Style. (thanks PK!) I love the black cabinets and the gorgeous counter tops. Here is her post:

This is the kitchen I inherited when I bought my home. I knew I wanted a fixer-upper, something to add my own flavor to, and as you can see, this house has definitely given me (and is still giving me) the opportunity to do so. My favorite part of this kitchen was the laminate countertops that had split, buckled, and swelled at the joint in the corner. OMG, it was so gross I thought I was going to be sick every time I looked at it. Unfortunately, I don’t have a lot of counterspace but I’ve been able to make do. My dream kitchen would be an open space with drawers for spices, an island, an attached great room/open floorplan, and probably a serving window that leads to the pergola in my beautiful backyard. As you see, that’s not what I’m working with.
I really loved the combination of that original 1984 wallpaper with that dark trim. I’m sure that lots of fun and exciting meals were held in this space before I moved in!!! **note the sarcasm.
I really wanted to change the layout of the space and open the wall between the kitchen and dining room, but I was worried about taking on too much (both, financially and as a novice DIY-er/designer). I decided to go with the basic upgrade–flooring, paint, hardware, lighting and countertops–and keep my costs to a minimum.
I had a skim coat applied to the seams of the wallpaper and then primer and paint. I also had that little “bridge” taken down that went over the window and connected the two cabinets. The trim was painted a high gloss white to match the rest of the house (all the trim & windows were originally a pink-ish peach. Gross.), and I removed the doors between the entry hall and the dining room for a better flow. Just those small changes alone made a HUGE impact.
Drumroll, please . . .

This was the way the eat-in looked when the basic makeover was completed. The chairs were purchased for $2.50 each at a thrift store and then I added a fresh coat of paint and recovered the bottoms. They fold up, too, which means I can store them to use as additional seating if/when I get new chairs. I ended up covering the chairs with a heavy, charcoal grey faux suede-ish material. It’s soft, worked well, and only cost me about $5 for 5 yards. Lately I’ve been thinking of recovering them with a patterned fabric, but haven’t found anything yet. That crooked light came from Ikea (the glass was actually uneven), and the one in the kitchen did as well. I’ve since changed the light in the eat-in, but am still searching for the right fixture for the kitchen. I did eventually paint over the discoloration left by the old fixture.

This . . .
has evolved into this . . .
Dayka – it’s gorgeous. The kitchen looks so much bigger and more spacious now that it’s bright. I love your black cabinets and the counter tops. EVERYTHING looks amazing and know that it was a DIY, it has to be so rewarding every time you walk in. Great job! Thank you so much for sharing your beautiful transformation!

~~~~~~~~~~~~
Do YOU have a DIY makeover in your archives?
Shoot me an email. I’d love to see and feature it!

Have a great weekend!

Giveaway event coming soon! So many generous vendors getting in on the celebration!
More details coming at the end of next week!

Awesome Kitchen Makeover…

When I saw this kitchen featured by Kat at Grass Stains – I couldn’t wait to share it with you. Kat and her husband helped her friends remodel their kitchen and it’s amazing. Here is her post:

Last weekend we drove over to Atlanta to help our friends John and Leslie work on their kitchen. (I love working on projects in my own home, but working on others’ projects runs a close second!)

They started their project last July by pulling up their baseboards, but over the past 9 months haven’t been able to make as much progress as they would have liked, so we went over to lend some helping hands.

It’s been years since Leslie tore an inspiration photo out of a magazine, but she knew what she wanted:


She was completely taken with the white beaded-board wainscoting and checkerboard wood floors, and she wanted to lighten up all of her oak cabinetry. I forgot to take a “real” Before picture before we removed the cabinet doors, but you can see them sitting on the floor in the foreground, hinge holes puttied.


And here is After:

Before with Grayson holding up one of the oak doors:

And After. The upper cabinets are a very pale green, although they look sort of almond-ish in these pictures. I think they’re two shades lighter than the walls.
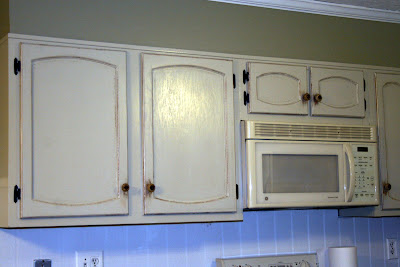
Here’s another After close-up — although not much better — of the upper cabinetry.

And an After close-up of my personal favorite, the lower cabinetry, which we painted black.

The floors probably cumulatively took longer to do than the cabinets, but John and Grayson did all of the measuring and taping of the floors, freeing me and Leslie up to work on the cabinets. Before:


And After, in daylight and from a little farther away:

Also After, at night with the overhead light on and closer up:


A shot of the floor where the breakfast table sits, Before:

And After, in daylight:

And After, at night with the overhead light on:


The squares didn’t all come out PERFECTLY, but since Leslie’s going for a distressed look, it will work. And, as John said, “On a gallopin’ horse, who’d notice?”

The guys really HAD done a great job of sanding, measuring, marking and taping the floor all afternoon so we could paint it that night after we finished the cabinets. They started off by measuring the 18-inch squares, then marking them with chalk lines parallel to the walls, then taping. They taped the INSIDE of the squares that would remain natural wood and the OUTSIDE of the squares we were painting. Before, during the measuring, marking and taping process:

And After, in the daylight.

Also After, at night with overhead lighting.

Isn’t it awesome? I love the cabinets and the floor is gorgeous. Thanks, Kat, for showing off Leslie’s kitchen! I’m adding it to my inspiration folder – I can’t wait to get to our kitchen. You guys are DIY superheros!


I'm Telling! A Home Improvement Show & Tell Recap.

I thought it would be fun to spotlight some of the projects from the Show & Tell Surprise Party earlier this week. Here are the DIY home improvement projects that I thought were creative, beautiful and fun. If you’re featured, Make sure you grab an “I’m featured” button from the right side bar. Thank you to EVERYONE participating. I’m amazed and grateful for your participation without warning. 🙂 In real life…I’d need hours to “get ready”. Those of you with the amazing kitchen makeovers – you’re killing me! I’m so jealous! Click on the links to visit for more pictures of each project!

Red Writing
(Dining Room Hidden Storage)

I Love My 5 Kids
(Kitchen Re-do)
Before

After
Polka Dot Thought
(Kitchen Makeover)
Before: KitchenAfter: KitchenForever Daisies
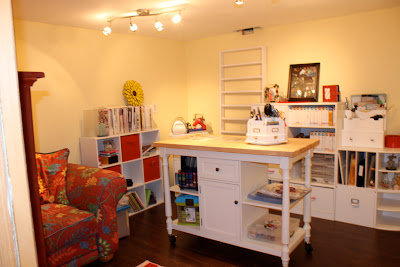
(Scrapbook Room)
Before

After

Moore Minutes
(Dining Room Makeover)
Before
After

Thrifty Living
(Office Makeover)
Before

After

Proud Feet
(Built In Bookcase)
Before

After
The Proud Feet
(Kitchen Makeover)
Before
After
Mother of 3 Fellows
(Craft Room)

My Creative Attempts
(Entry Room Makeover)
BeforeAfter


Something To Do
(Kitchen Makeover)
Before
After
The Craft Monkey
(Laundry Room Makeover)
Before

After

(Playroom Makeover)
Before
After


Craig, Blair & Turbo
(Kitchen Makeover)
Before
After
Home to Three Duncan Boys
(Closet Office)
Before
After
The Meckleys
(Laundry Room Makeover)
Before

After


Modern Country
(Master Suite)

Fingerprints on the Fridge
(Kitchen Remodel)
Before
After


Making It Mine

(Kitchen Makeover)
Before

After

I bow down to these DIY queens! Each of your home improvement projects are awesome!
So many beautiful spaces. I wish I was a traveling blogger…
I’d pop by to see your projects in person.
Thank you SO much for sharing your makeover stories!
I’m inspired!
(See all of the amazing Show & Tell submissions! Check them out here if you missed them!)

What are you up to this weekend?

This post is brought to you by Hotpoint-Spares.co.uk, for all of your Hotpoint washing machine spares.