Fall Festival – Week #2

I’m really early for Monday, but I just finished my post and can’t wait. Welcome to The DIY Show Off Fall Festival – a blog party all about fall! Add your DIY fall related project or fall decorating link below to participate.

I’m participating in Met Monday (see link below!). My metamorphosis = tree branch to fall decor. 🙂

Here is the project I did this week:

I personally don’t usually decorate for Halloween, but last year I made a spooky tree and I love it!

So this year, I wanted to do a tutorial and decided I wanted to make a ghost tree. It’s so easy. Here is what I did:

GHOST TREE

NEVERMORE TREEMaterials:
  • Vase/urn
  • Spray paint
  • A stick from the yard that looks like a “tree”
  • Spanish moss
  • Styrofoam
  • Mini-bird(s)
  • Spray adhesive/hot glue
  • Optional: For the white ghost tree, I used “cheesecloth” to make ghost bats. For the black raven tree: I added spider webs, black plastic spiders and sheer ribbon for embellishments

Tutorial:

I put the styrofoam inside my urn. I left the plastic on it.
Then I poked my stick through the center.

I spray painted my urn and stick. (My owl wasn’t quite all white so I spray painted him too although – it’d be better to find one perfect and not alter him. But, he still turned out okay. For the black spooky tree – the birds were already black.)
I sprayed the Spanish moss a little too.

Once everything was dry, I used spray adhesive on the moss and used it to cover the styrofoam. I put clumps in the “tree” too. Dragging it here and there.
Then I added embellishments (use hot glue if needed). To the black one, I pulled spider webs from branch to branch (spider web is cotton-like product purchased from Joann Fabrics) and added some spiders. I tied on sheer black ribbon bows. All done! For the ghost tree, I added the owl. I cut 6″ strips of cheesecloth. I folded in half and tied a knot in the middle. I used fishing line to string them from a few branches and shaped them to look like ghost bats.

Here they are finished!

Nevermore Tree


Ghost Tree


What do you think?

~~~~~~~~~~~~~~~~~~~~~~~~
What is the Fall Festival?
  • A blog party on Mondays during the autumn season
  • Autumn/Fall inspired DIY projects

How can I join?

  • Create a blog post about an Autumn/Fall project that you’ve done
  • Add your blog name and project to Mcklinky (example: The DIY Show off – House # Pumpkins)
  • Type in the permalink address, not your basic blog address. A permalink is the address that links directly to your specific post. (example: http://thediyshowoff.blogspot.com/2009/08/house-number-pumpkins)
  • You must use The DIY Show Off Fall Festival button and link back to The DIY Show Off Fall Festival post so that everyone gets to join in the fun. Here is the button:
  • This week’s link to cut/paste is: http://thediyshowoff.blogspot.com/2009/09/fall-festival-week-2.html
  • I’ll be posting The DIY Show Off Fall Festival on Mondays and try to start the party sometime on the prior Sunday evening.
  • Although a tutorial is helpful, it’s not required. Anything autumn related and DIY is permitted.
  • Please follow all steps above or your link won’t be posted. 🙁
  • If you’ve been inspired by something you see here – show us what you did too!
  • Enjoy and be inspired!
~~~~~~~~~~~~~~~~~~~~~~~~~~~~~~~~~~~~~~~
If you missed the Fall Festival last week with my faux-mercury glass pumpkins tutorial – it’s the first link in the party below!

There’s still time to participate in the Scavenger Hunt!
Check out the prize (something every DIYneeds)! Make new friends!

I’m linking to

DIY Day @ ASPTL

Trash to Treasure Thursday (hey – sticks in your yard are trash!)

Susan’s Metamorphosis Monday on Between Naps on the Porch -head over for tons of links to great transformations!
Fall Nesting 2009 at The Inspired Room
~~~~~~~~~~~~~~~~~~~~~~~~~~~~~~~~~~~~~~~~~

THE DIY FALL FESTIVAL:

Fall Festival – Week #1

I’m opening The DIY Show Off Fall Festival tonight. I hope you’ll join me and that I’m not the only one! I’ll list my 2 previous projects to use as an example.

Edit: We interrupt this blog post for a very important message. For MORE links to awesome blog parties see the end of this post. Now back to the Fall Festival:

What is it?

  • A blog party on Mondays for Sept., Oct. & Nov.
  • Autumn/Fall inspired DIY projects

How can I join?

  • Create a blog post about an Autumn/Fall project that you’ve done
  • Add your blog name and project to Mcklinky (example: The DIY Show off – House # Pumpkins)
  • Type in the permalink address, not your basic blog address. A permalink is the address that links directly to your specific post. (example: http://thediyshowoff.blogspot.com/2009/08/house-number-pumpkins)

Other info:

  • This is my first party so I’m new to Mcklinky and giving instructions so if you experience any problems – please let me know.
  • I’ll be posting The DIY Show Off Fall Festival on Mondays and try to start the party sometime on the prior Sunday evening.
  • Although a tutorial is helpful, it’s not required. Anything autumn related and DIY is permitted.
  • If you’ve been inspired by something you see here – show us what you did too!
  • Please use The DIY Show Off Fall Festival button and link back to The DIY Show Off Fall Festival post that you’re participating in. 🙂
  • This week’s link to cut/paste is: http://thediyshowoff.blogspot.com/2009/09/week-1-diy-show-off-fall-festival.html
  • Enjoy and be inspired!

Here is my project:

~~~~~~~~~~~~~~~~~~~~~~
Faux Mercury Glass Pumpkins

I love these mercury glass pumpkins from Pottery Barn.
But….

  1. On back order
  2. $24 for one 6″ pumpkin
  3. Mr. DIY + glass = “oops” & sad me
Pottery Barn image

So, I made my own with more of this type of mercury-glass look:

Ballard Design image

Materials:

  • 1 funkin (faux pumpkin). I bought 3 different sized white ones at Michaels with a 40% off coupon for the large one. The orange would be okay too. Gourds would be a fun twist.
  • 1 can of Metallic Finish spray paint (Mine was from WalMart – Rust-oleum Bright Coat/silver). It takes way less than a full can.
  • 1 nearly empty can of Rust-oleum Universal Satin in Brown Hammered (or see instructions for another option).

Tutorial:

I sprayed my pumpins with the silver paint. Spray generously. If there are drips, they’re unseen and towards the bottom.

Do not let silver dry – go directly to next step. My can of metallic brown was nearly empty, so it was sputtering which was perfect. I spritzed “spots” on top of the generous wet silver paint. So, both paints sort of blended. Let dry. All done! (Email me pictures! I’d love to do a slide show!)

(Note: I also tried white paint instead of the brown hammered, but it didn’t give me enough contrast or the look that I wanted. If you can’t “spritz/sputter” the brown…maybe try splattering with a toothbrush and metallic brown craft paint. You will have tons of paint so experiment to see what works best to achieve the look you like).

End Result:

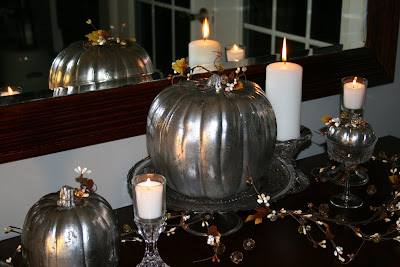
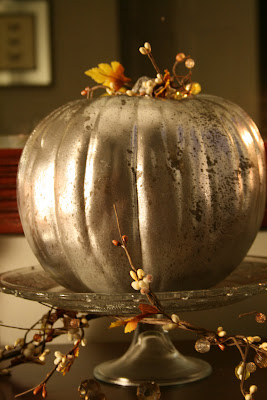
I love my shiny faux mercury glass pumpkins. They change in different lighting. It’s so easy! Let me know if you give it a shot! I’d love to see how yours turned out!


What do you think?

~~~~~~~~~~~~~~~~~~~~~~~

Hopefully you had a chance to DIY something fun this weekend! Please join me Mondays!

Fall Festival – An Autumn DIY Show & Tell

You’re Invited!

Please join me for a blog-linking party celebrating Autumn DIY projects!

Date: Mondays! Here’s a look at a draft schedule:

9/7 – Autumn
9/14 – Autumn
9/21 – Autumn
9/28 – Autumn & Halloween
10/5 – Autumn & Halloween
10/12 – Autumn & Halloween
10/19 – Autumn & Halloween
10/26 – Autumn, Halloween & Thanksgiving
11/2 – Autumn & Thanksgiving
11/9 – Autumn & Thanksgiving
11/16 – Autumn & Thanksgiving

What: If you have a DIY project with an autumn theme that you’d like to “show & tell”, just blog about it on Mondays, sign up and link to the party!

More details coming Monday!

Here is the button to participate!

You in?